3. Administration
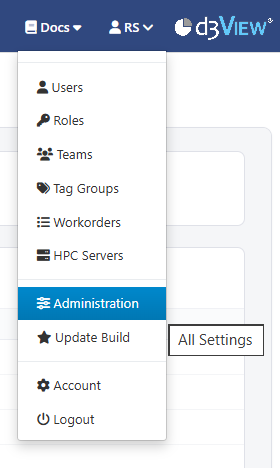
As an administrator, you extra capabilities can be explored on your page at the top right corner. Click on your name to view the drop-down administration menu. In this tutorial, we’ll cover the important aspects of your administrator functions.
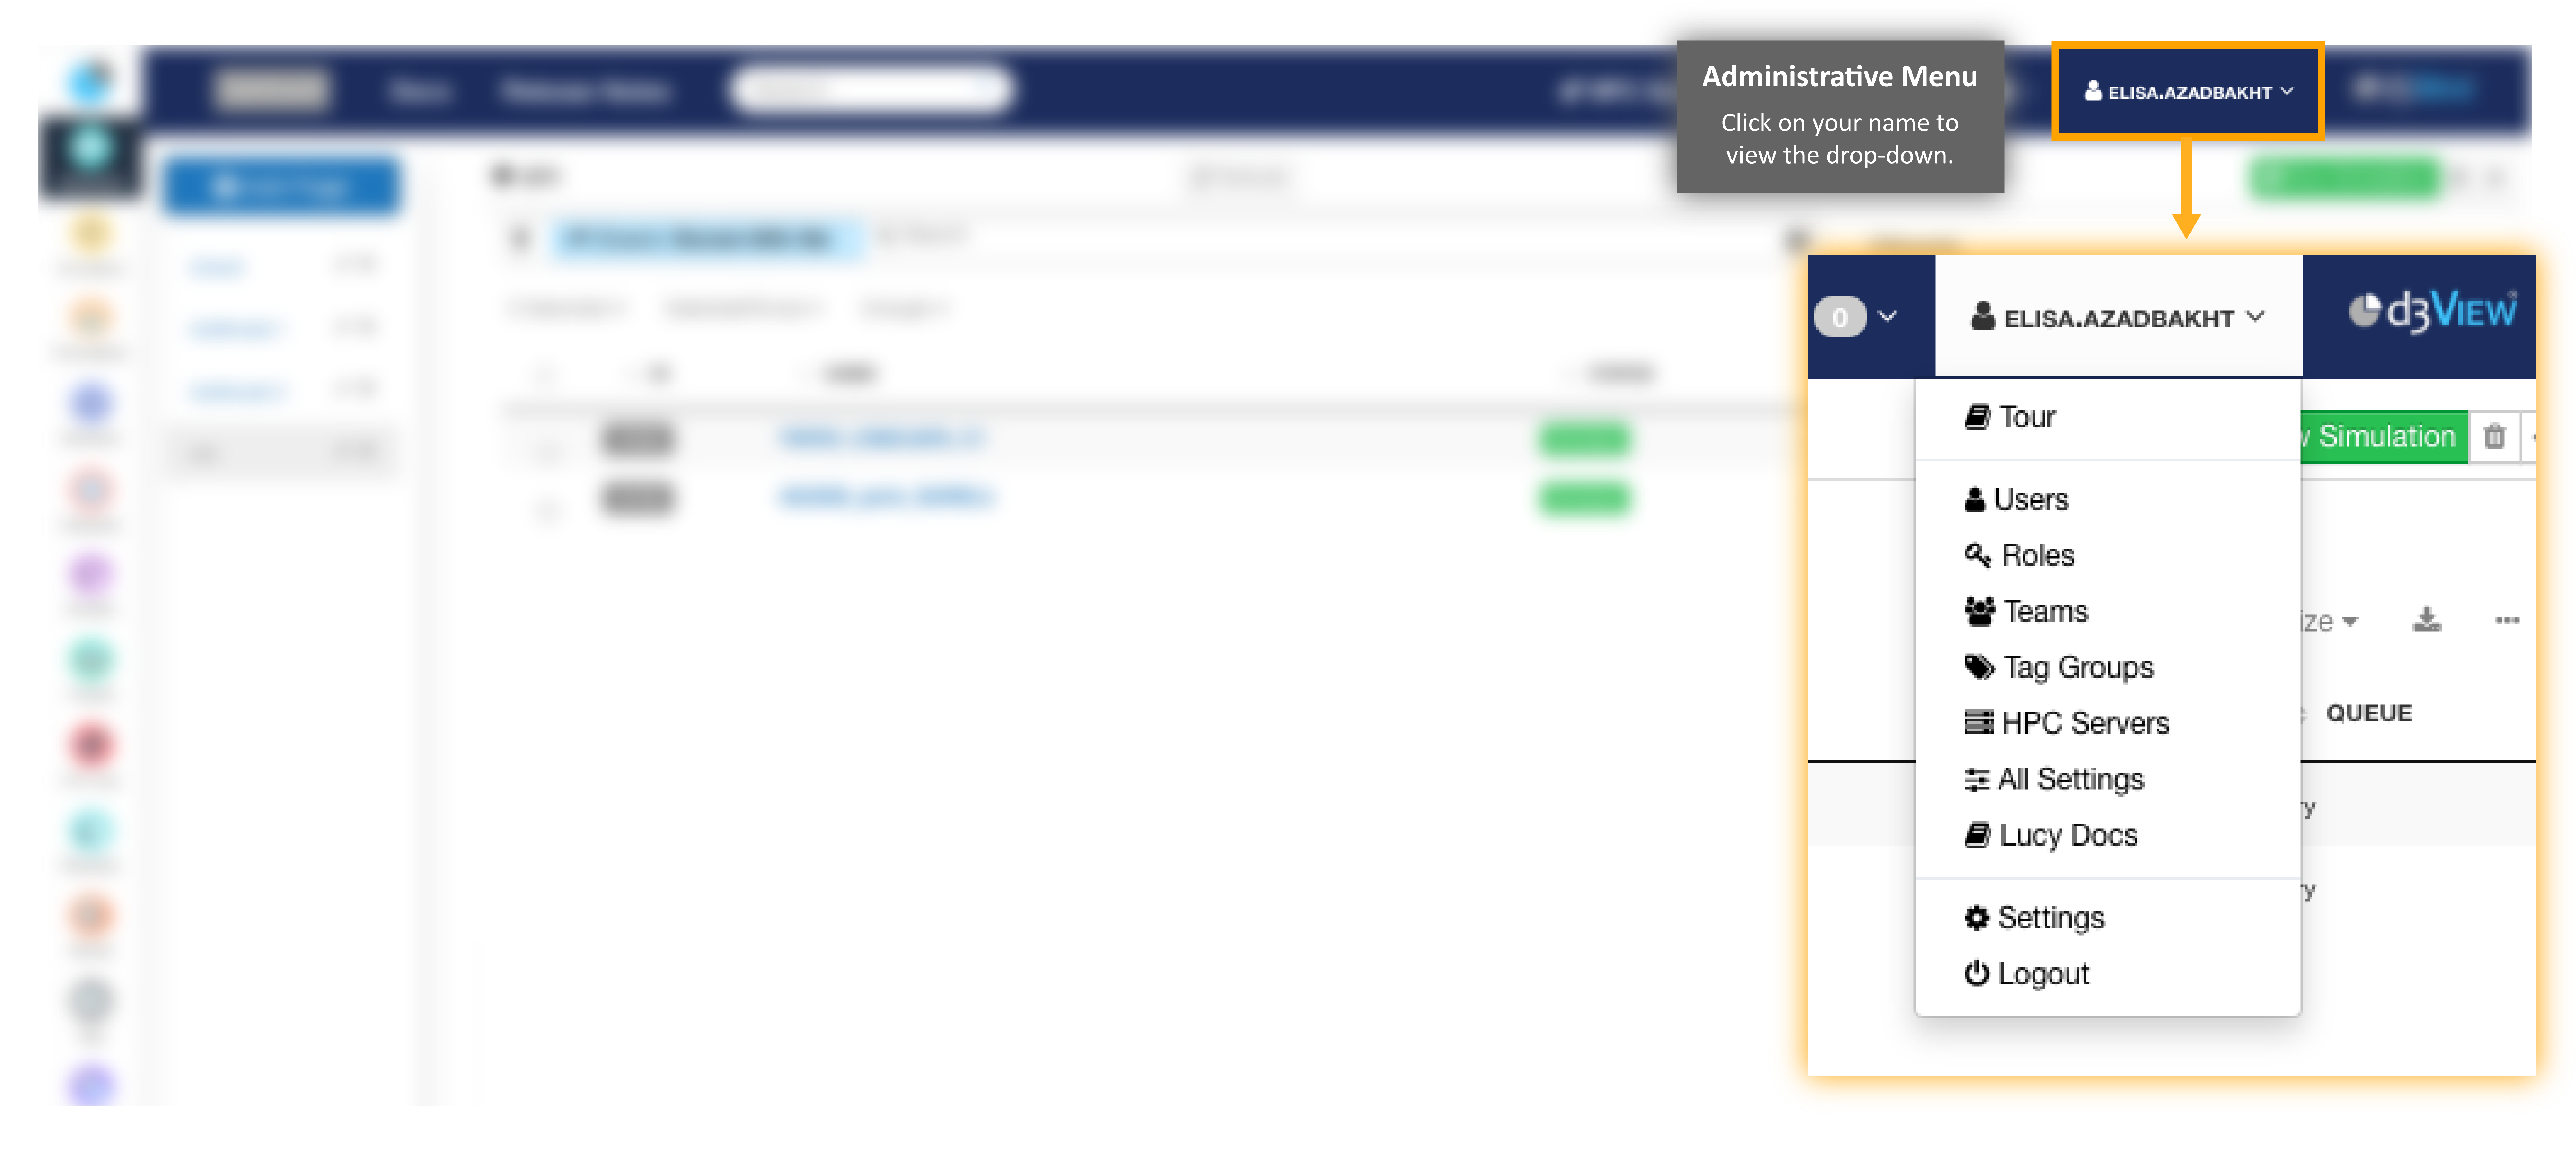
Figure 1: Administrative Menu
What Will Be Covered:
- Users
- Adding a User
- User Logins
- Roles
- Teams
- HPC Servers
- Editing HPC Servers
- HPC Utilization
- All Settings
- Post Processors
- LDAP Settings
- Logs
- Lucy Docs
3.1. Users
Click on the Users option in the Administrative Menu to get started.
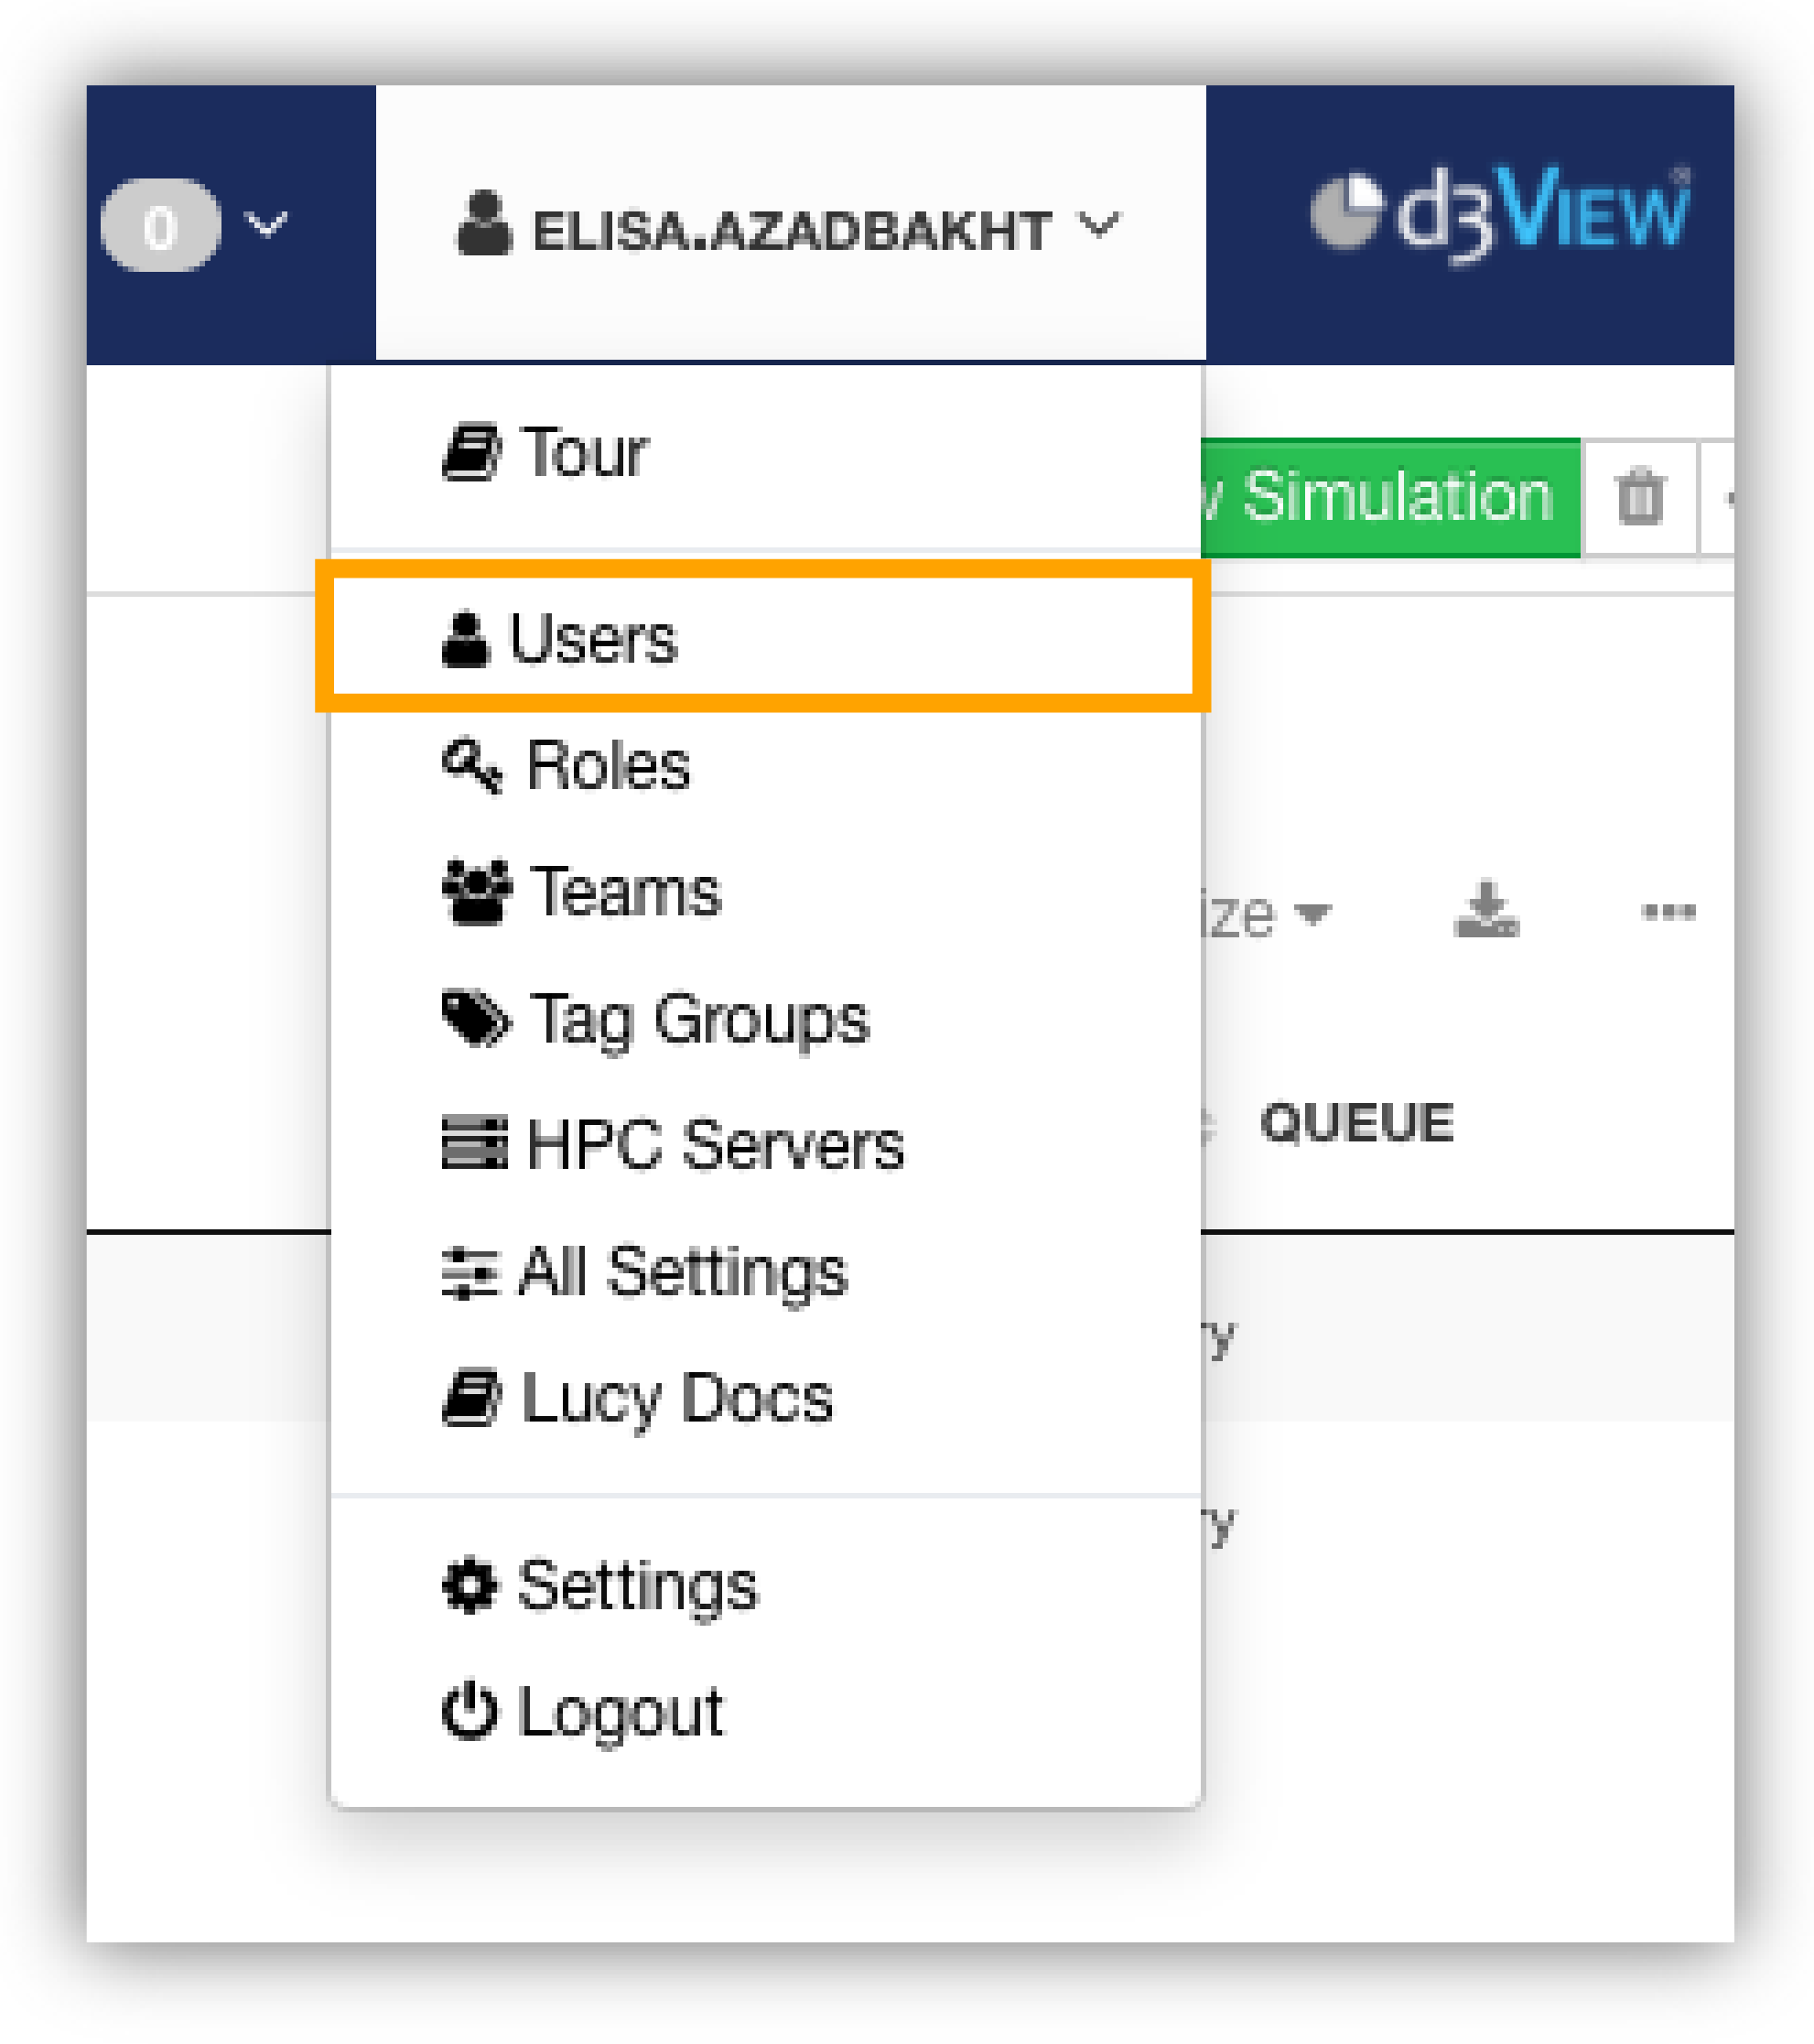
Figure 2: Users Option
The users section shows you thumbnail views of all users under your administration. You can perform actions such as edit, view or impersonate on individual users.
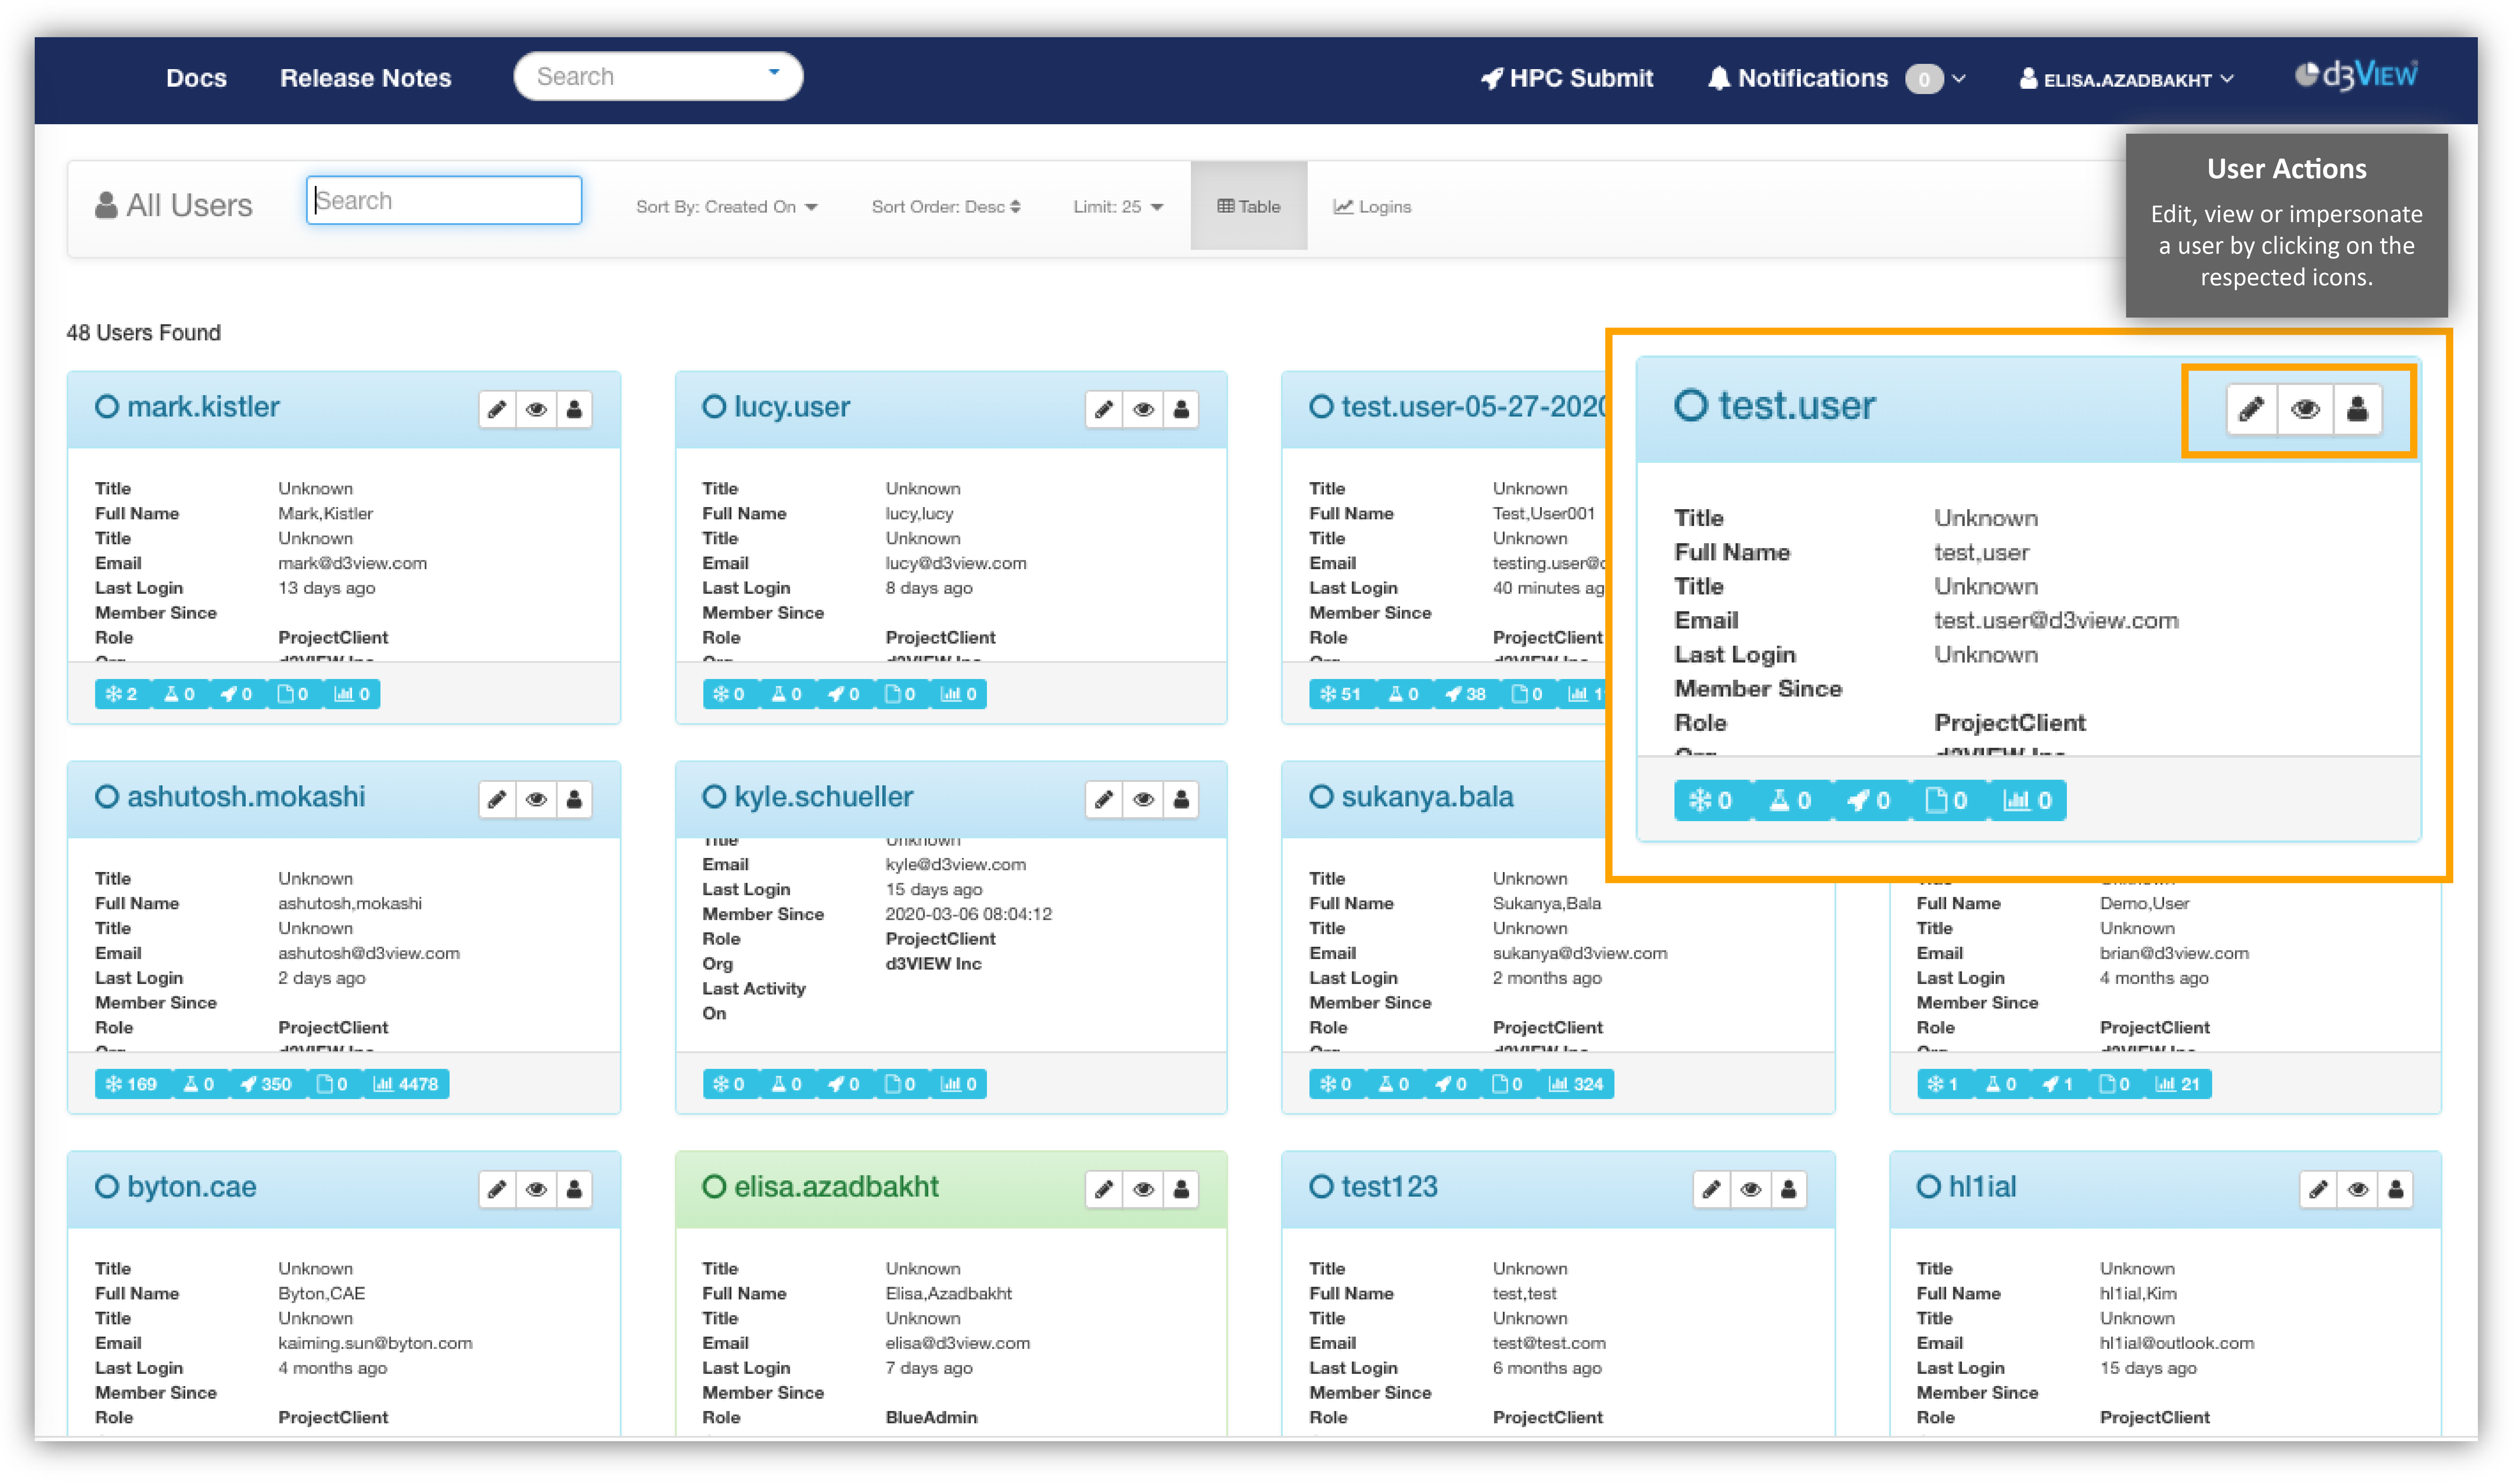
Figure 3: All Users
Where Am I?
Add User
Click on “Add User” at the top right to create another user. The window for creating or editing a user is basically the same. Here, you can choose a role for the user.
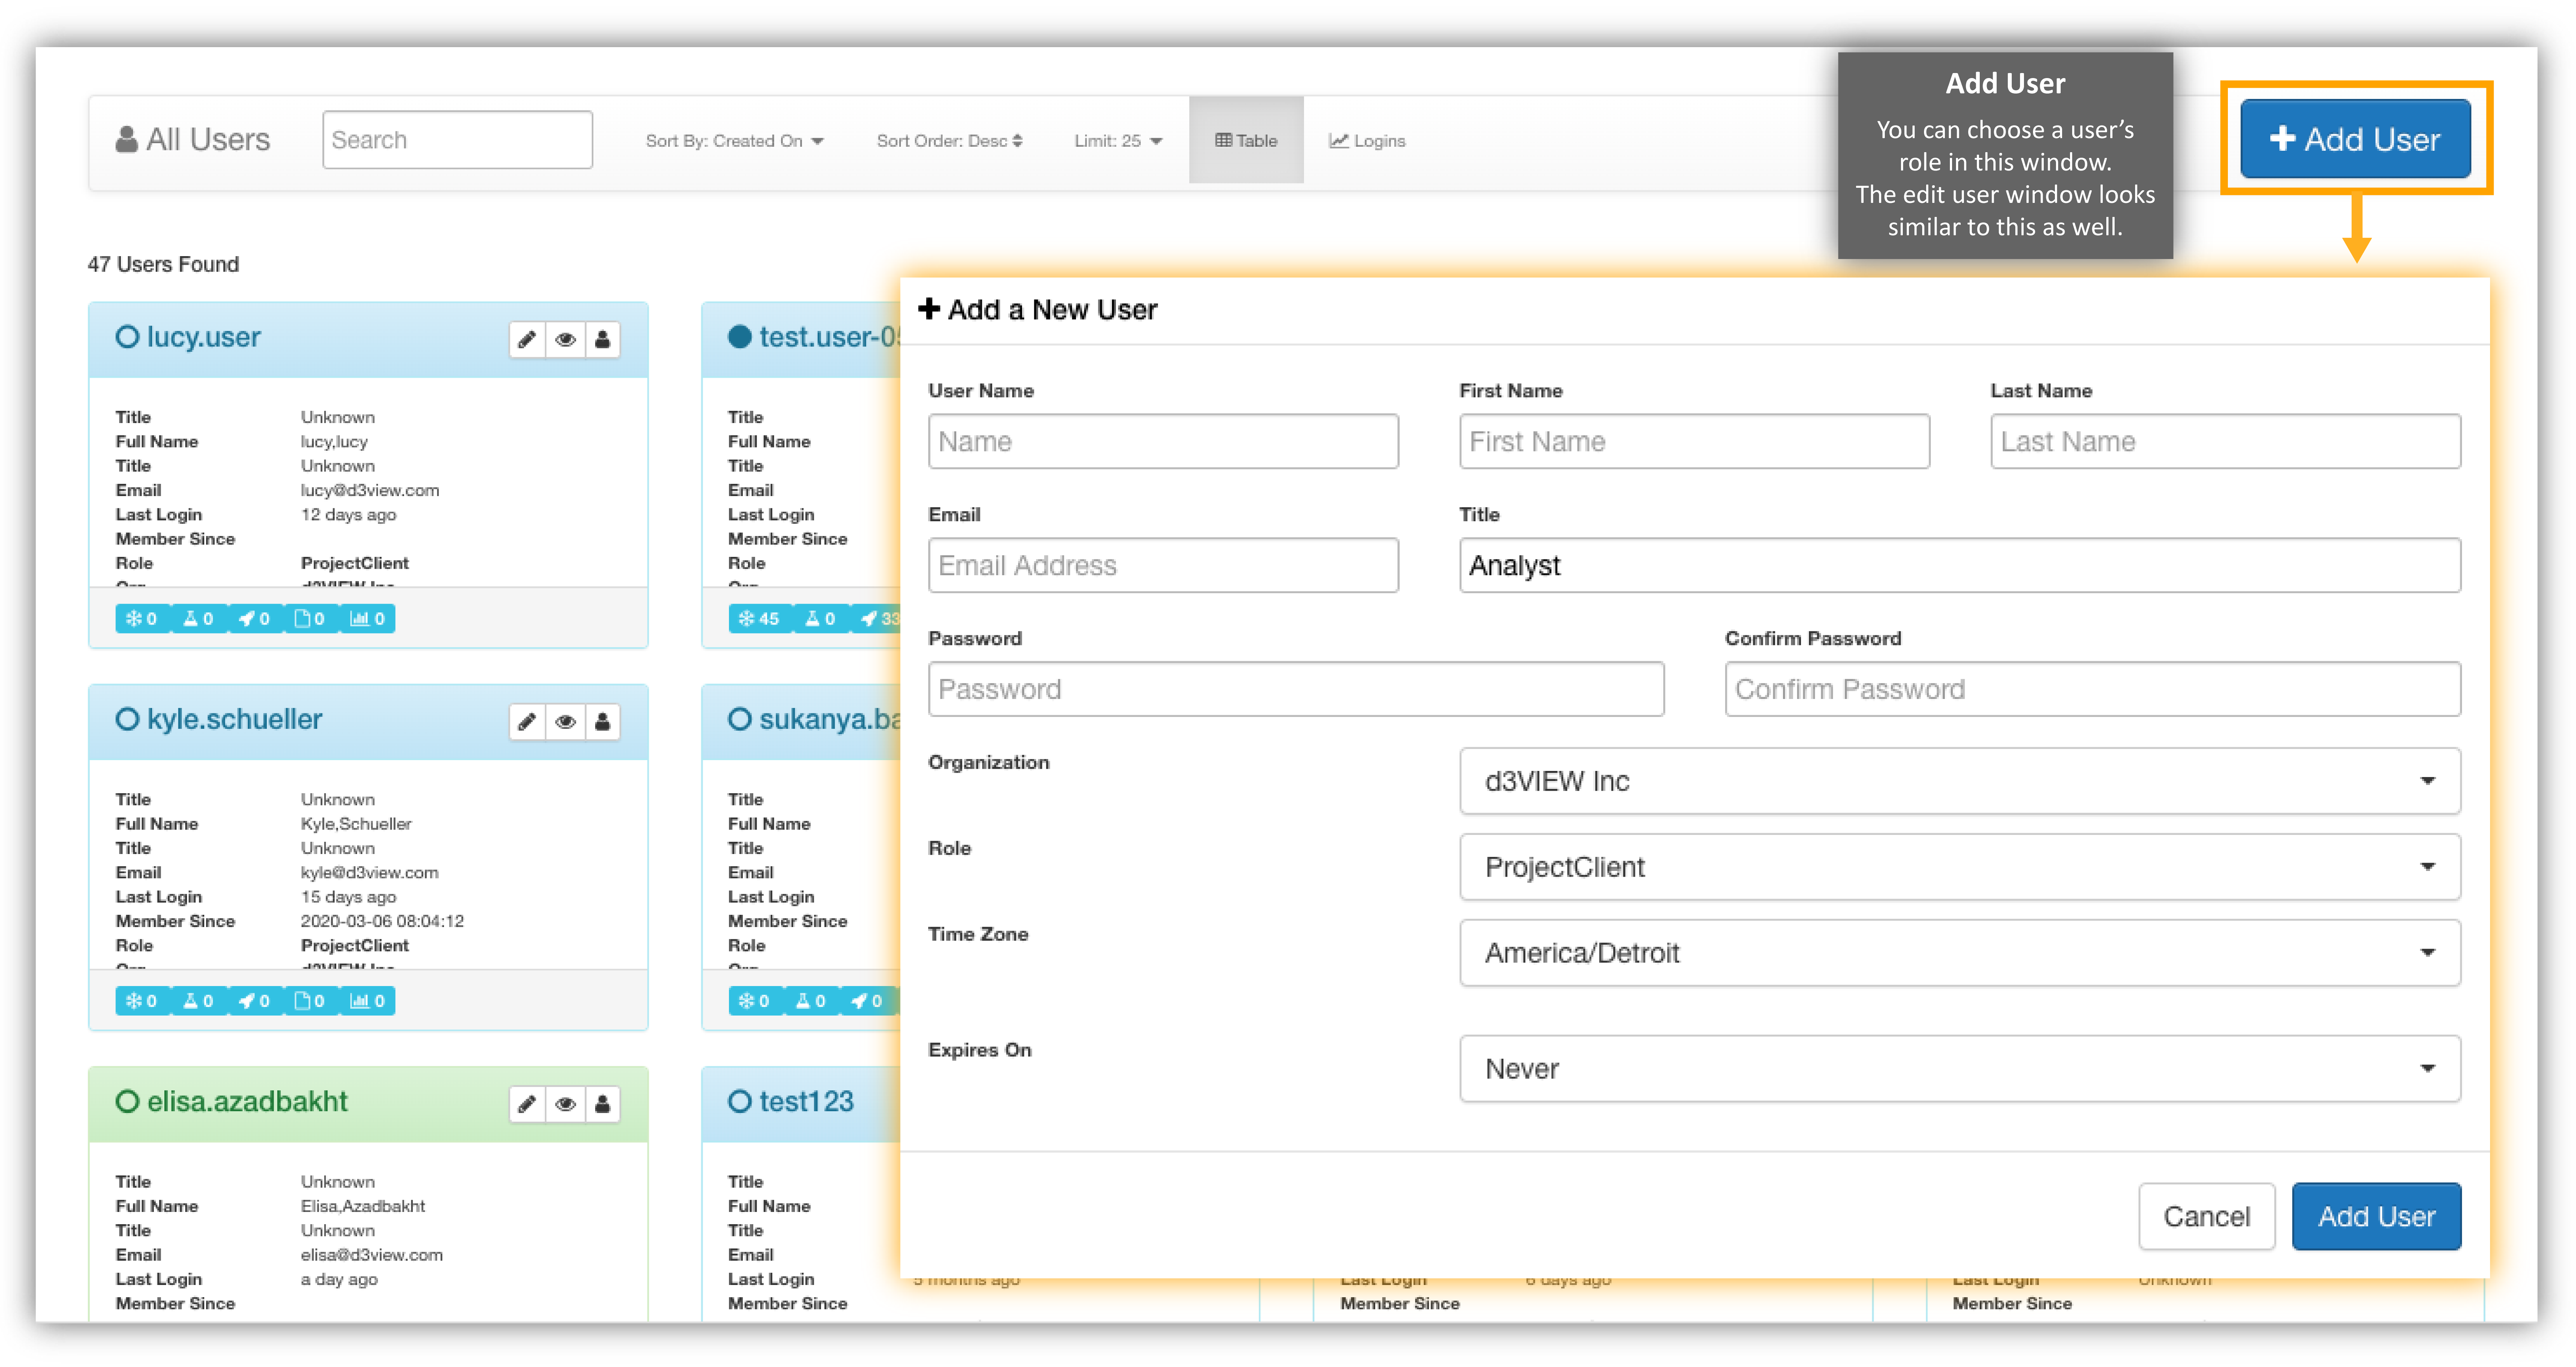
Figure 4: Add User
User Logins
Click on “Logins” on the grey bar next to “Table” to see which users logged onto the platform on particular dates.
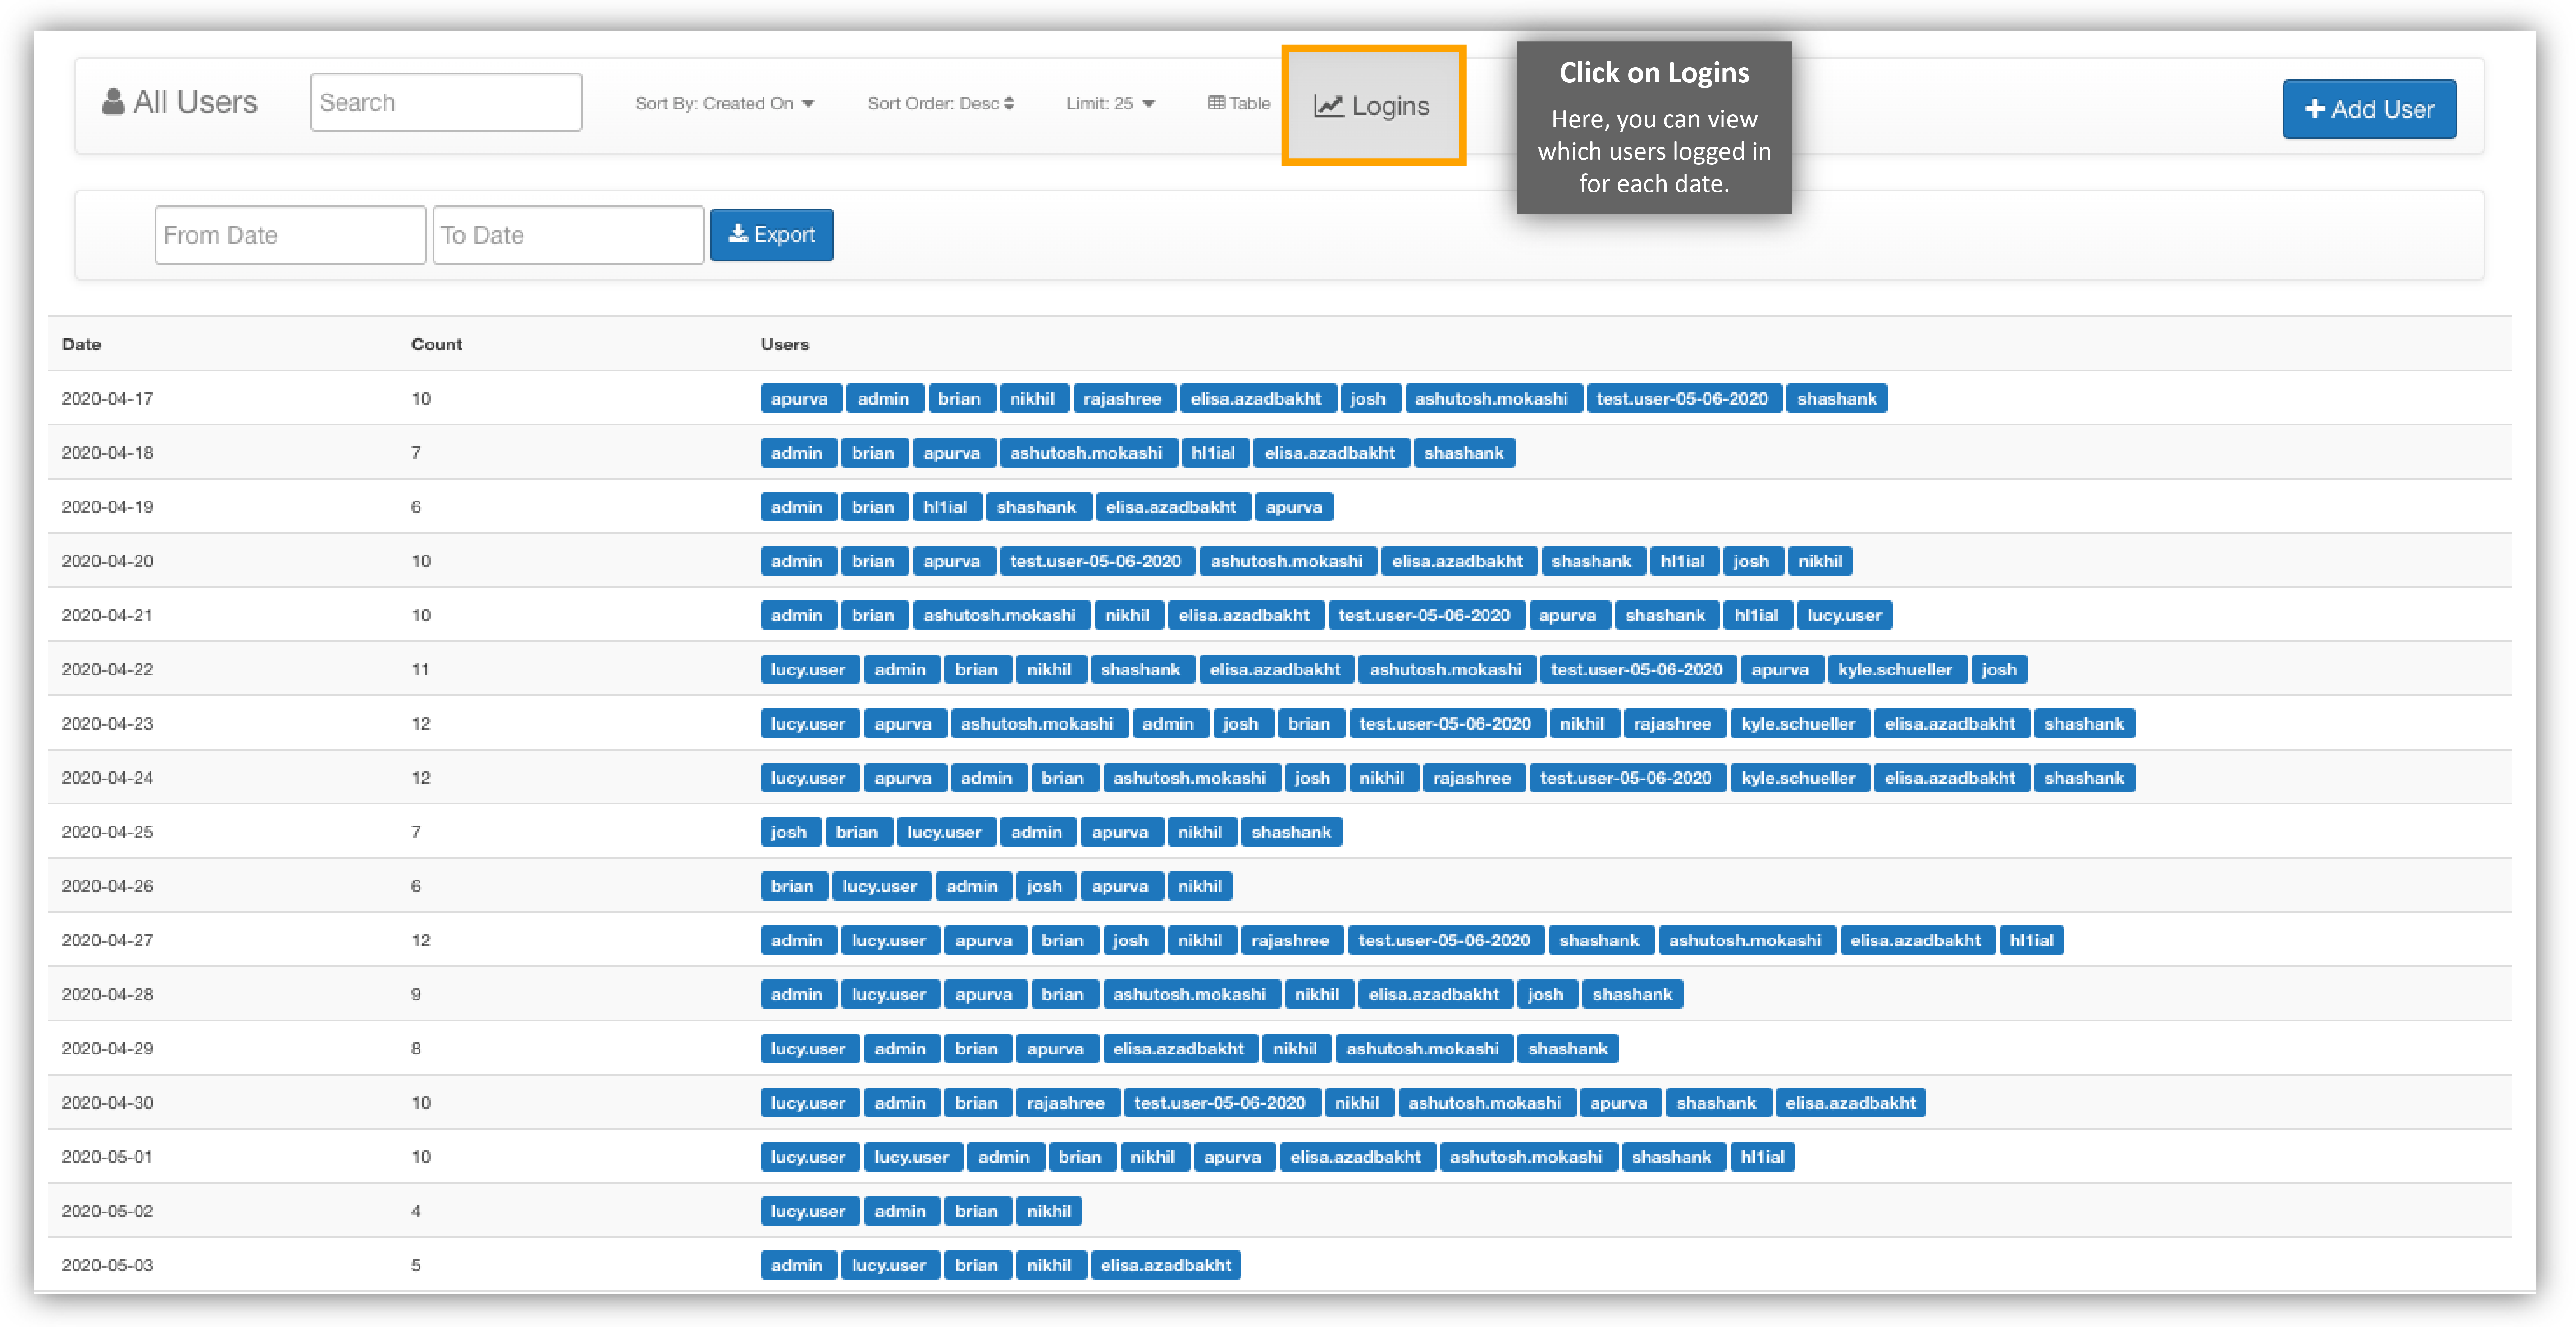
Figure 5: User Logins
Below video shows how to add user and manage them.
3.2. Roles
Roles make it easier assign permissions to users. You can give reading or writing capabilities to a particular role and give that role to certain users.
Click on the Roles option in the Administrative Menu to get started.
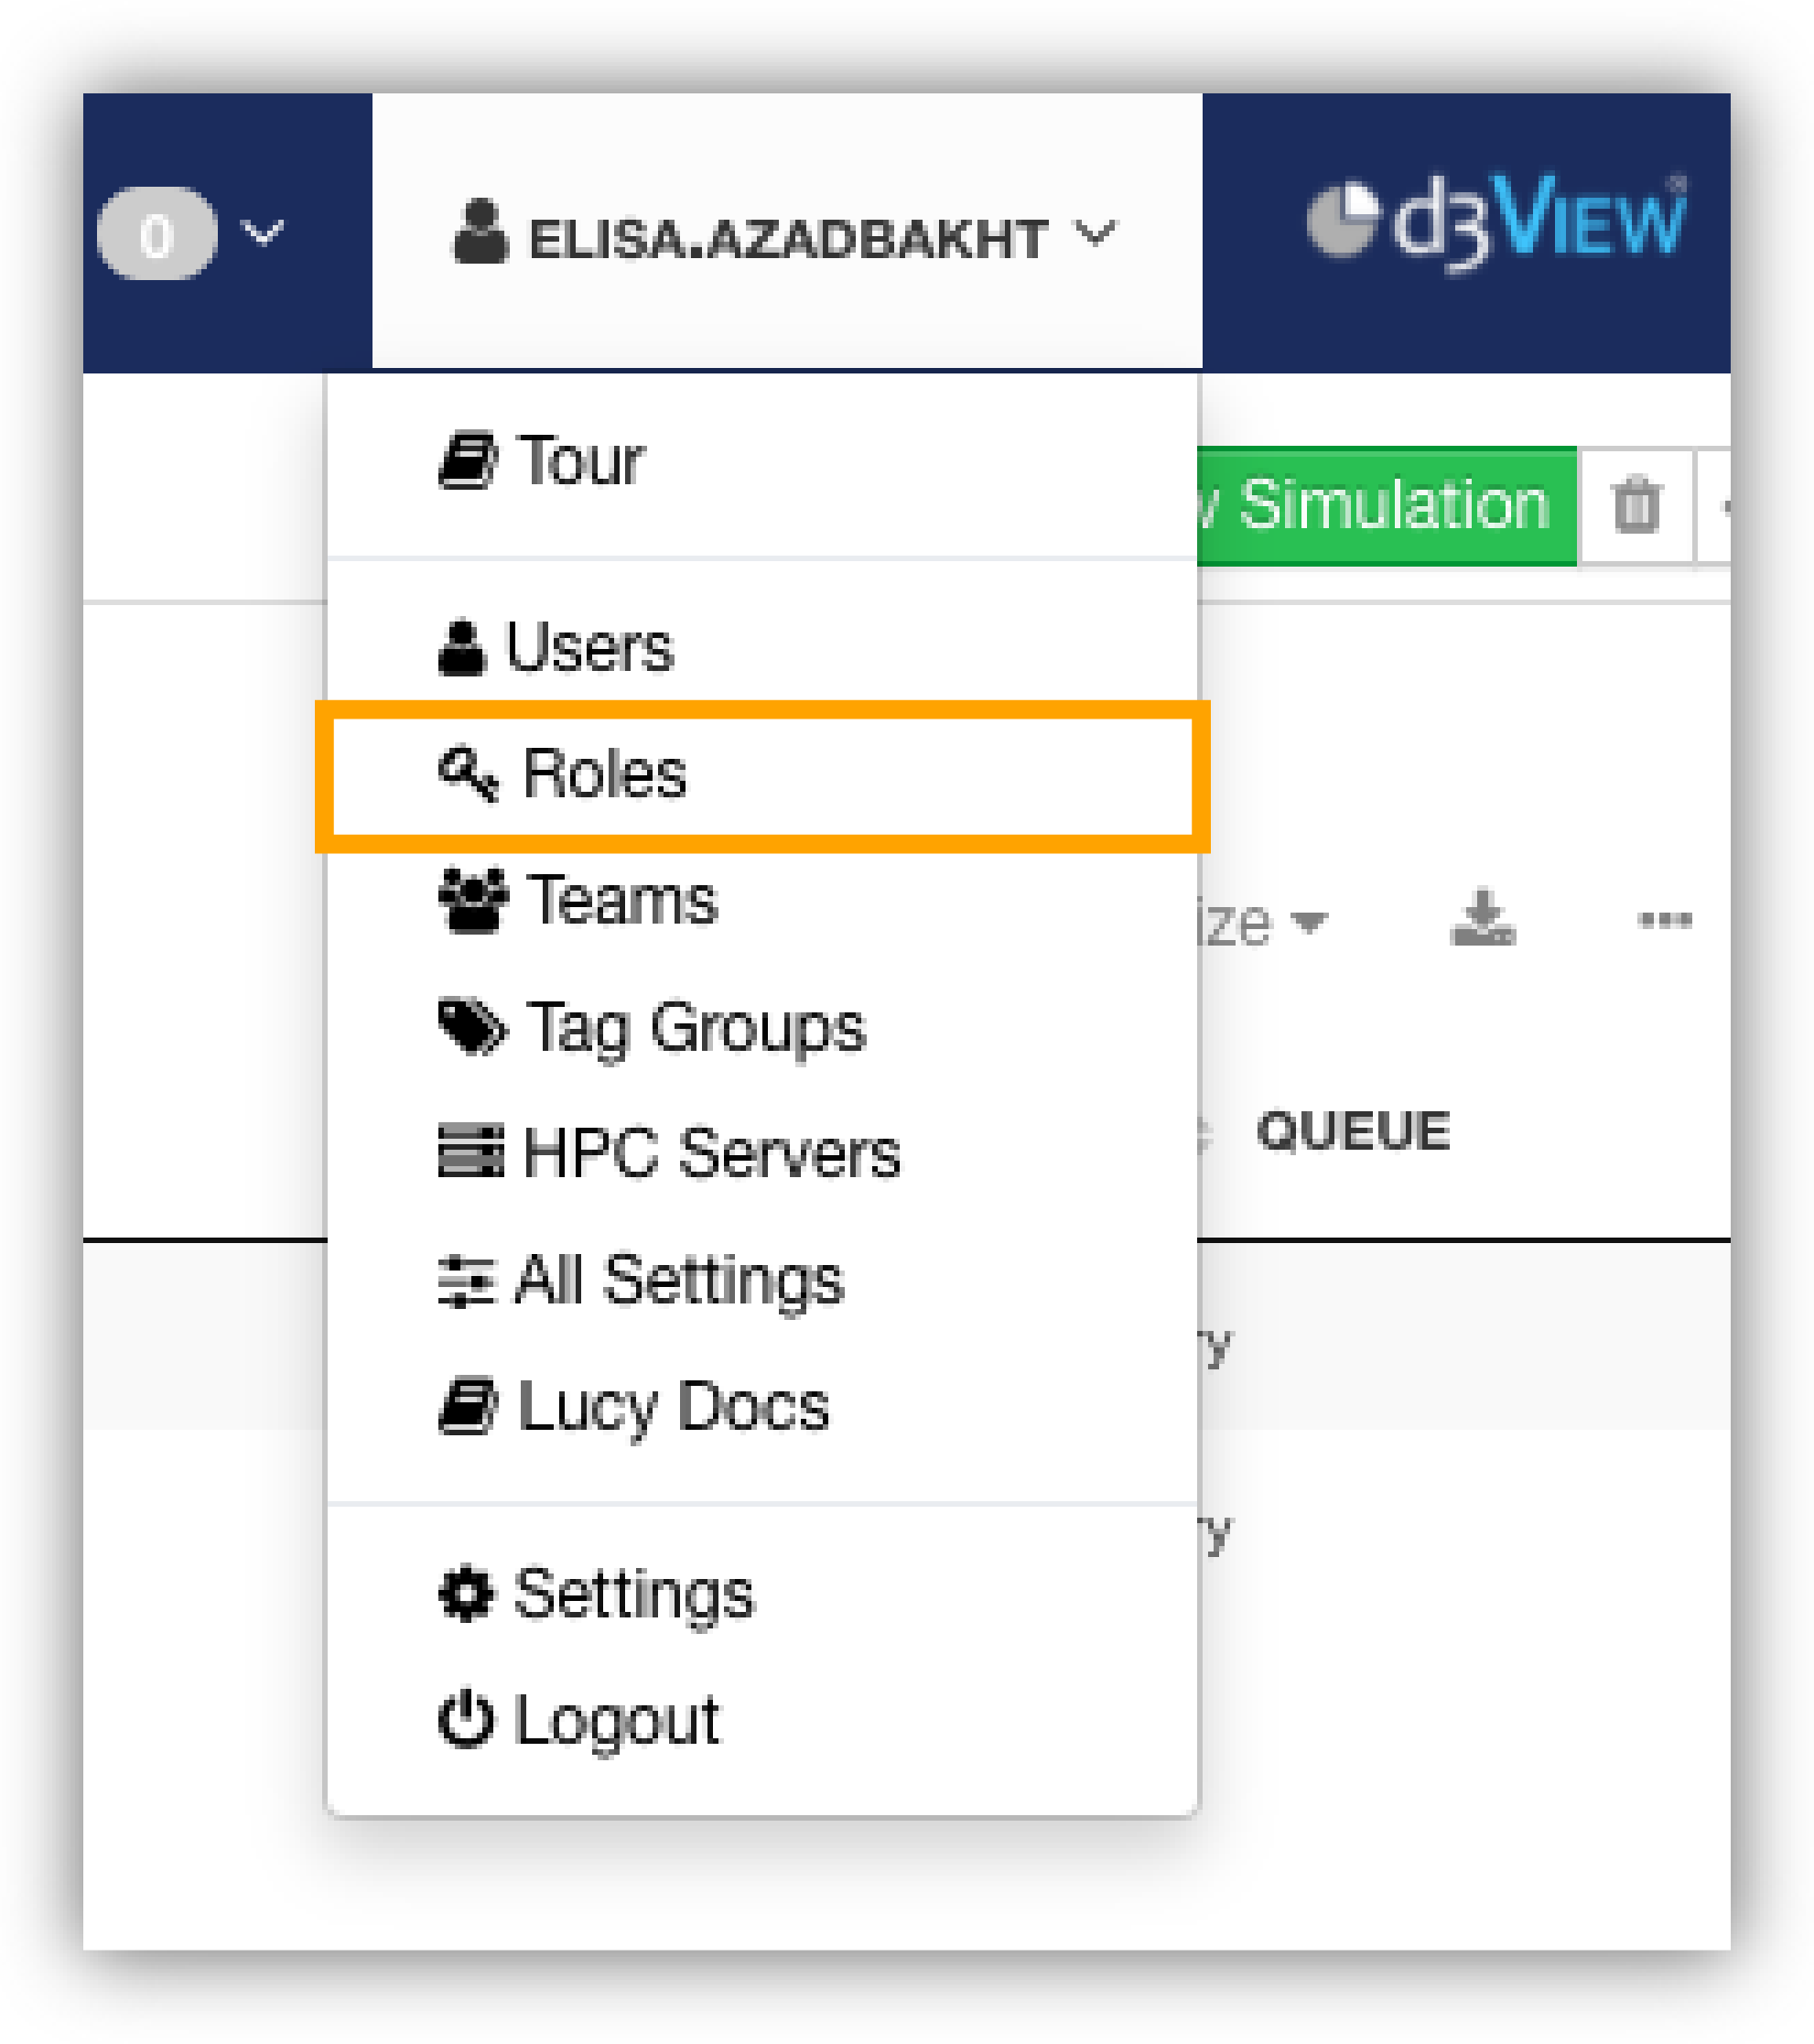
Figure 6: Roles Option
New Role
Click on ”New Role”. Make sure to give a new role a name and description as well as set reading and writing capabilities for the options.
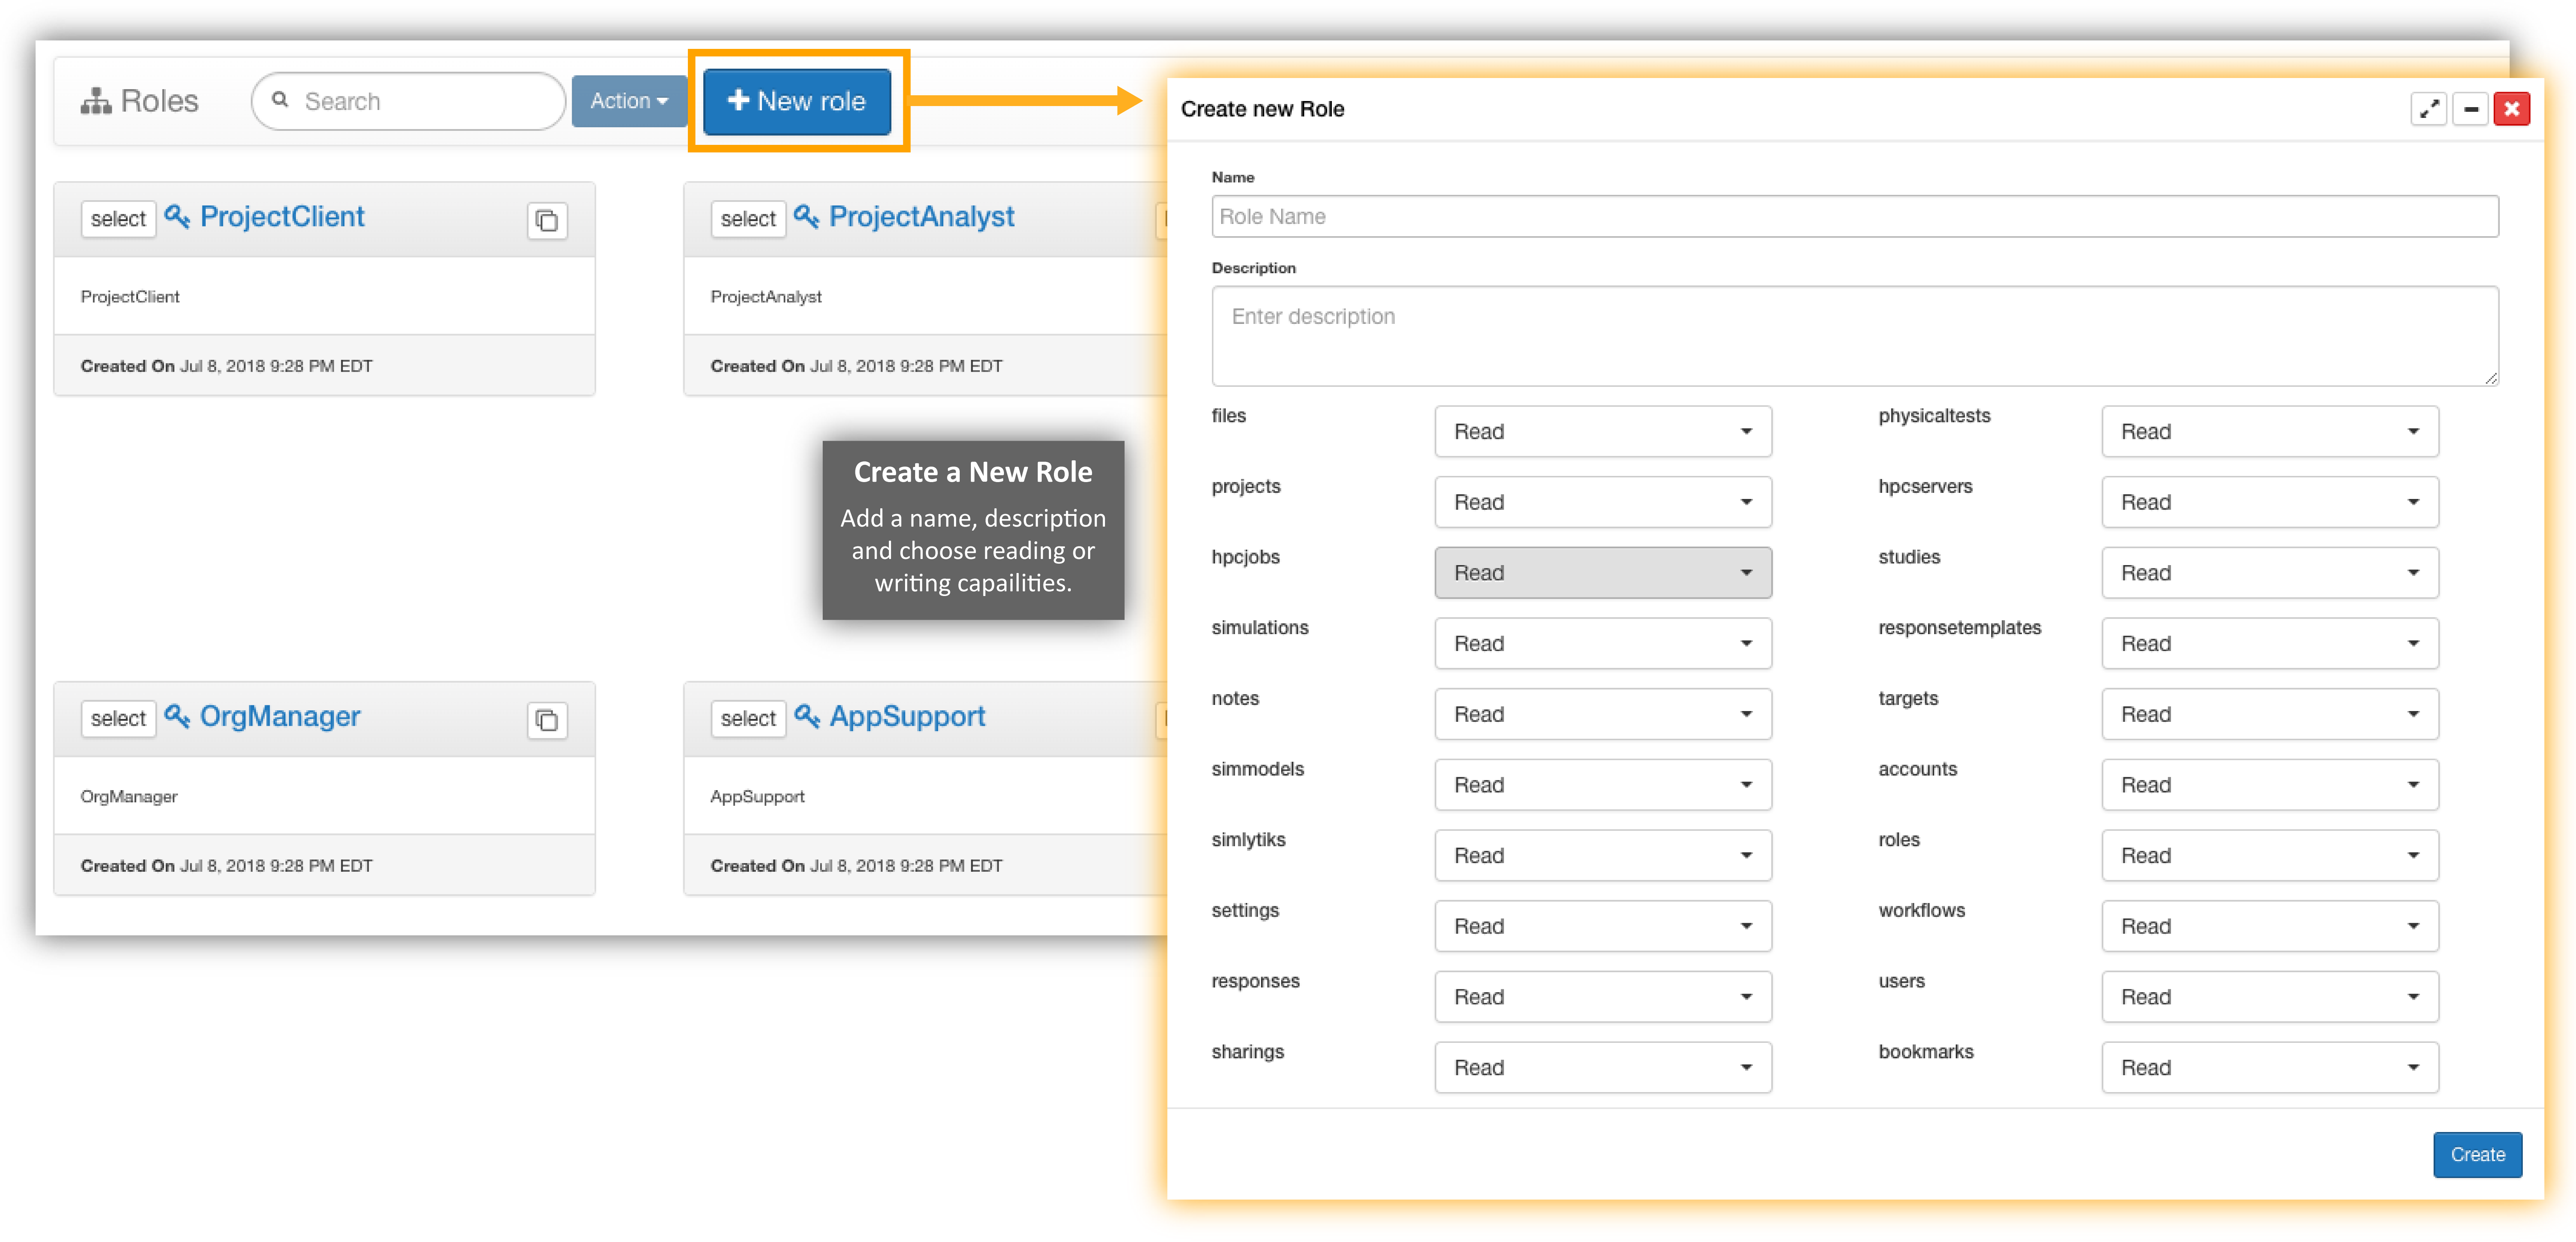
Figure 7: Create a New Role
Roles with Applications and Permisisons.
Applications with Permissions can be added to Roles and users can be assigned to the Roles while creating or while editing a Role

Each role in the page will show the count of Applications and Users.

Right context menu options like Edit, Meta data , Inhert role and Delete options are available for Roles.

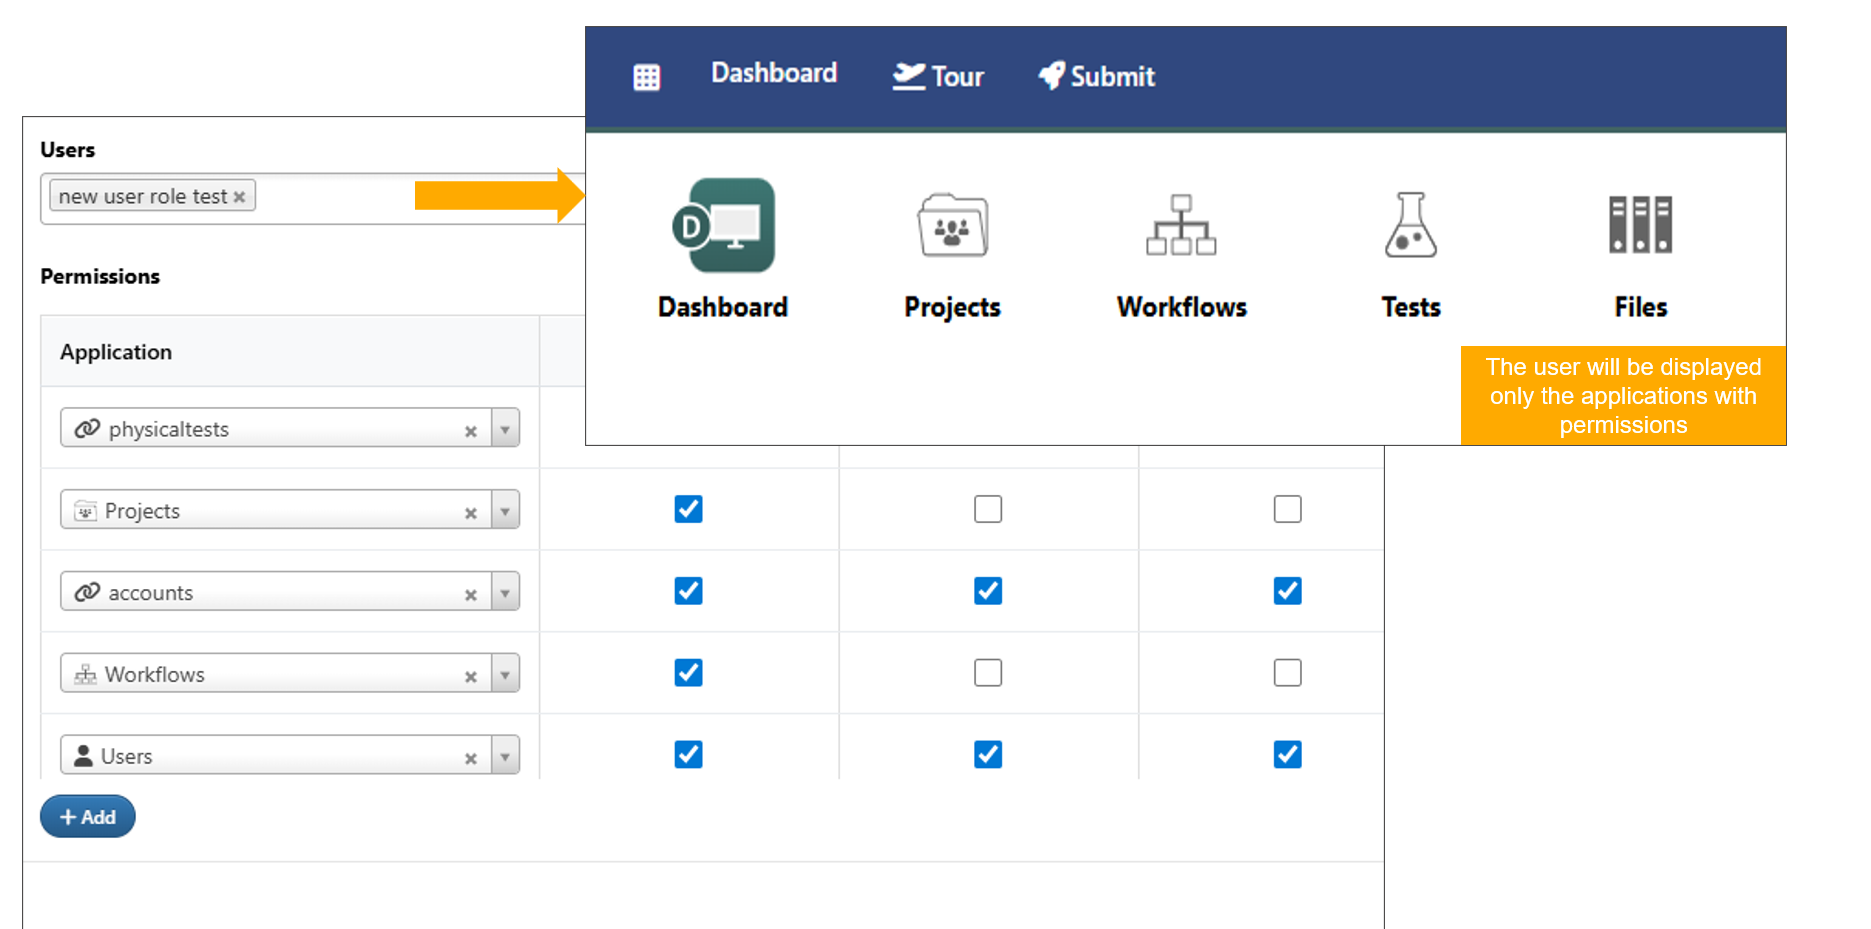
Users with Application Permissions
The User will be seeing only the applications available in roles with respective permissions.
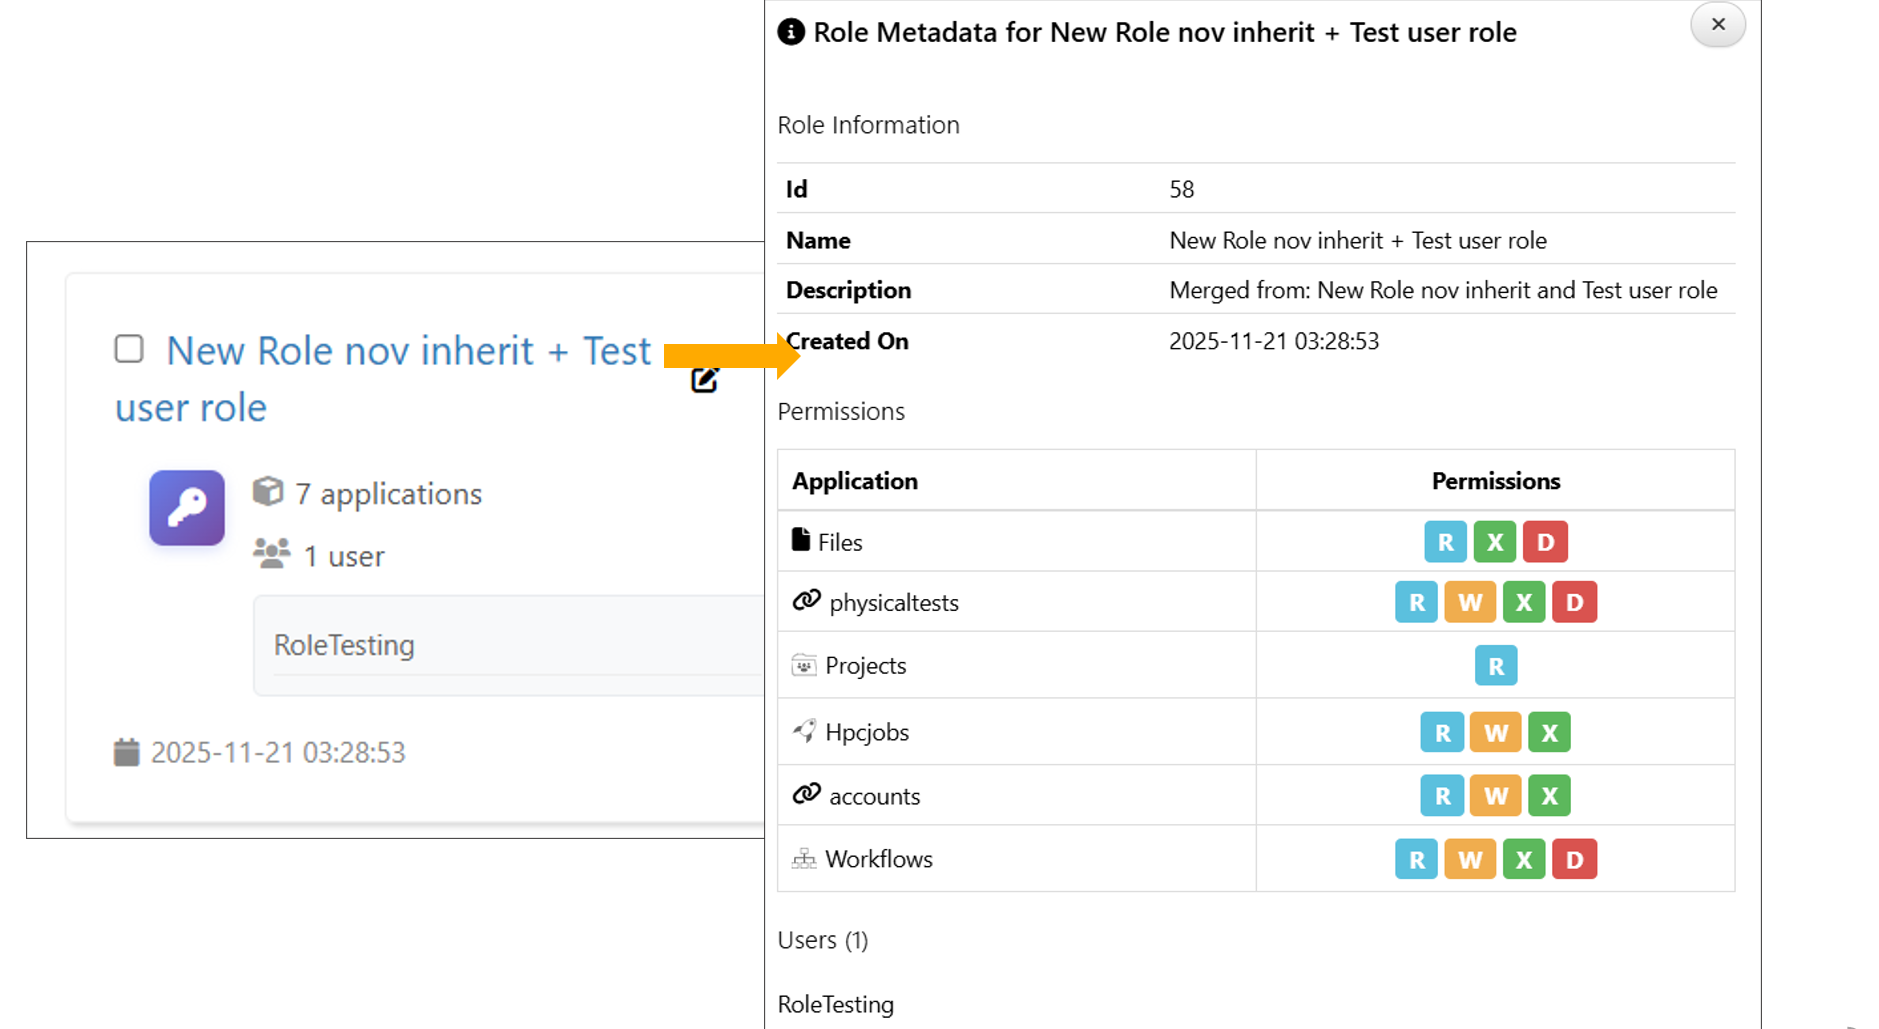
Metadata
Metadata for each Role is now viewable in the sidebar, including permissions and associated users, by clicking on the Role’s name.
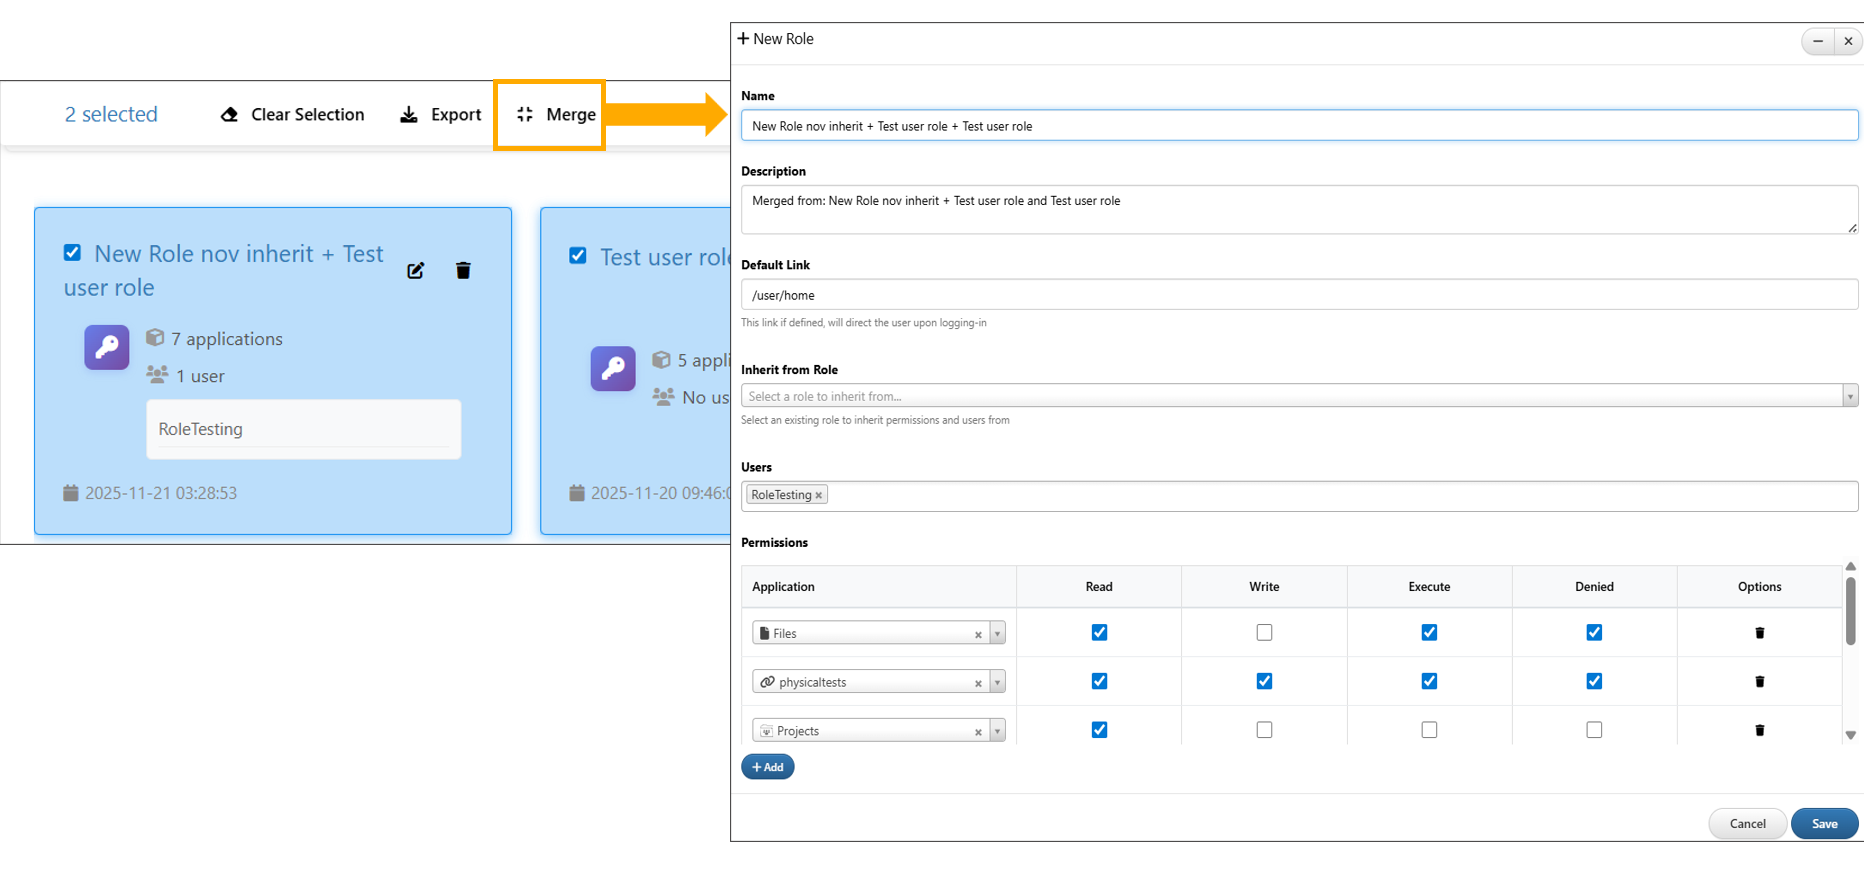
Merge Role
Selecting two roles now shows a new “Merge” option, allowing you to combine their users and permissions into a single role.
3.3. Teams
You can organize your users into teams. Replicate your office or labs’ teams onto the platform so you can stay more focused and efficient.
Click on the Teams option in the Administrative Menu to get started.

Figure 8: Teams Option
Add Team
Click on “Add Team” at the top right corner to create another team. In the new window, choose a name, description and users to populate you team.
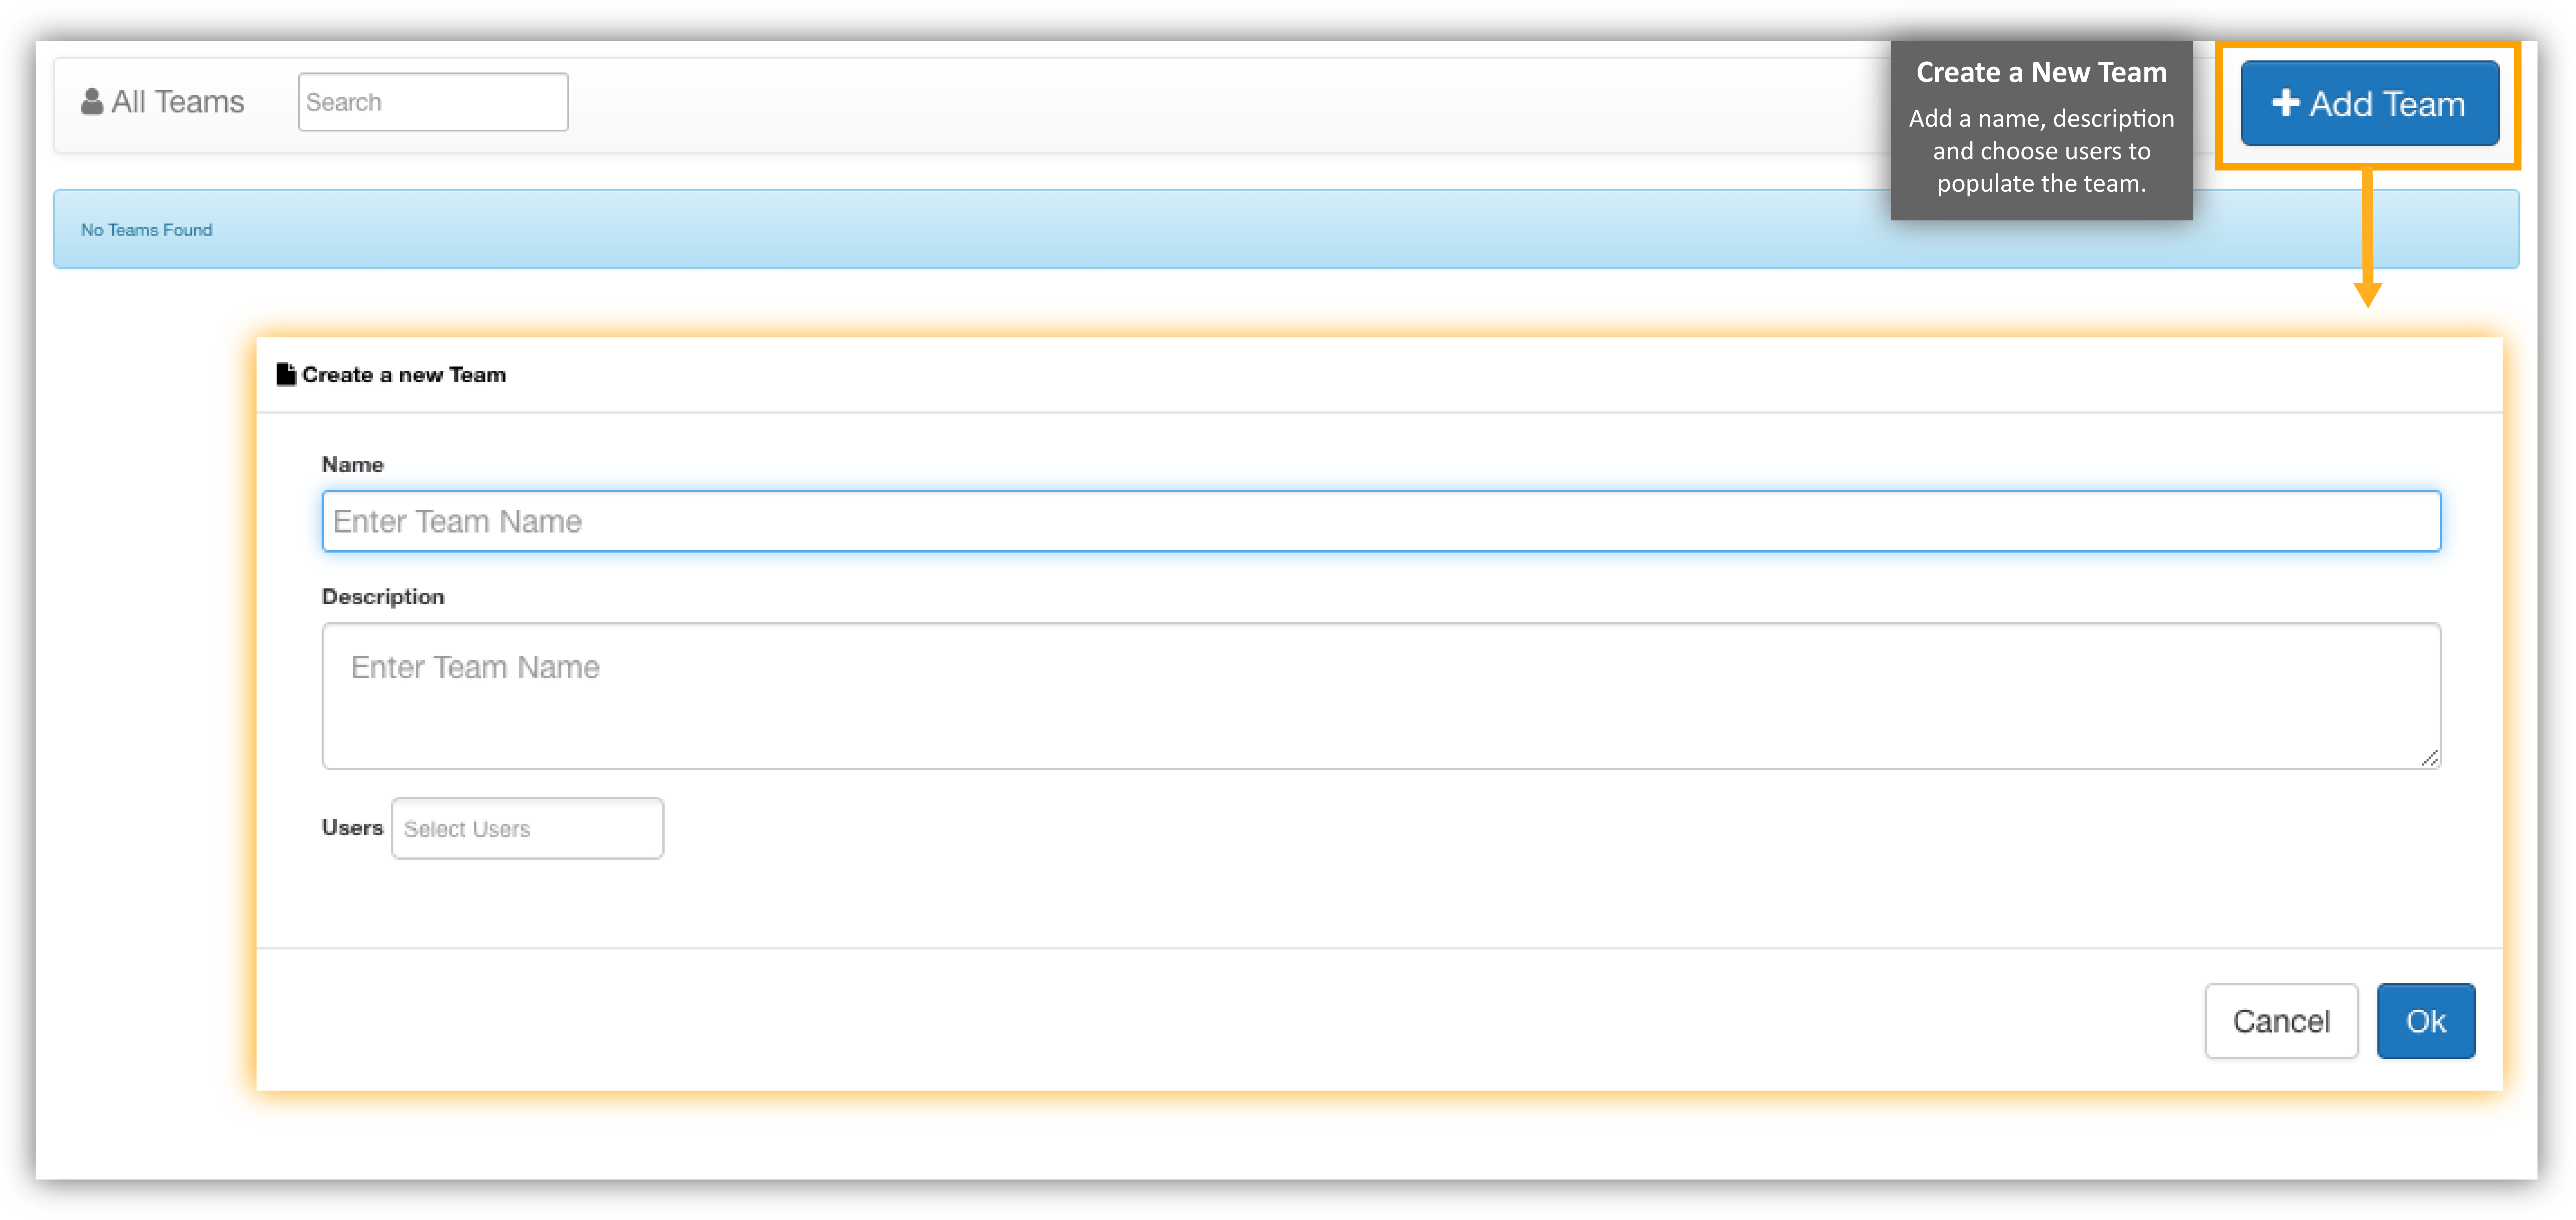
Figure 9: Add a Team
Where Am I?
3.4. HPC Servers
Click on the HPC Servers option in the Administrative Menu to get started.
HPC Servers Option
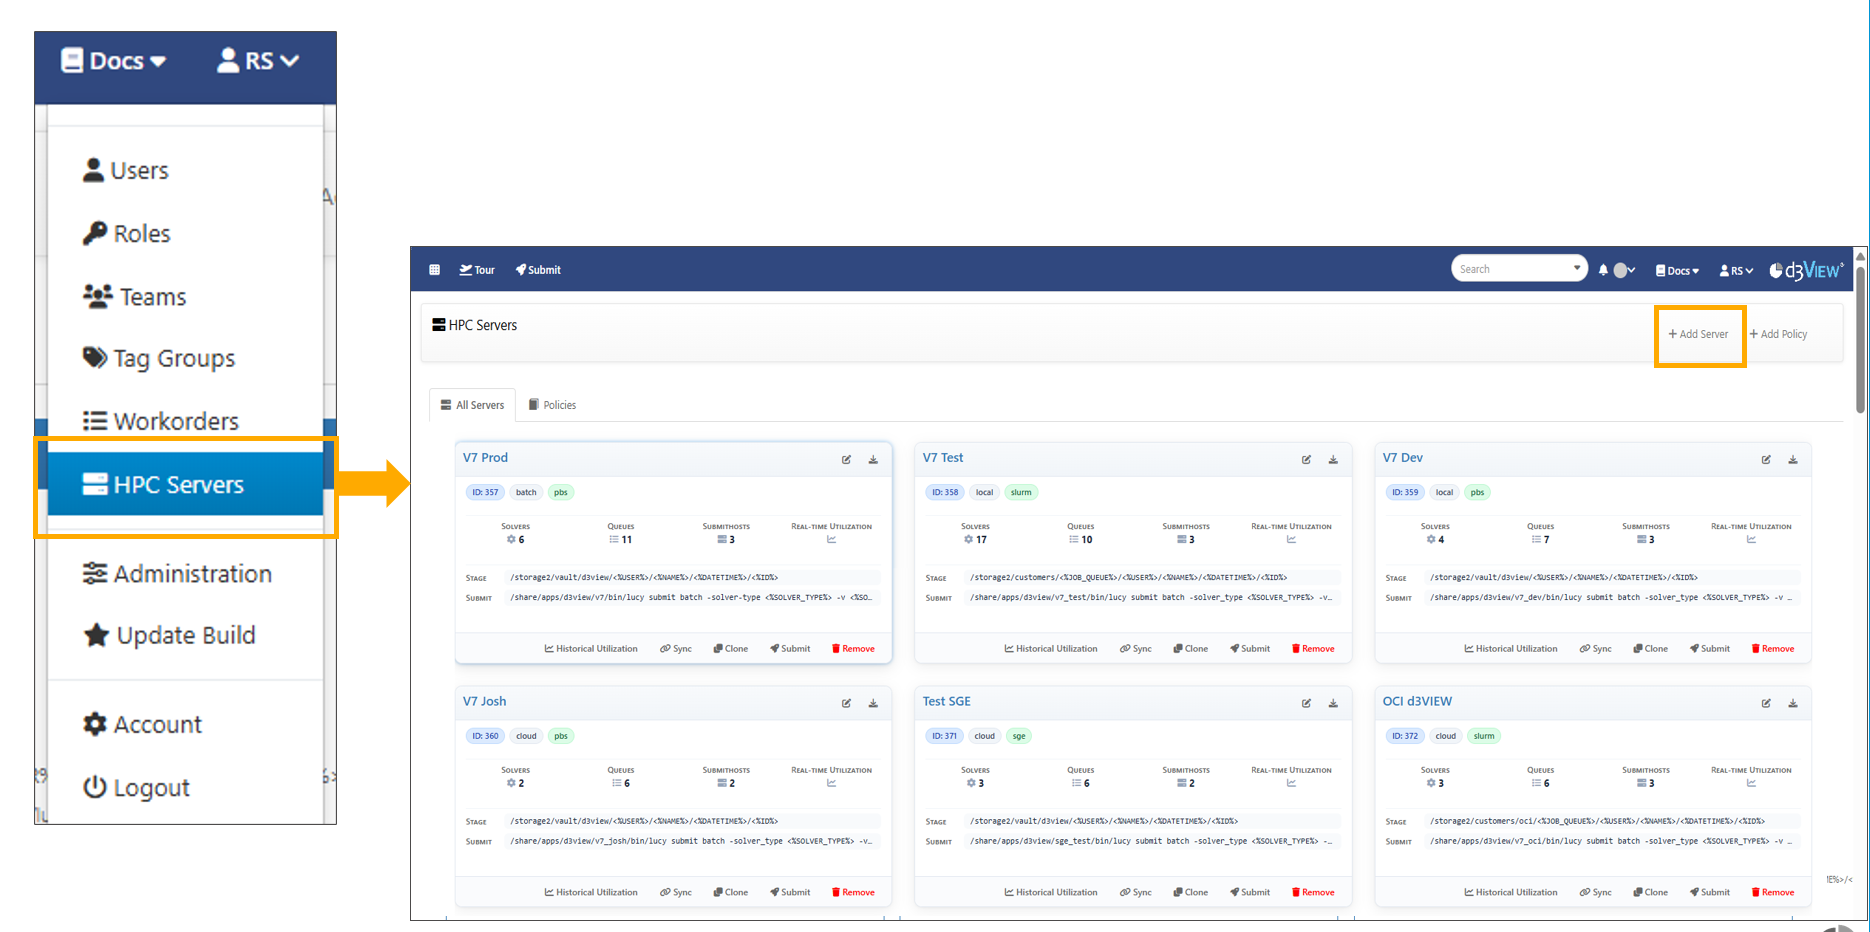
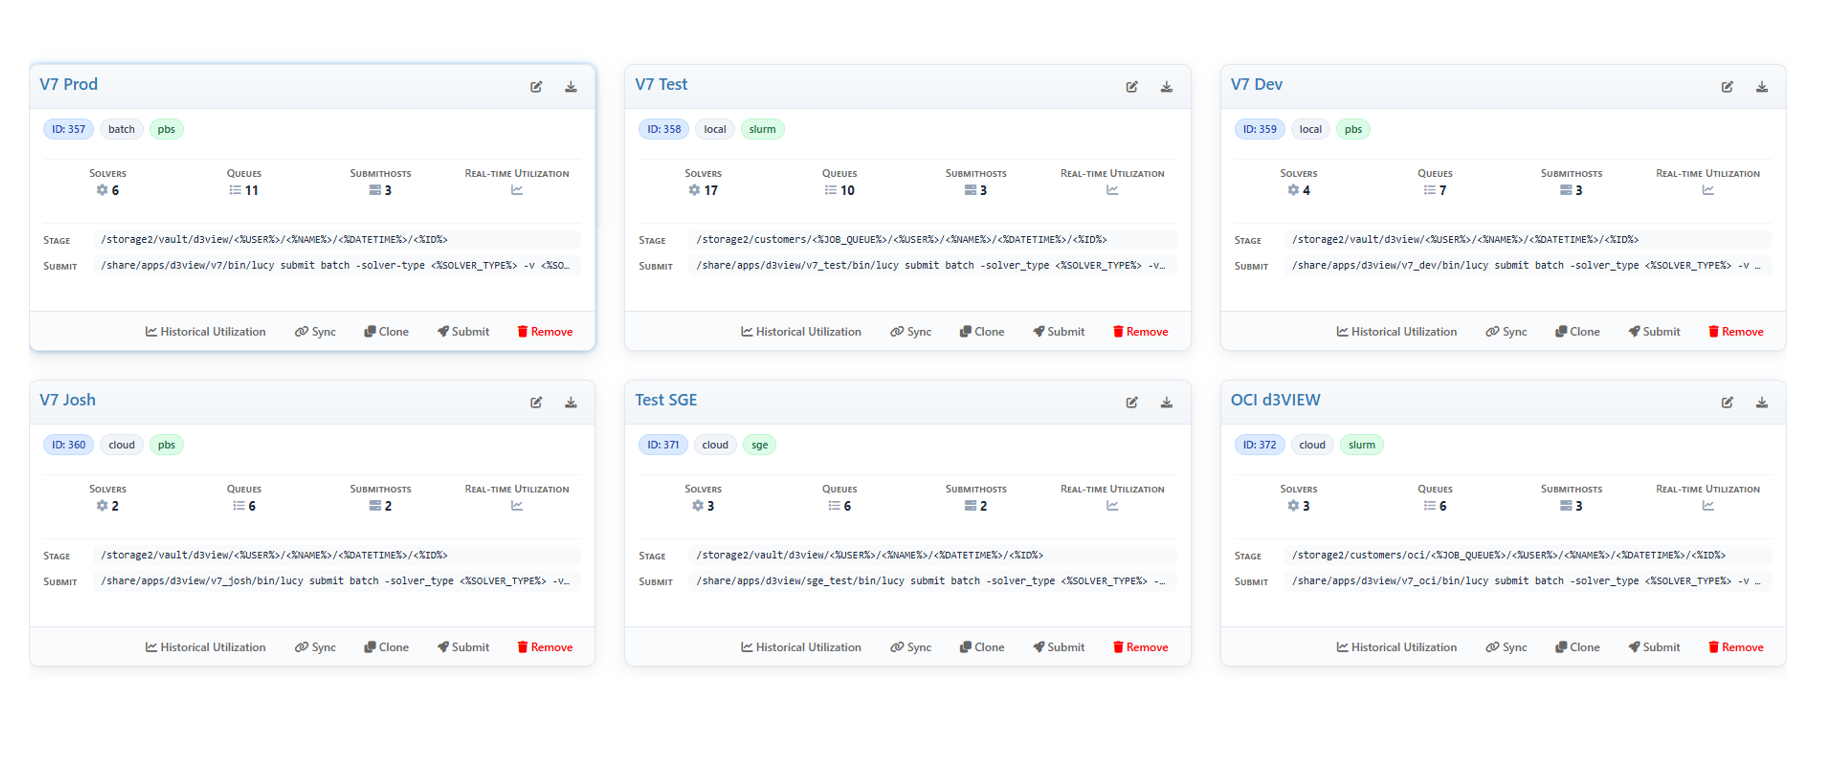
View thumbnails of all your HPC servers and perform actions on them such as viewing utilization, editing, duplicating, exporting or deleting.
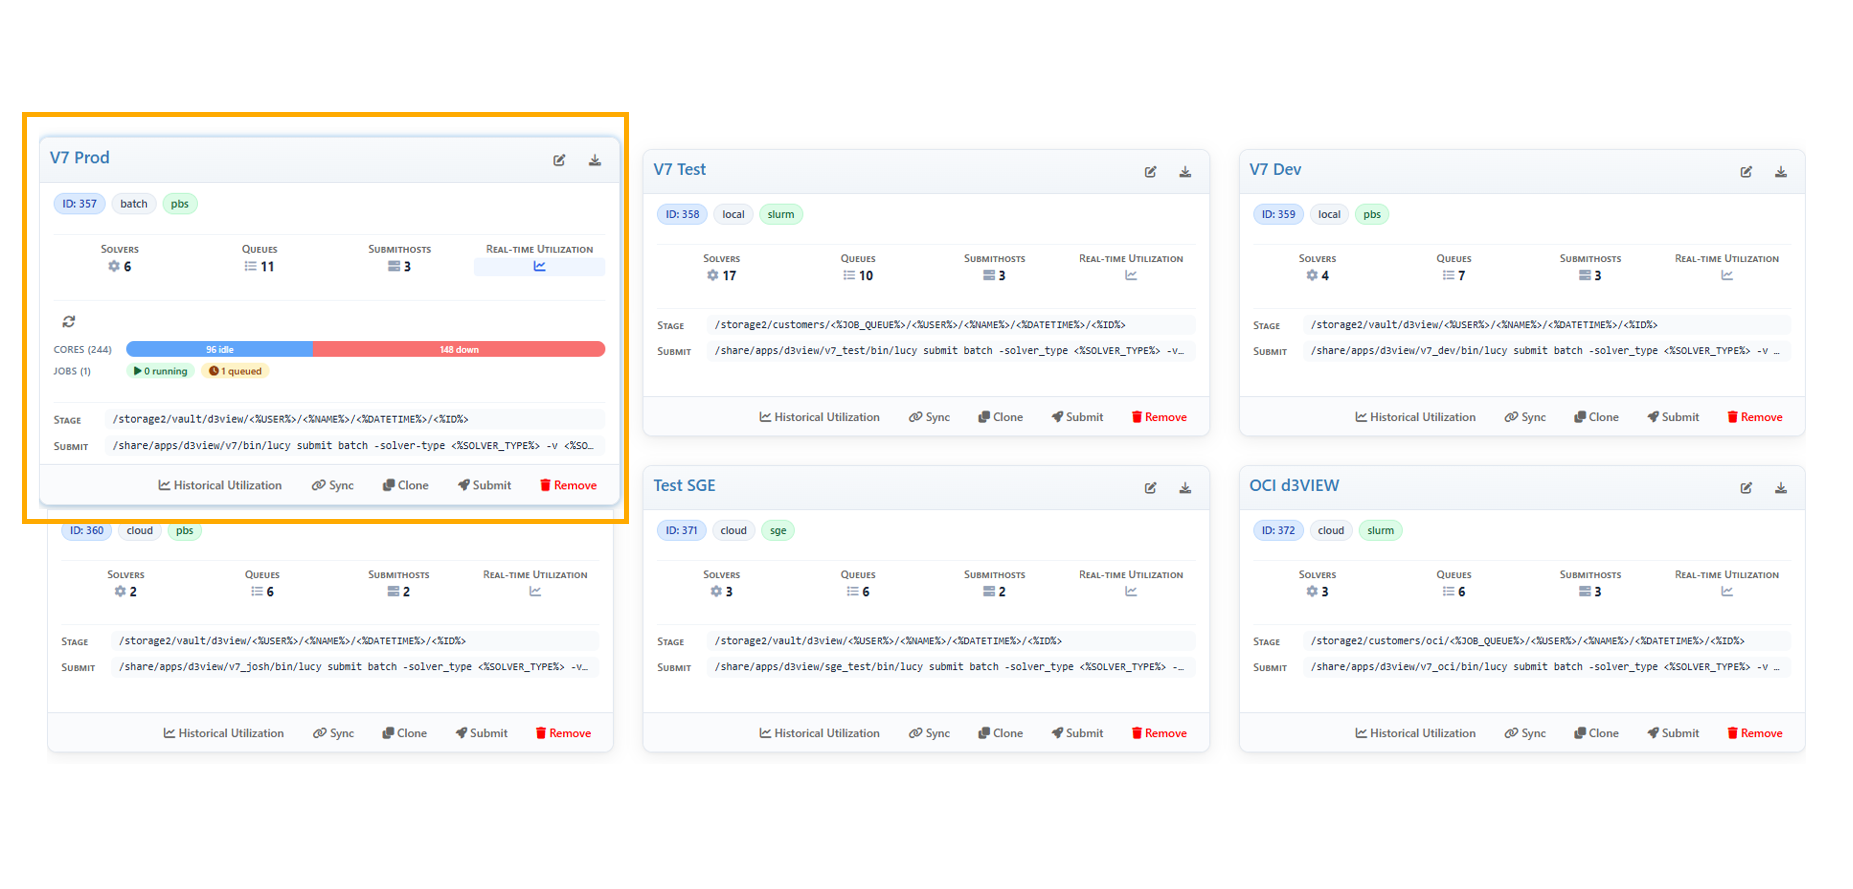
Figure 11: All HPC Servers
Add an HPC Server
Click on ”Add Server” at the top to start a new HPC server configuration.
HPC Servers Option
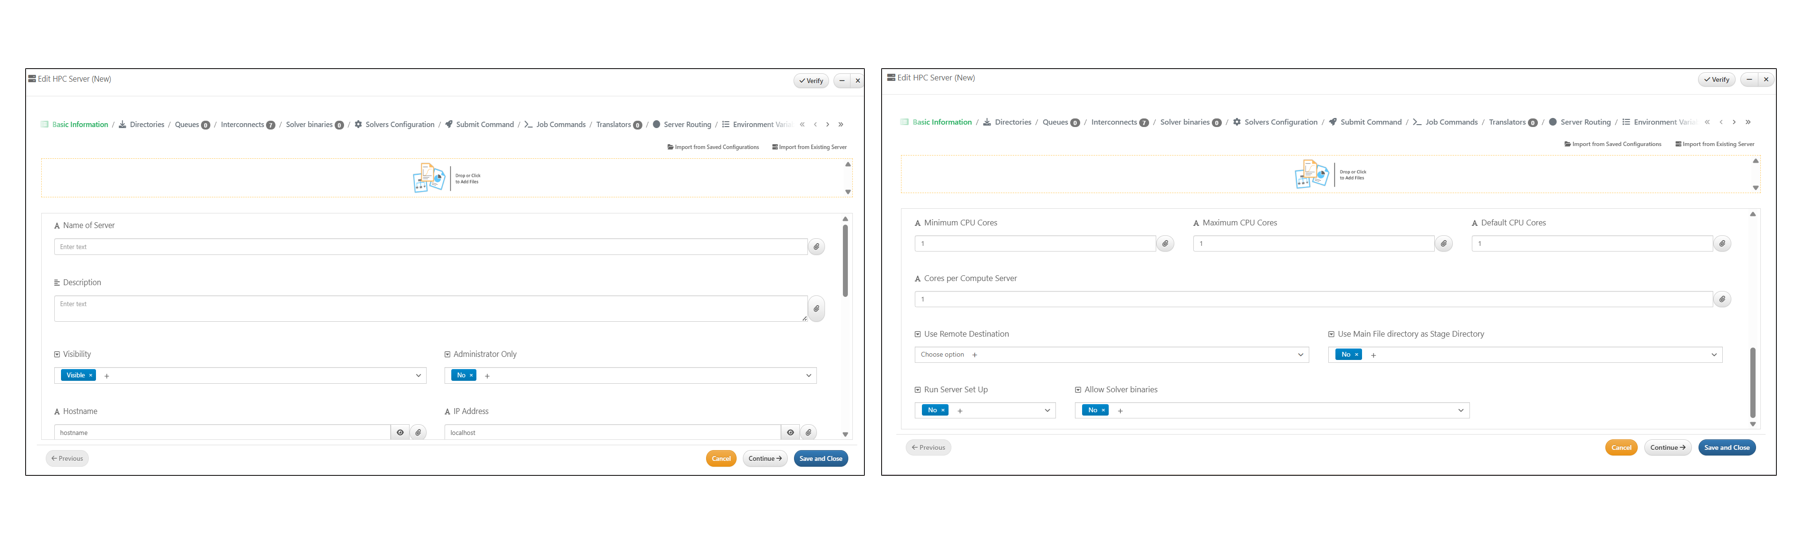
Basic Information
Two new options are available in the Basic Information section (top-right corner) to import data for creating HPC servers.
Two new options are available in the Basic Information section (top-right corner) to import data for creating HPC servers.
The available options are:
- Import from Saved Configuration Imports server details from a previously saved configuration.
- Import from Existing Server Imports server details from an already configured server.
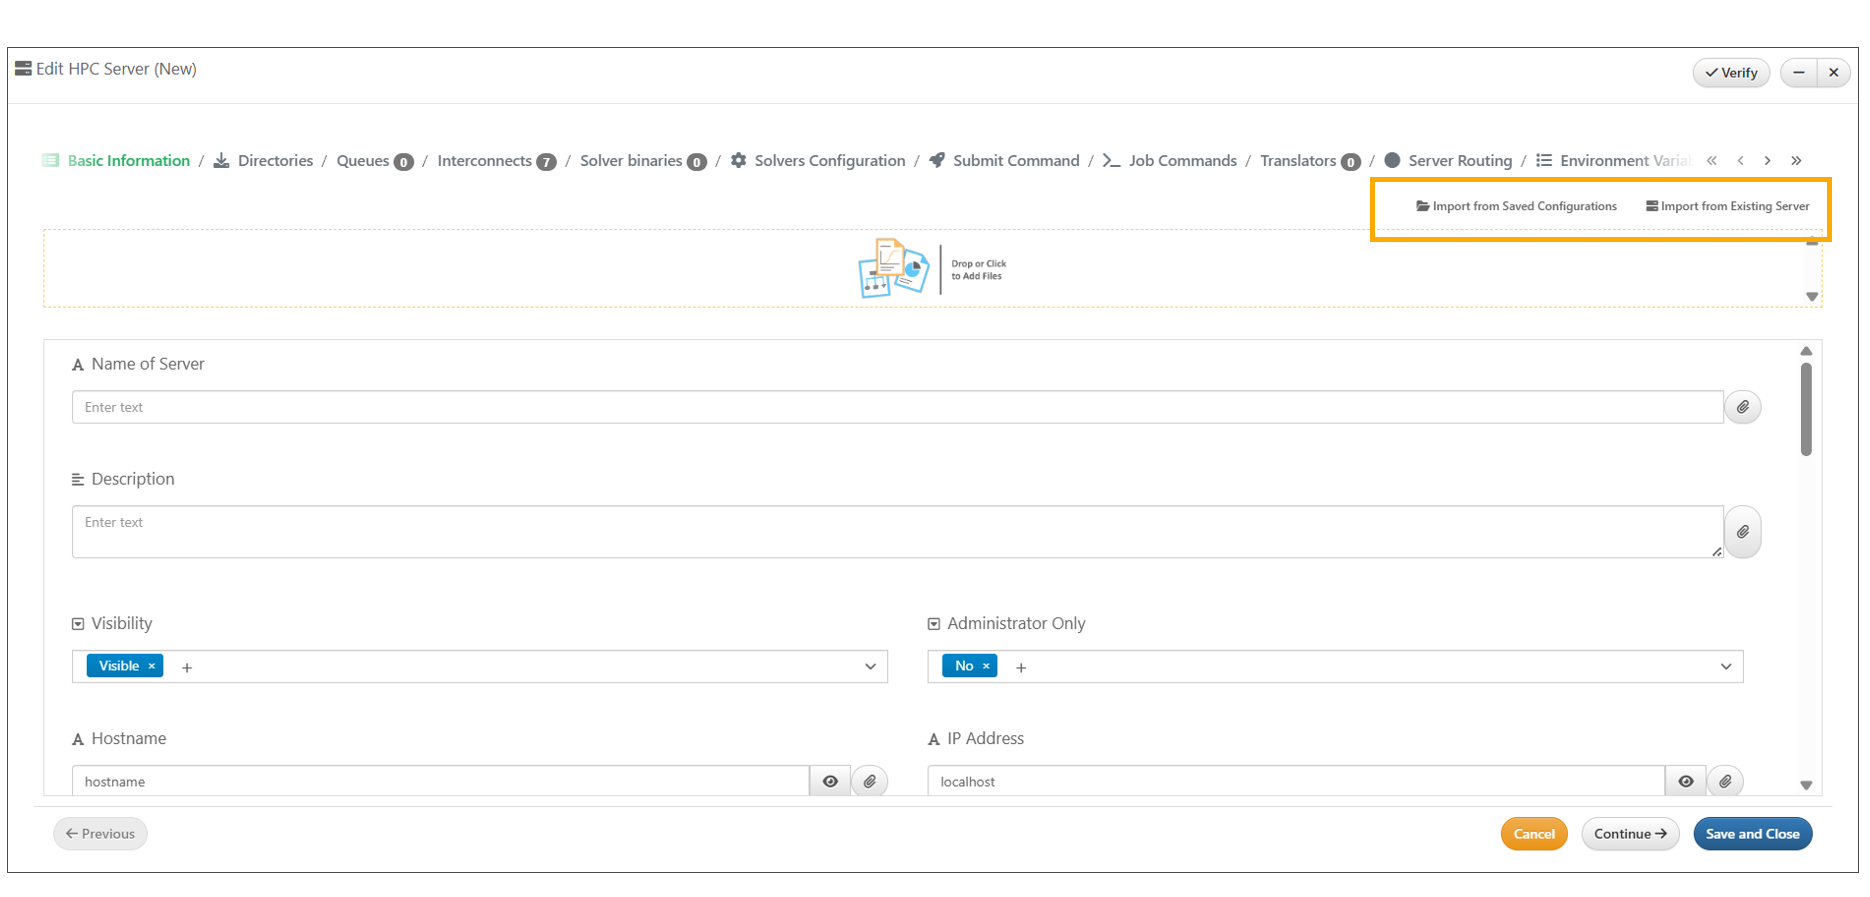
Basic Information Import Options
Fill details like Name of the server, Hostname, IP Address , Operating system, Scheduler, Scheduler Binary path, Min/Max and Default CPU cores, Cores per compute server and click on Next after adding information.
Basic Information
Directories
Provide the Lucy Folder path, Stage Directory path (where simulation data and files will be created), and Compute Execution Base Directory path for the HPC server, then click Next to proceed.
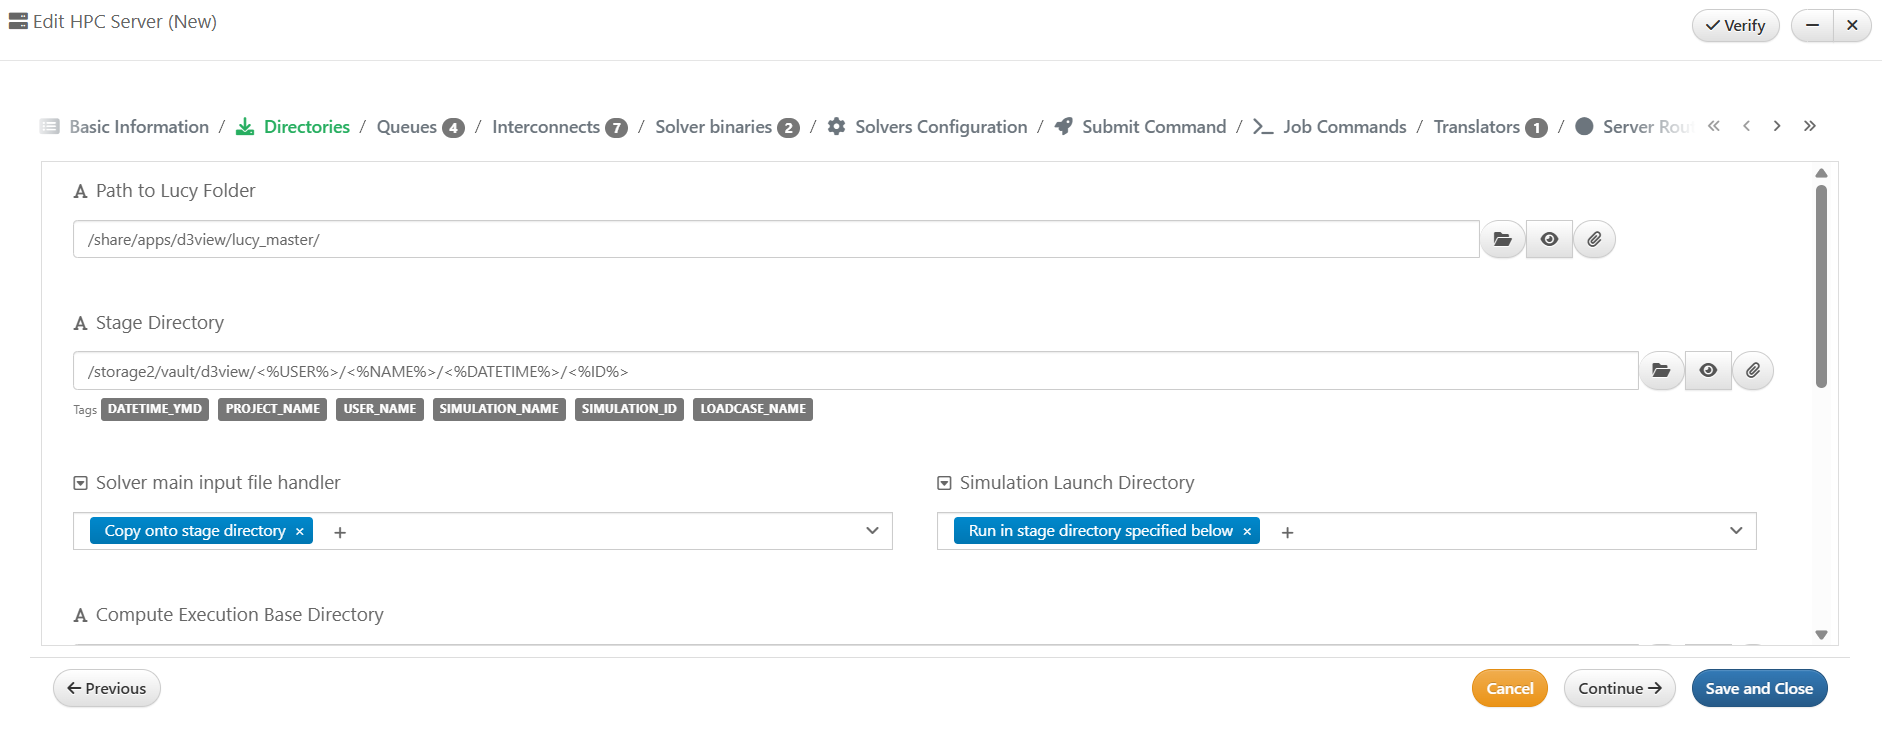
Directories
Queues
Add Queues with Cores information and proceed to next step
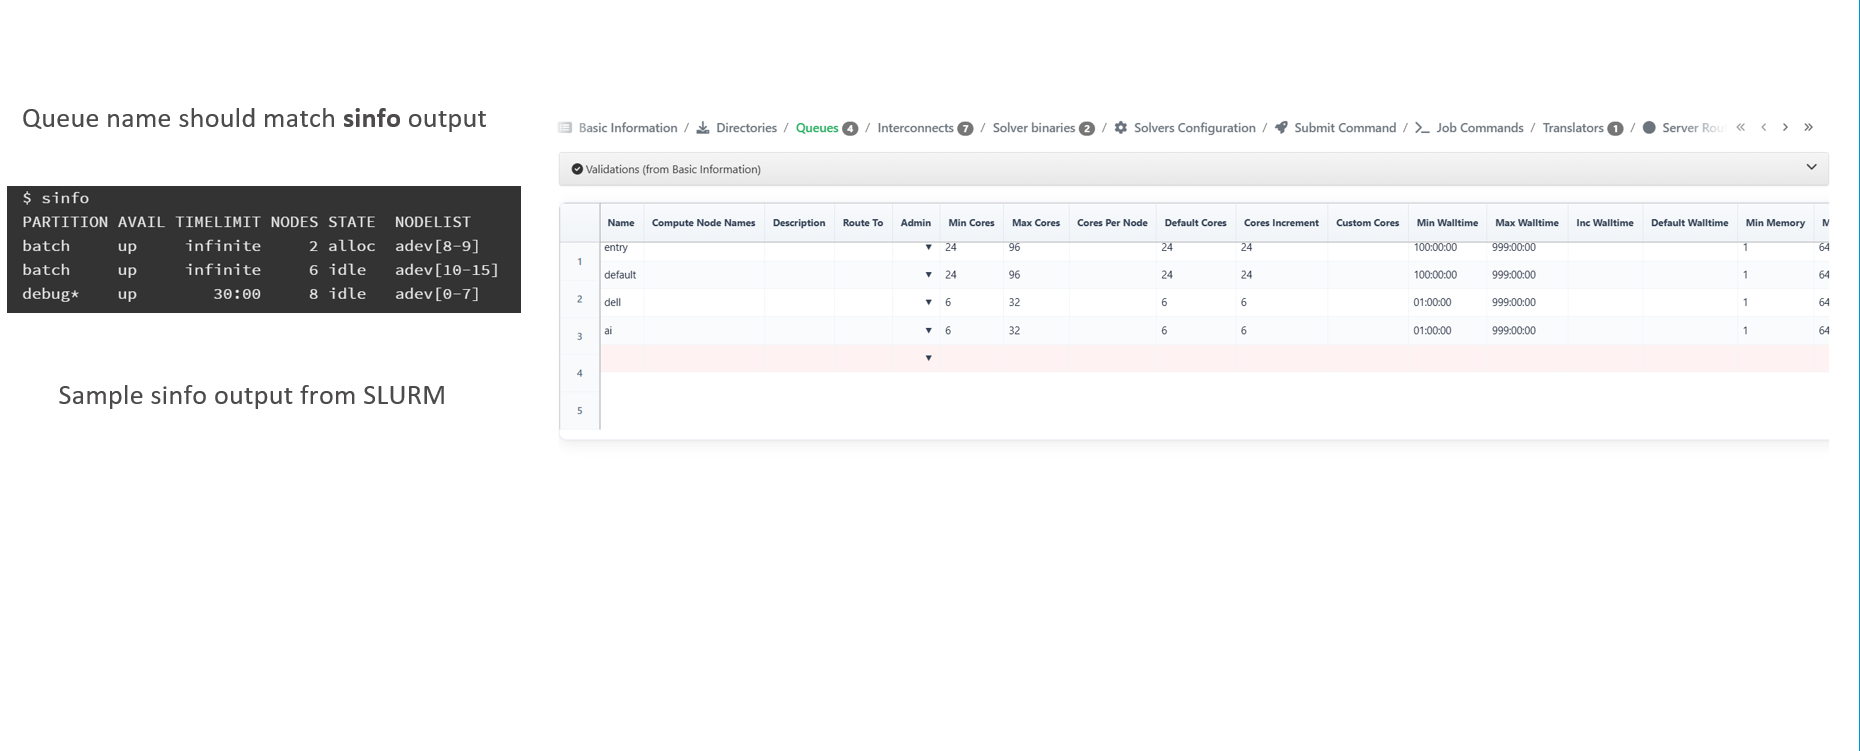
Queues
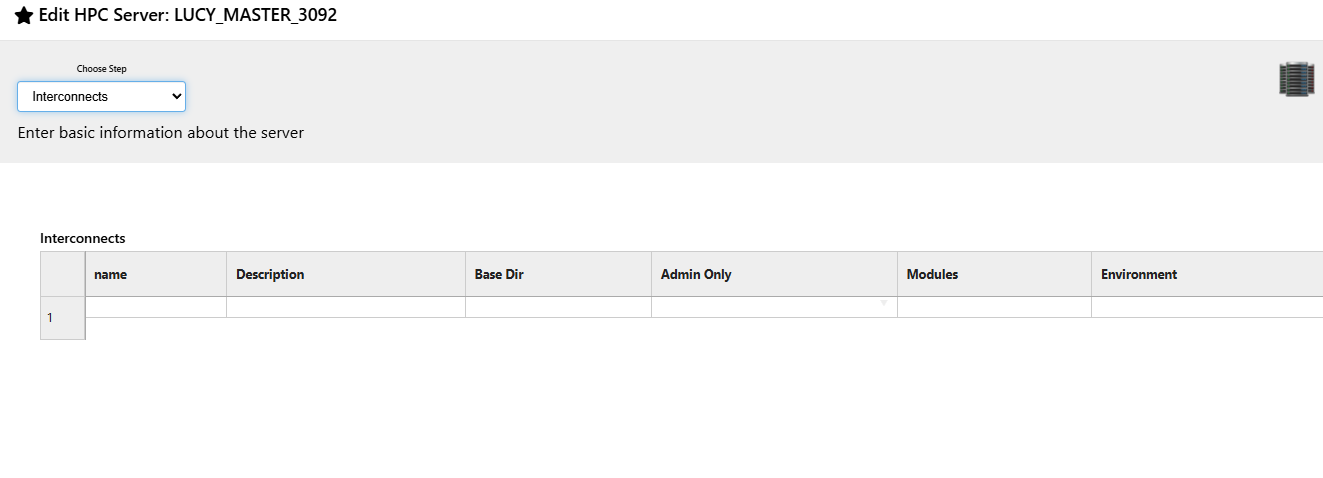
Interconnects
- Interconnects in HPC servers are high-speed networking technologies used to connect compute nodes within an HPC cluster.
- They enable low-latency and high-bandwidth communication between servers, which is essential for parallel computing workloads.
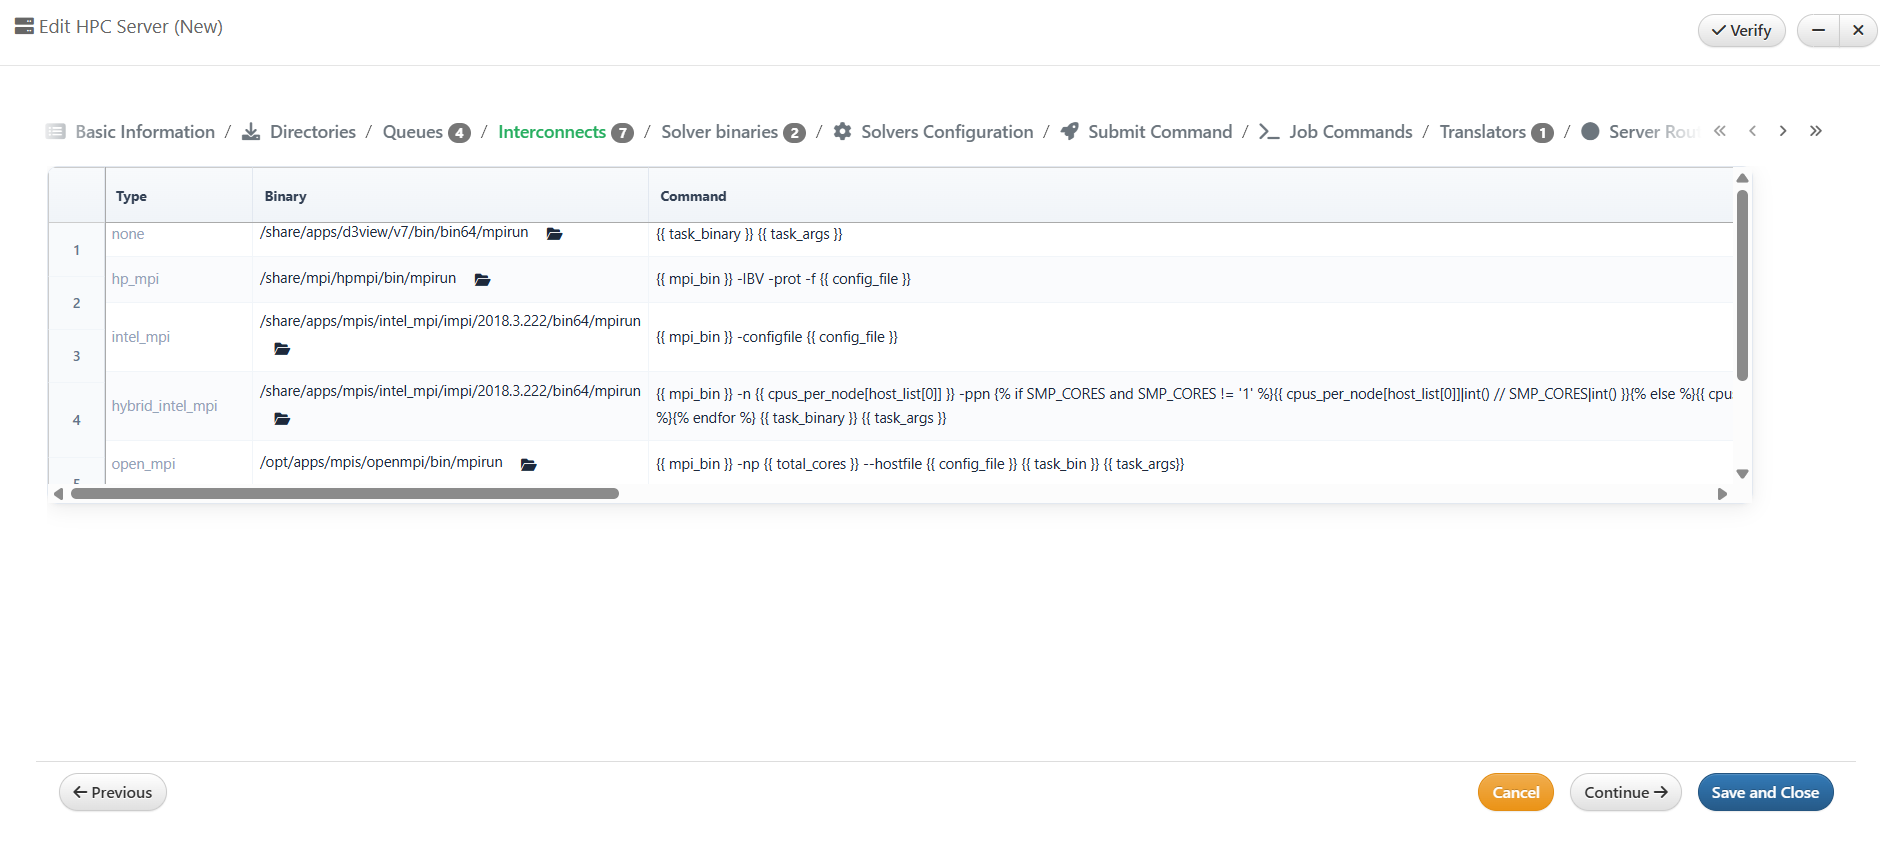
HPC Servers Interconnects
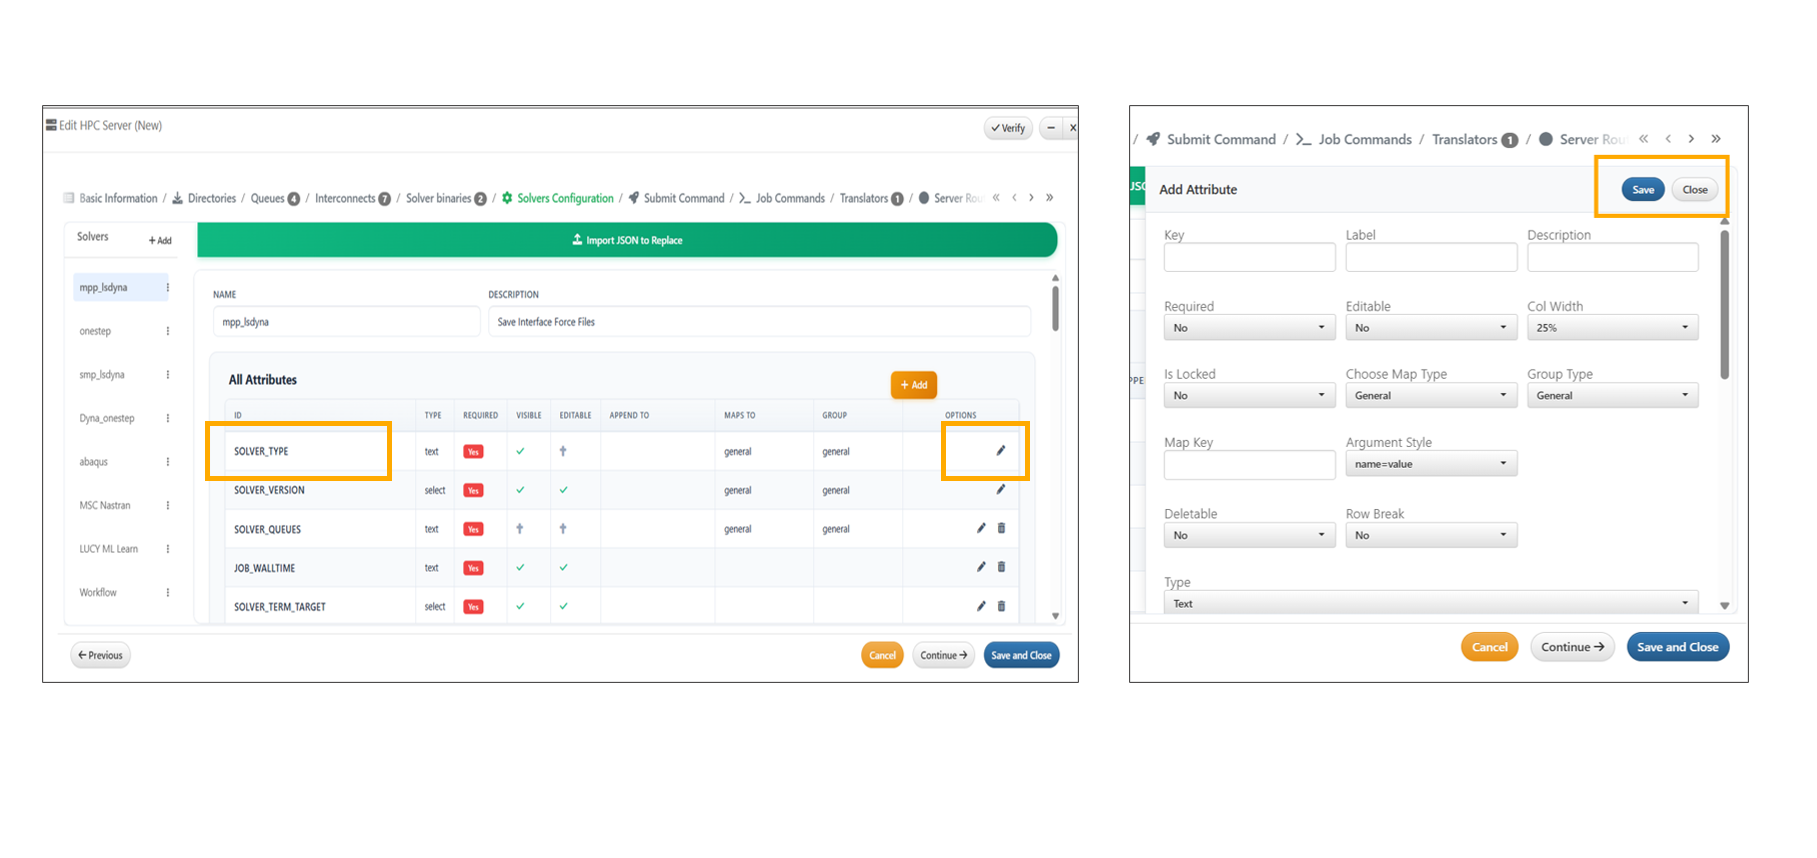
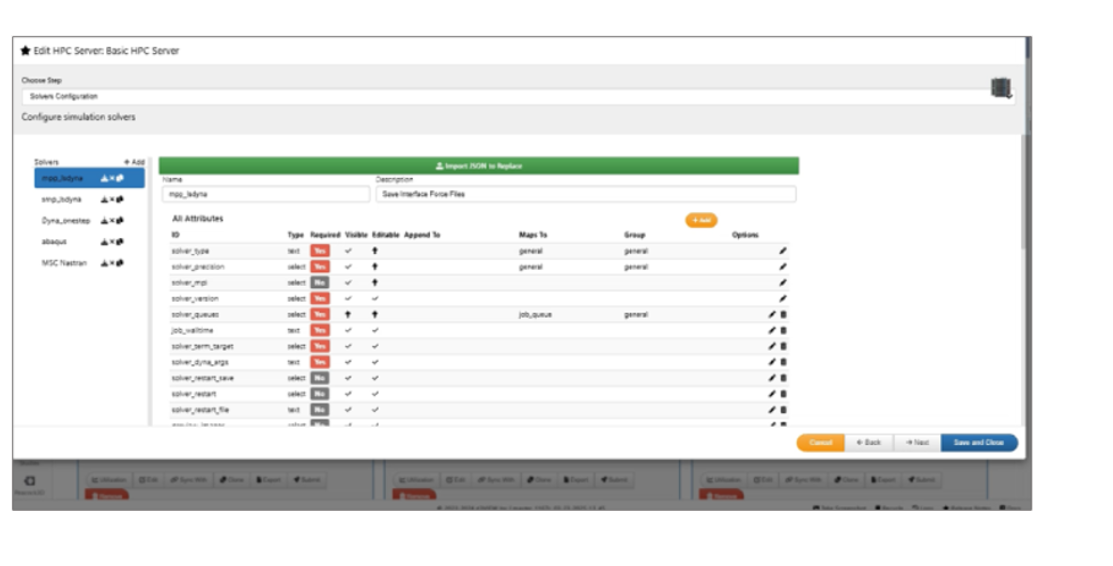
Solver Configuration
All Attributes are shown in this step, and each attribute can be edited using the edit icon available on the right side of the attribute. We can add new Attribute by clicking on Add button available in top right header
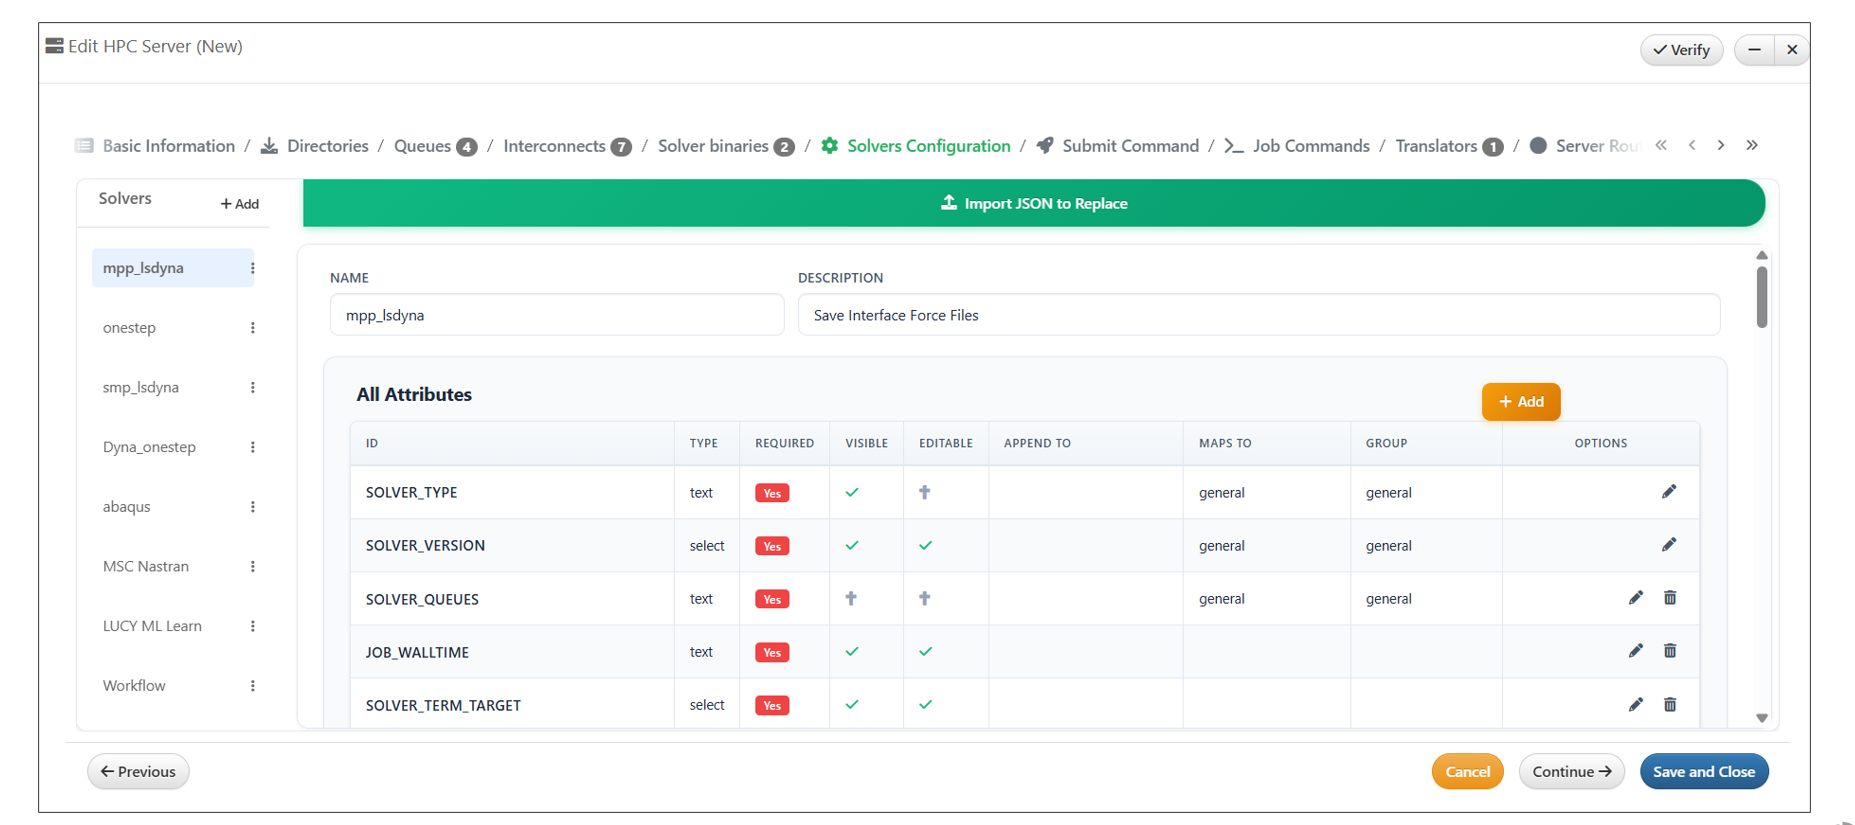
Solver Configuration
HPC Solver Configuration Upload
Solver configurations in HPC Servers can now be uploaded using JSON files and remain visible across navigation steps within the workflow.
Overview
This enhancement allows users to upload solver configurations in JSON format and ensures that the uploaded data persists while navigating between different steps, improving workflow continuity and usability.
Features
JSON Upload Support
- Users can upload solver configurations using JSON files
- Enables easy import of predefined or external configurations
- Reduces manual configuration effort
Configuration Persistence
- Uploaded configurations remain visible when navigating between steps
- Prevents loss of data during step transitions
- Ensures a smoother and more reliable user experience
Adding an Attribute
Add information in the attribute inputs and click on apply changes at the end to save the attribute
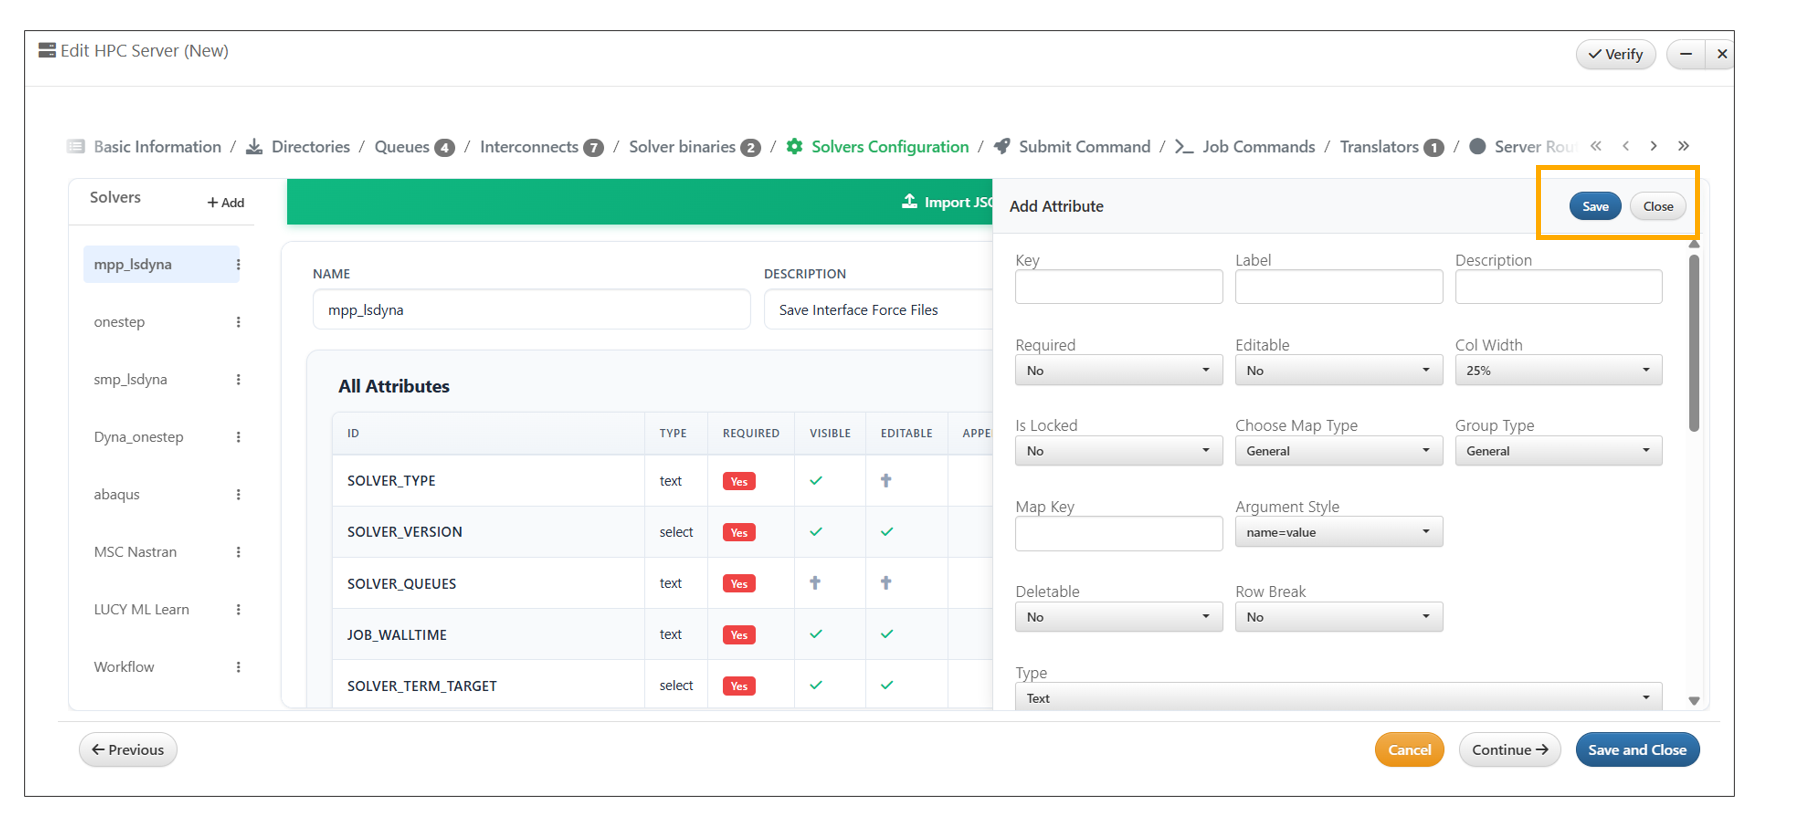
Adding an Attribute
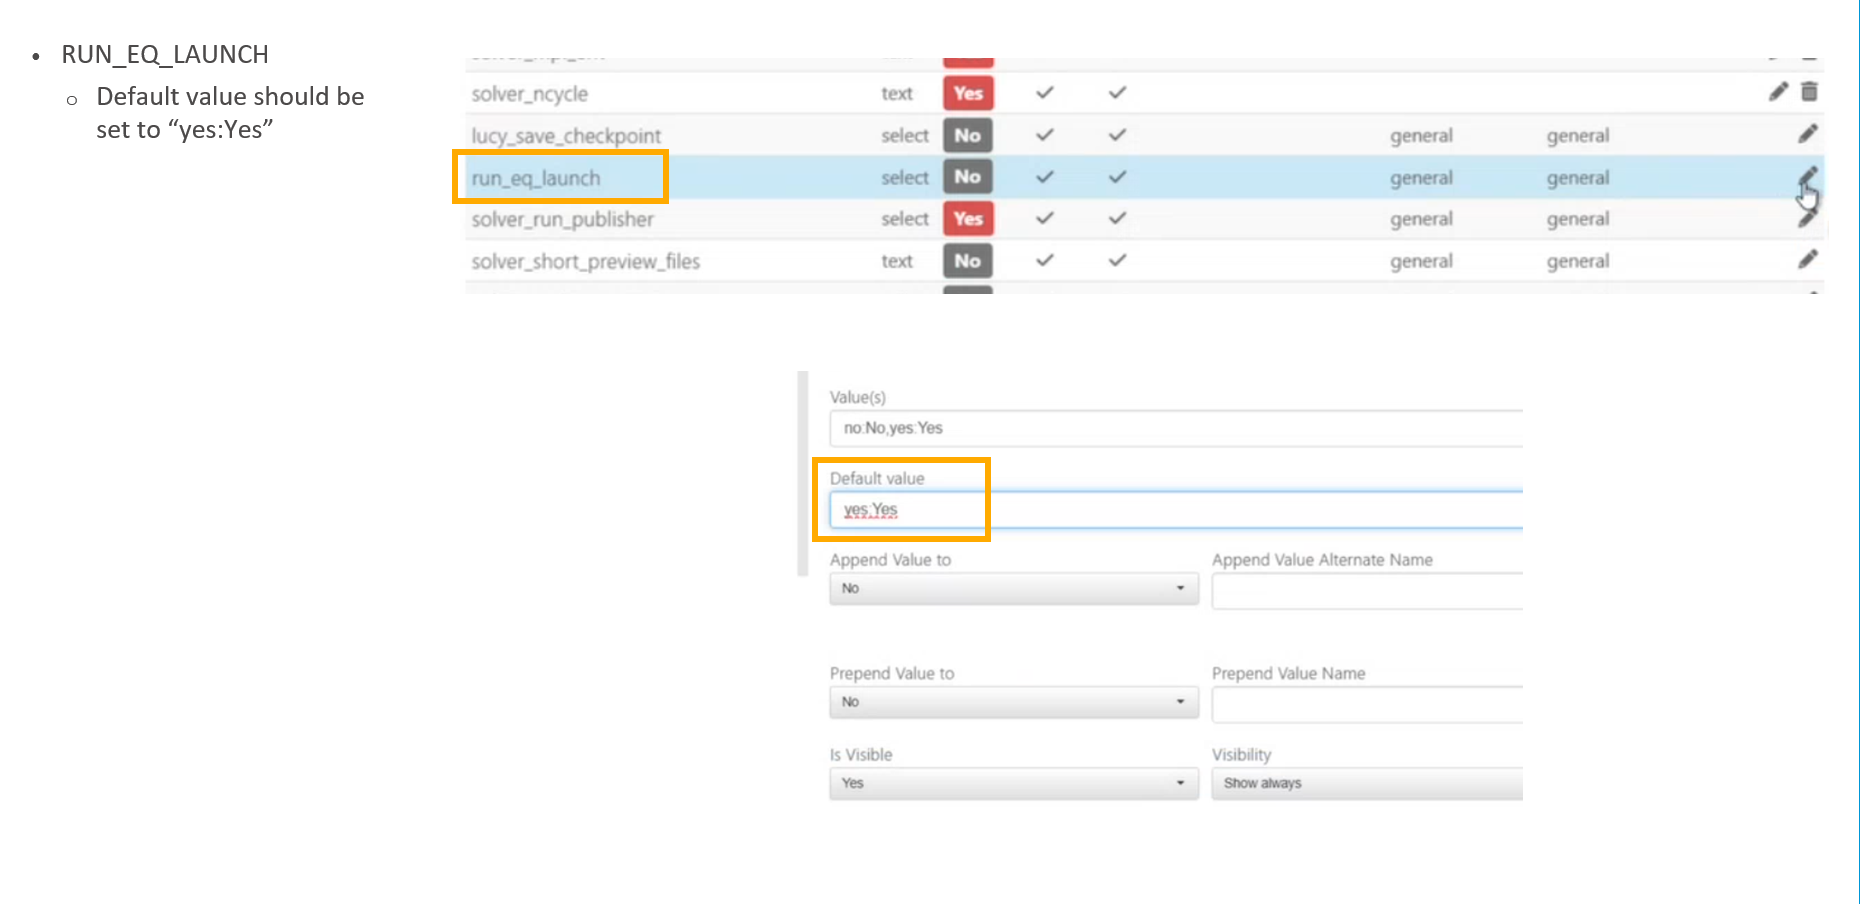
Edit Solver_Version
Click Edit icon to edit “solver_version”. The value provided need to match the version names in the LUCY.JSON file
Editing an Attribute
Solvers configurations
Solvers configurations
Submit Command
Add Submit command and Submit template information and proceed to next step

Submit Command
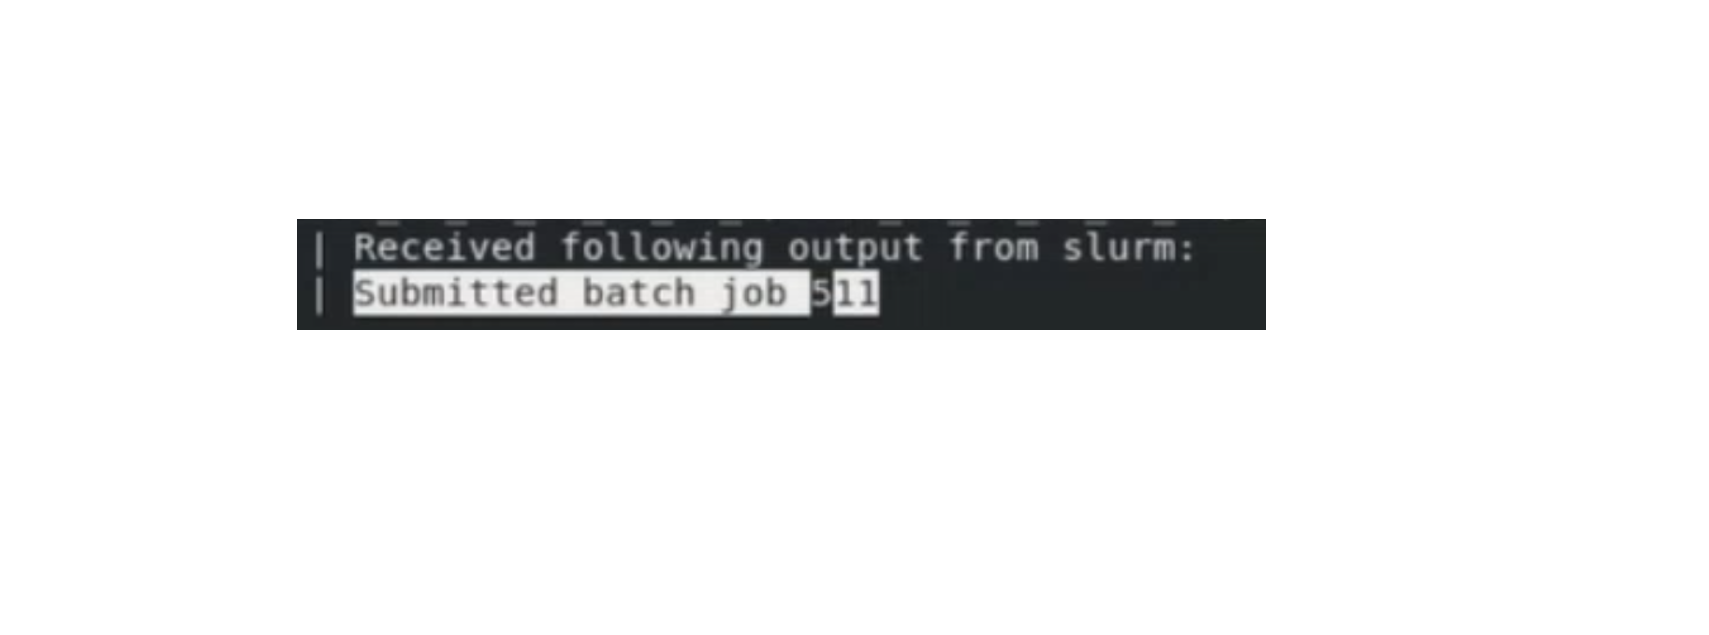
Key or Regular Expression for JOBID Extraction Submitted batch job (d+) This pattern should match the Slurm output
Submit Command
Job Commands
Provide all required JOB commands that are helpful in submitting a Job and proceed to next step
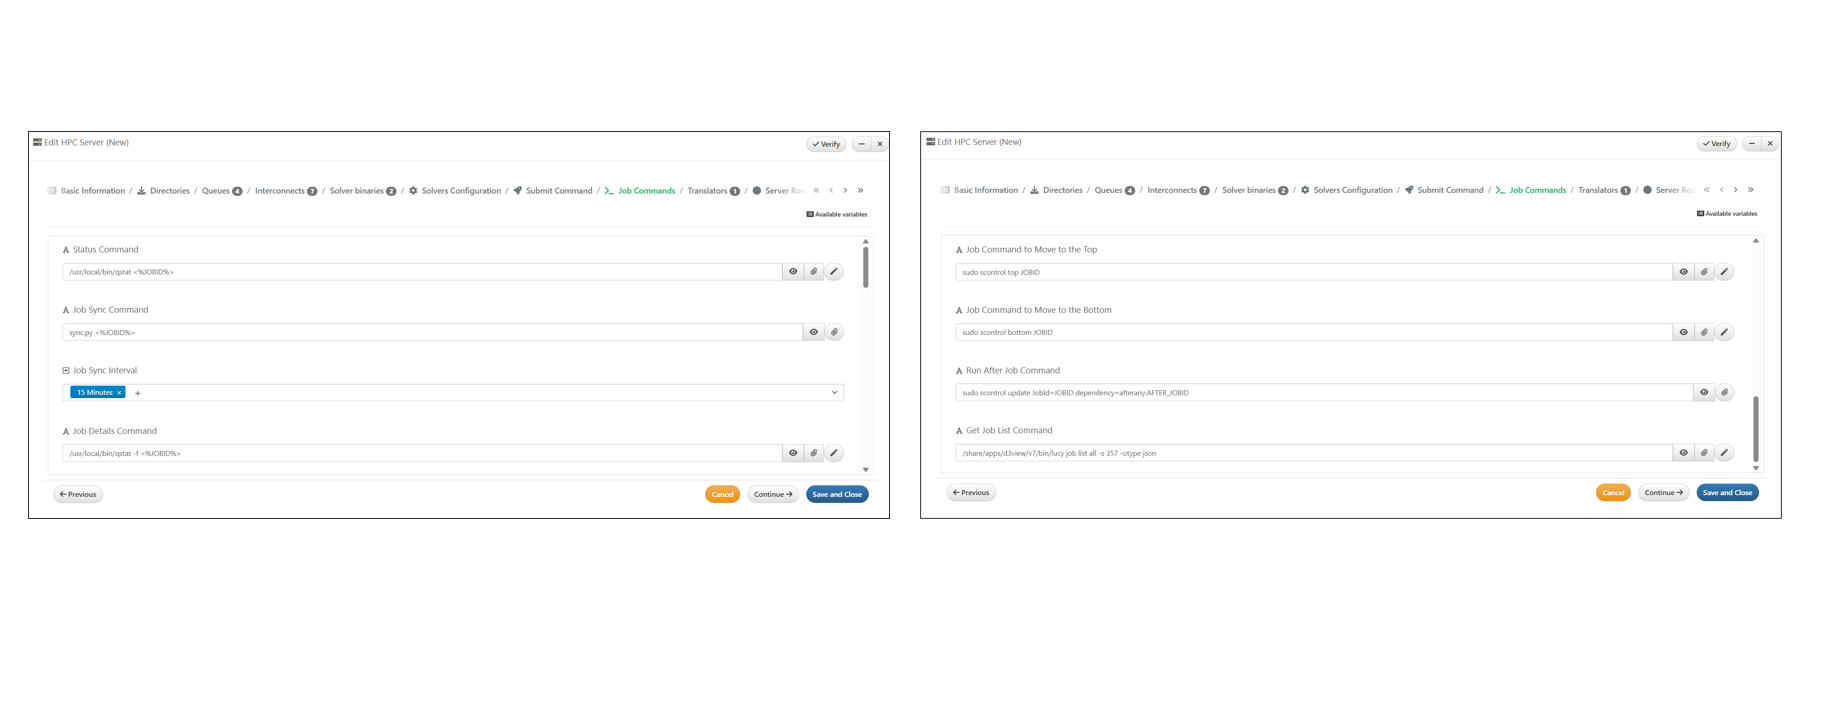
Job Command
Server Routing
Next, we can navigate directly to Server Routing step and Provide Routing policies.
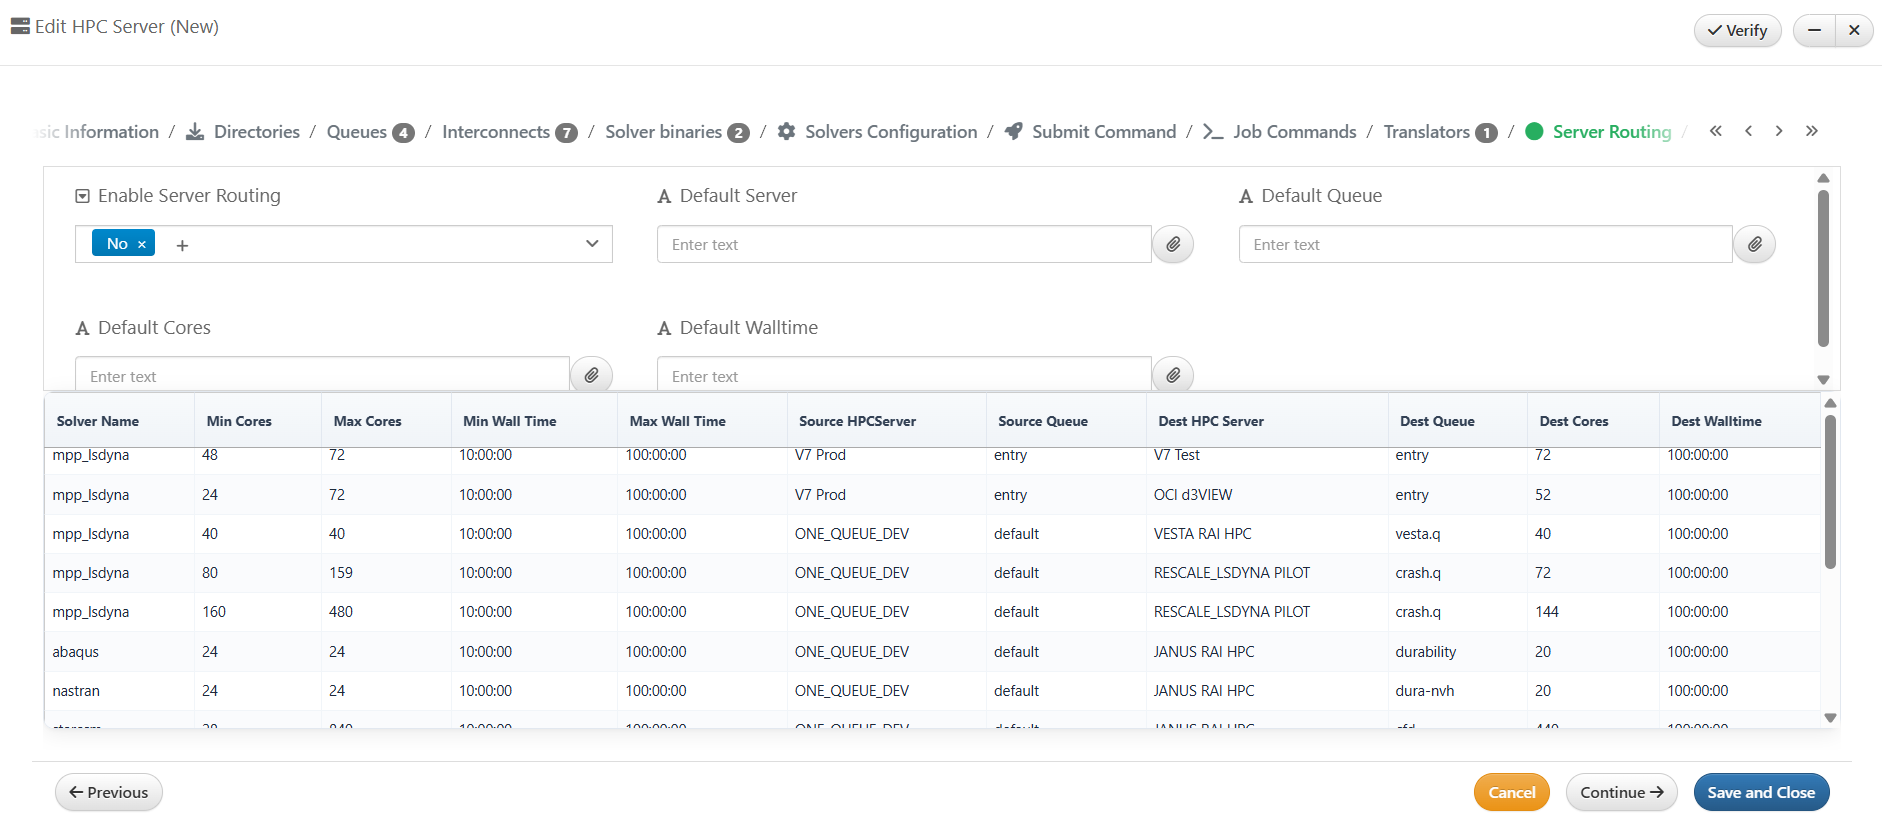
Server Routing
Environmental Variables
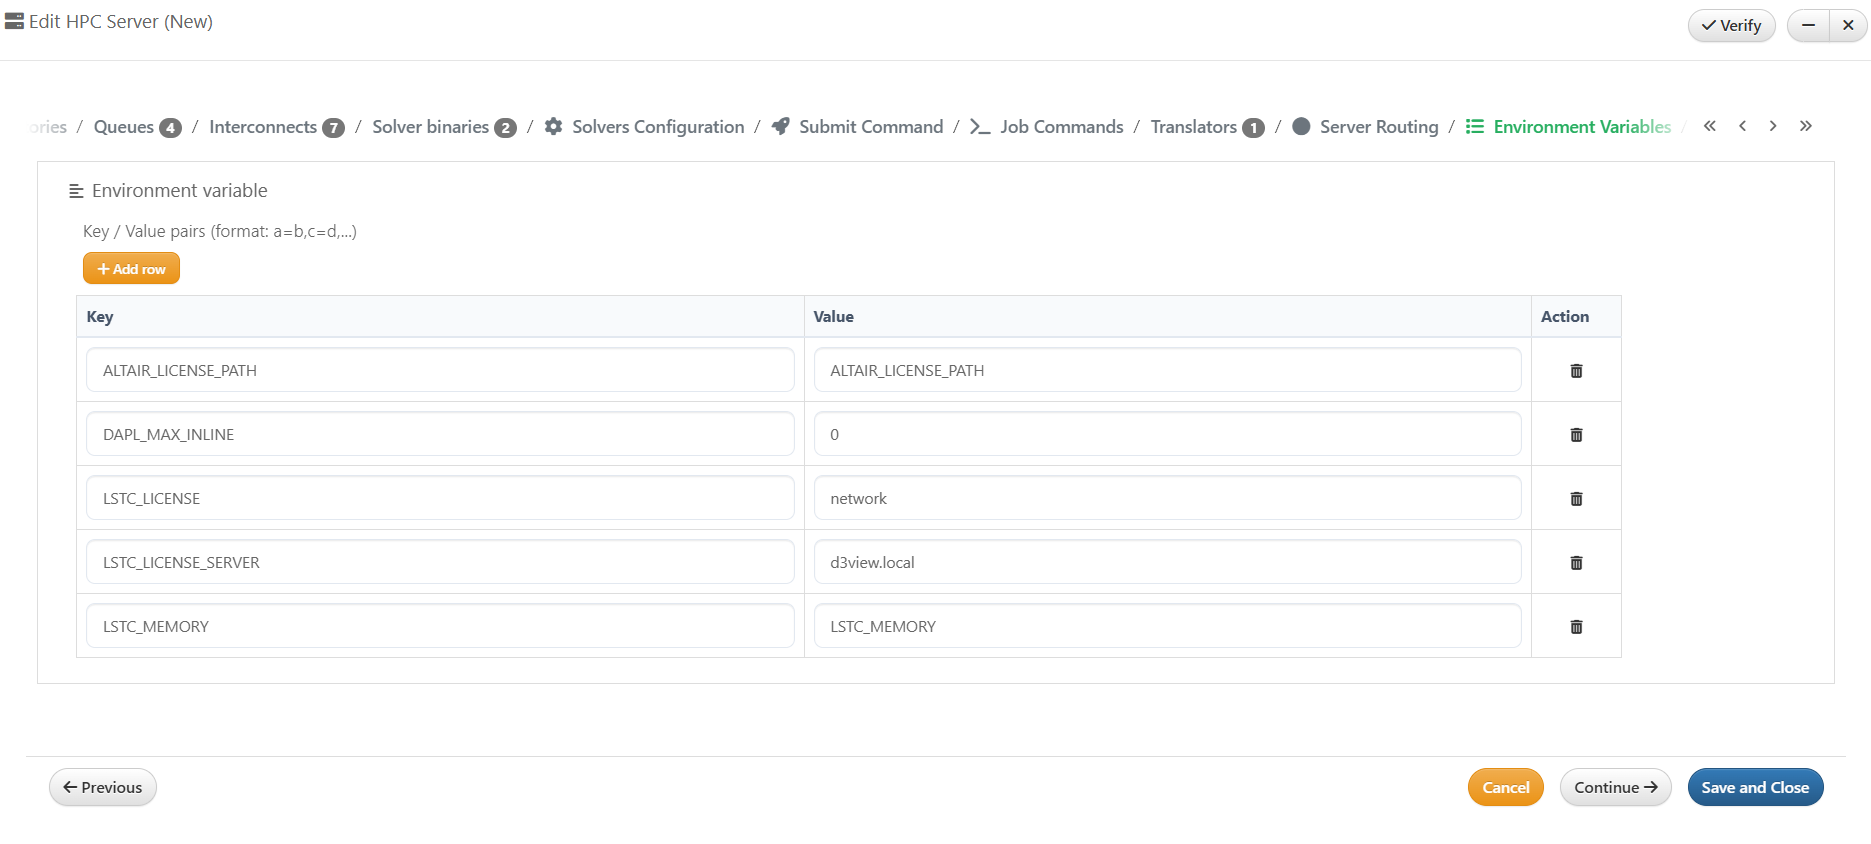
Environmental variables
File Browser
Go to the File browser step and add Browser remote and Transfer commands and click on next step
File Browser
Submit Hosts
Add the Submission Hosts information and proceed to next step
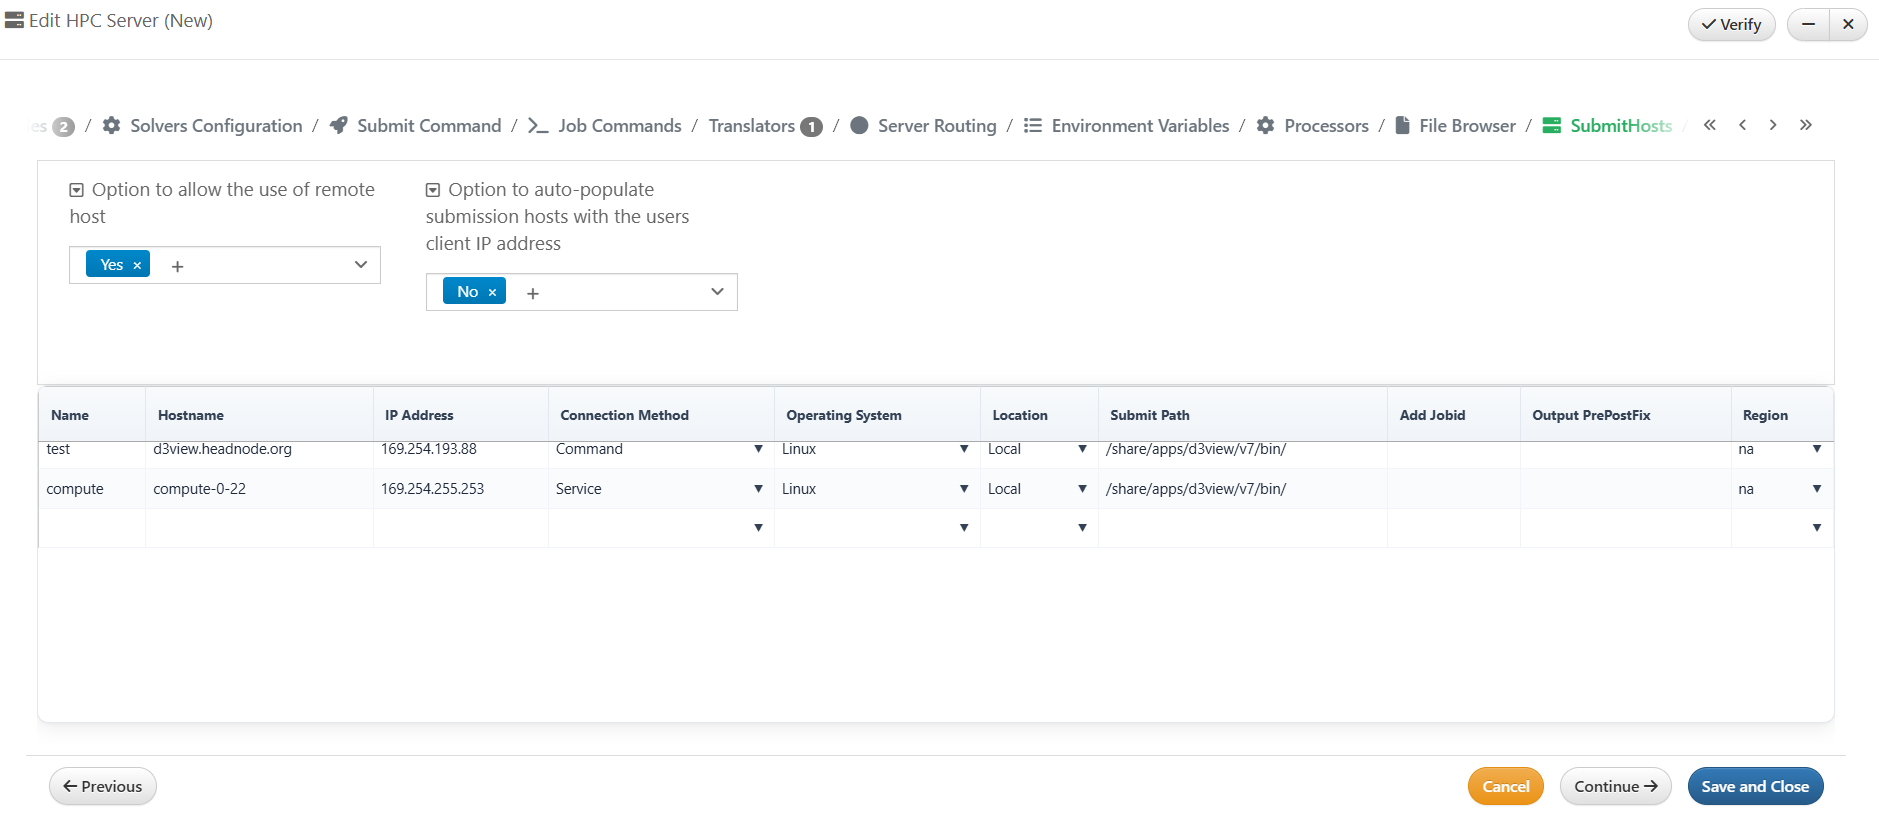
Submit Hosts
Regions
In Regions step, the user can configure the regions information
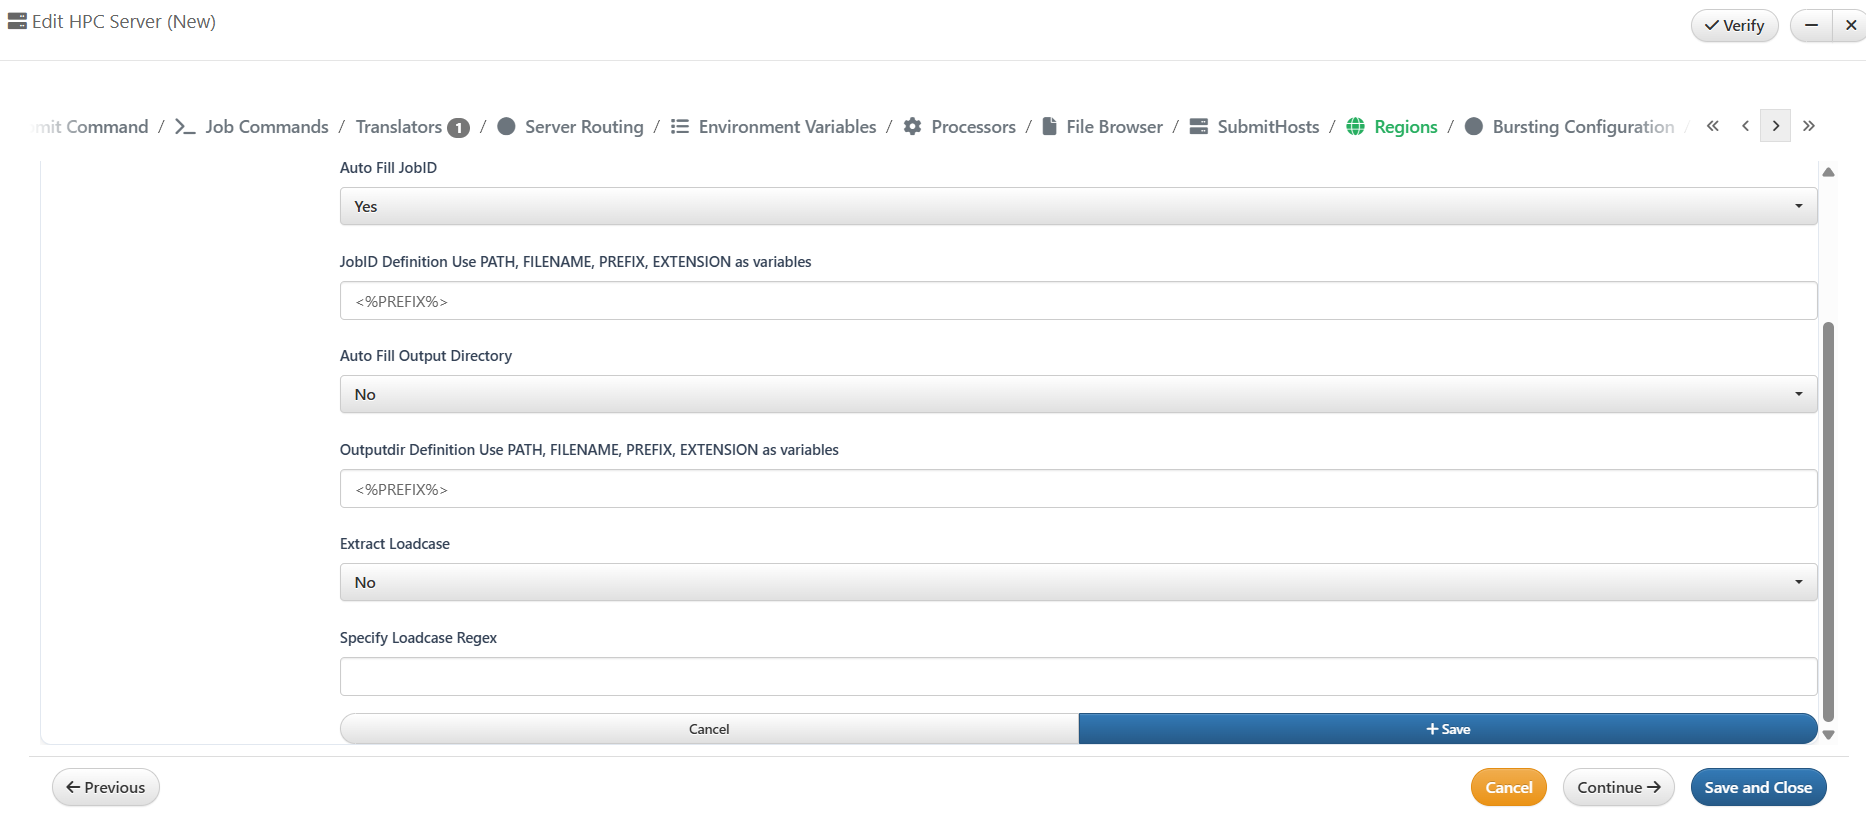
Regions
Bursting Configuration
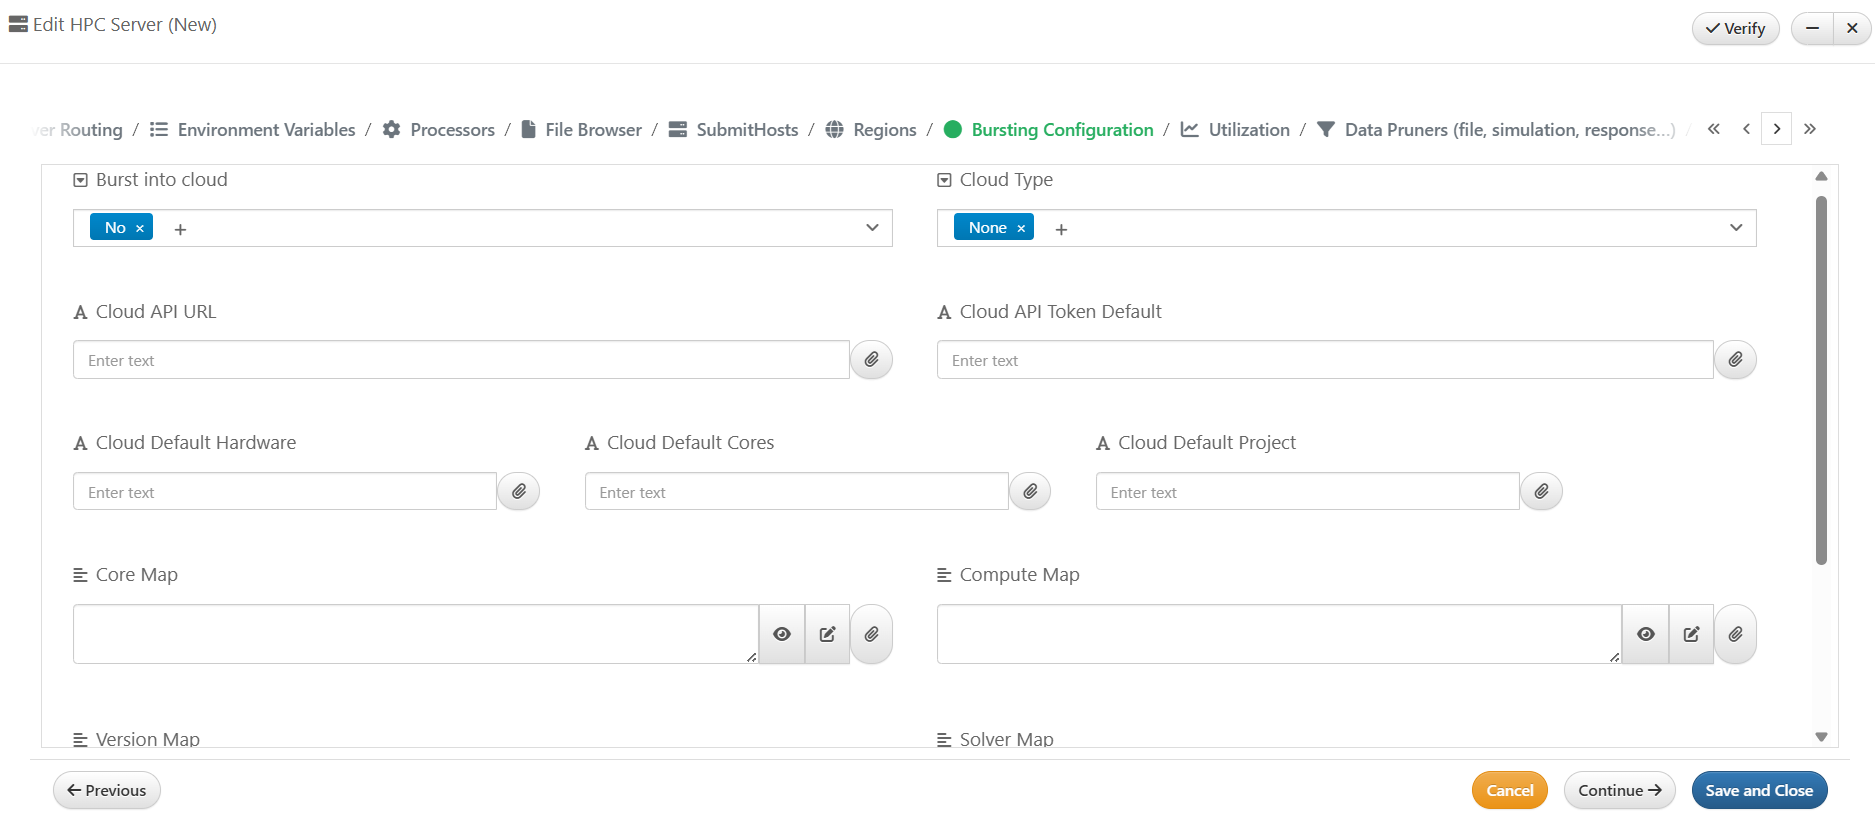
Bursting Configuration
Utilization
Provide the paths for the storage of server usage information
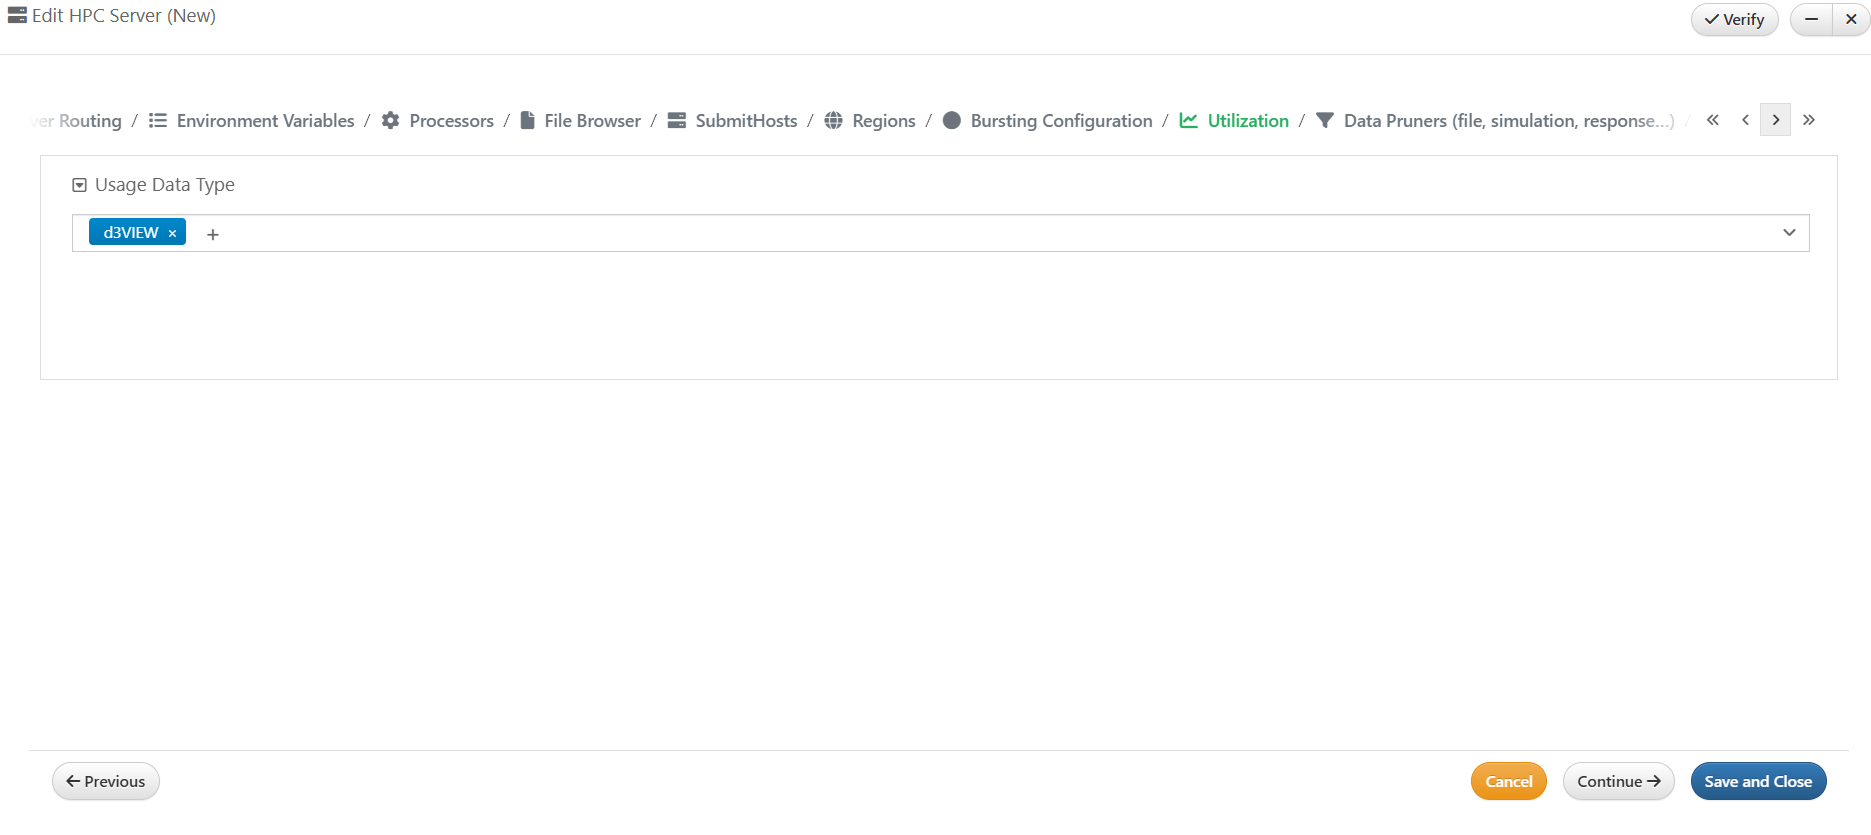
Utilization
Data pruner types
Add File Pruner Definitions and proceed to next step
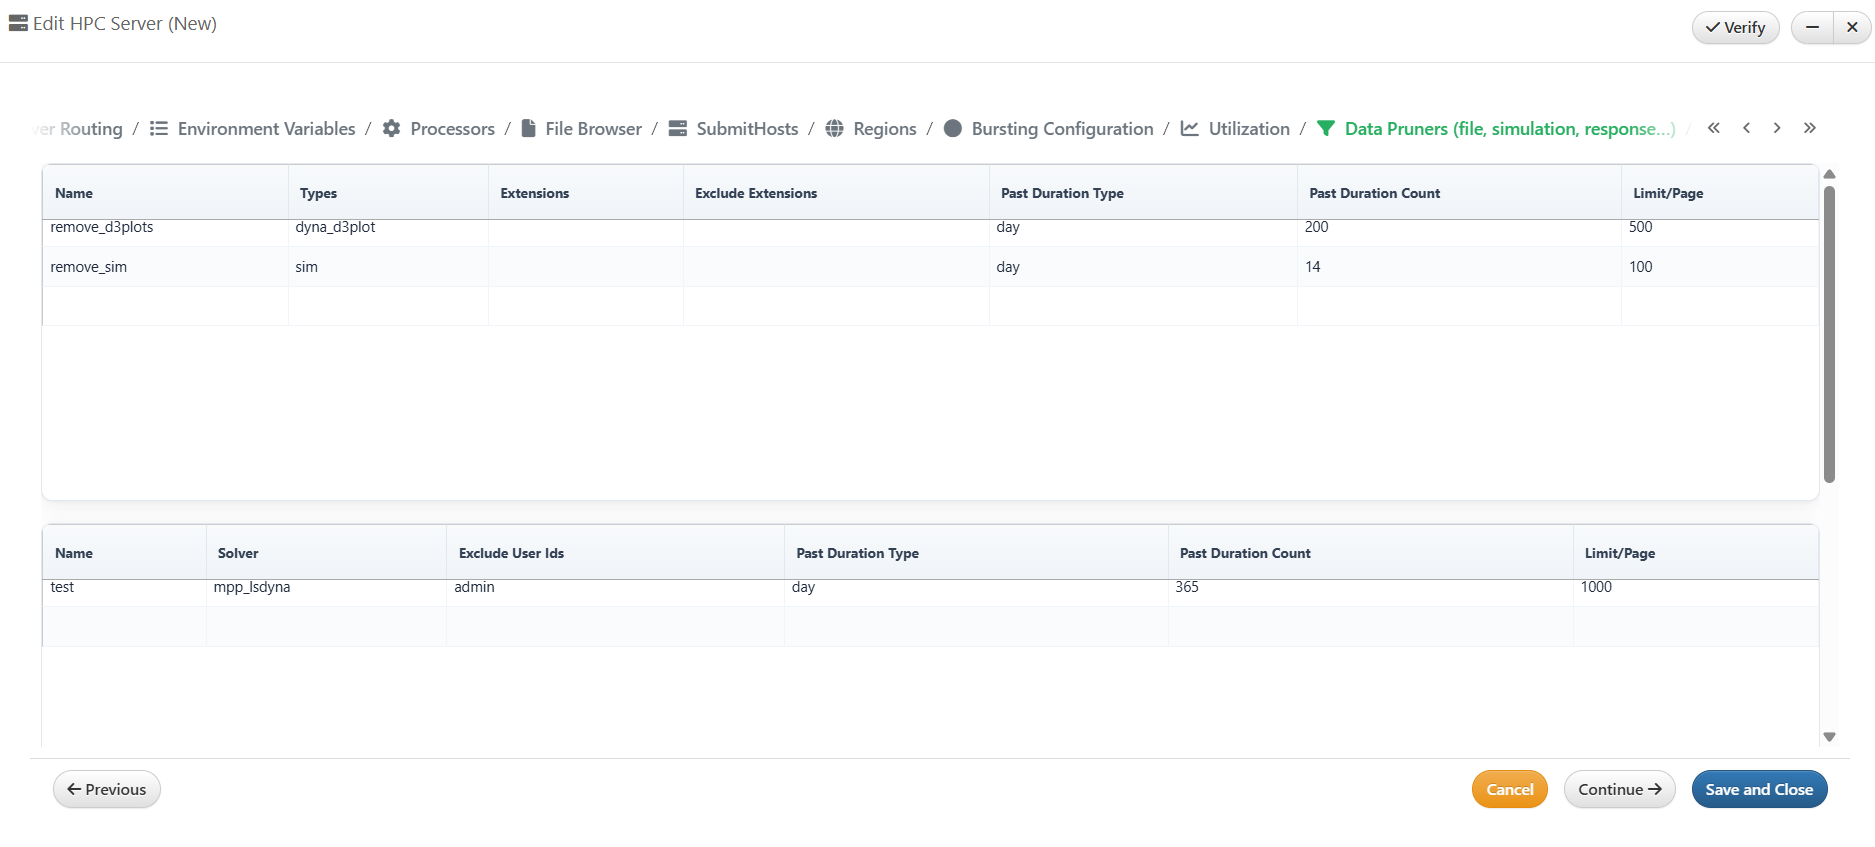
File pruner types

File pruner types
General settings
The Last Step is the Include the general settings as per the users required and click on Save and Close button
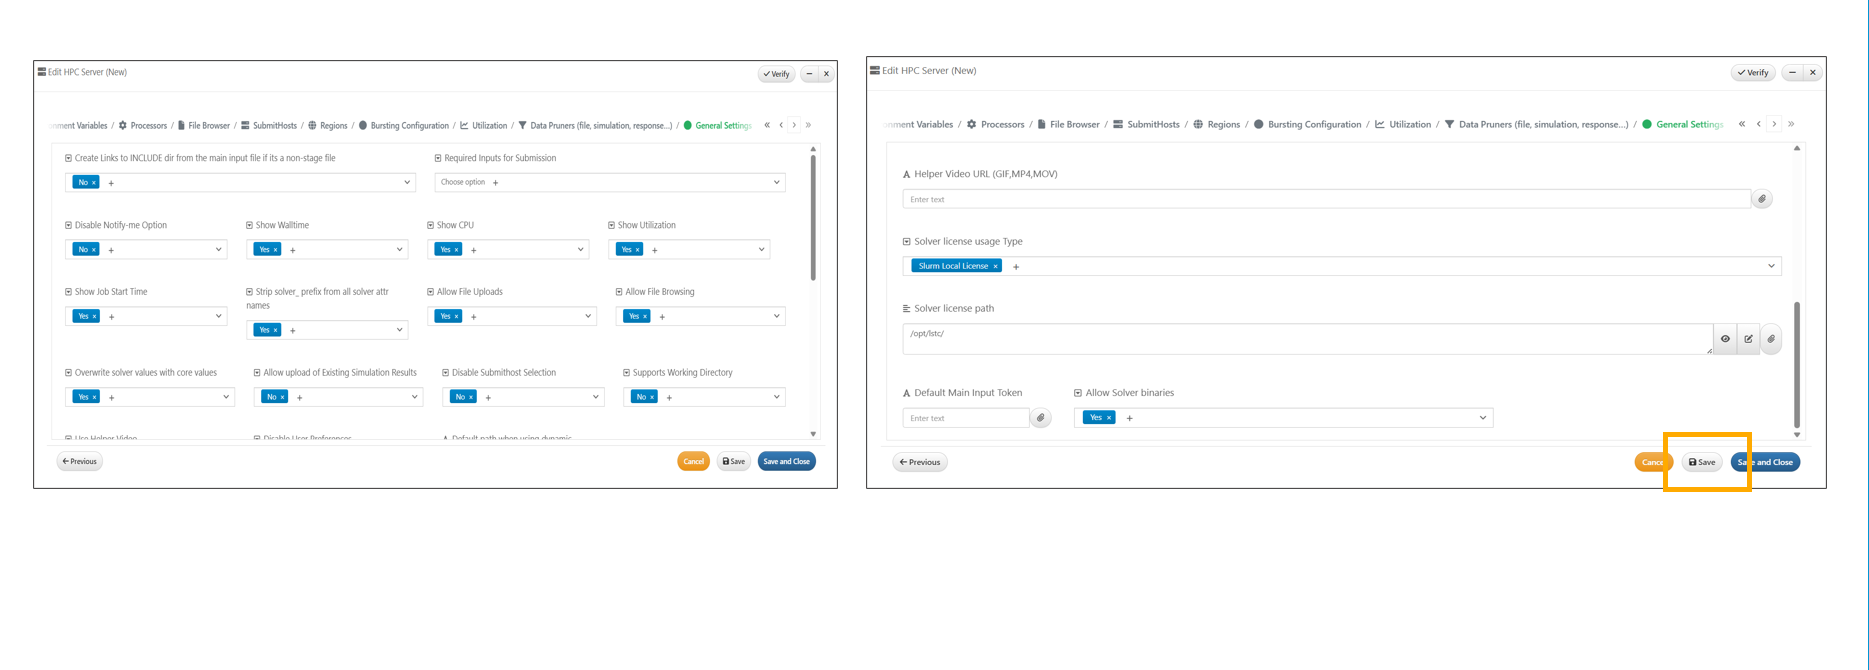
General settings
HPC Server saved in Home page
HPC Server saved in Home page
LUCY JSON File Configurations
Update URI, PORT and “lucy_scratch_dir”
lucy_scratch_dir is specified lucy dir. The system LUCY should be in the d3VIEW_INSTALL_Dir/lucy/
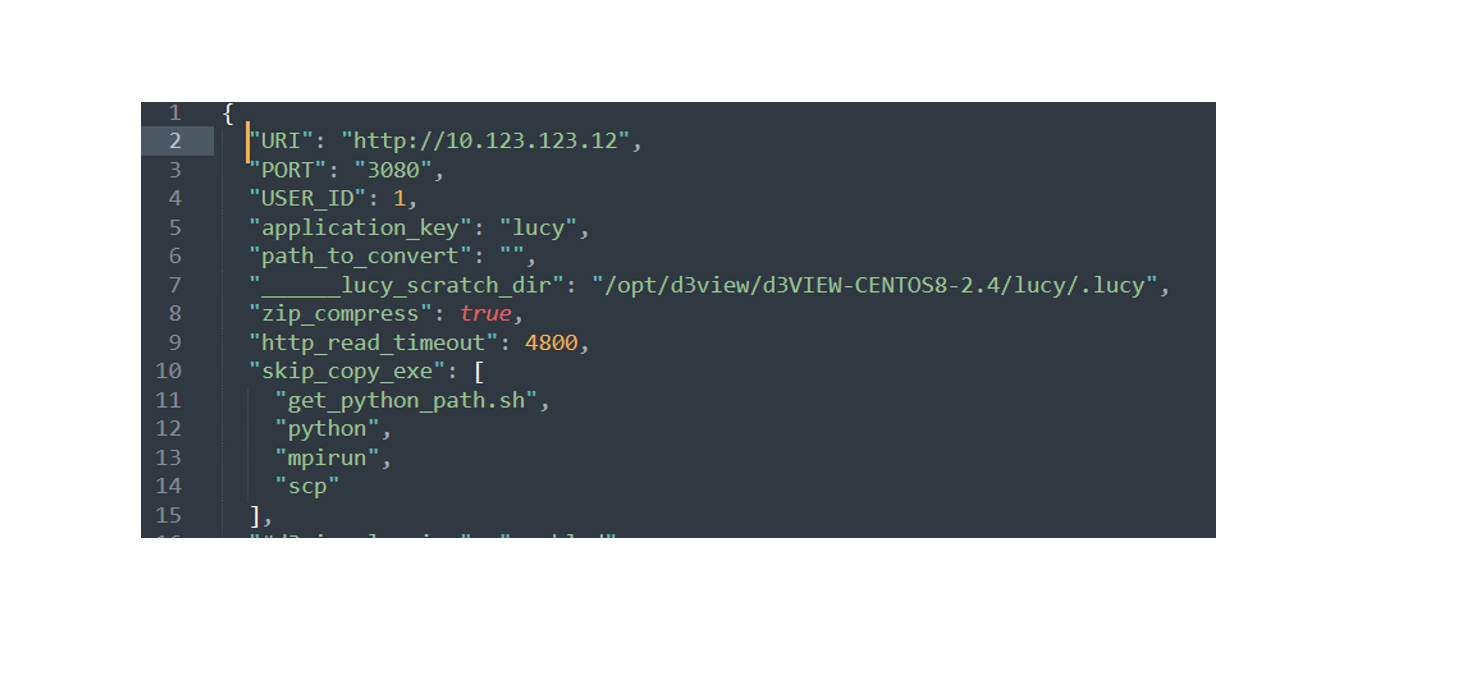
lucy_scratch_dir
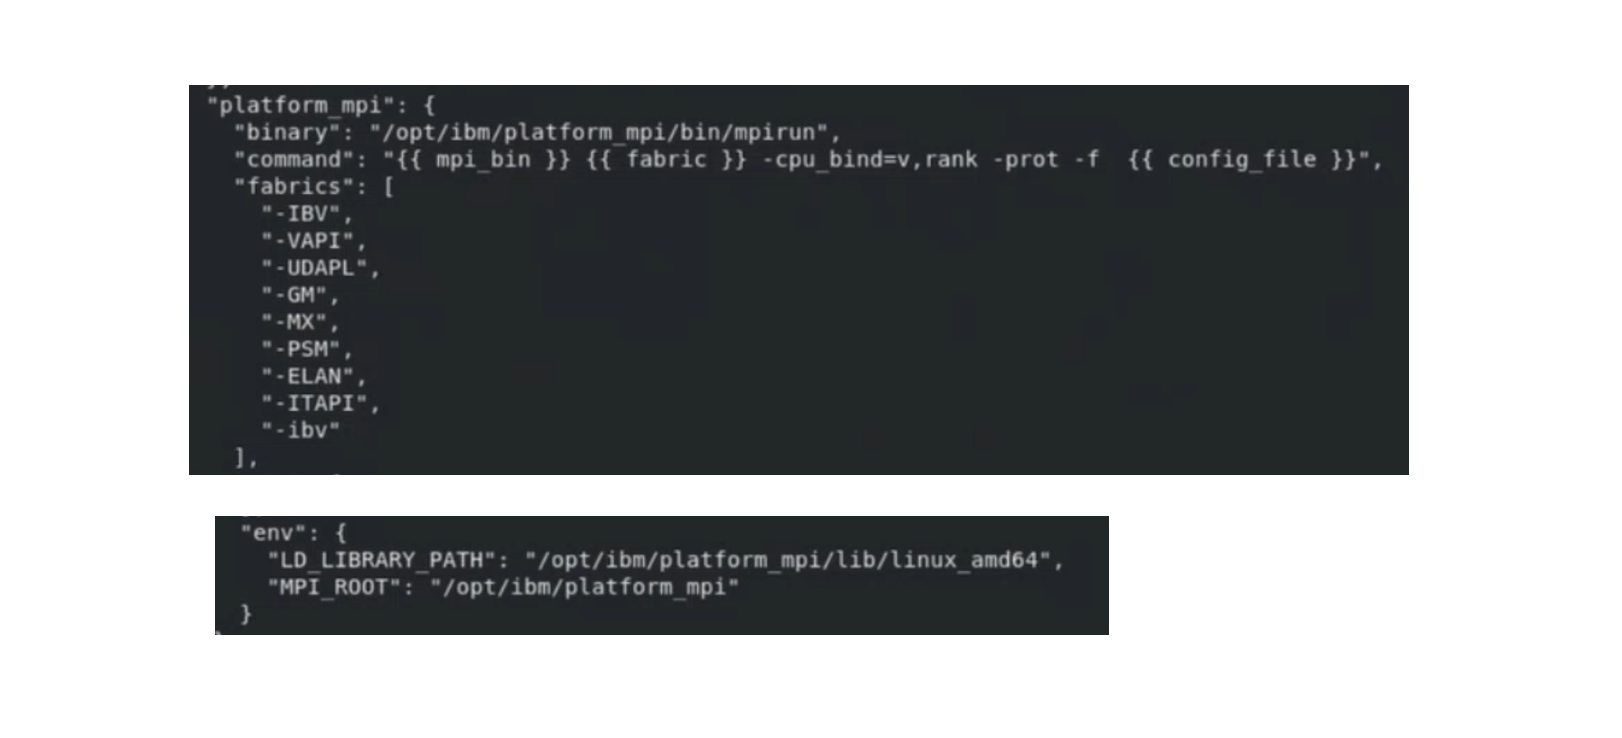
Update mpi paths
Using “Platform_mpi” as an example, we need to provide the correct mpirun path. We also need to provide the correct path for LD_LIBRARY_PATH and MPI_ROOT path in the “env”
Update mpi paths
Create LSDYNA version
Create a new version for LS-DYNA. We need to provide correct path for binary and post_bin. We also need to provide the correct “mpi_type
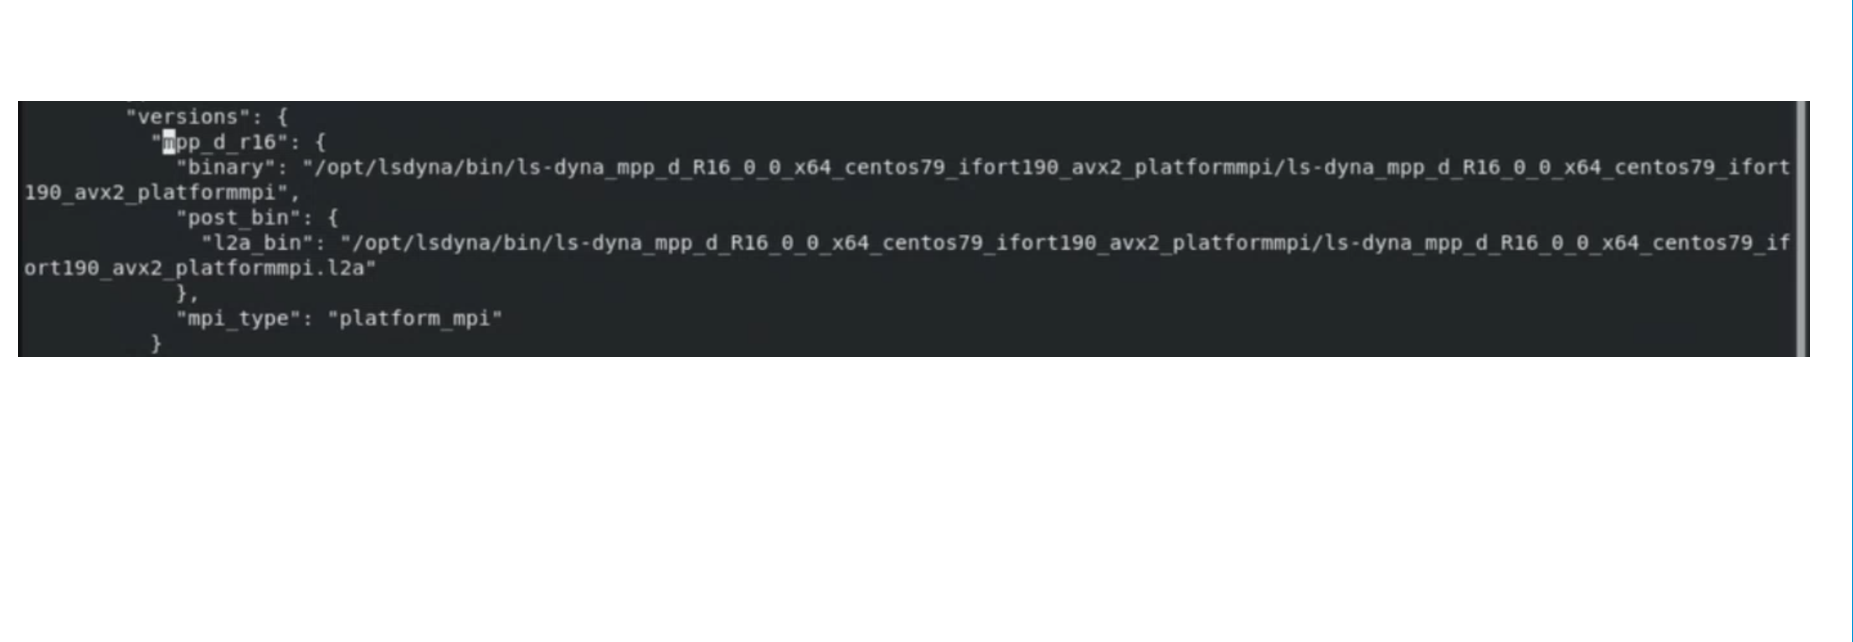
Create LSDYNA version
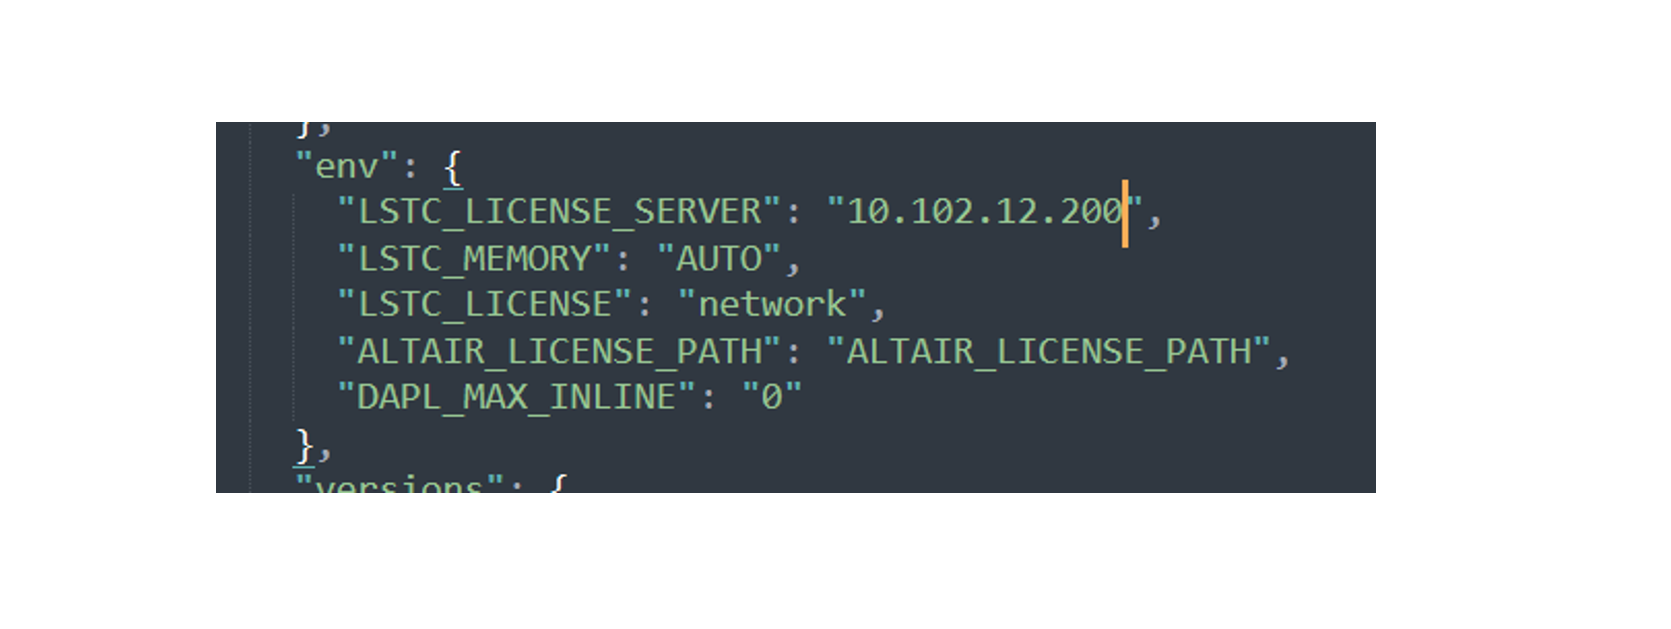
Update LSTC_LICENSE_SERVER
Update LSTC_LICENSE_SERVER in the “env” under LSDYNA
Update LSTC_LICENSE_SERVER
Floating Bar with options
HPC Servers page supports multi-card selection: drag-selecting server cards shows a floating bar with selected count, Compare, and Clear Selection buttons. Using Compare with two or more servers opens the Turings comparison dashboard.
Edit HPC Server
Click on ”Edit” next to a server thumbnail to update its settings.

Figure 20: Edit a HPC Server
The default solver in HPCSERVER now has all necessary attributes. All the newly created servers will have these attributes by default.
Attributes
Column width of an attribute can be edited and saved to HPCserver in server settings option.
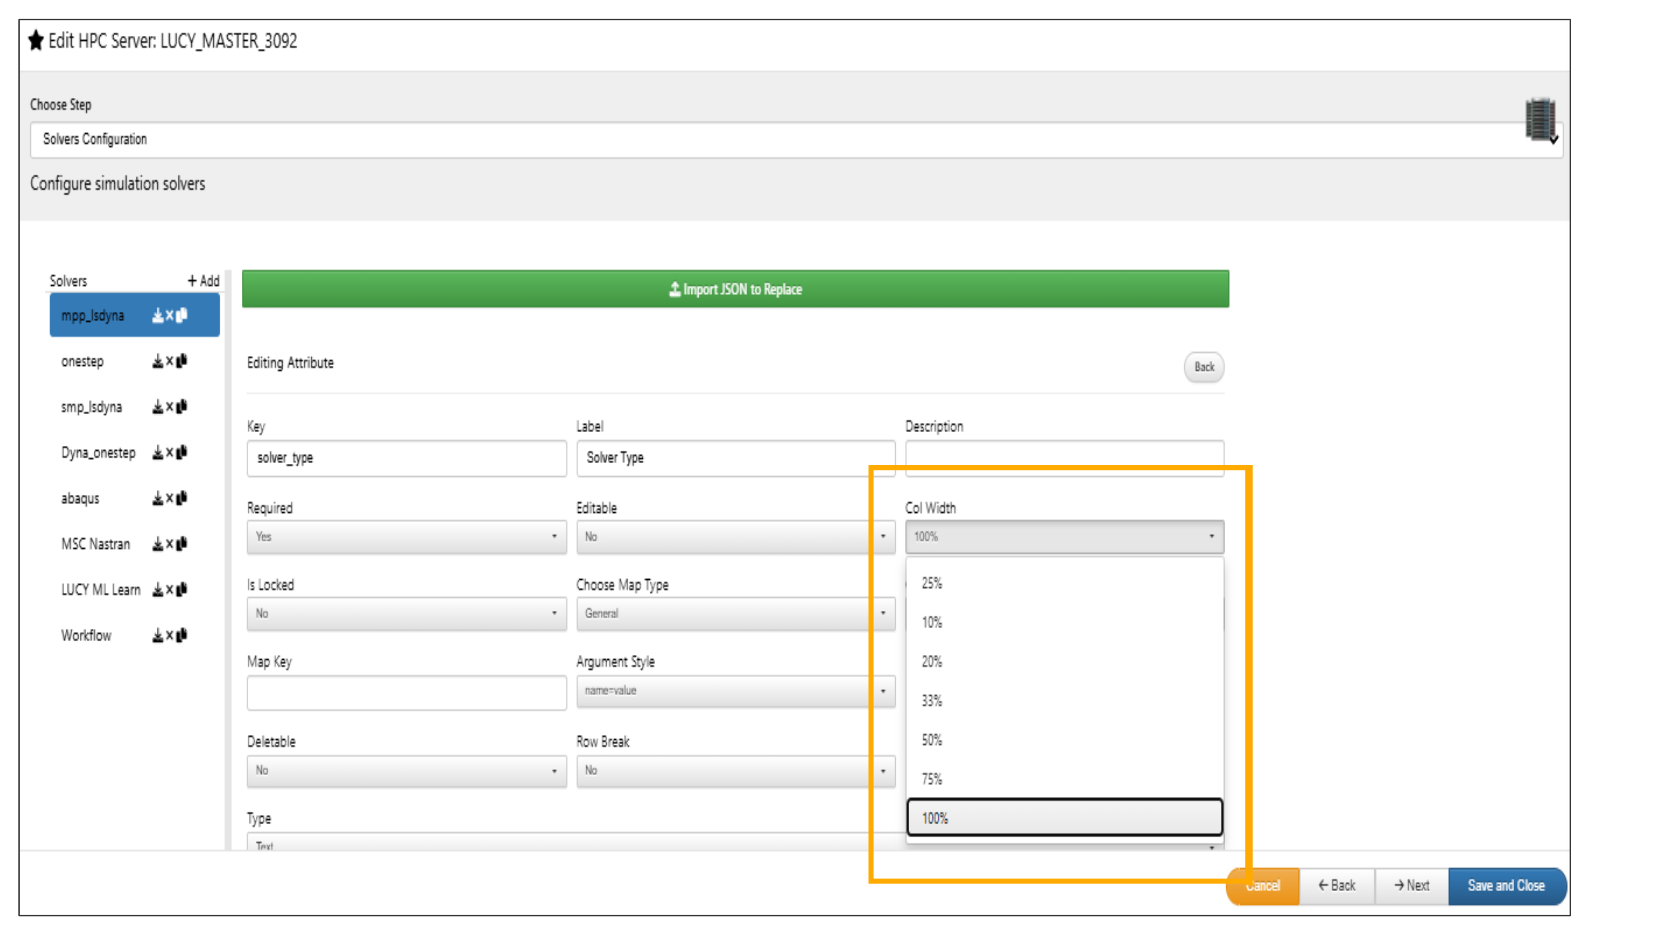
Column width of an attribute
Interconnects and Translators
We have new options to add Interconnects and Translators to HPC servers while editing them.
- Interconnects - We can add name , description , binary and commands to create intreconnects.
- Translators - We can add name , decription , binary and commands to create Translators.

Interconnects
Interconnects
HPC Utilization
You can view HPC usage by clicking on “Utilization” next to a HPC thumbnail. This window will show you visualizations and information such as core usage, running jobs and peak utilization.
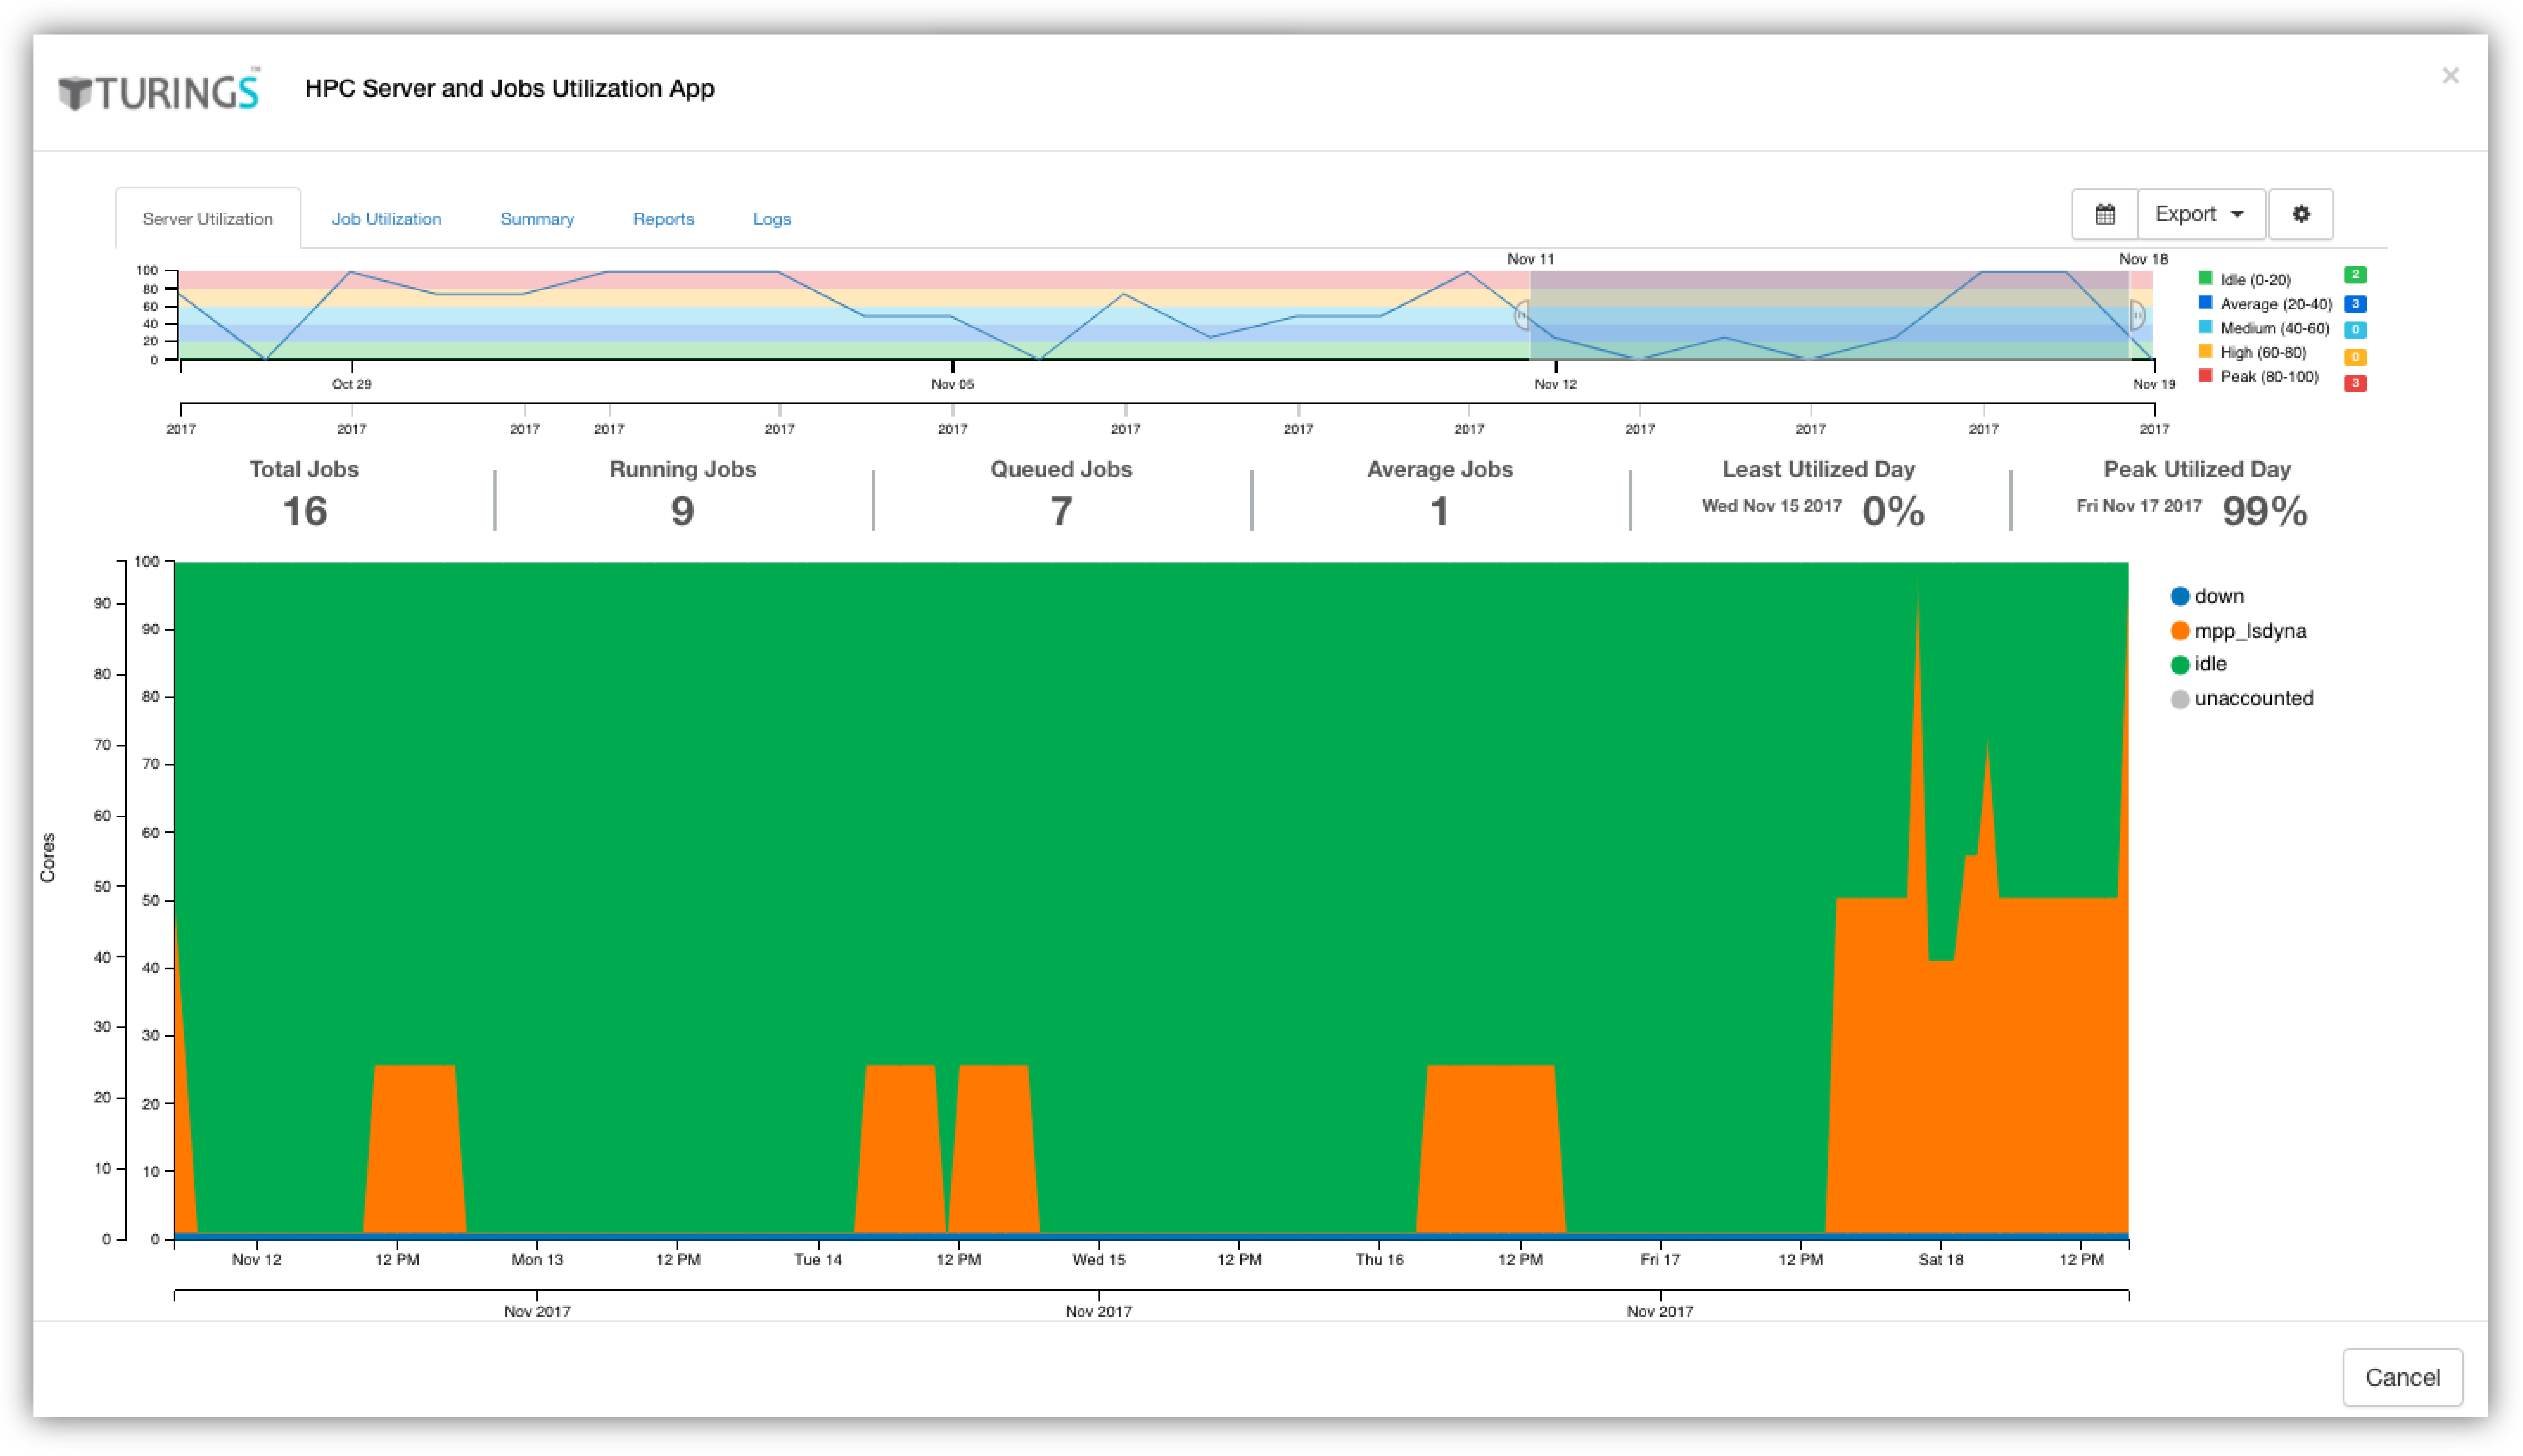
Figure 21: HPC Utilization Window
Below video show us how to manage HPC server or add a new HPC server to the page.
HPC server settings
Here are some of the settings where solver attributes are used to enhnace the process of Job submission.
- Options to use to detect hung simulation and to terminate them
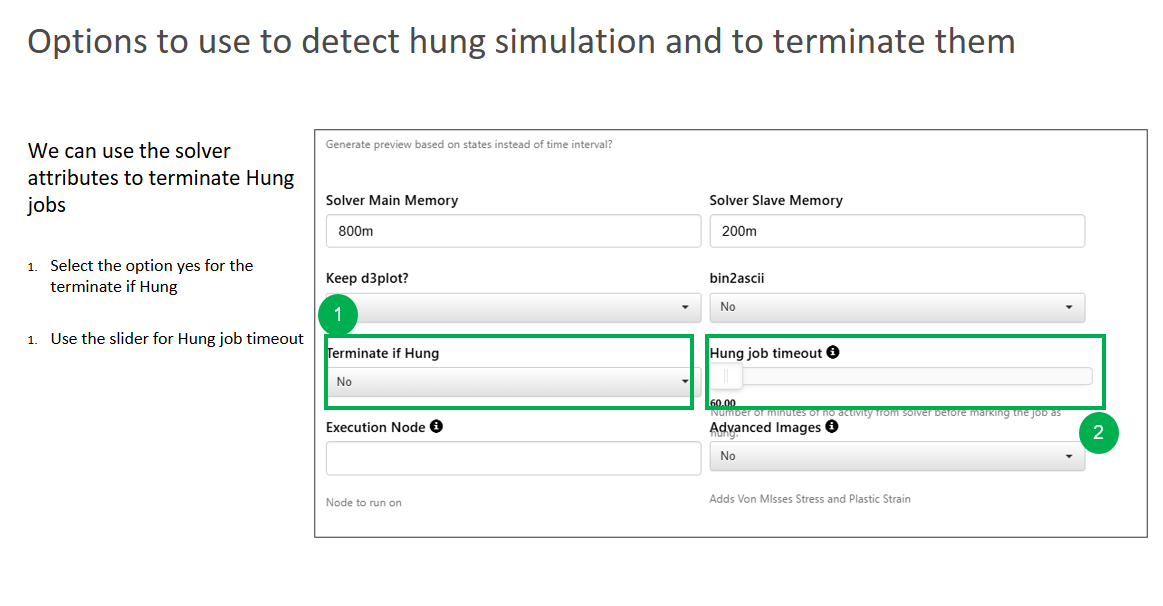
detect hung simulation and to terminate them
- Options to terminate jobs with errors that have hung
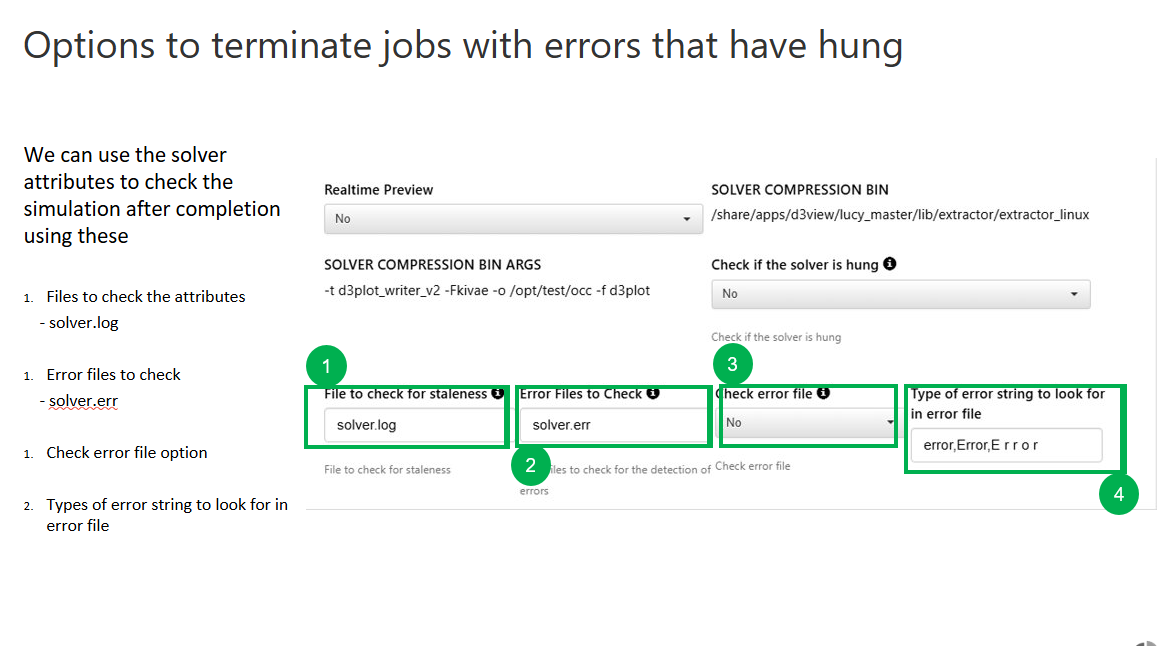
detect hung simulation and to terminate them
- Options to restart the Simulation
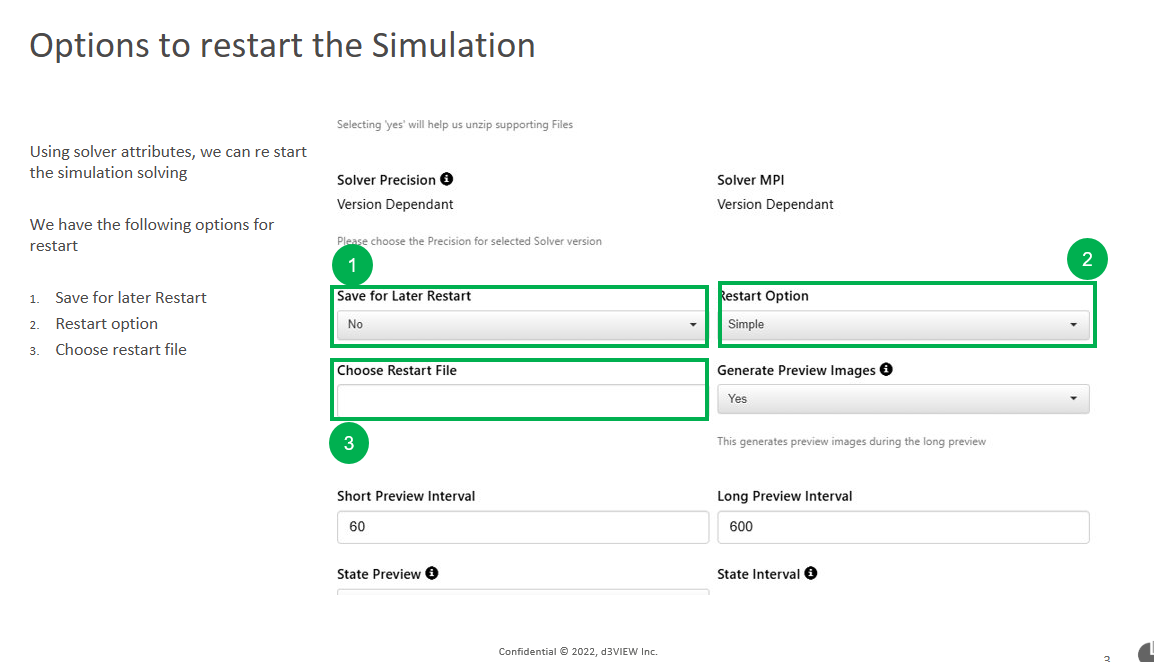
terminate jobs with errors that have hung
- Options to post-process simulation after the simulation completes
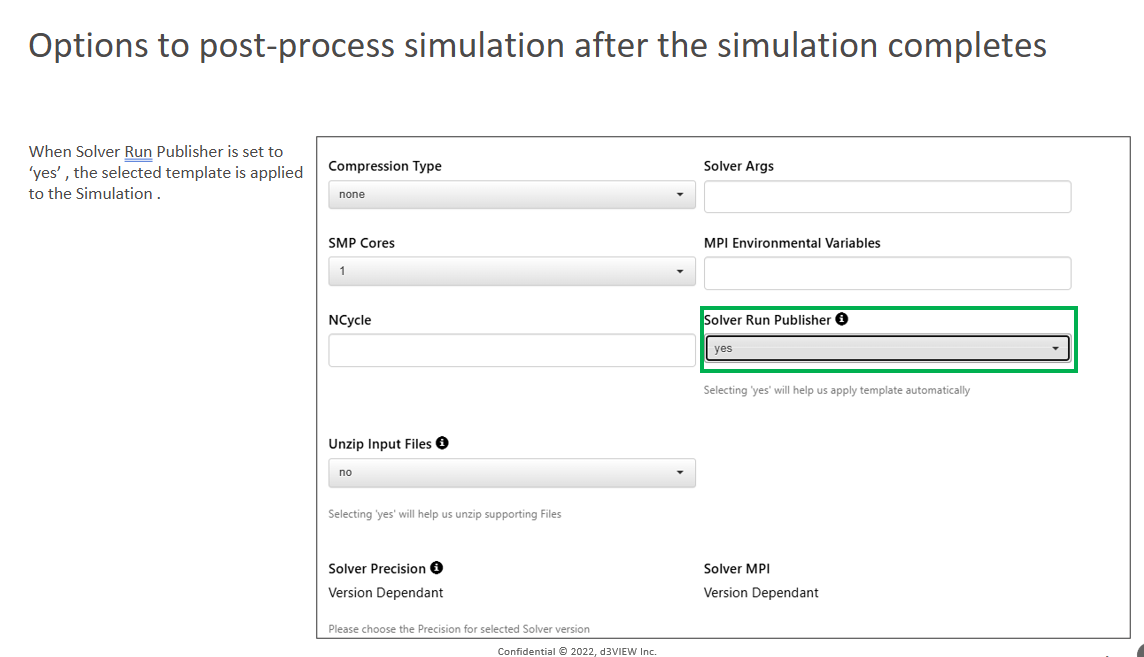
Post-process simulation
- Solver Version
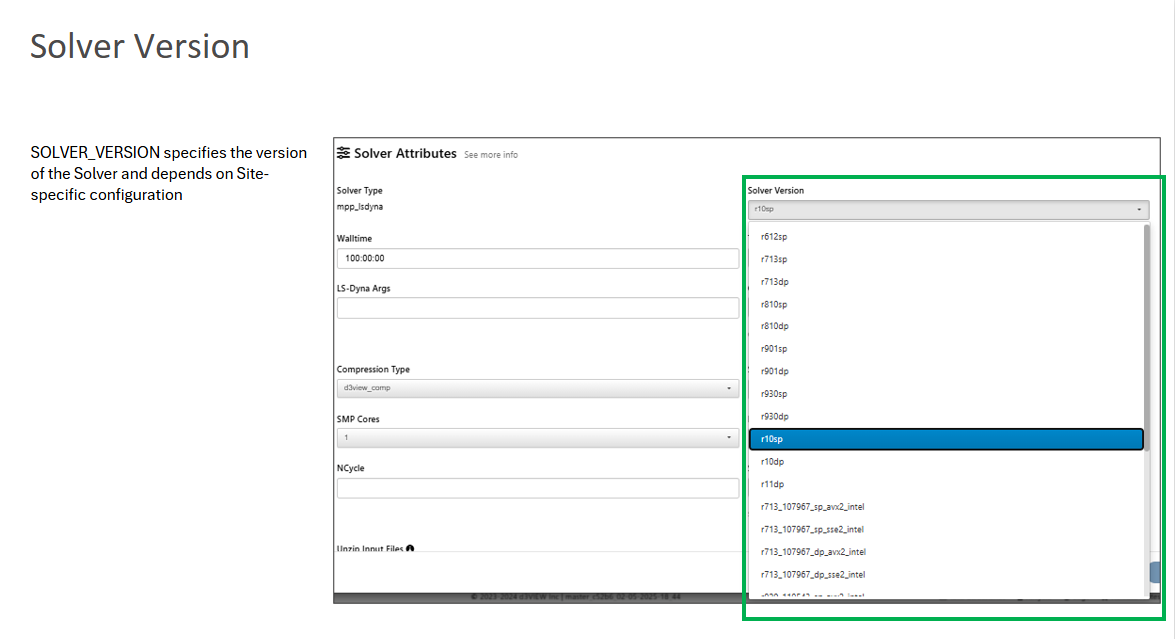
Solver Version
- Selection of Compression type for LS-DYNA Result files
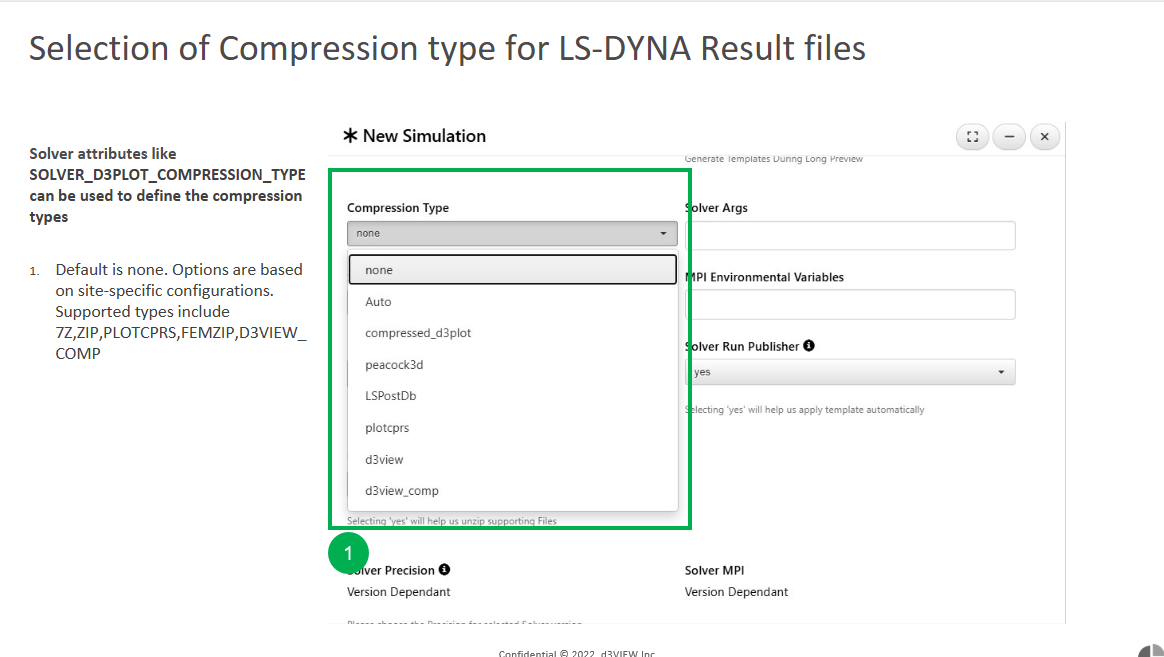
Compression Type
- Solver Precision and Solver MPI
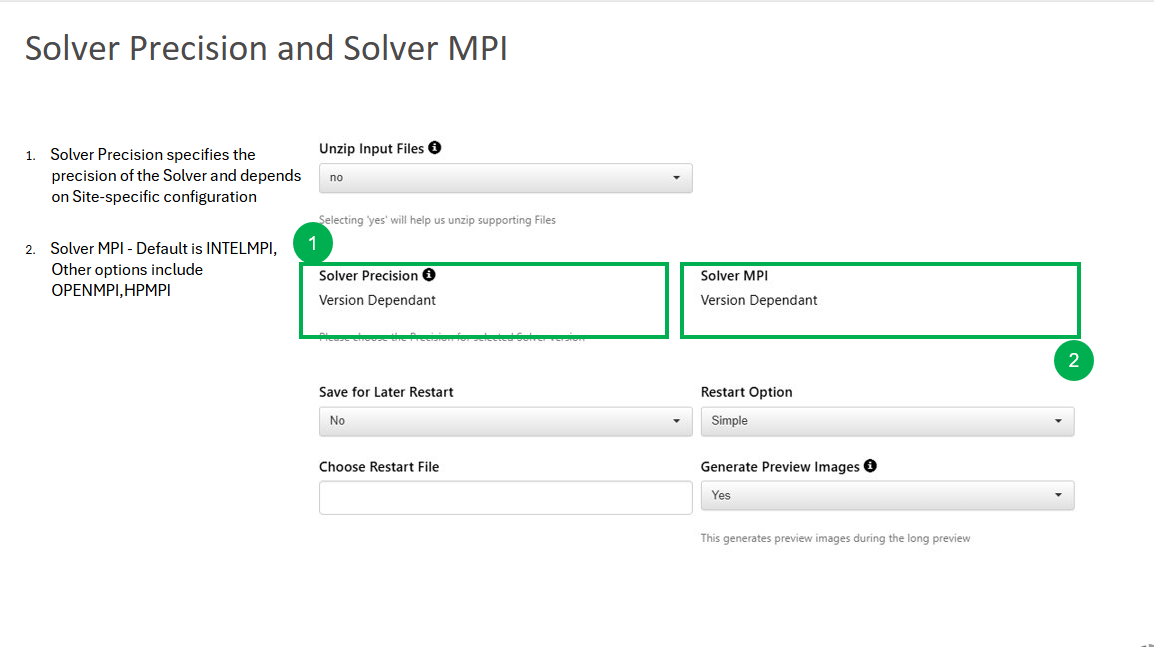
Solver Precision and Solver MPI
- Options to provide Preview intervals and state intervals
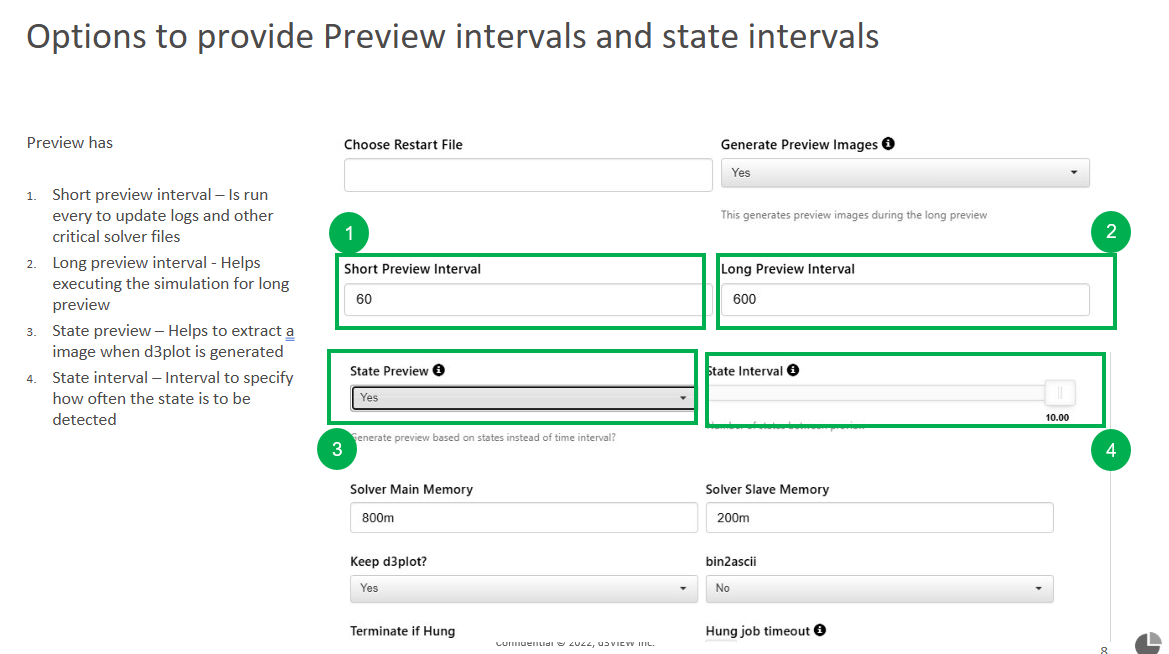
Preview intervals and state intervals
- Memory Options
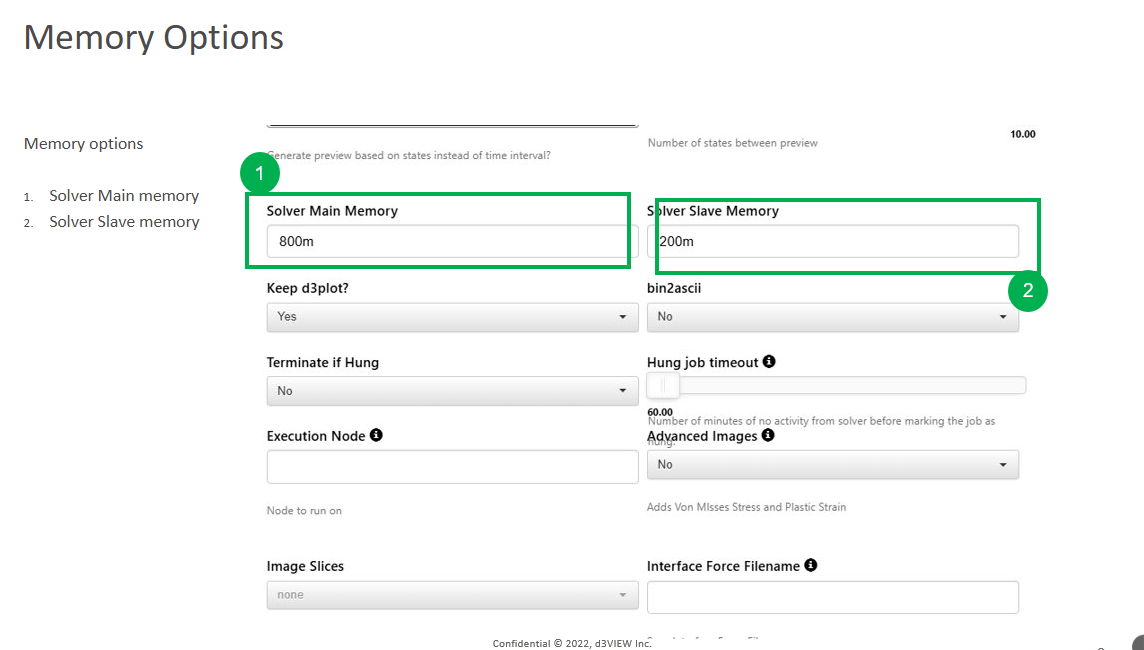
Memory Options
- Binary path to use for compression
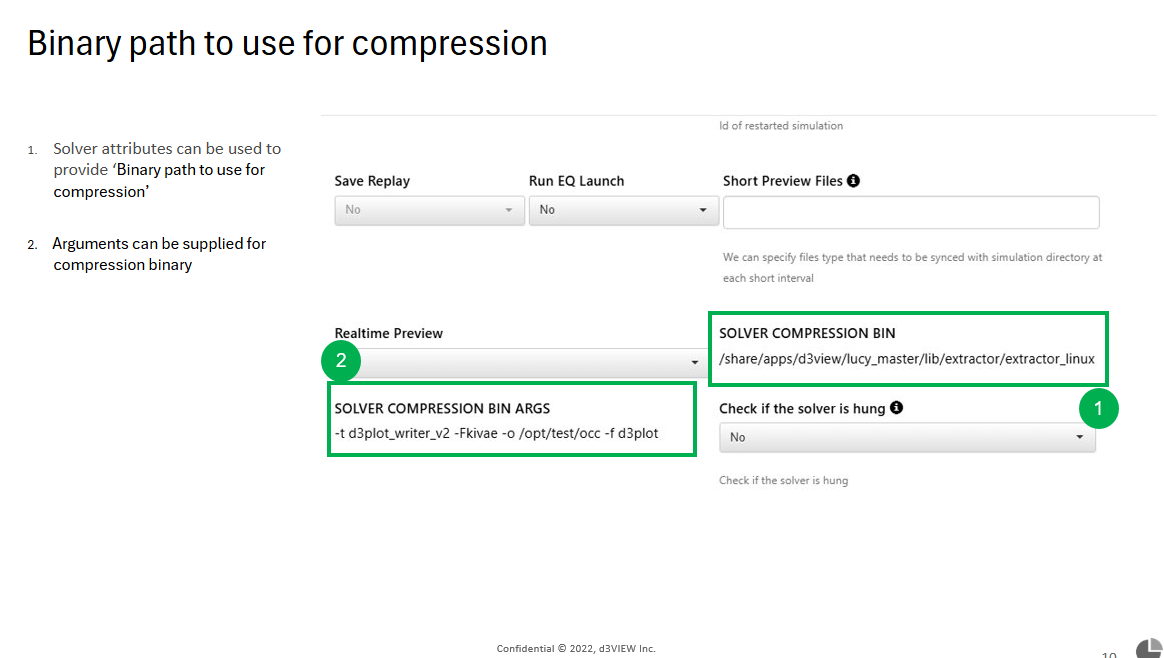
Binary Path
- New variables QOS and NICE
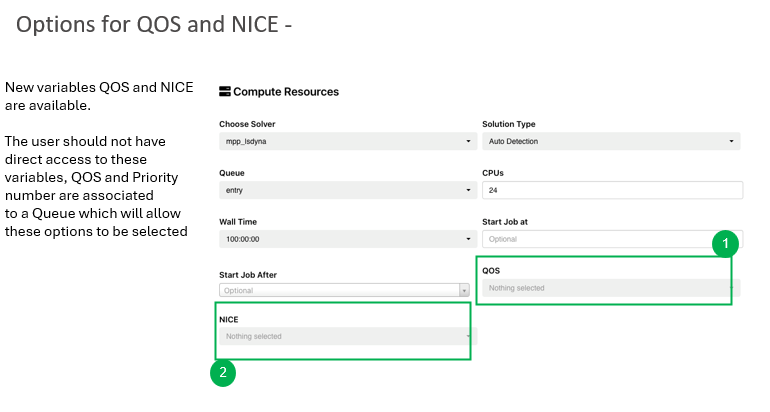
QOS and NICE
HPC Disk/Job/Node status
HPC Servers in job submission will now show disk status/Job status and Node status.
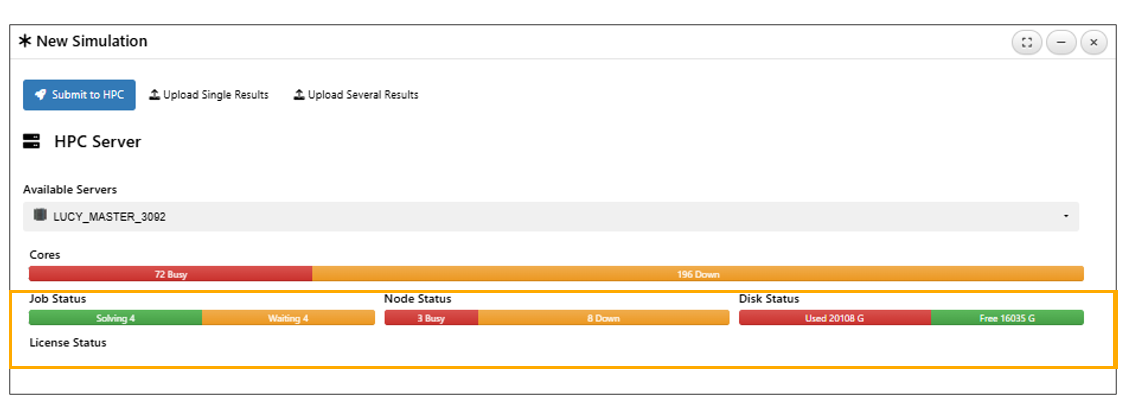
Disk,Job and Node
In Job Submision , we now see node information in the node status and job info in the job status when clicked in HPC servers.
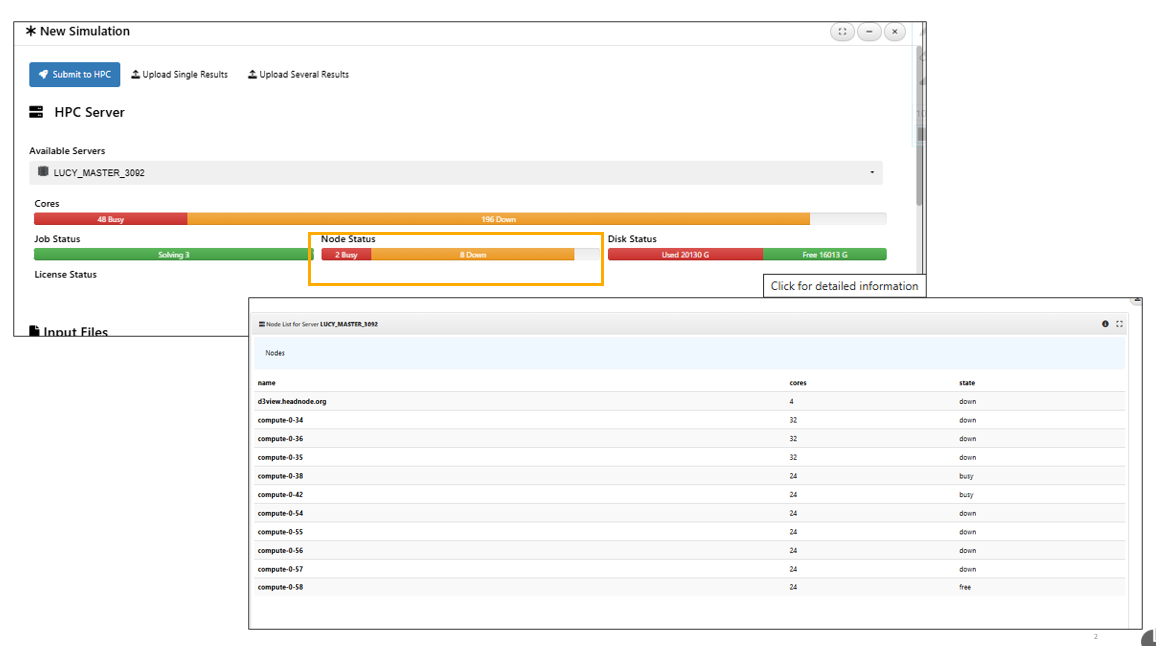
Node status
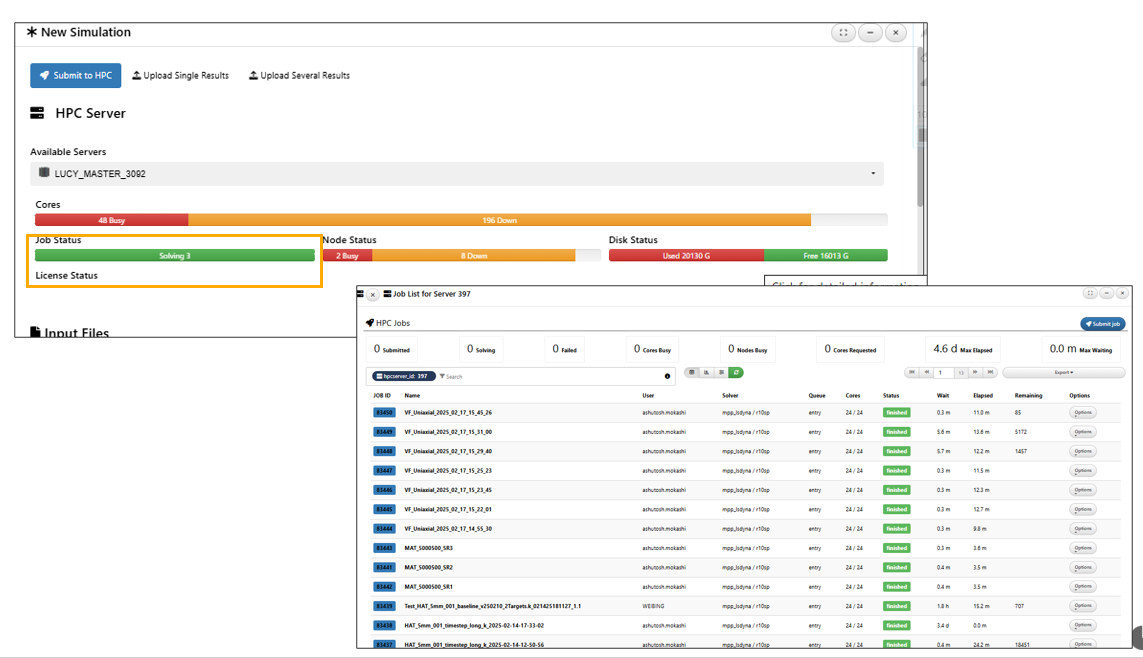
Job status
Clicking on Disk usage will show usage by users i HPCservers while submitting a job.
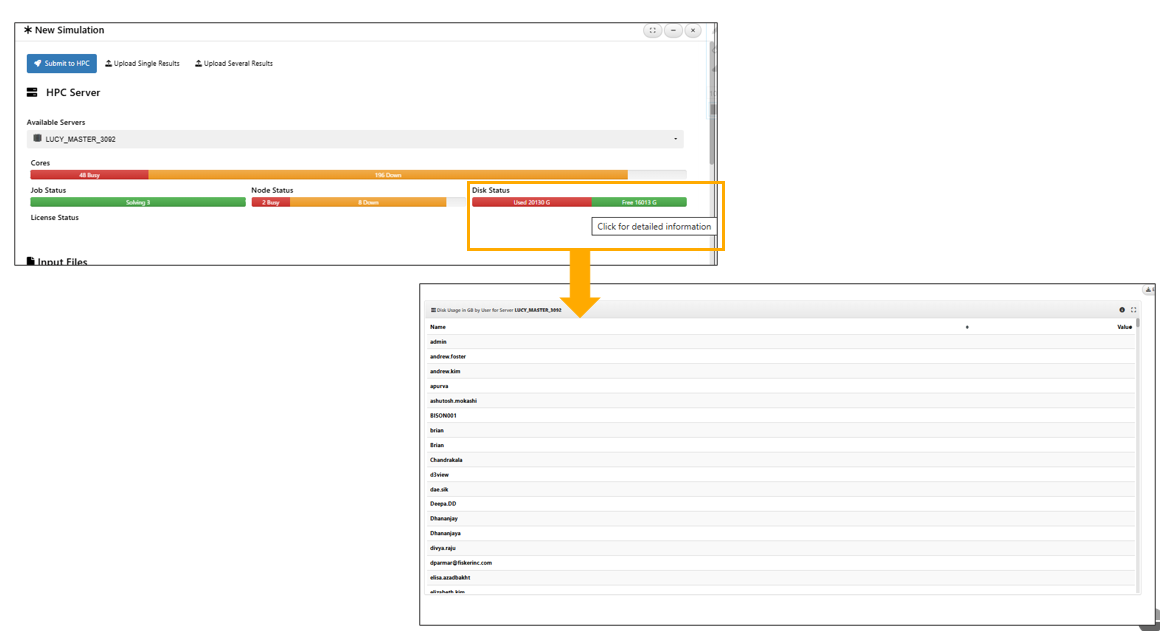
Disk usage
HPCSERVER → Utilization view during job submission now includes the queue list.
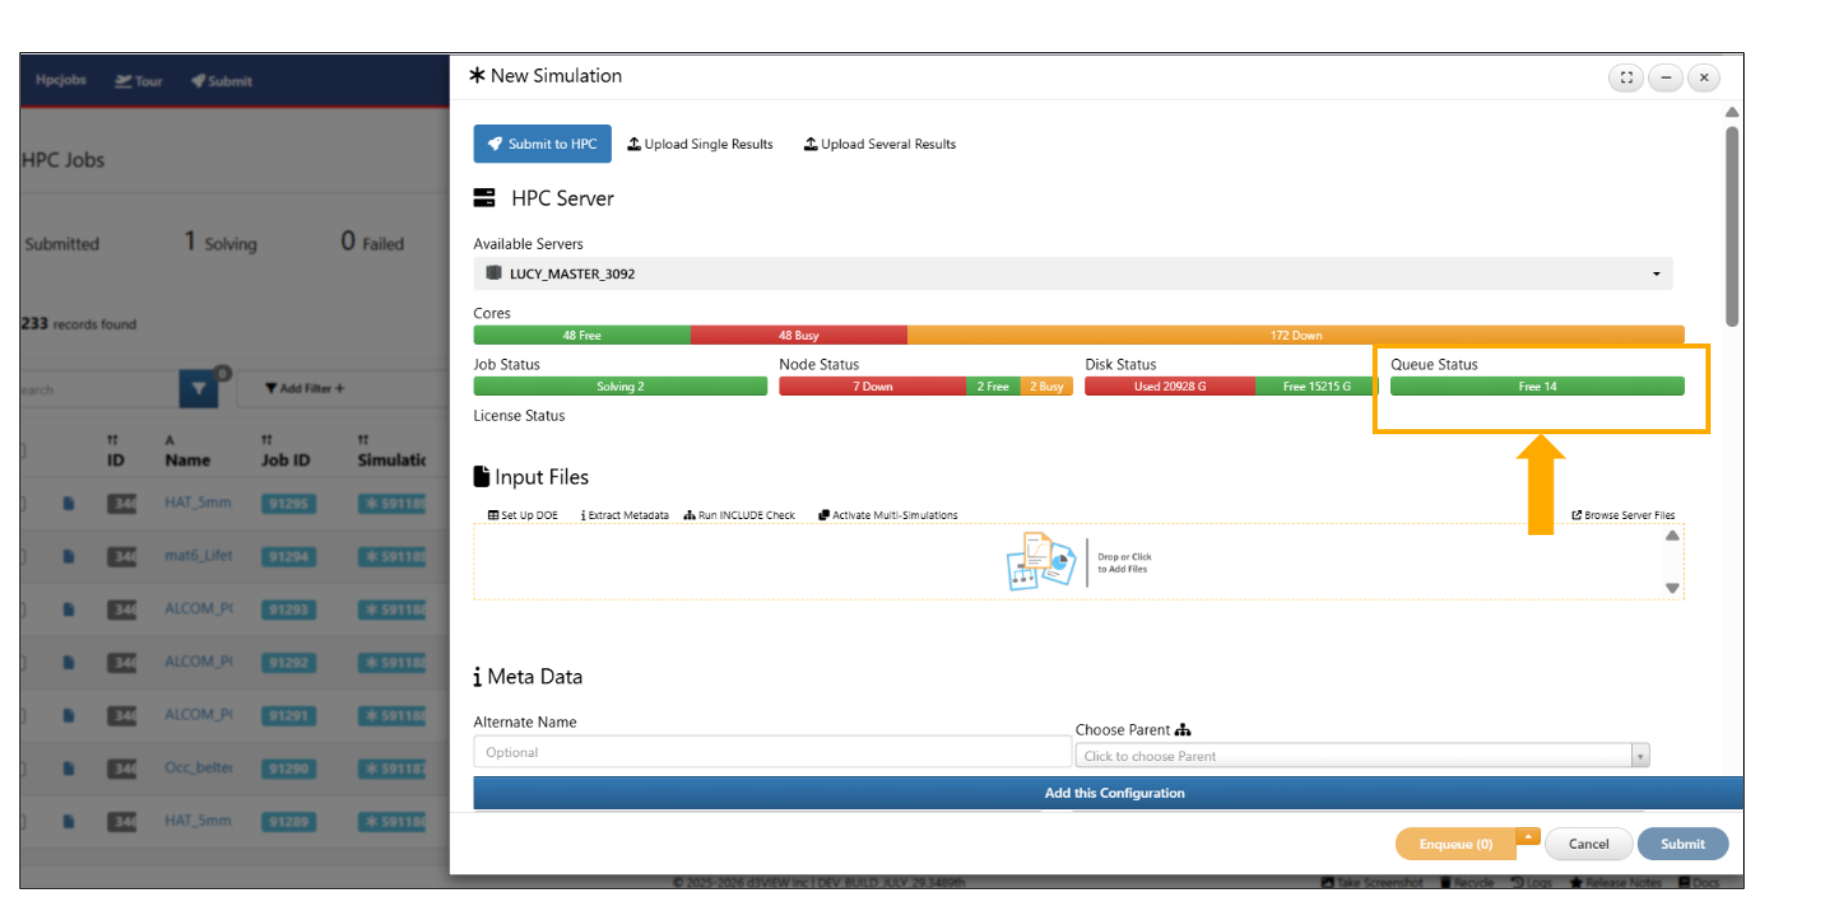
HPC server queues
3.5. Administration page
Click on the Administration option in the Administrative Menu to get started.
Administration page
The Administration page provides centralized system configuration and monitoring. It includes the following pages:
- Displays database sizes, active users, and PHP version.
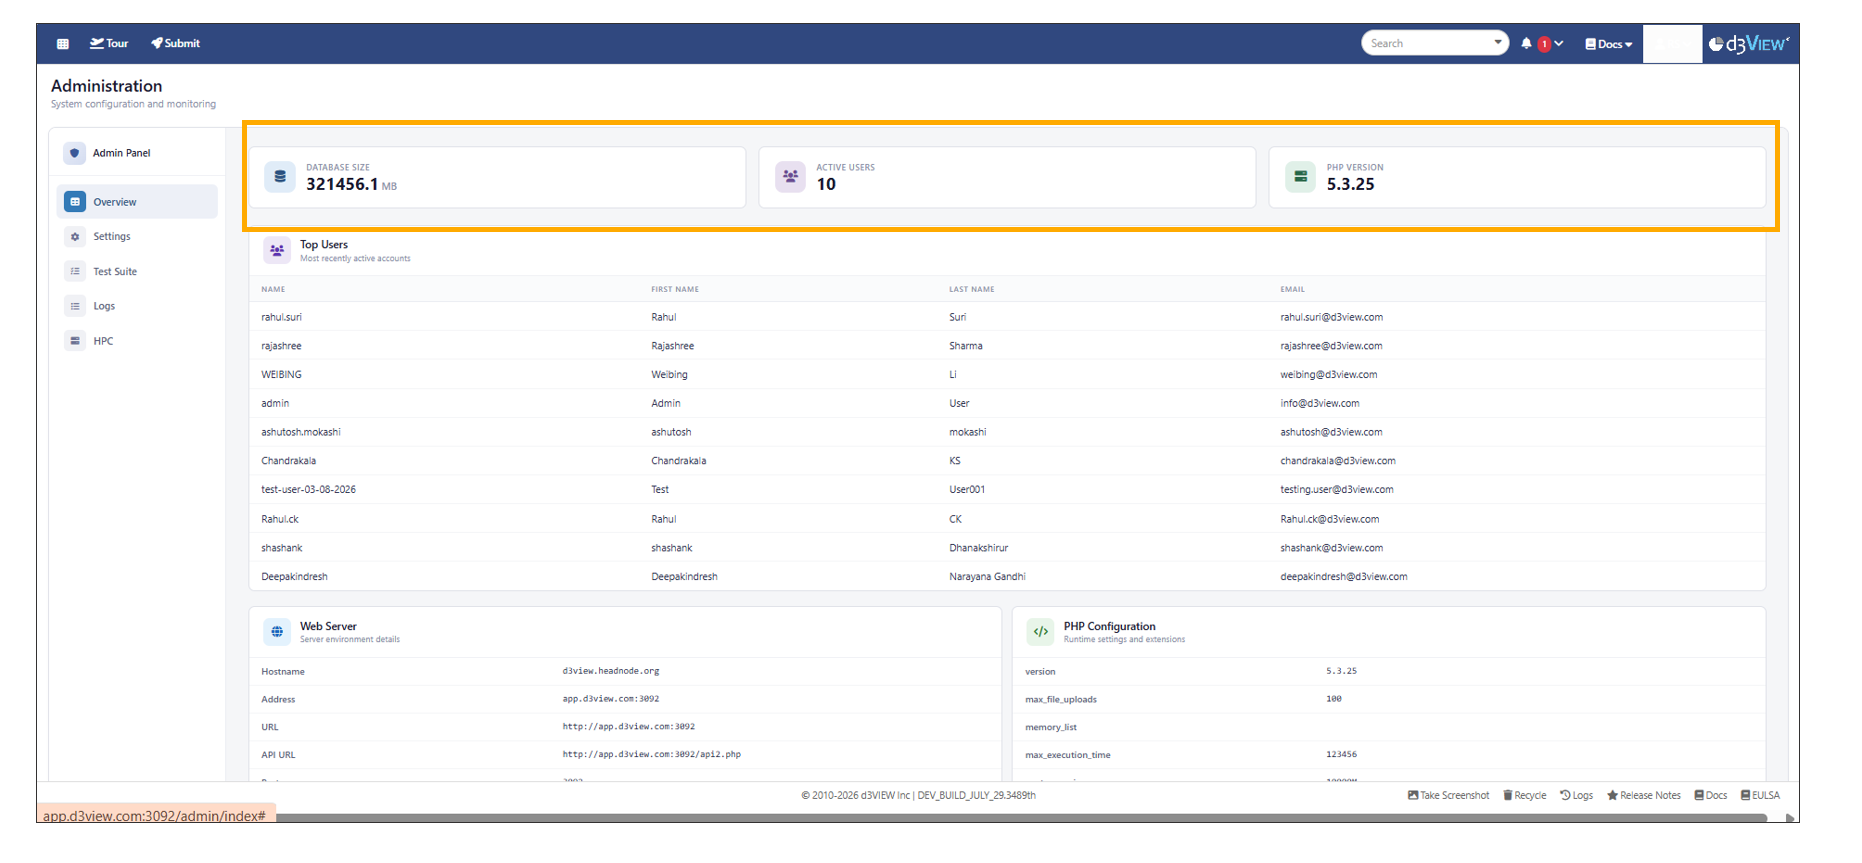
Overview
- Provides all administrative configurations, including default LLM settings.
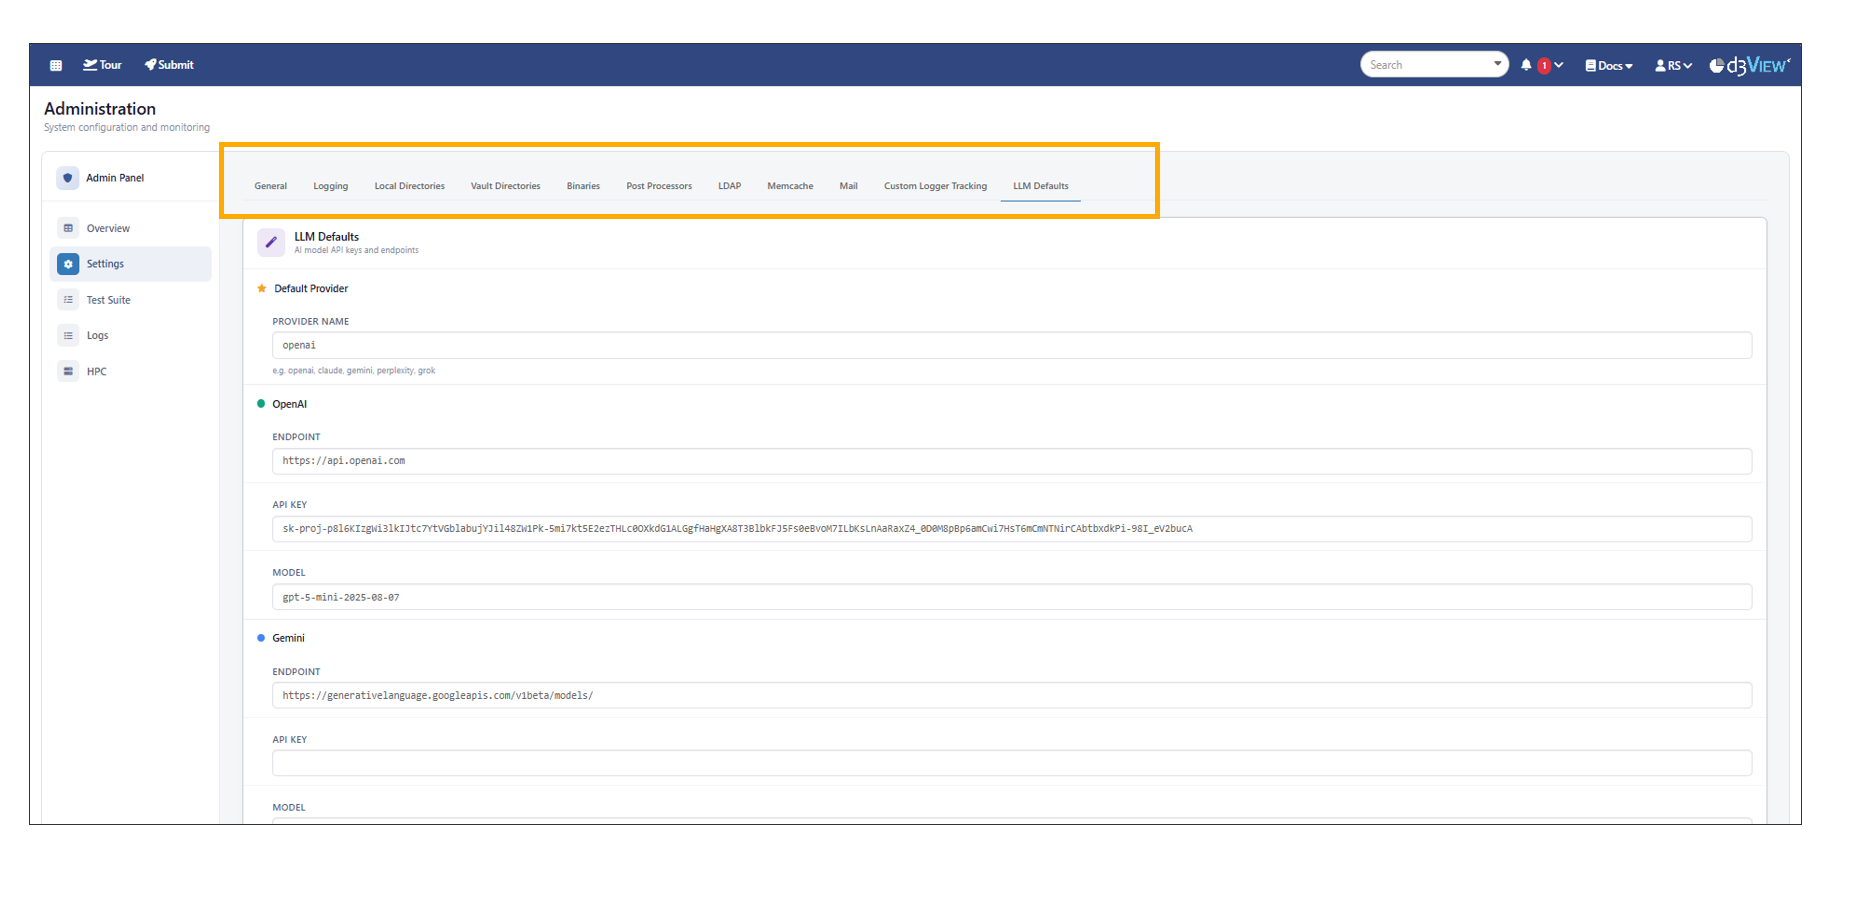
Settings LLM
- The Administration page now includes Search and Export options, making it easier to find specific settings and download configuration details.
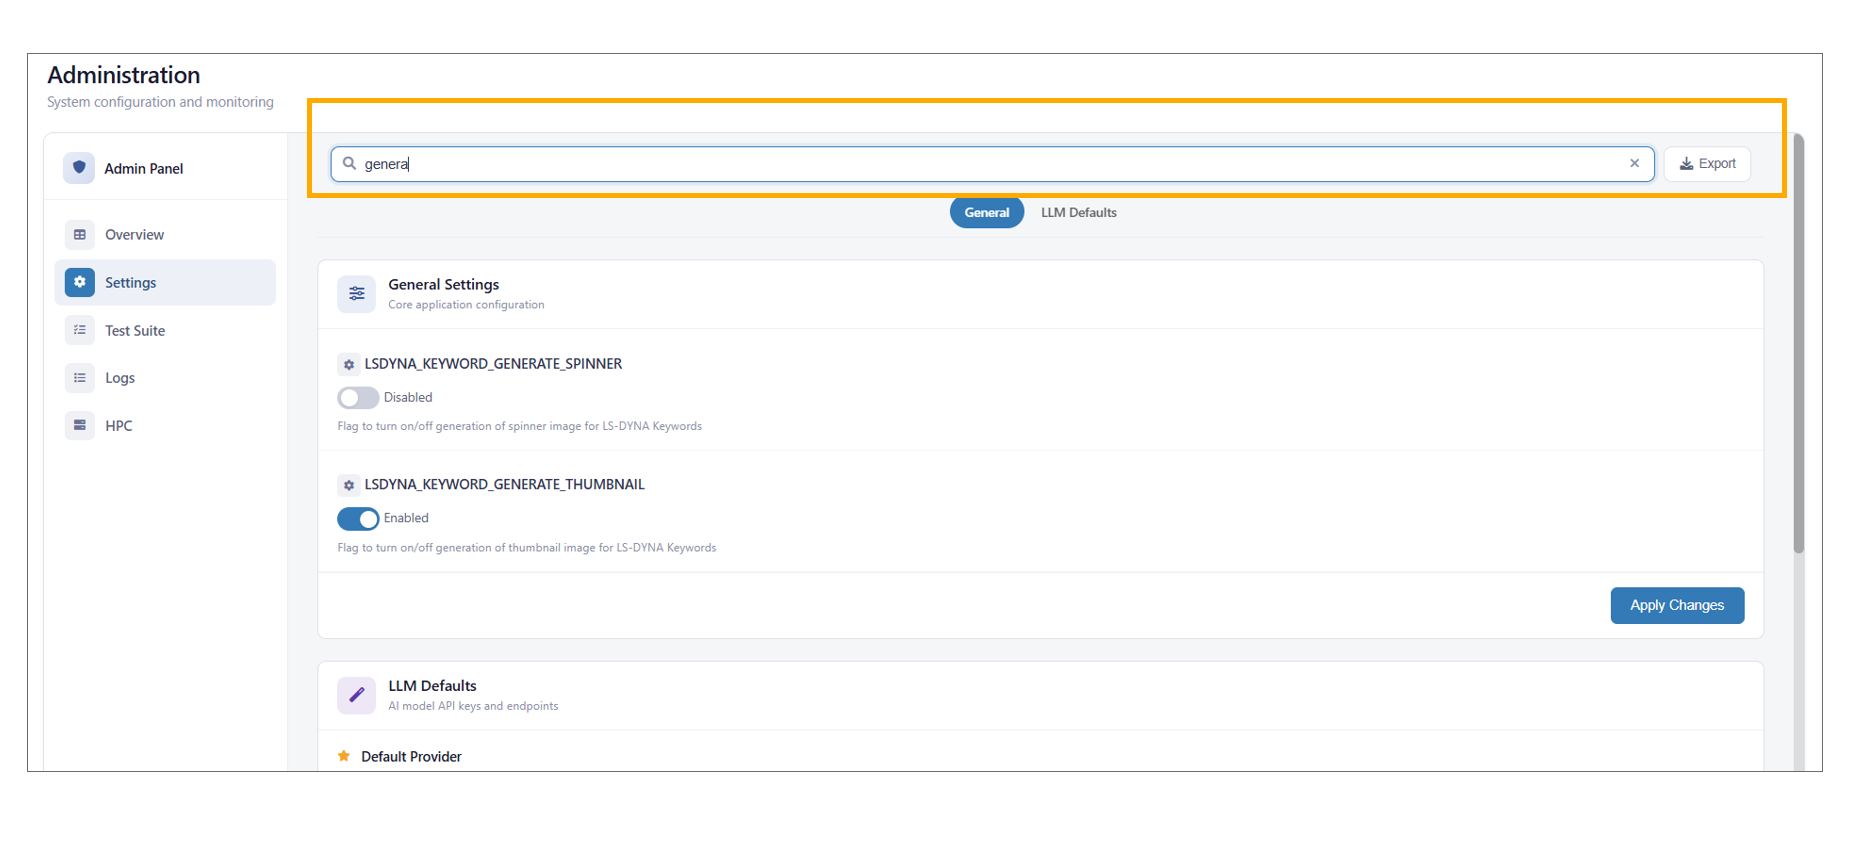
Settings Search
Under the settings section on the side panel, you can update an array of settings. The buttons for these sections are located on top. Click on Post Processors to go to this section.

Figure 24: Click on Post Processors
Update these settings as you like.
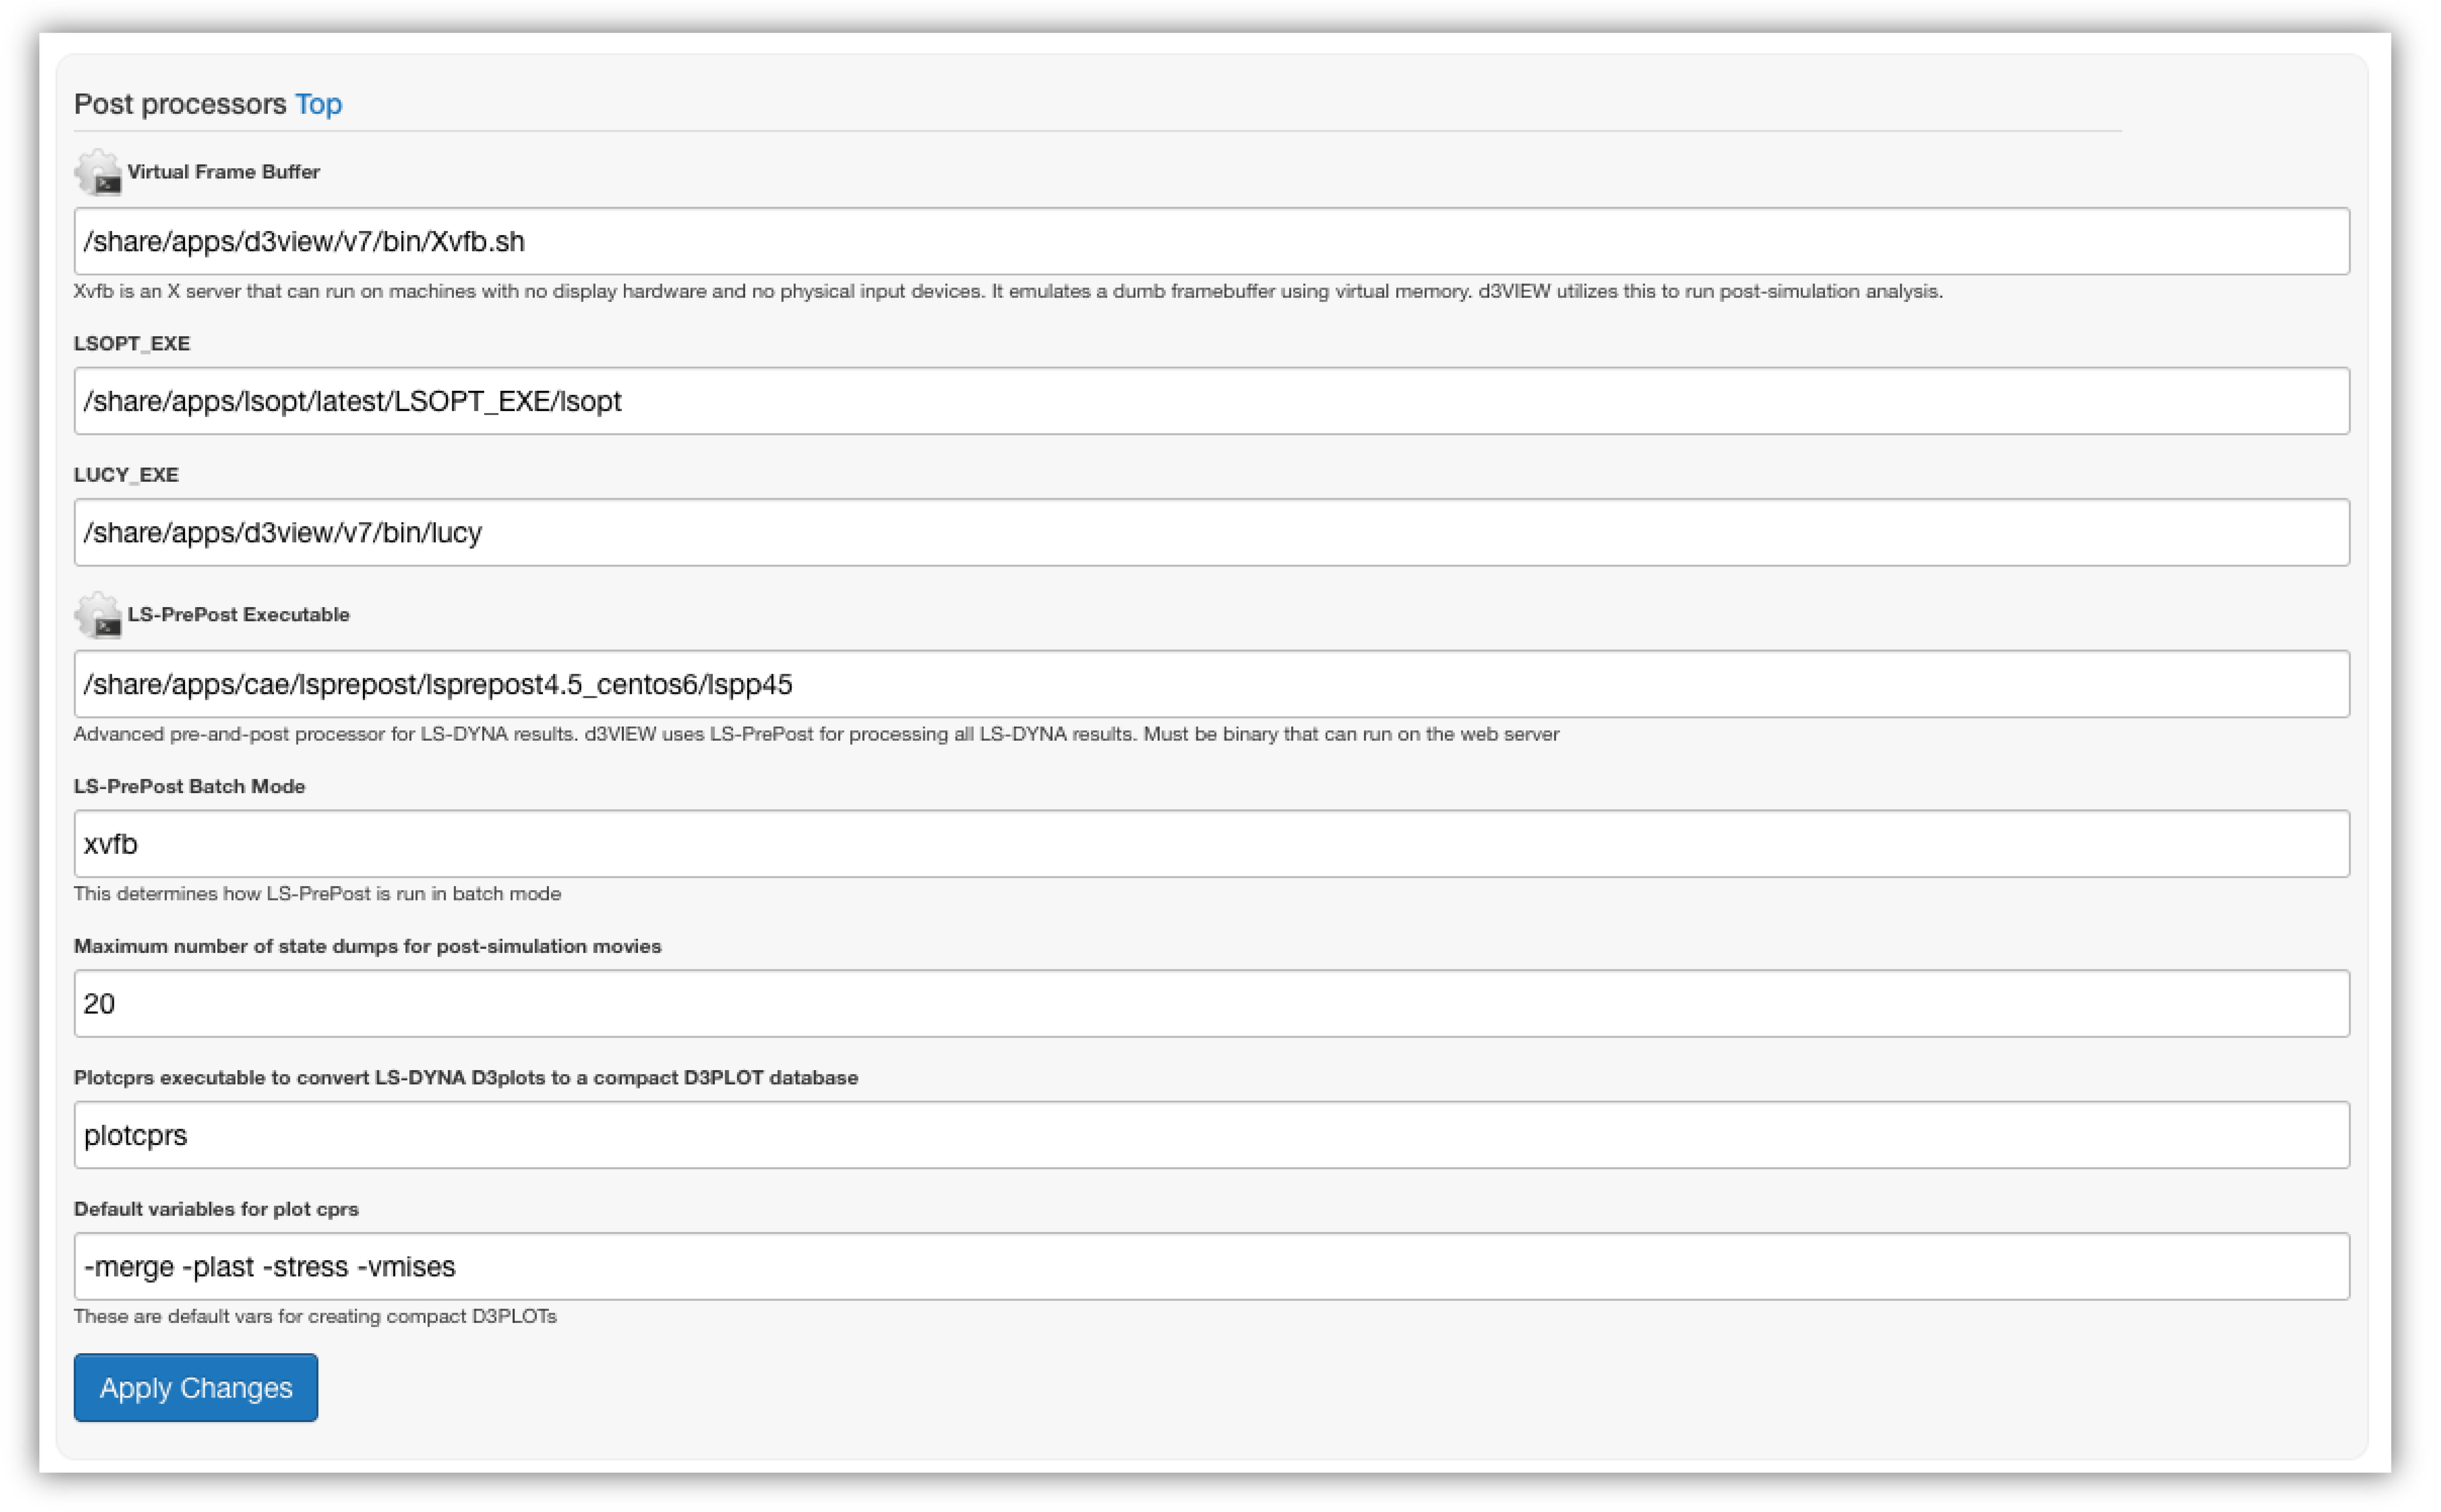
Figure 25: Post Processors Settings
Under the same side panel section, click on “LDAP” at the top right next to “Post Processors”.
Figure 26: Click on LDAP Settings
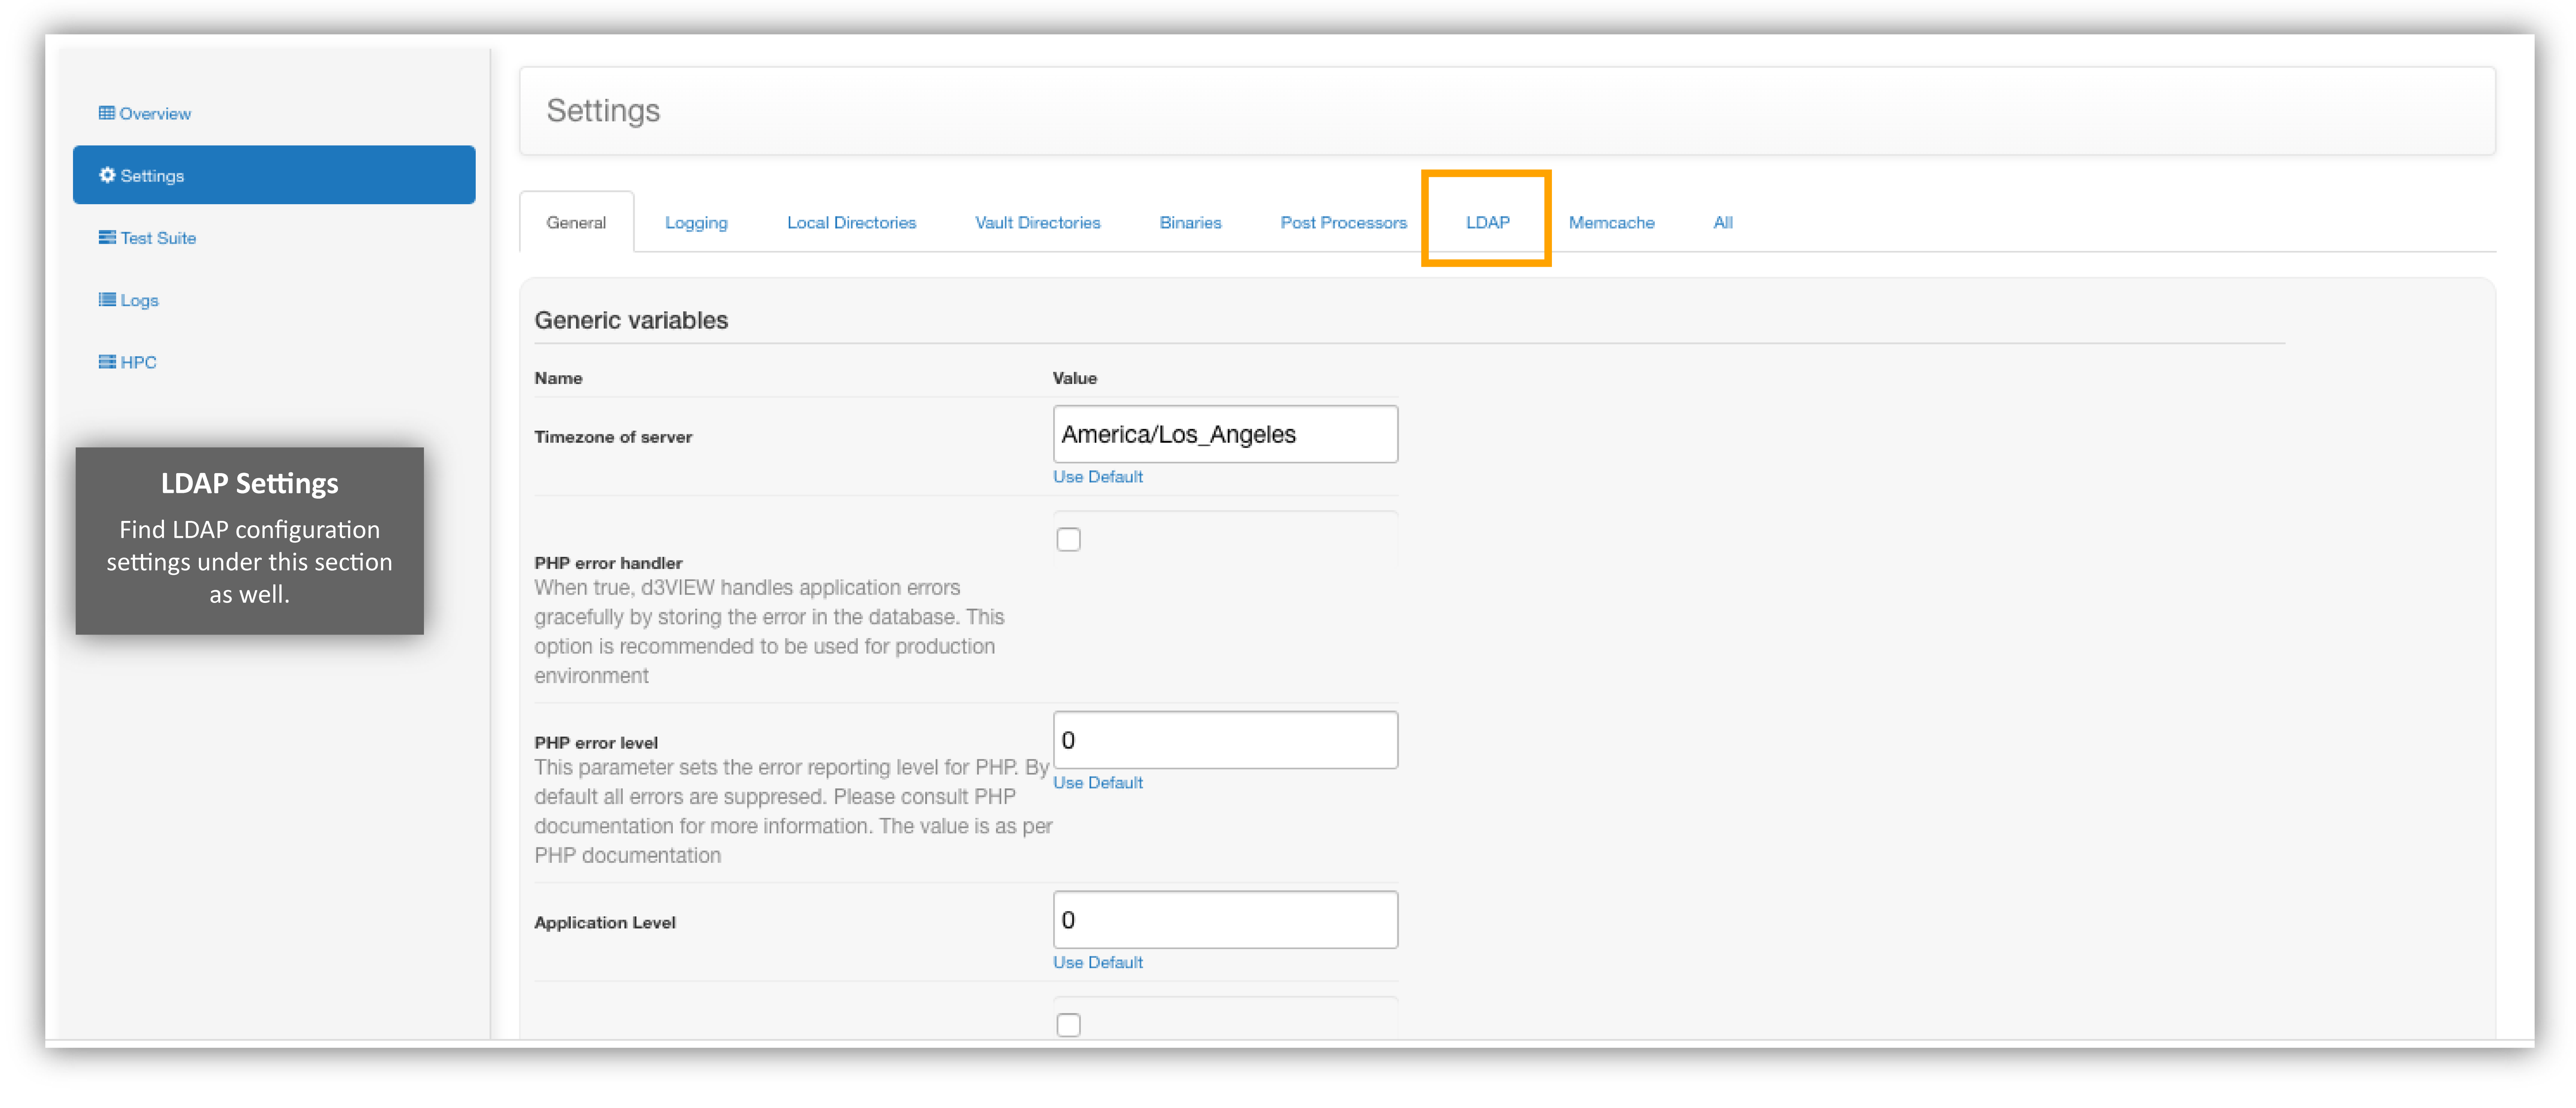
Here, you can edit you LDAP configuration.
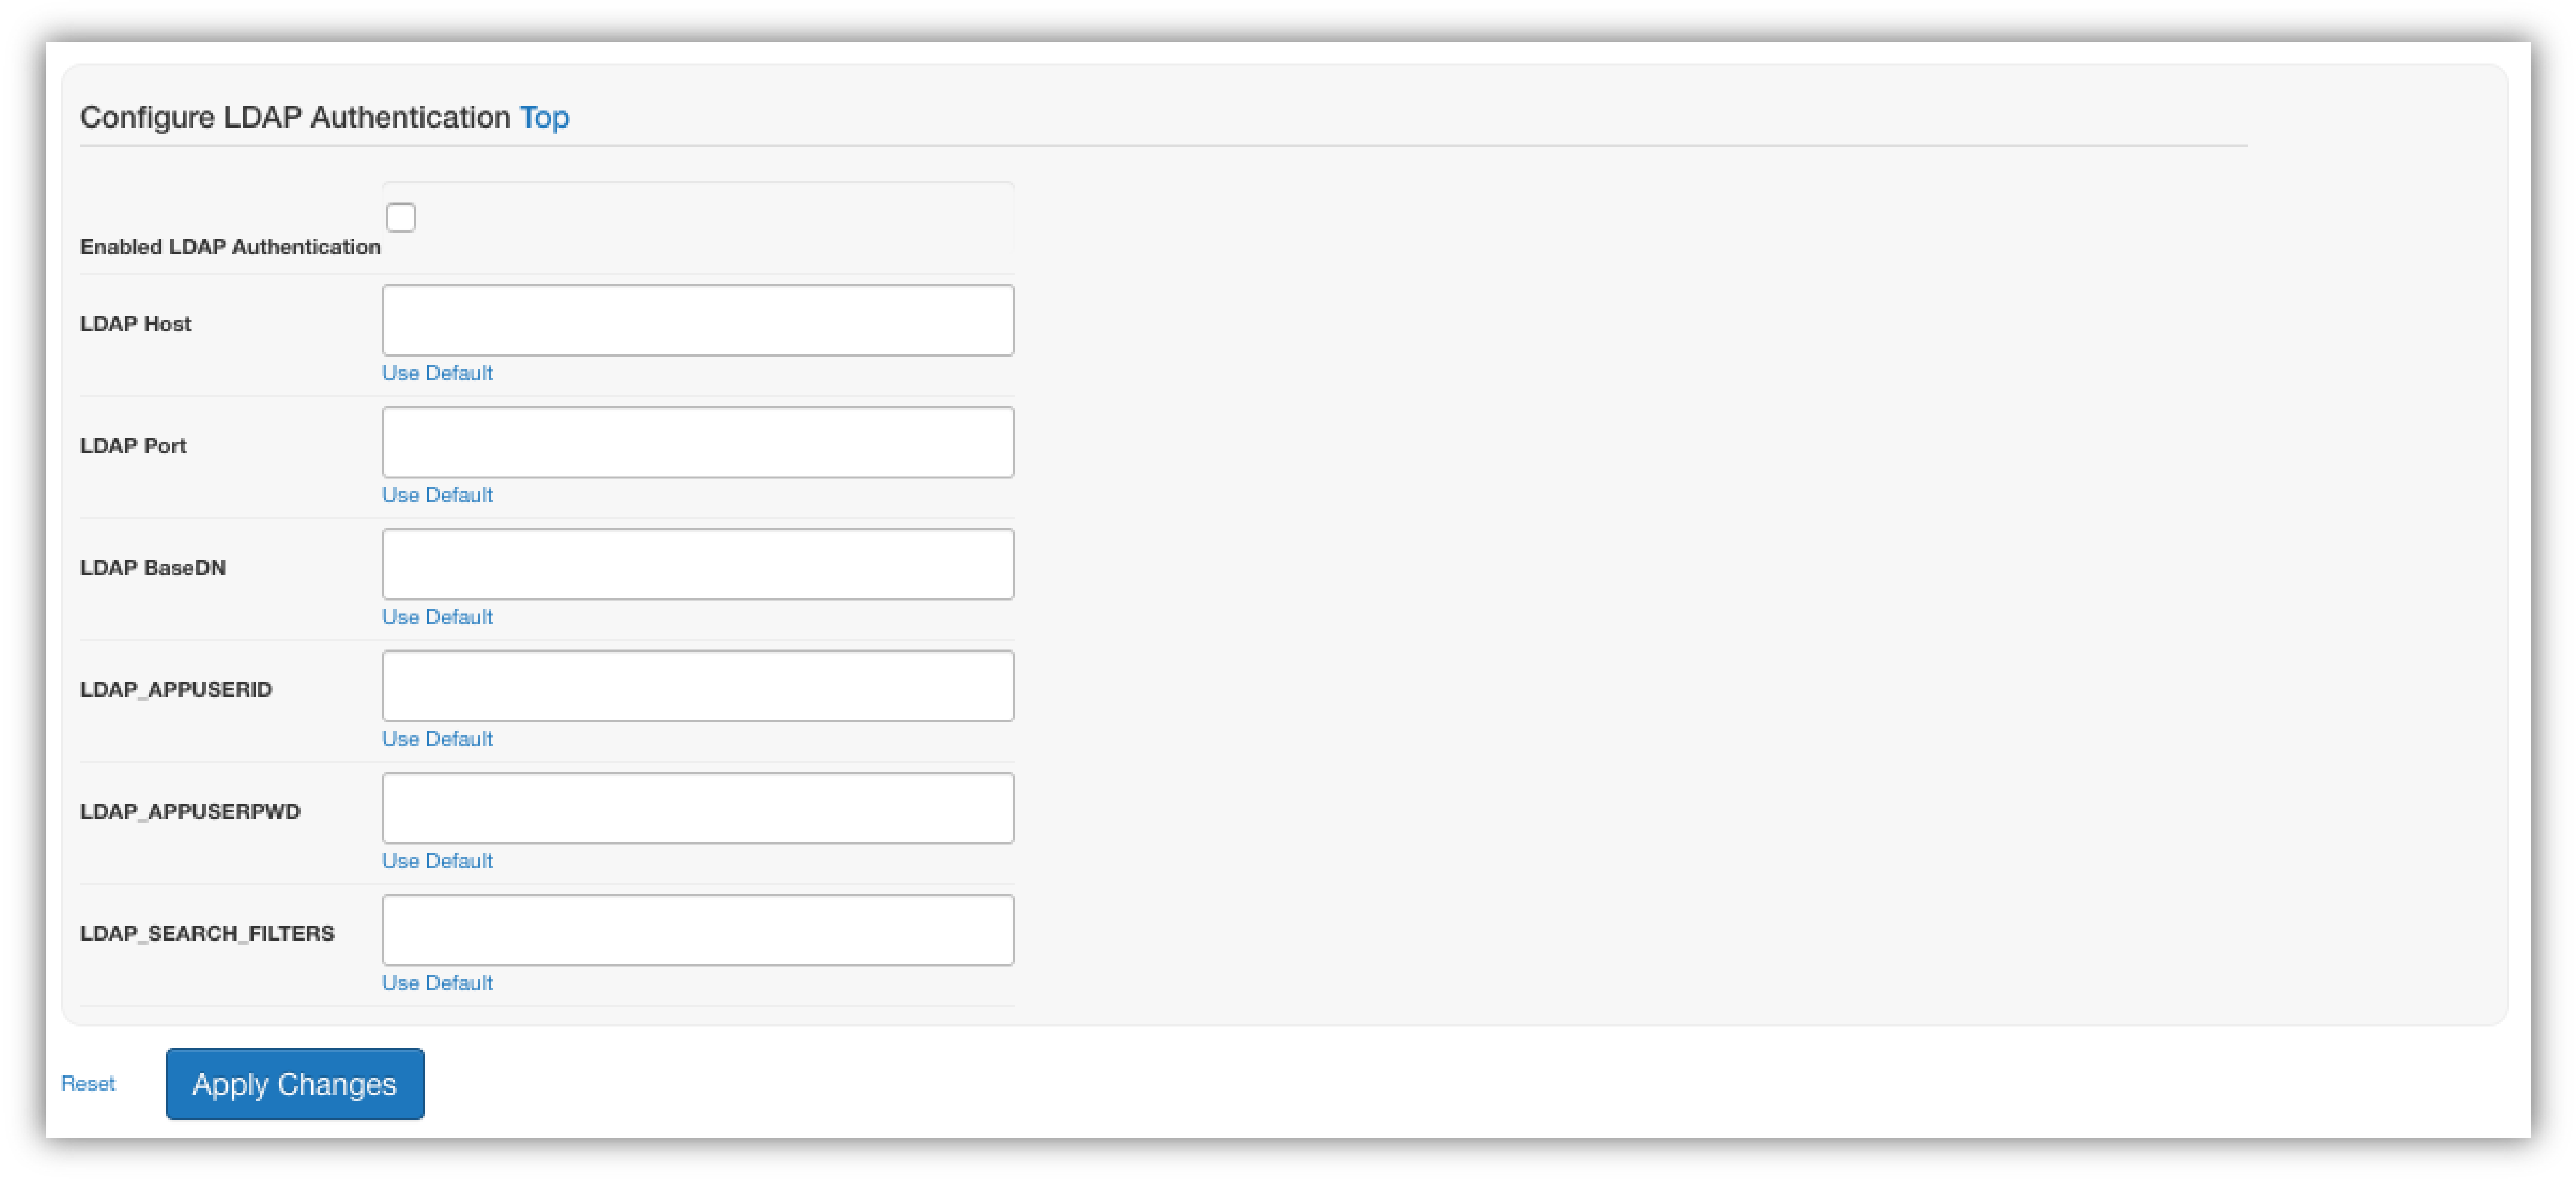
Figure 27: LDAP Settings
- Supports installation tests with a Run Tests button.
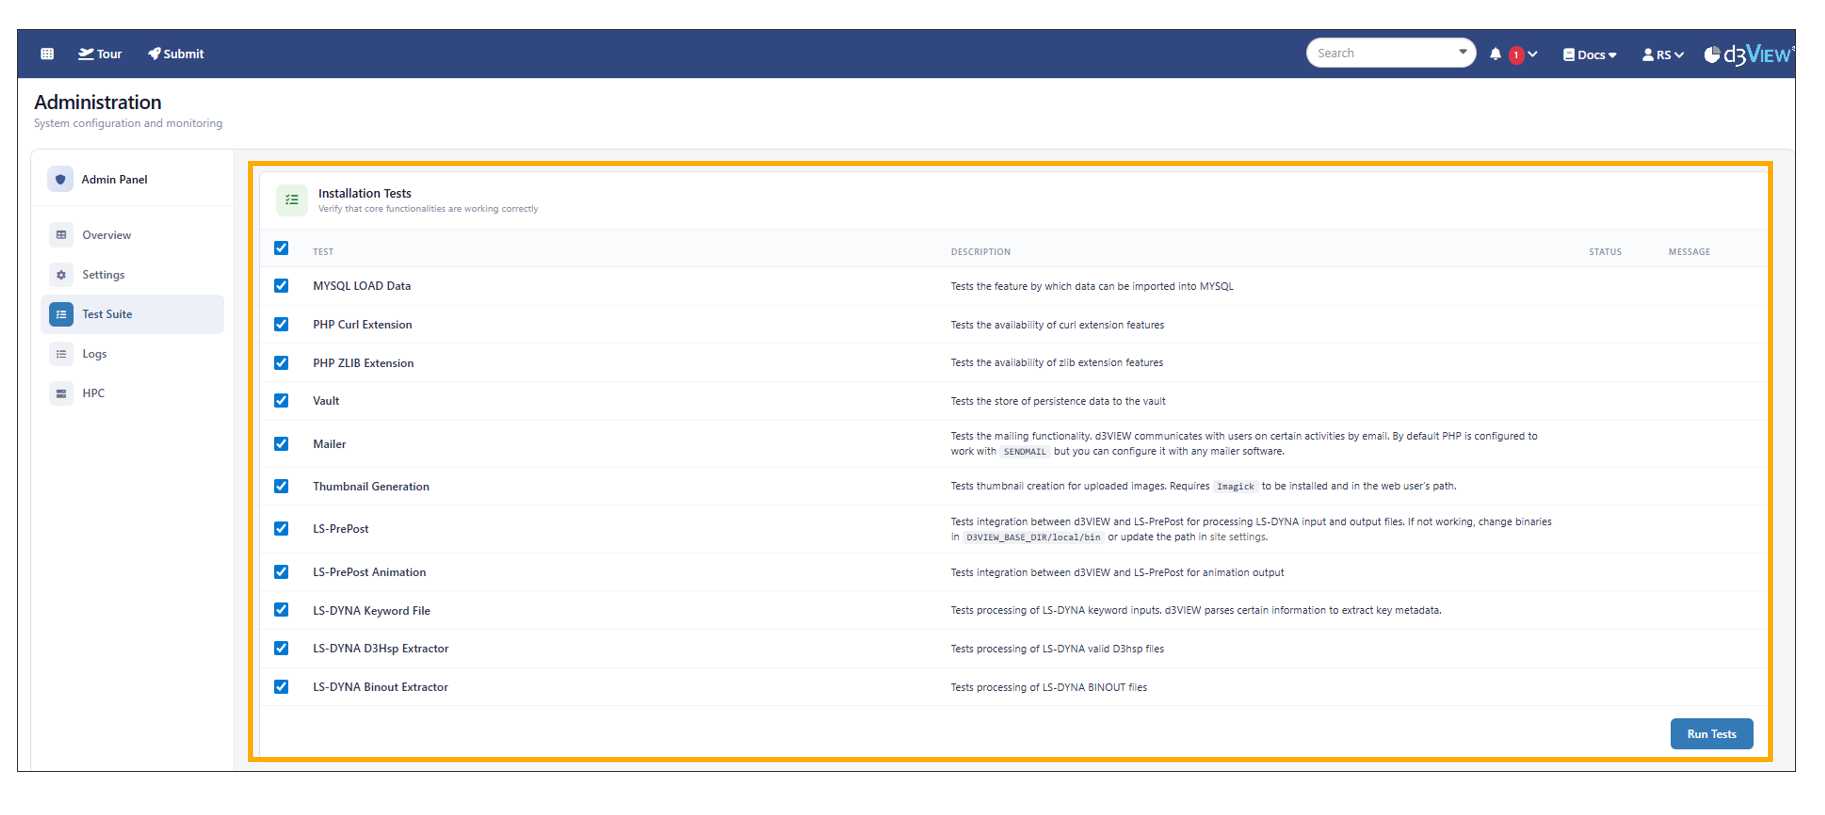
Test Suite
- Shows recent activities and events.
- Includes a Clear Logs button.
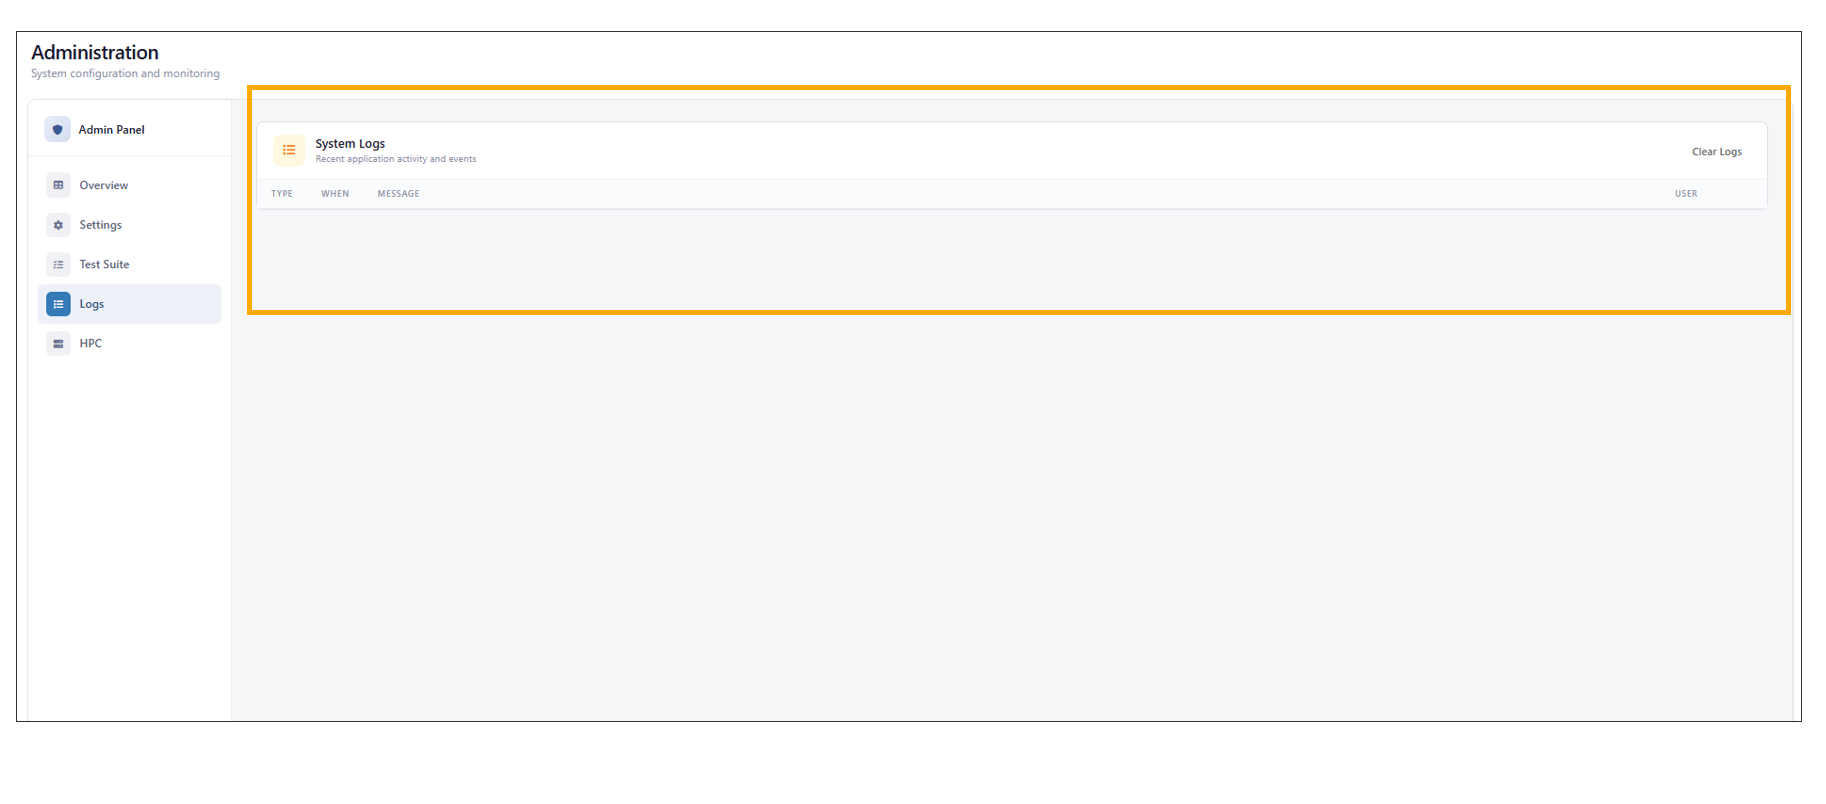
Logs
- Lists all available HPC servers configured in the system.
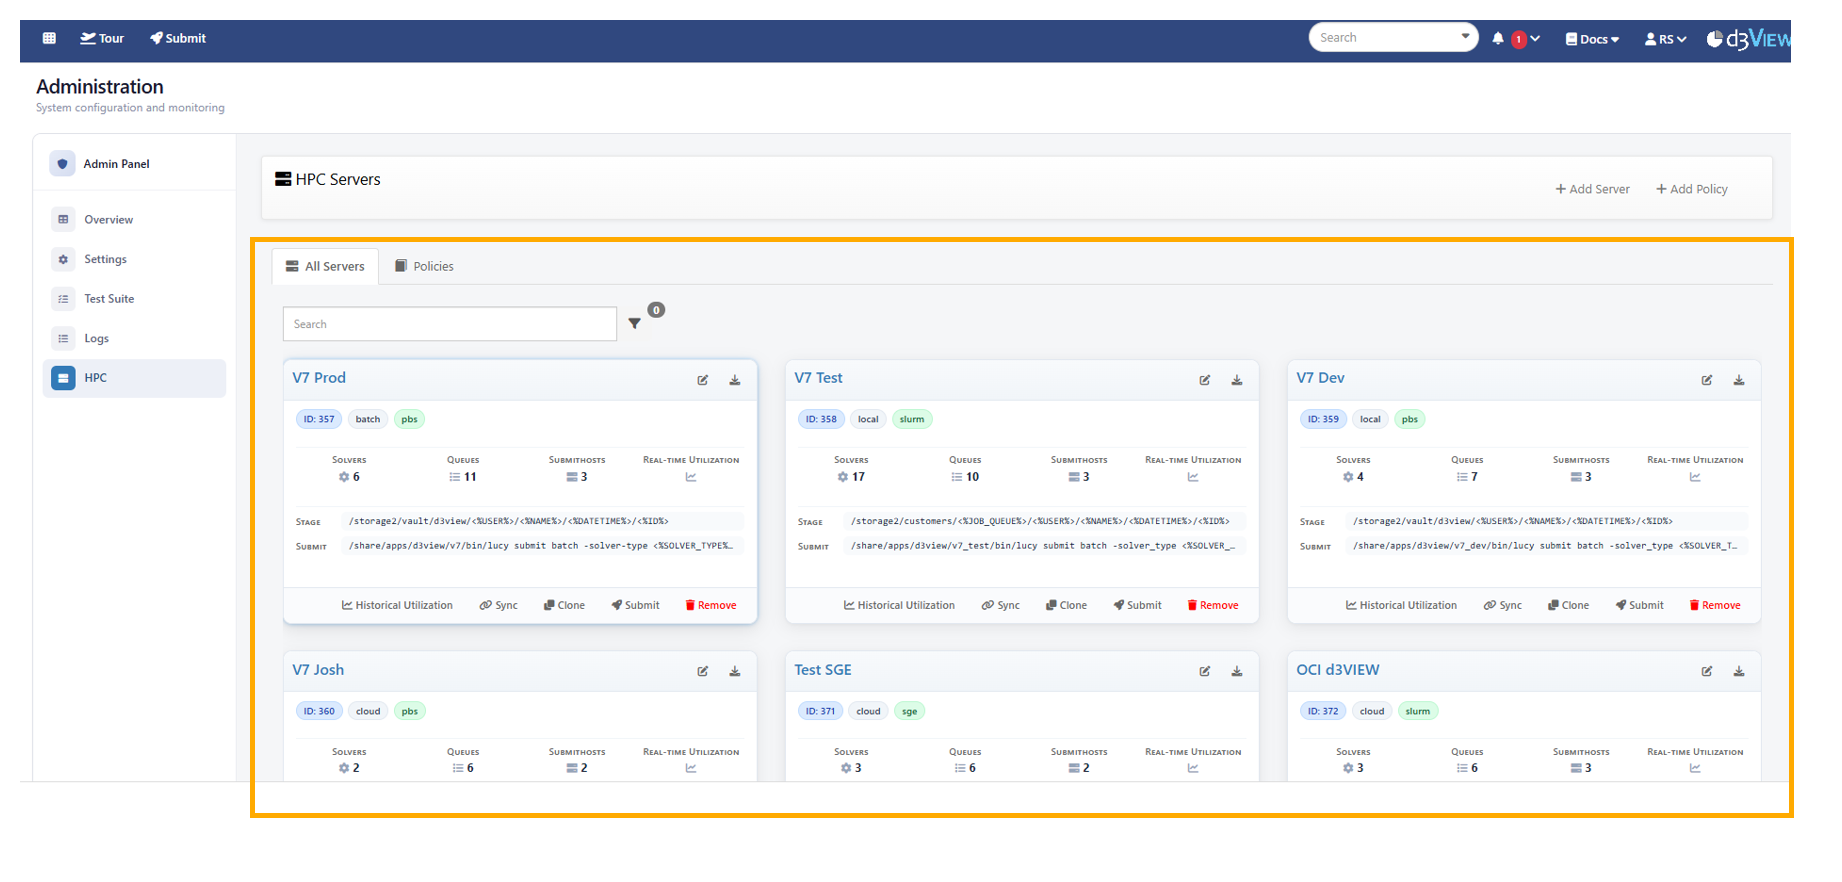
HPC
3.6. Email settings
Mail settings in Administration includes several MAIL Settings for the user.
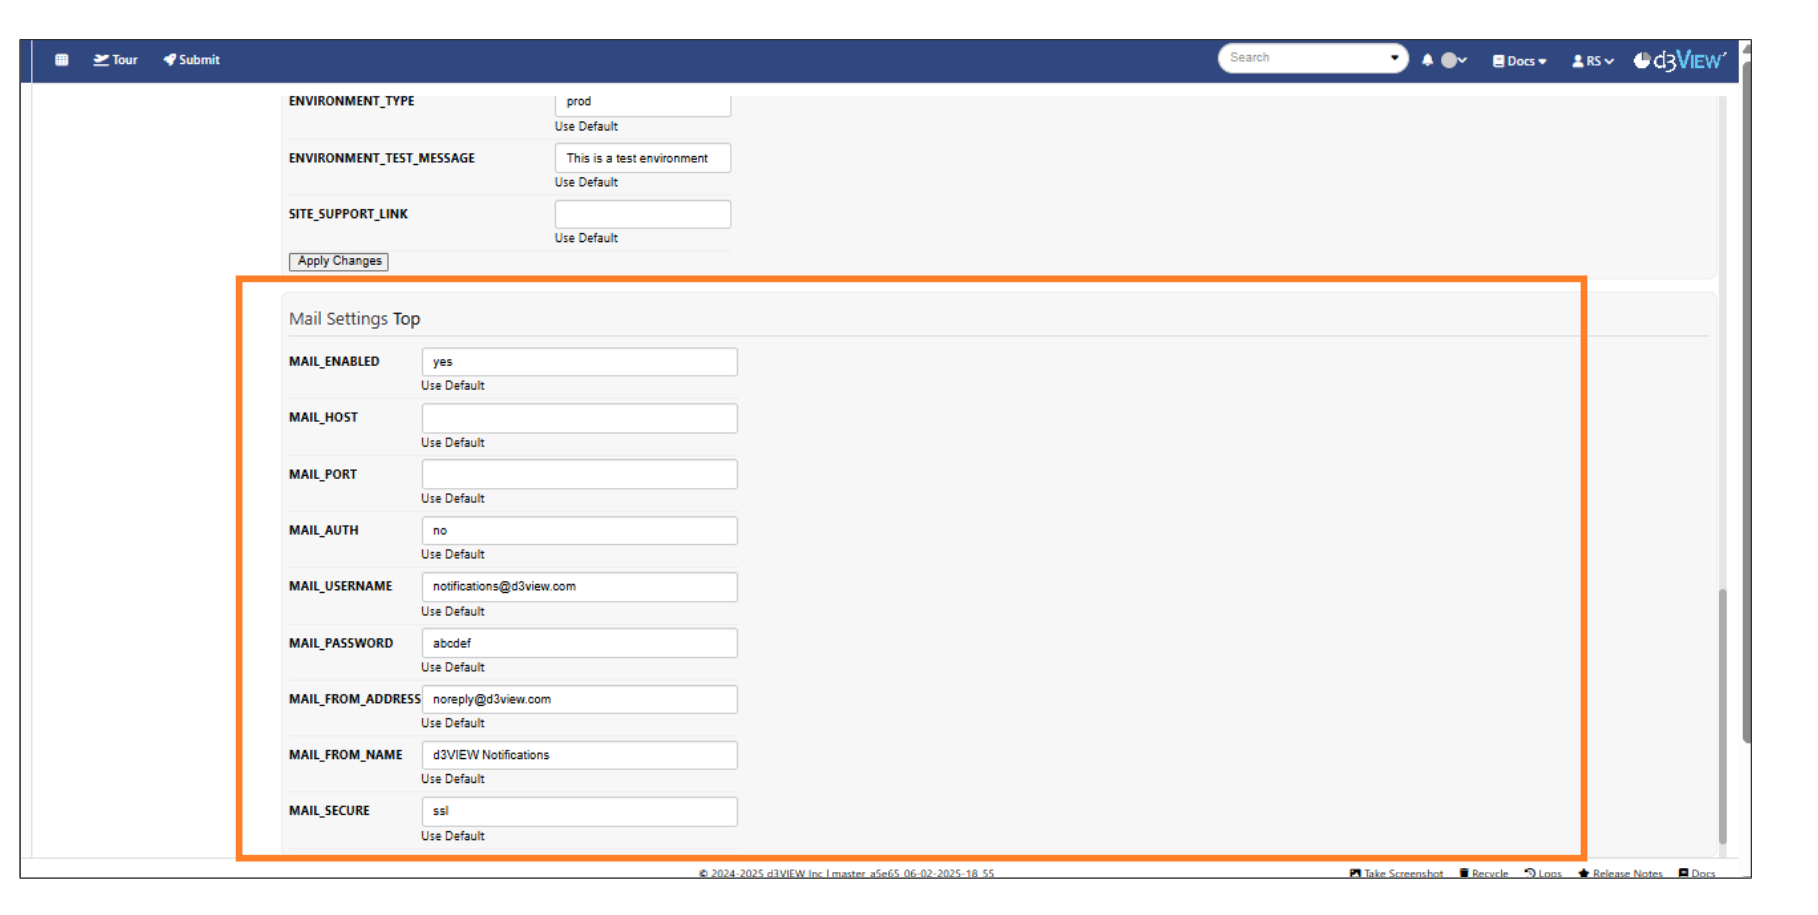
Email settings