17. Templates
Templates help turn data into information and automate the process of extracting information from raw simulations or experimental files. They are used in post processing to extract, transform and store all the required responses from a simulation or physical test automatically after the job is solved. Templates can extract from multiple parallel simulations and scale to thousands of simulations at the same time. Basically, they are a group of responses and transformations saved by users to reuse later for other simulations or physical tests.
With Templates, you can utilize machine data processing over manual data processing.
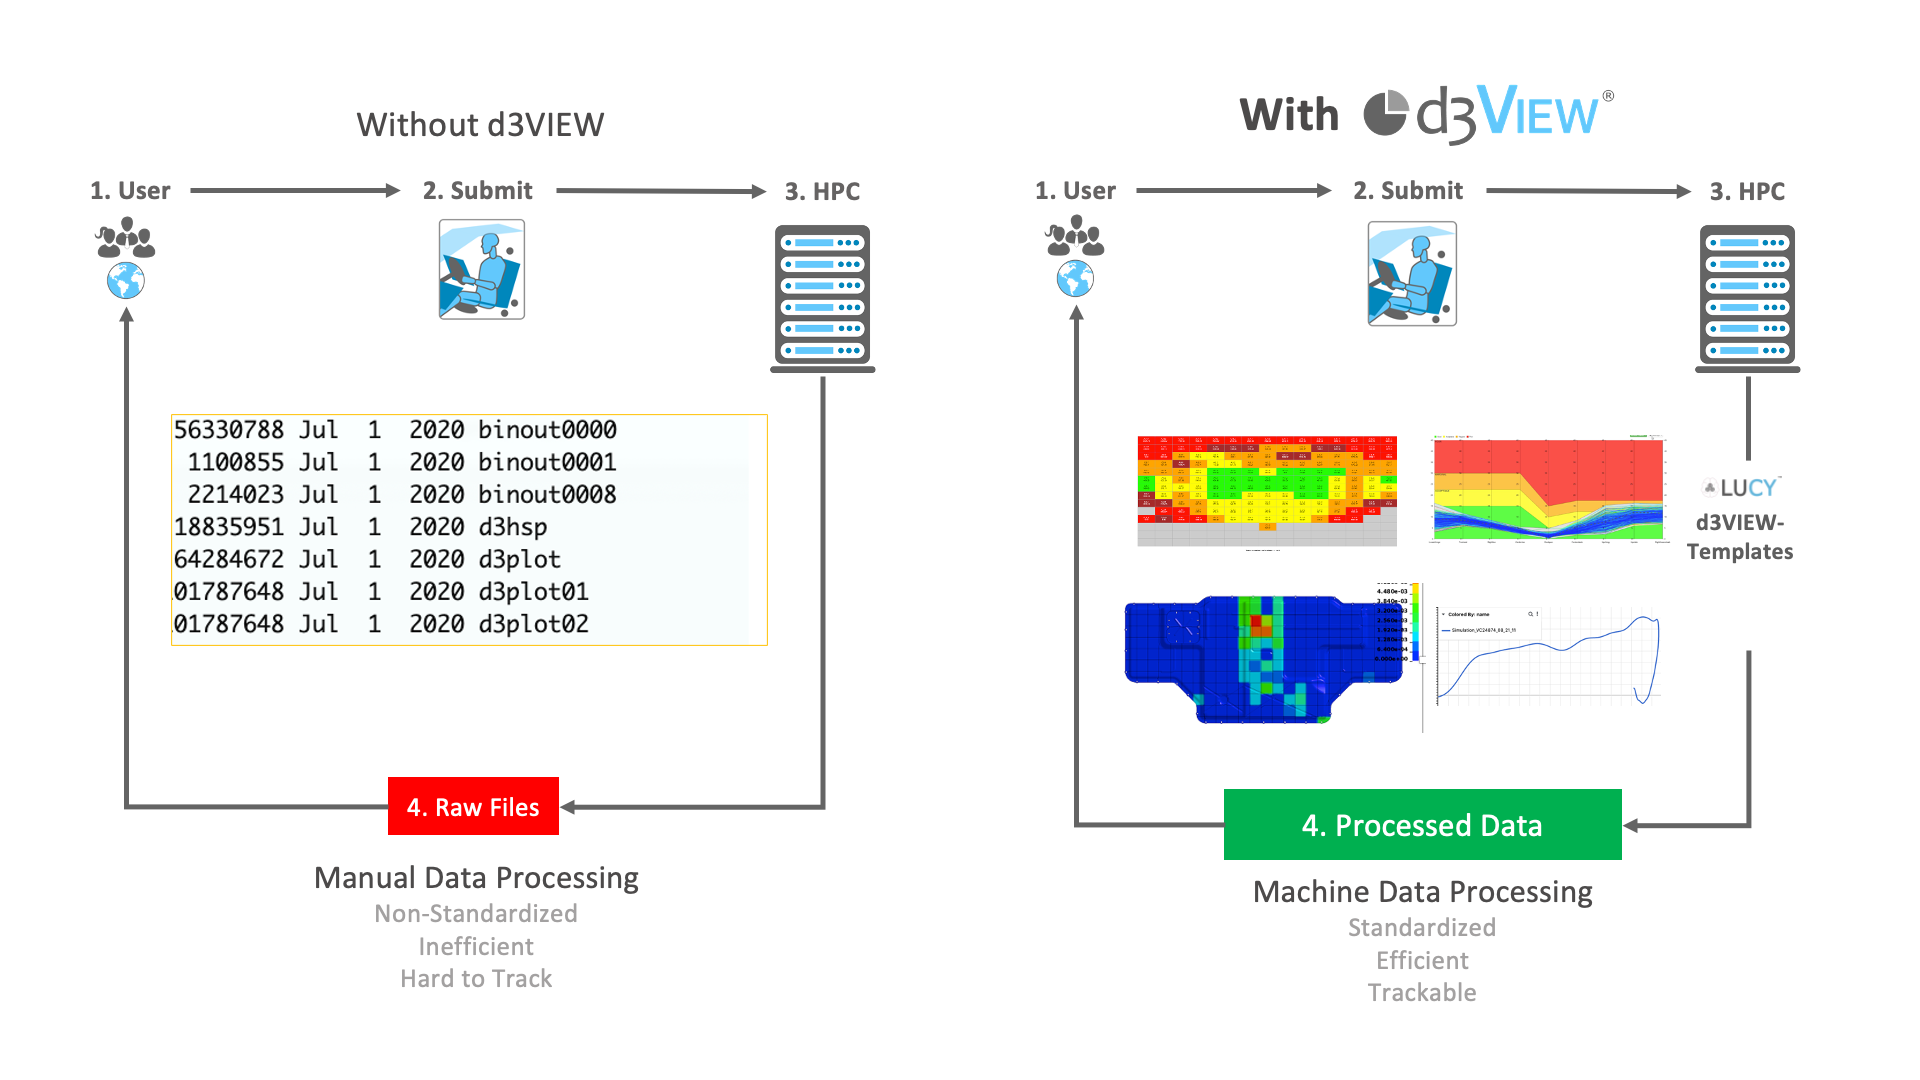
Manual Vs Machine Data Processing
What Will Be Covered
- Creating and adding to a Template
- Applying a template before a job or test is processed
- Applying a template after a job or test is processed
- Managing Templates
17.1. Creating a Template
Template Creation
Templates can be now created using two options, one from the library and the other by uploading a file.
You can create templates from the responses of your simulations or physical tests. You can also create a template from a file.
Create or Update From Simulation or Physical Test Responses
- Open the simulation/physical test from which the template needs to be prepared.
- We will use a simulation to create a template for this example. The same steps can be followed to generate a template from physical test responses
- Navigate to the responses tab and select all the responses that needs to be added to the template.
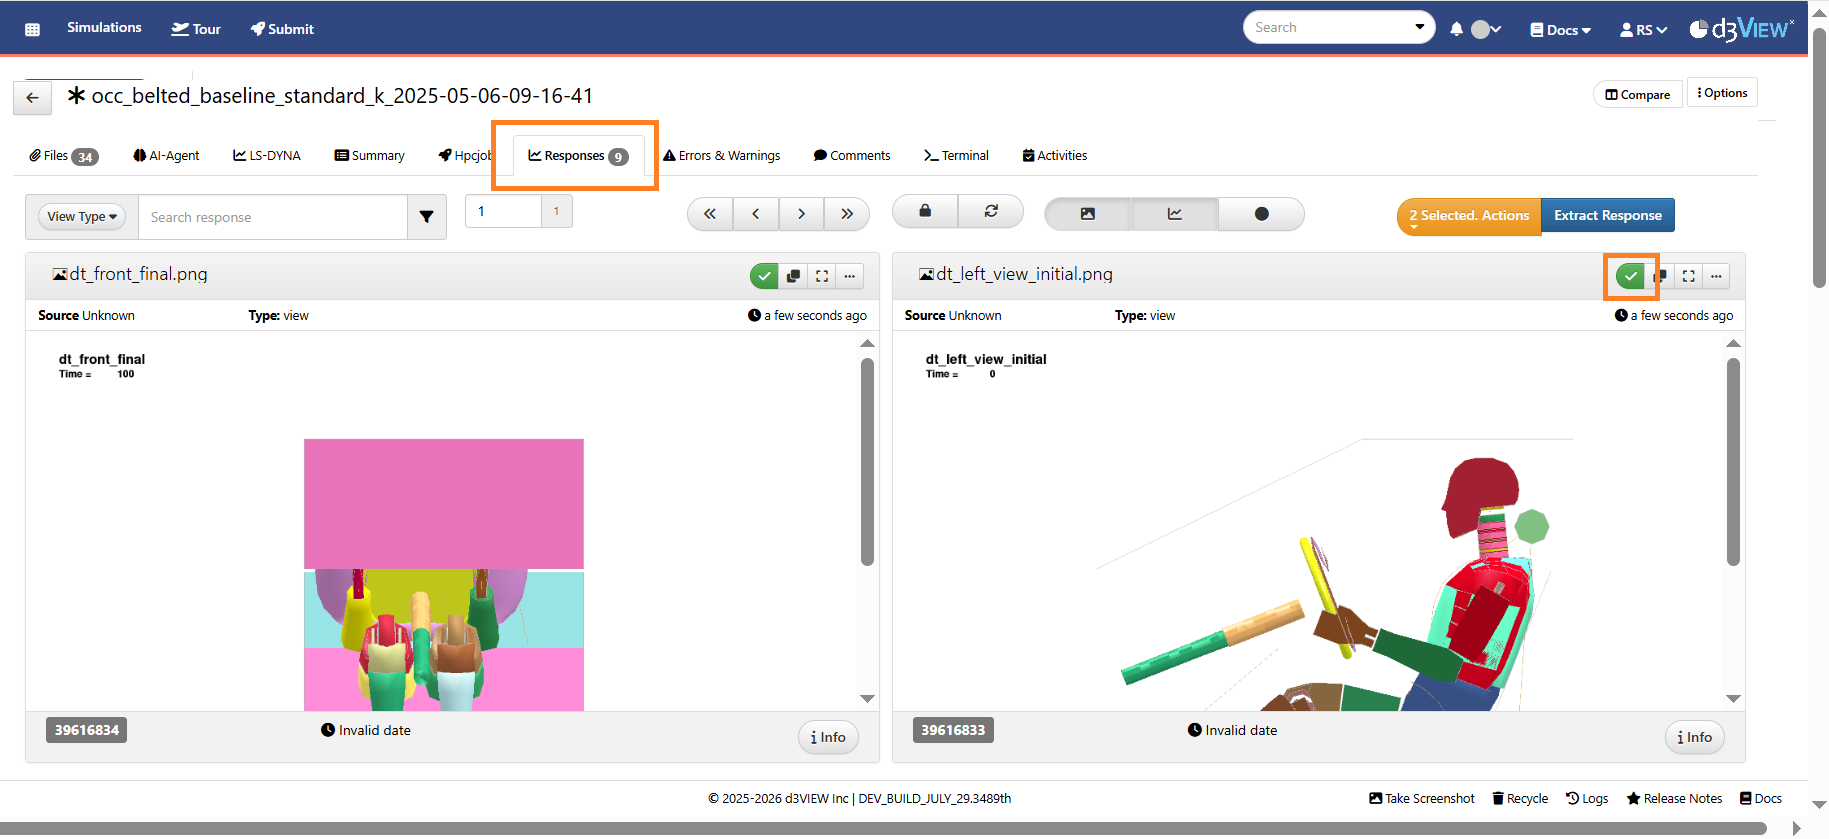
Responses Tab
- Click on the ‘Create New Template’ button under ‘Selected’ drop-down menu

Figure 2: Create New Template from Simulations Responses
- Provide a name and description for the new template in the ‘Create Response Template’ window.
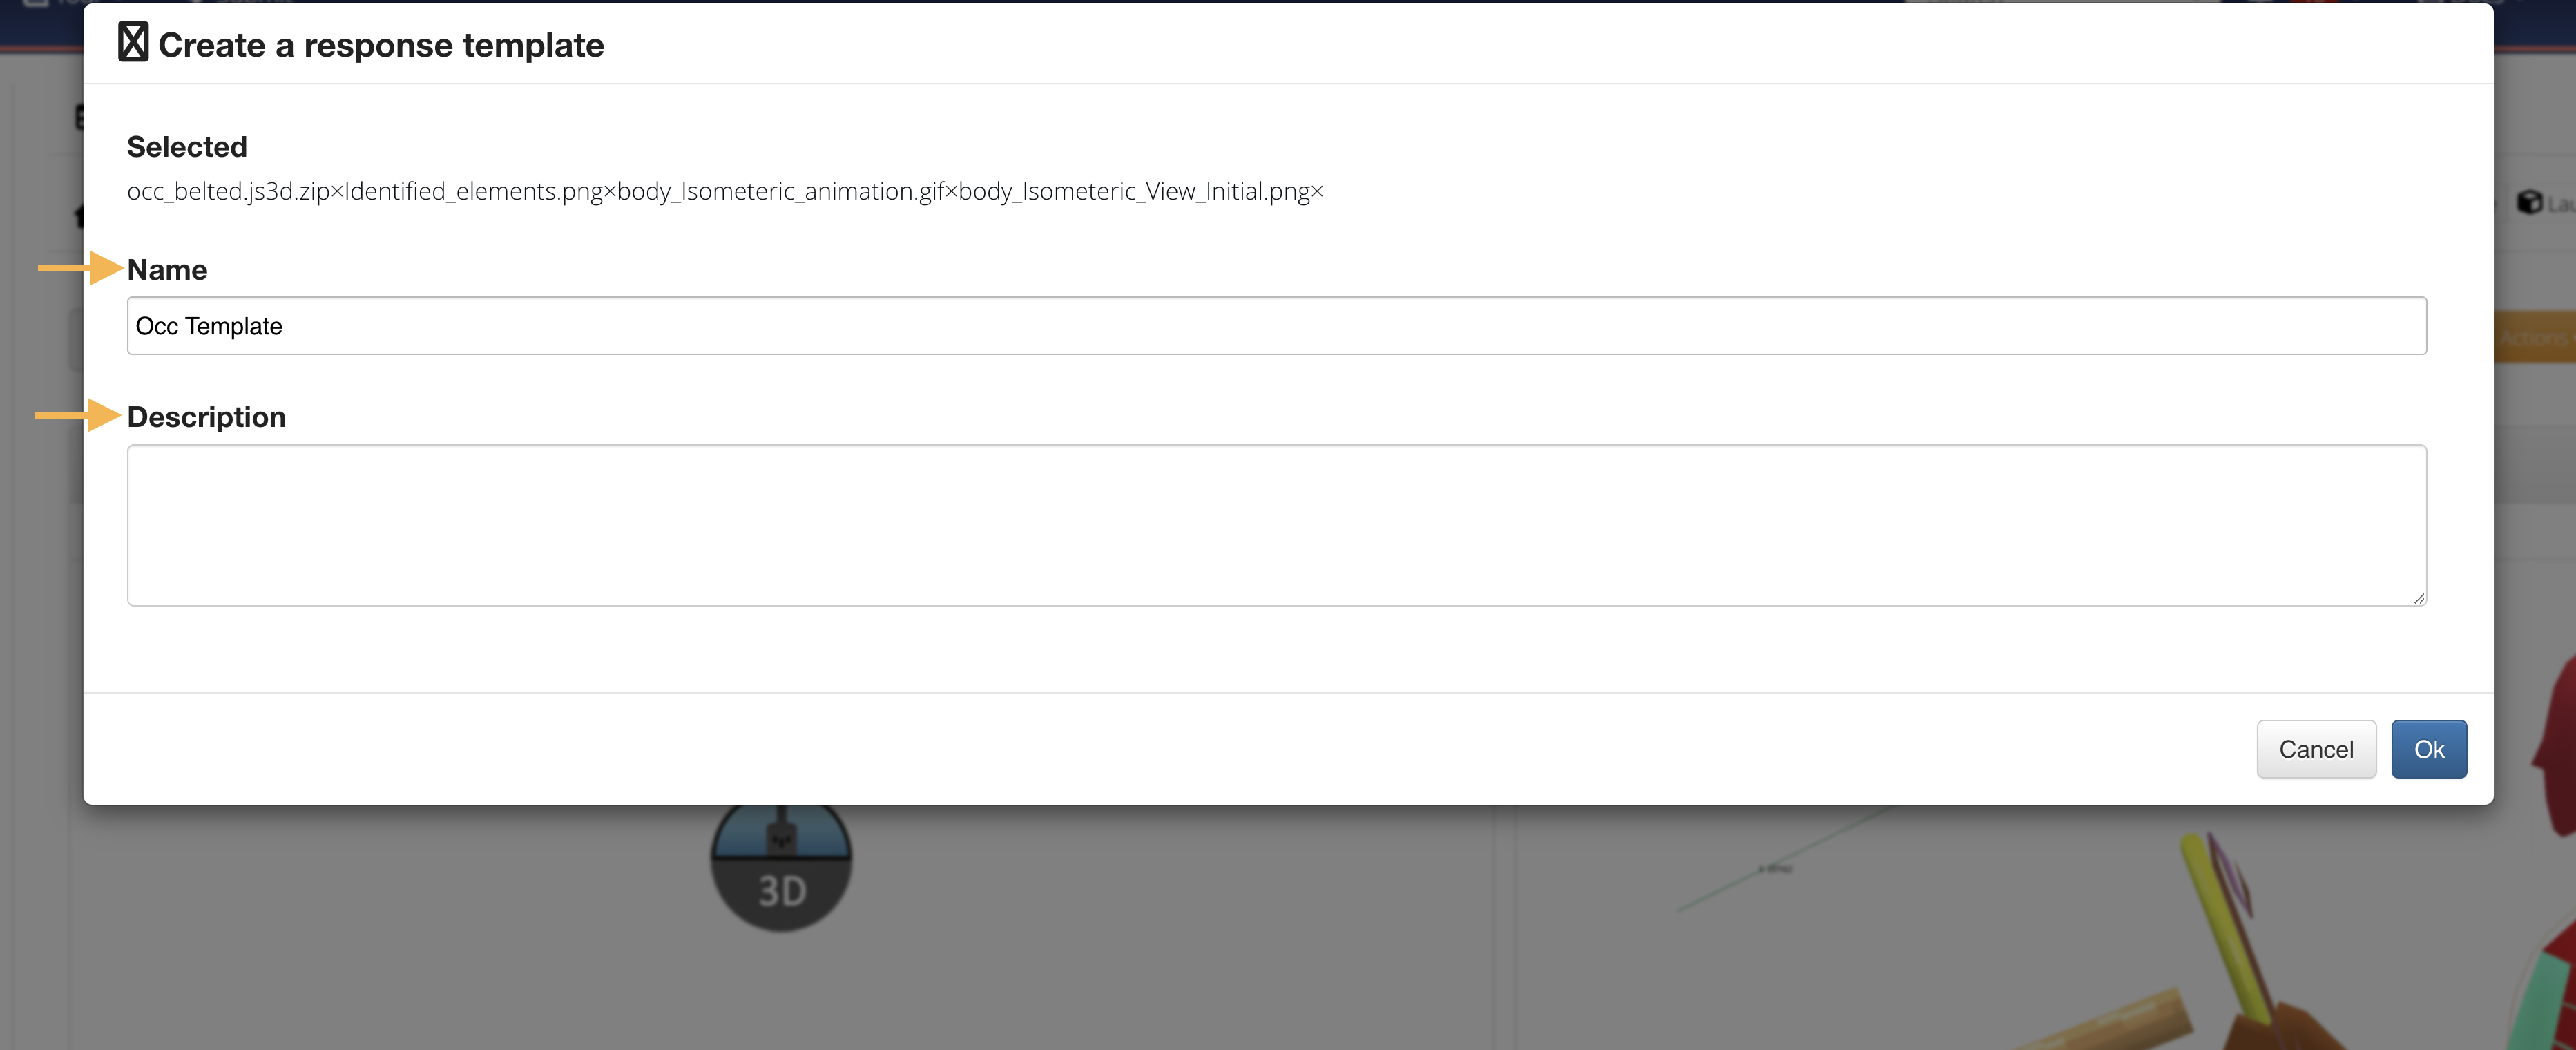
Figure 3: Create New Template
- To populate an existing template, click on ‘Add to Existing Template’ under the ‘Selected’ drop-down menu.
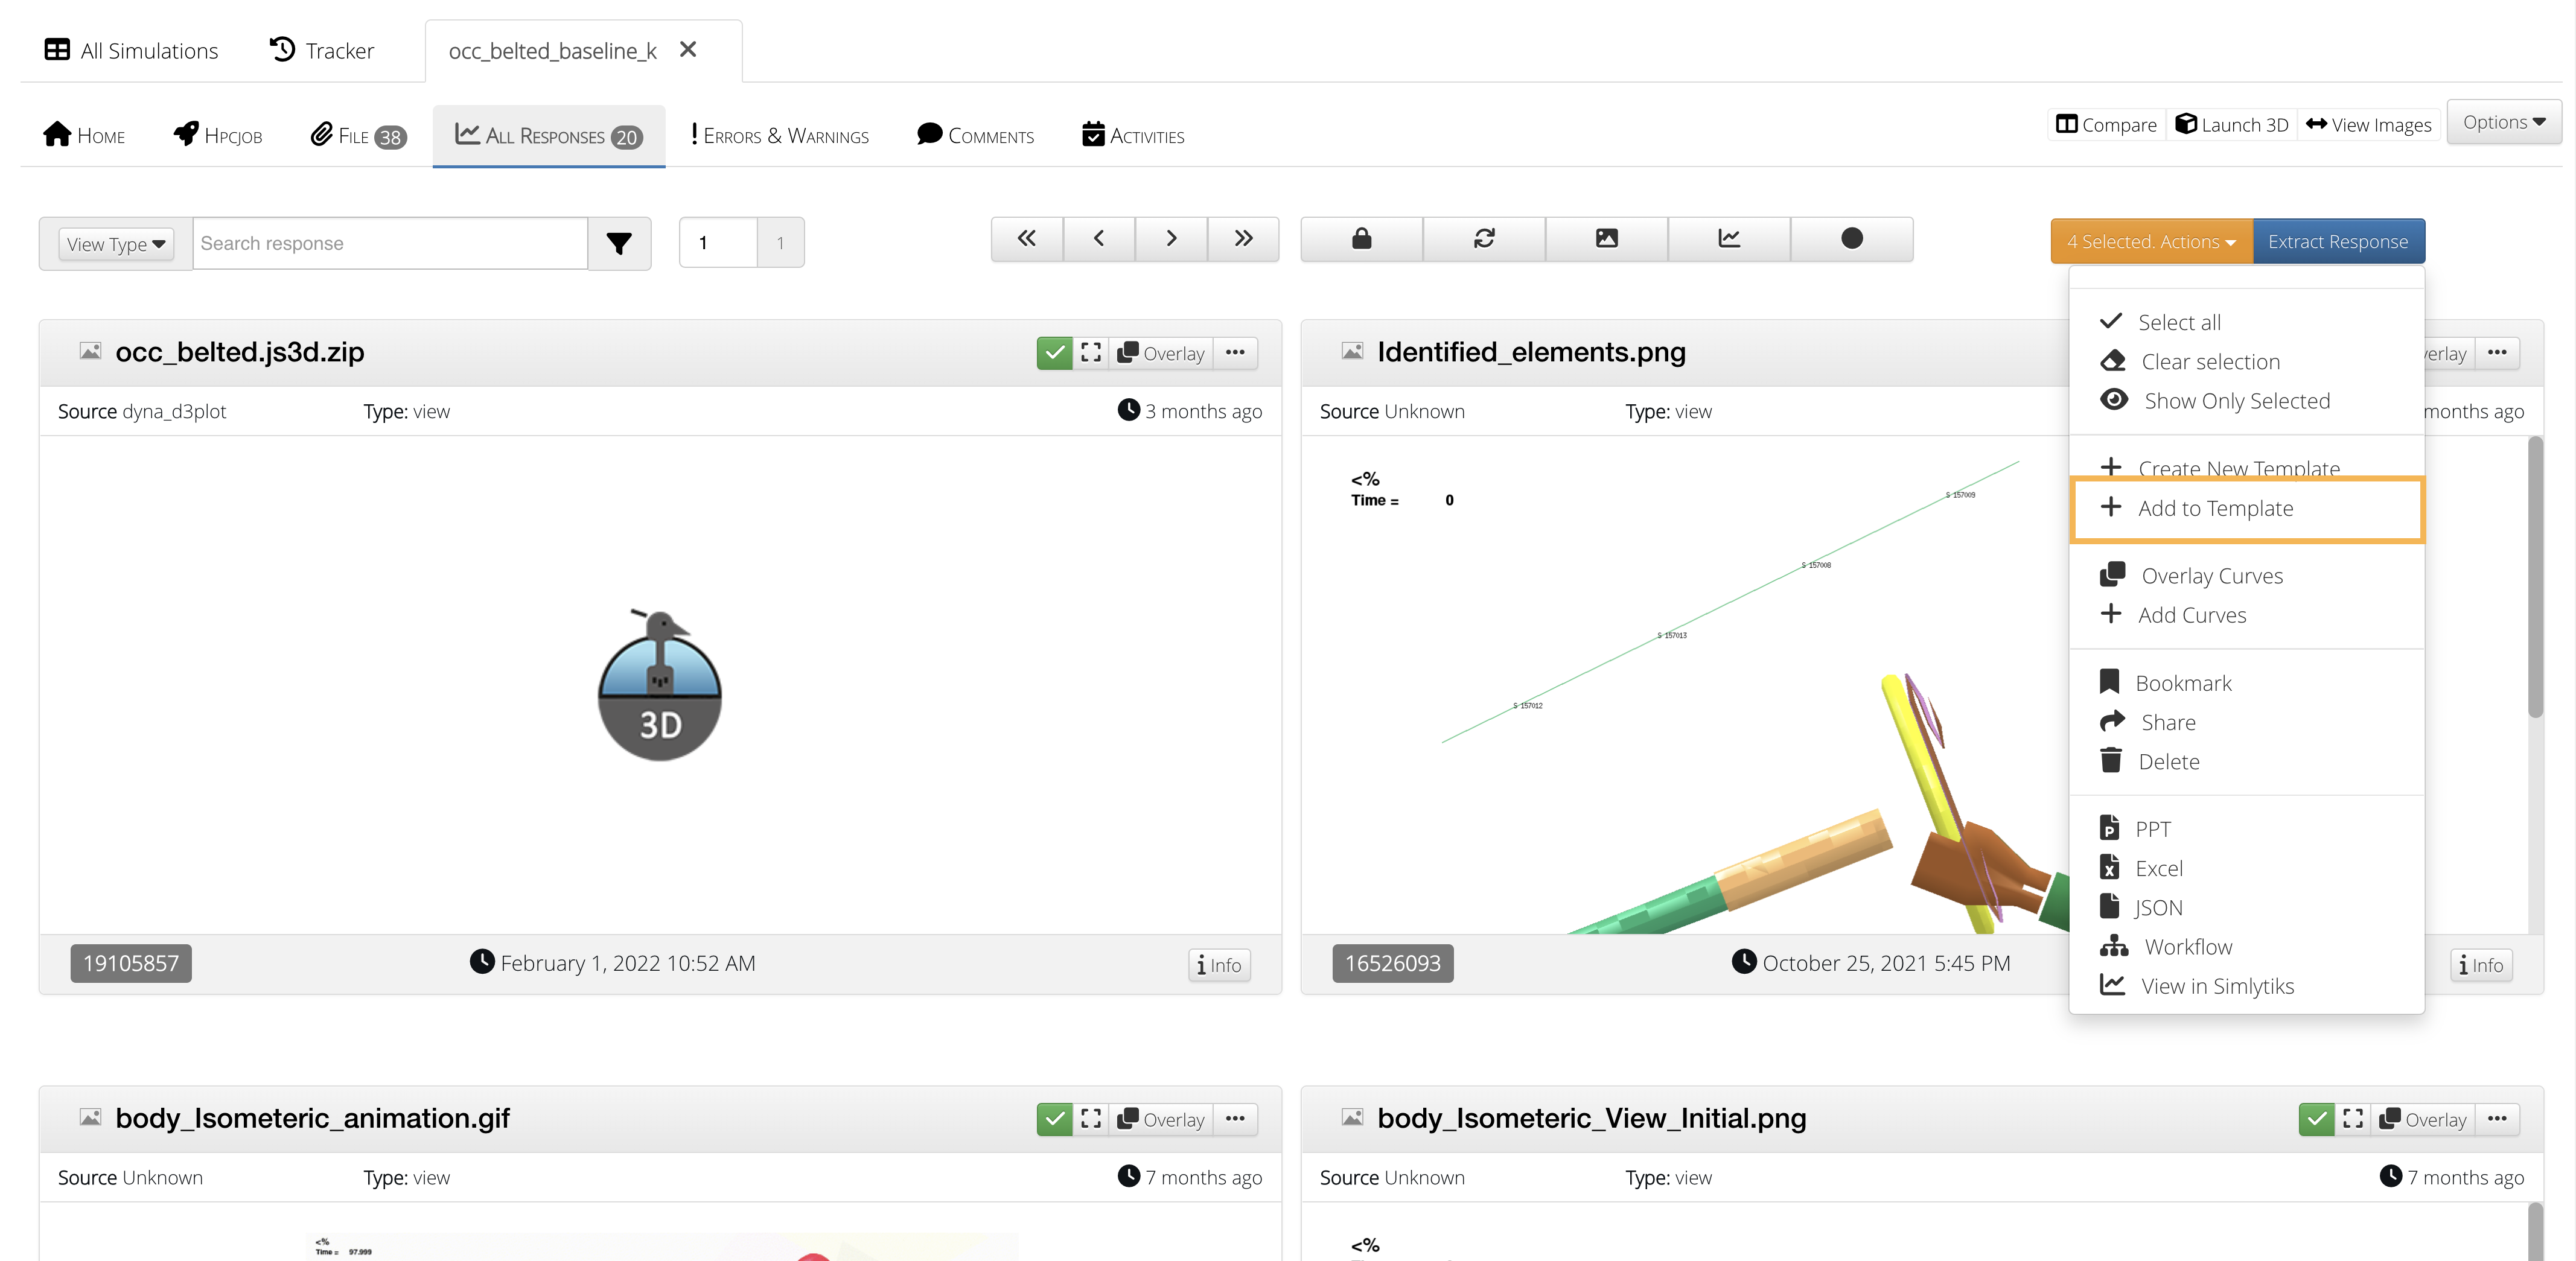
Figure 4: Add to Existing Template from Simulation Responses
In the next window, choose the remote lookup as a template, and select the templates. Click ‘OK’ to finish
Create or Upload from New Template Window
- Open the template application and click on the ‘New Template’ button
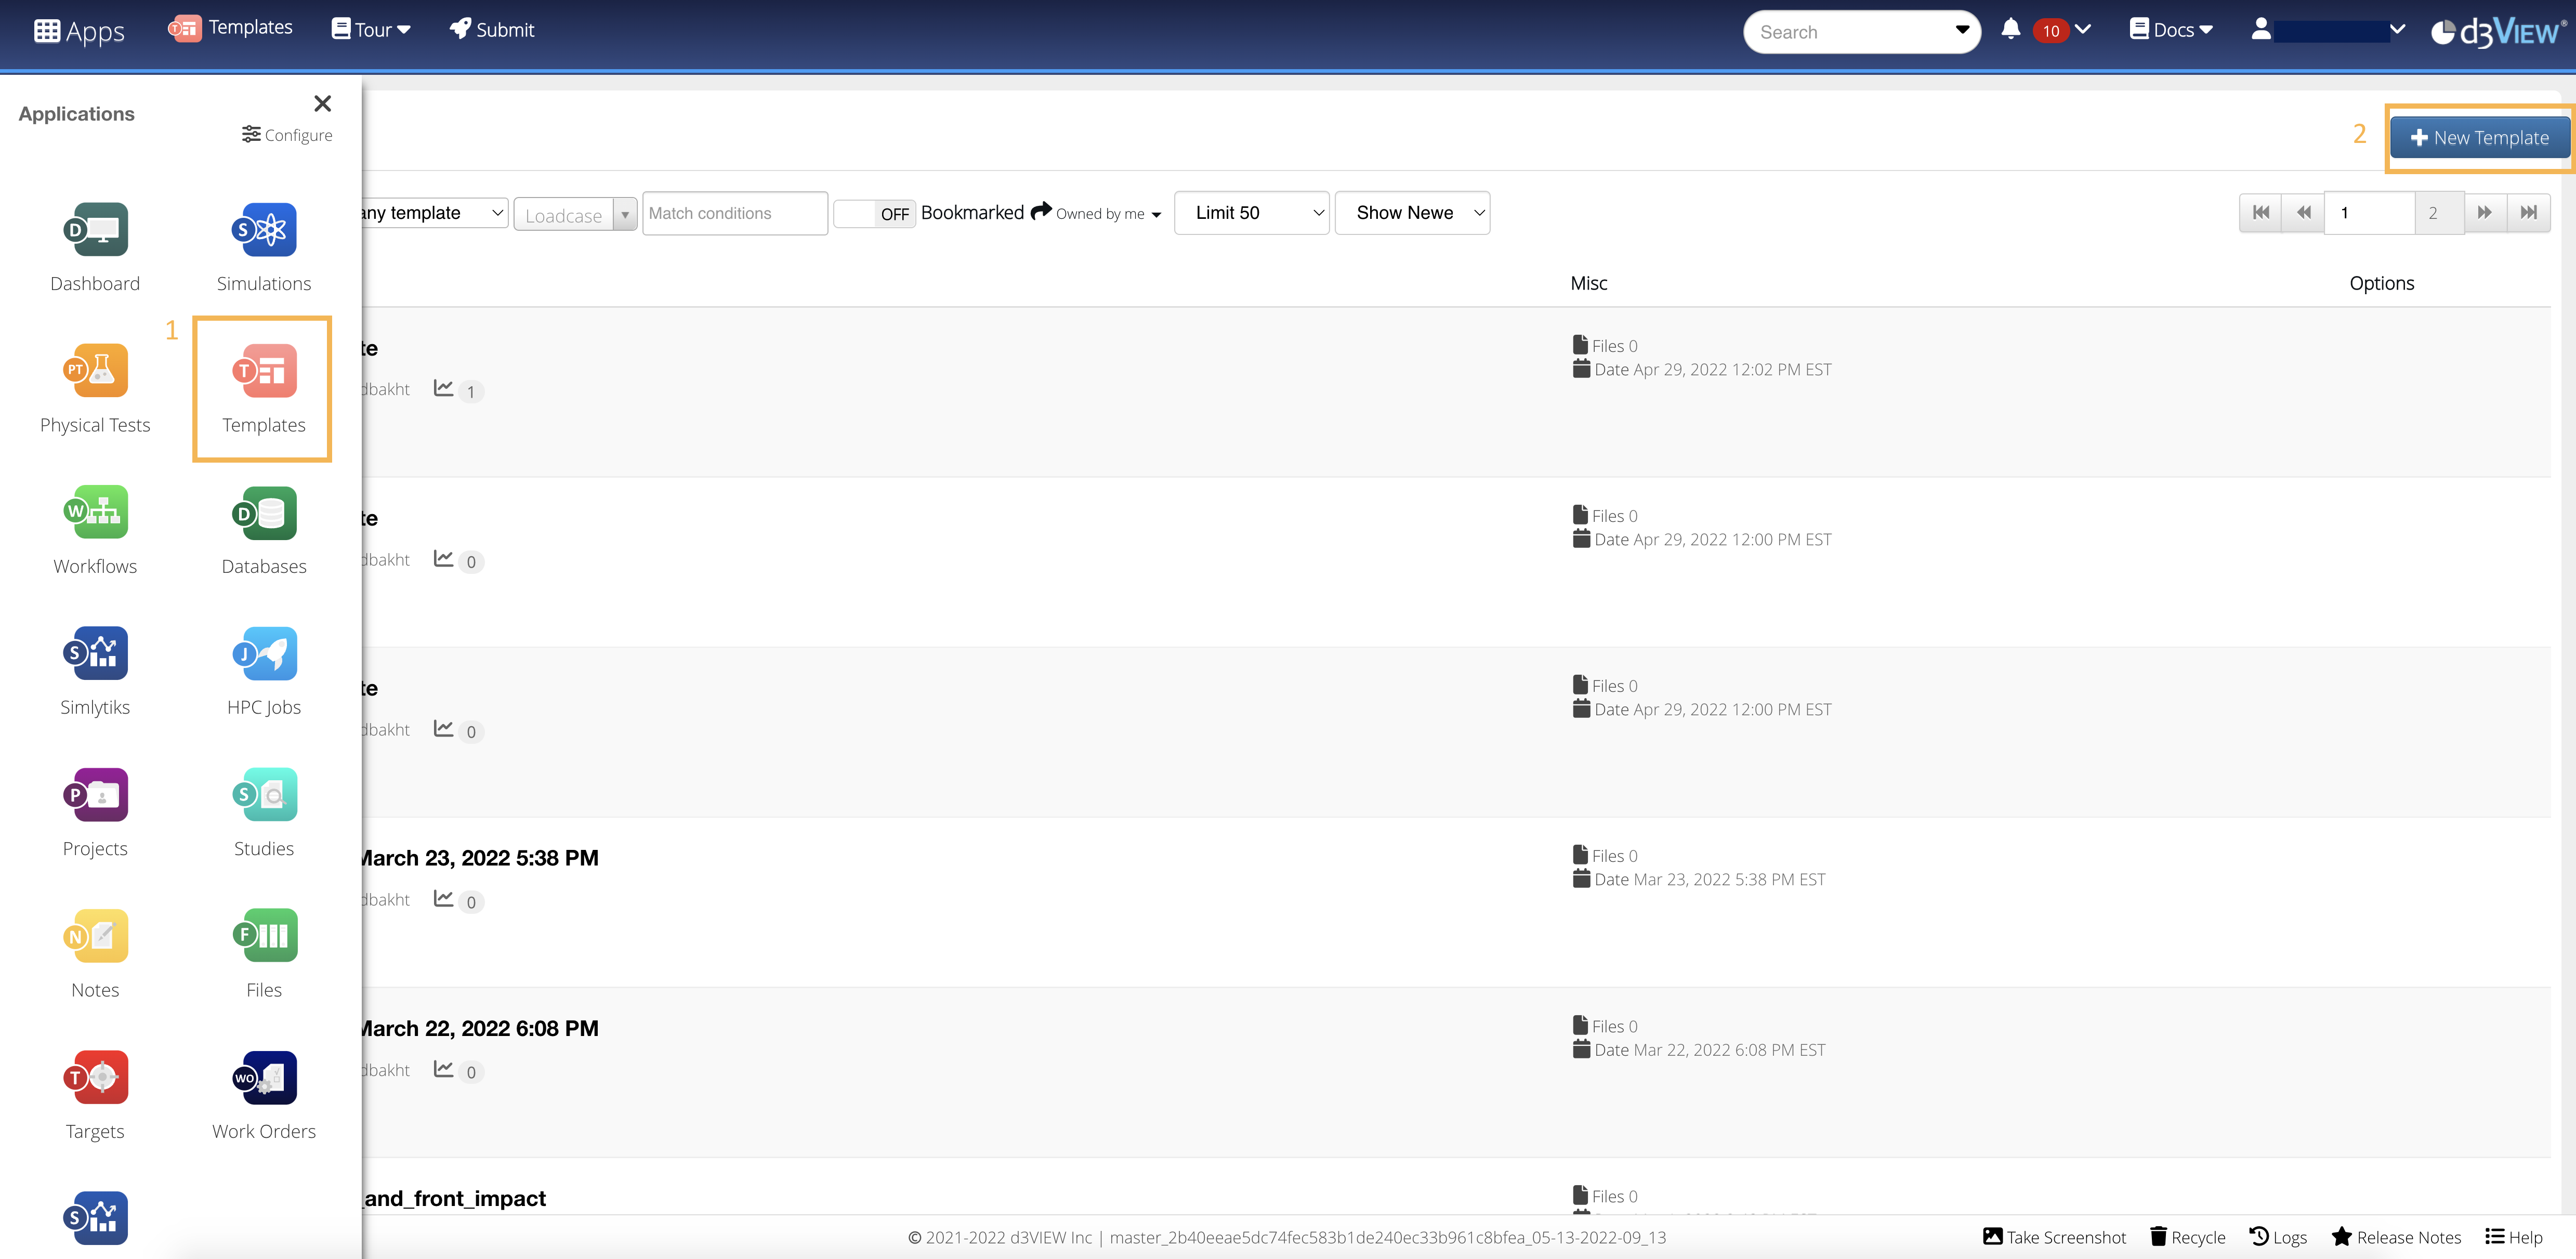
Figure 6: Create New Template
- We can choose to import a template available in the library or we can create a template by uploading a template JSON file.
- Click on the ‘From Library’ tab to import the template from the library.
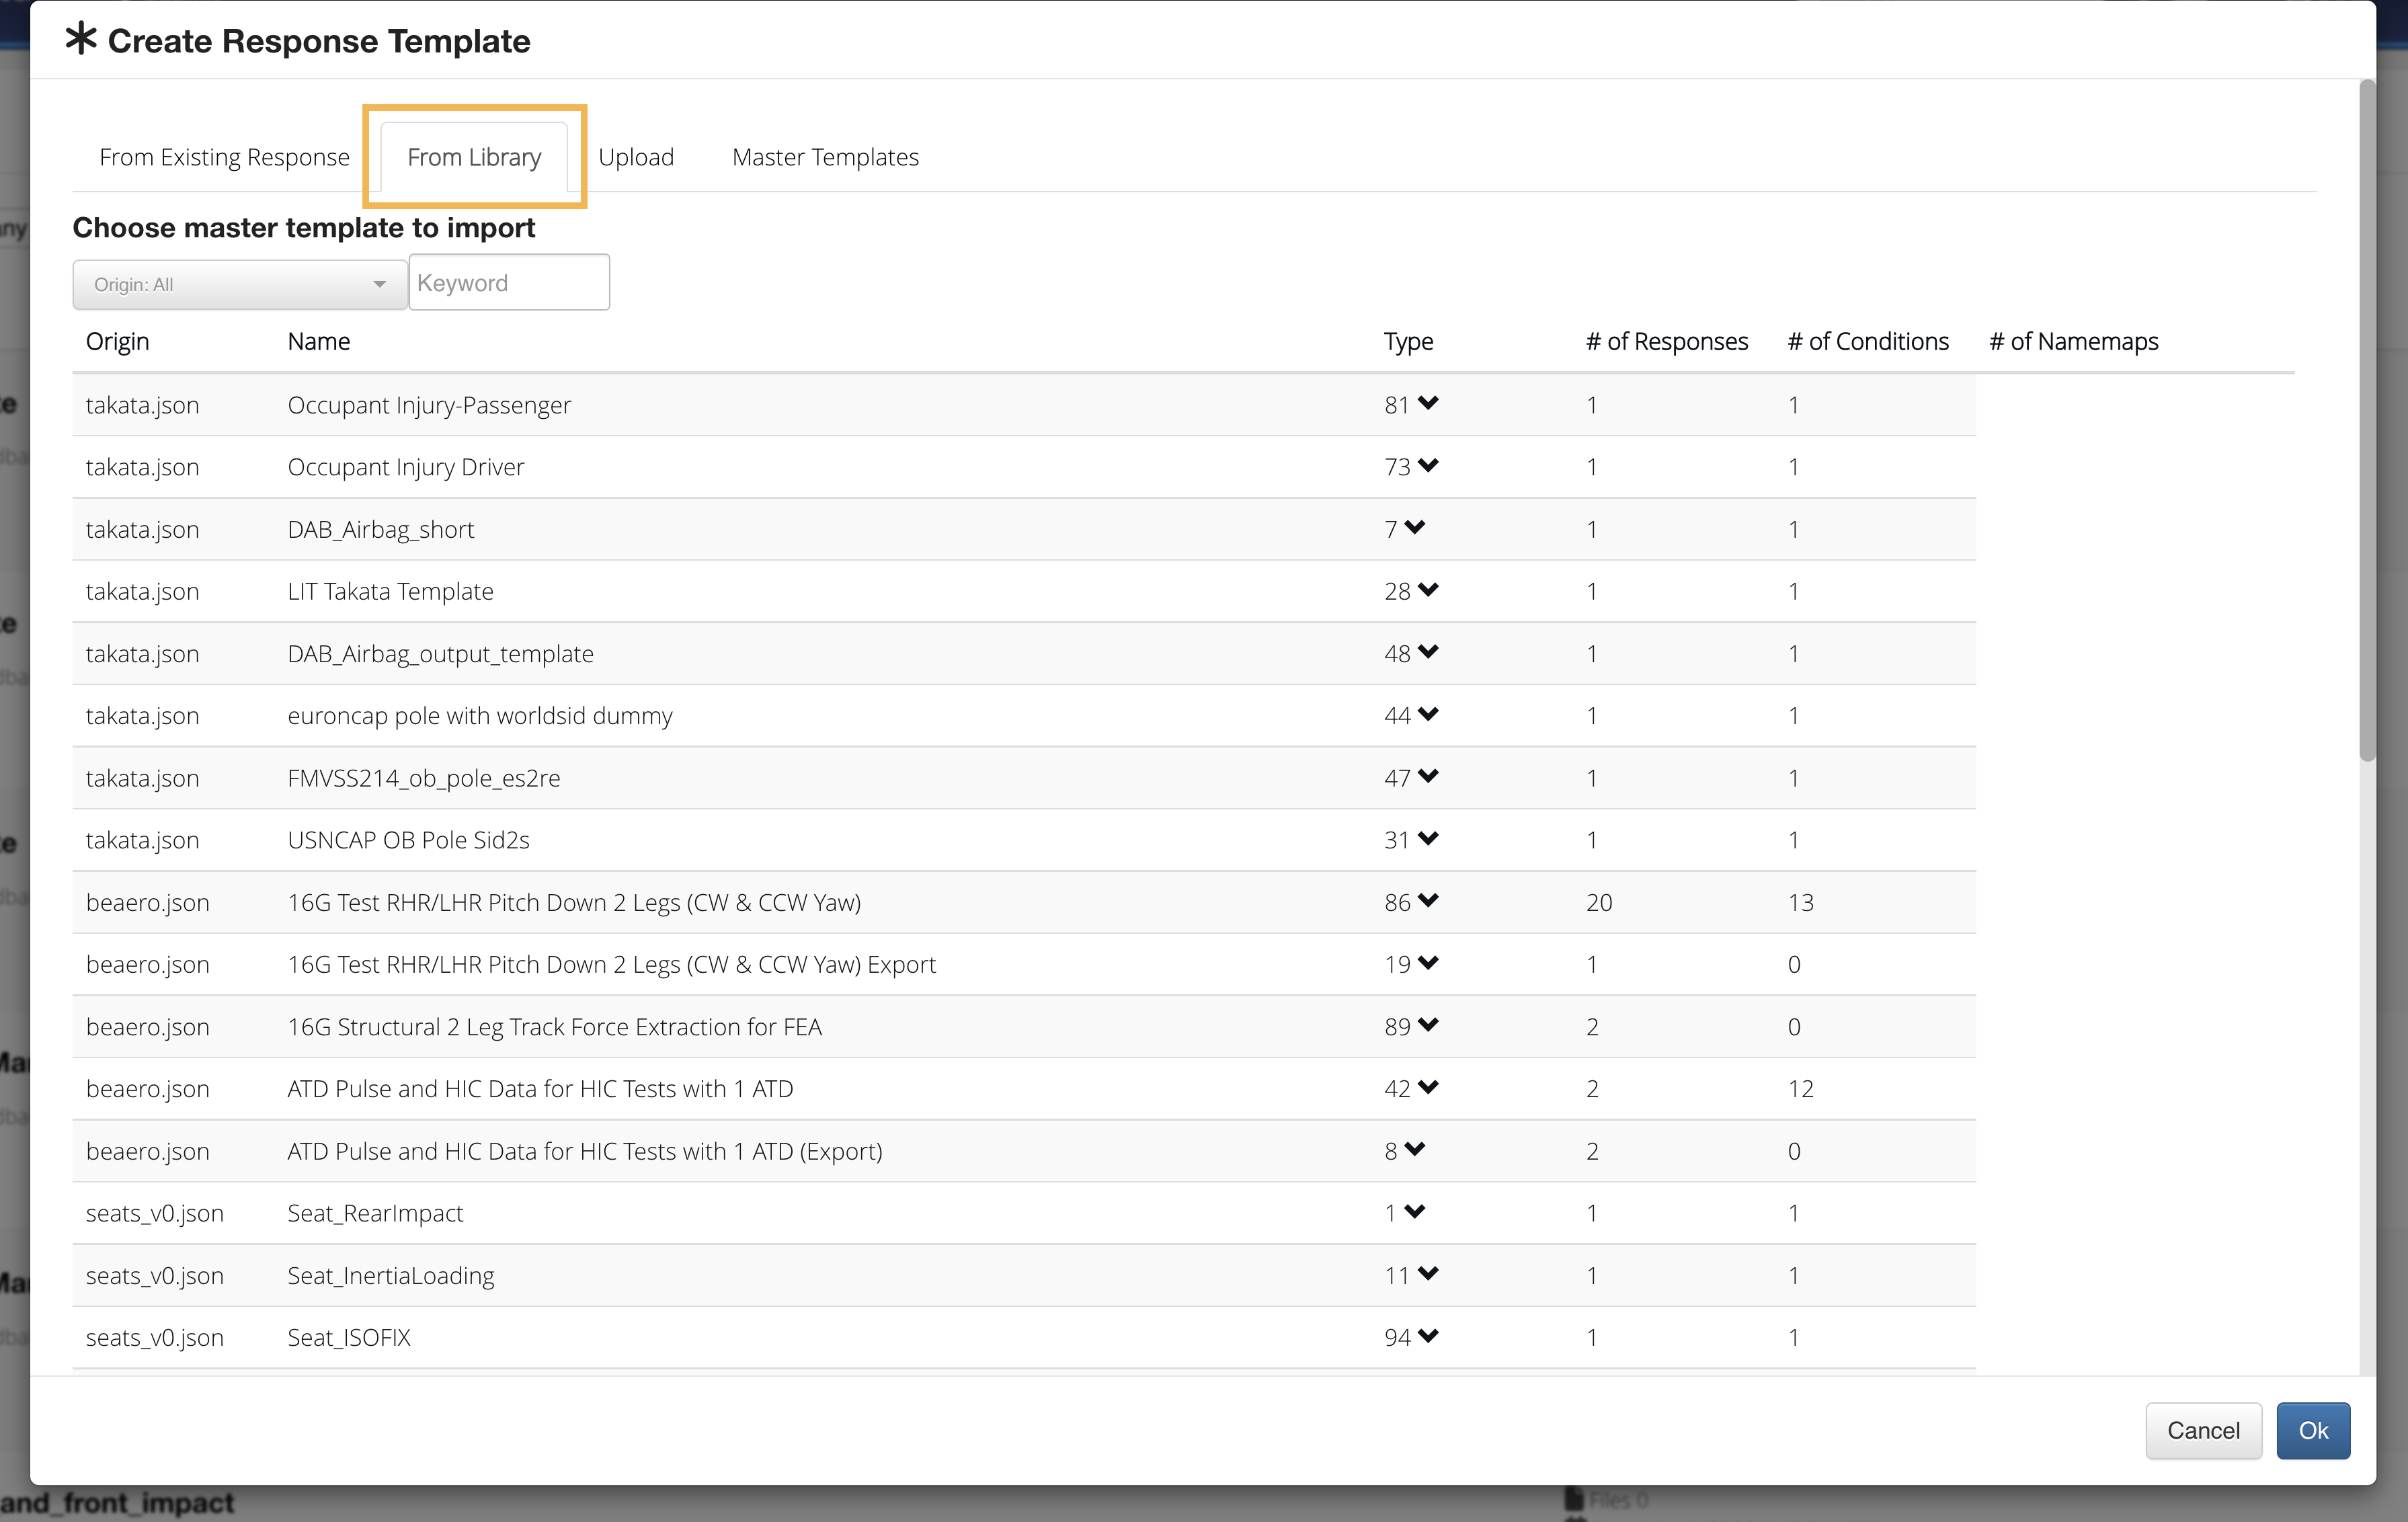
Figure 8: Create New Template From Library
- We can also create a template from a local file. Click to add or drag-and-drop files from your machine to upload as a template.
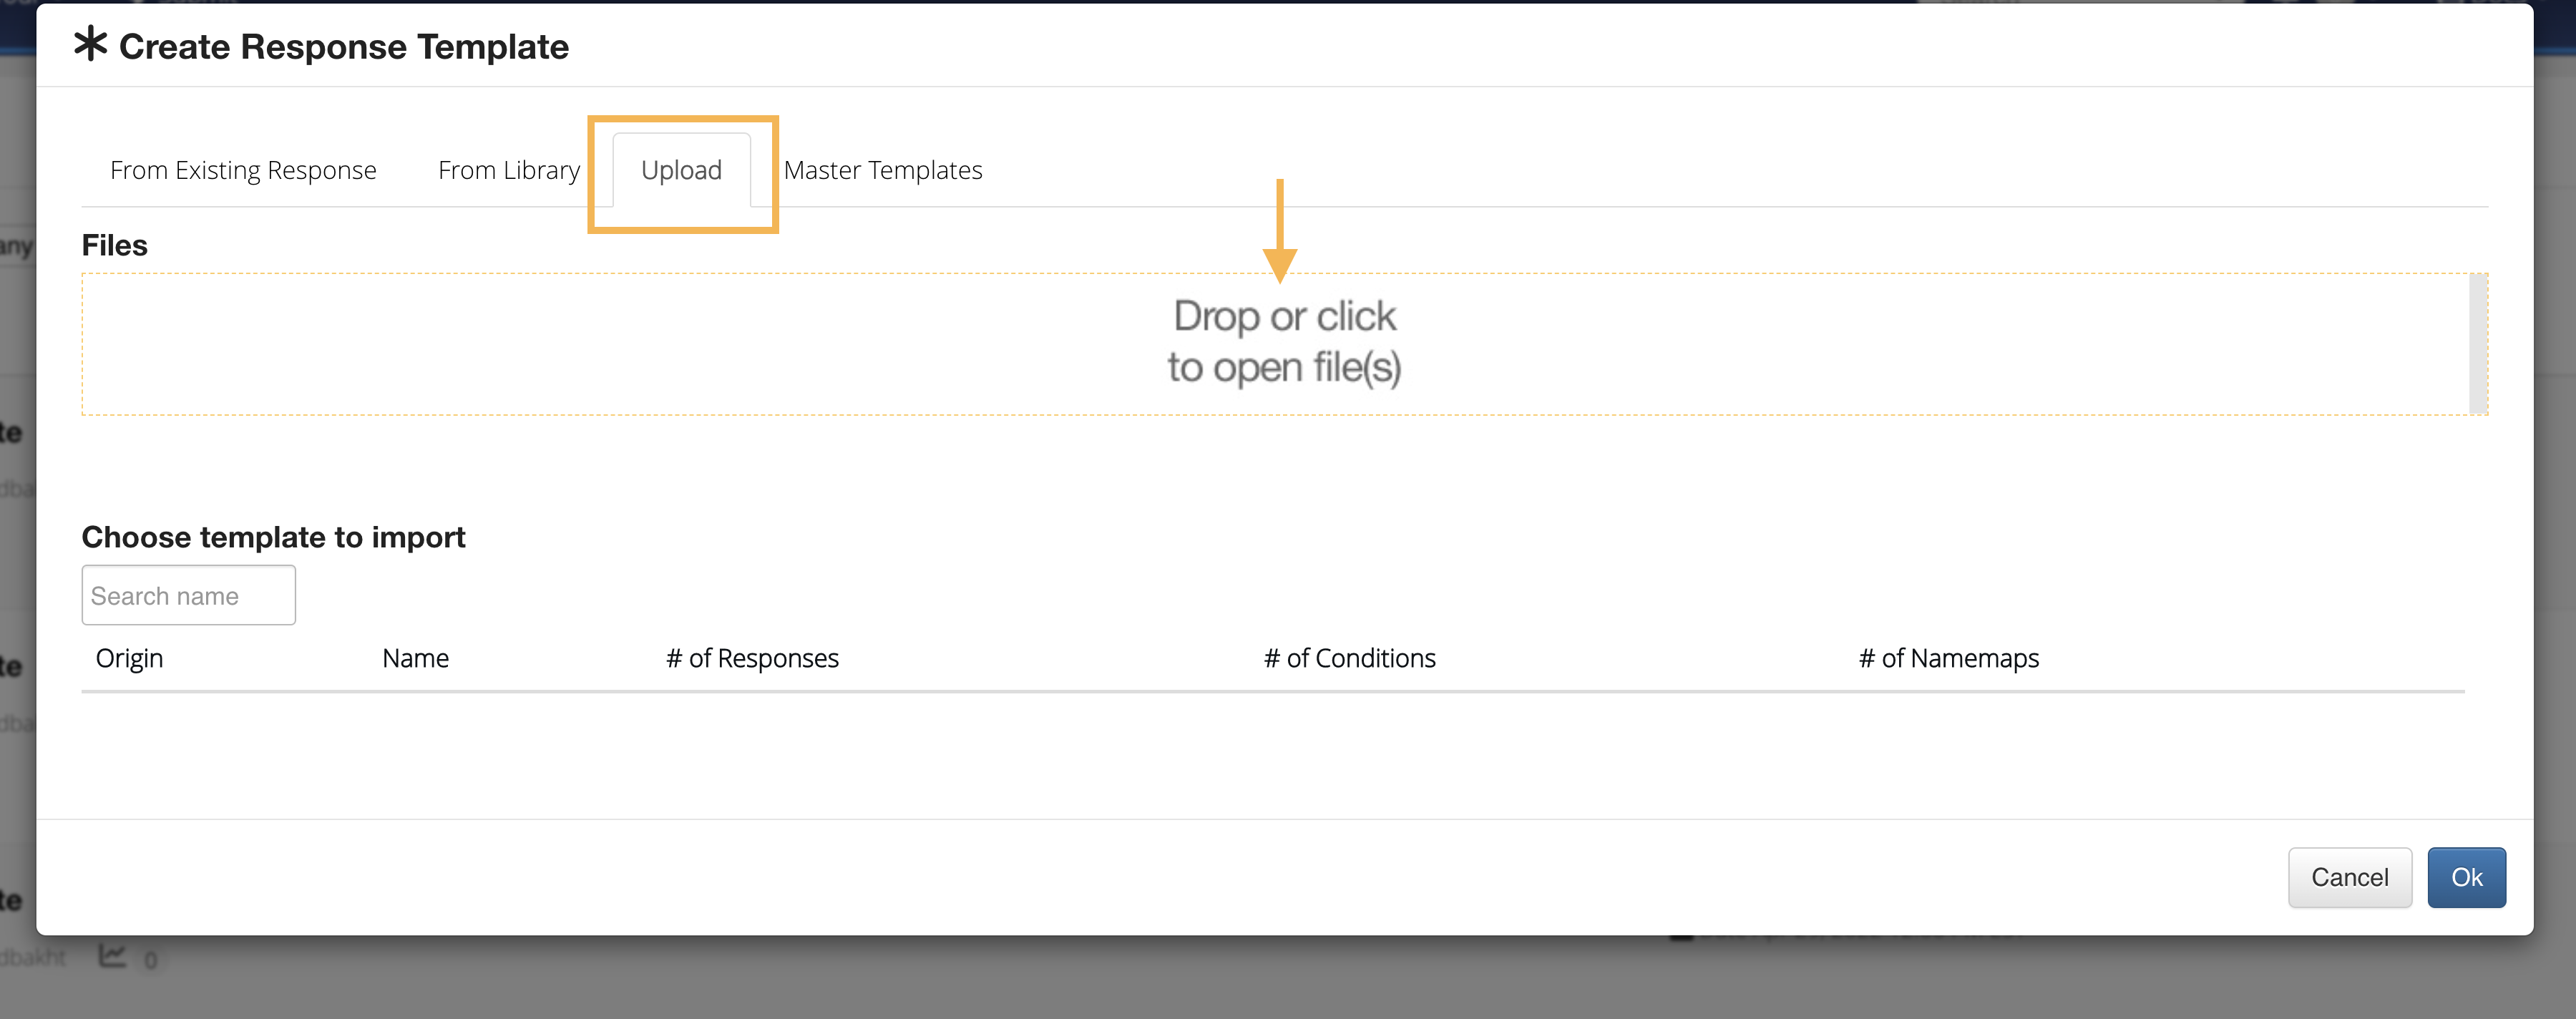
Figure 9: Create New Template From File
17.2. Applying a Template
Templates can be applied in the configuration settings before submitting a job or test. They can also be applied after a job has been submitted or a test has been uploaded.
Condition a Template for Simulations
Conditions allow us to tell the HPC to apply a template automatically to a solving simulation. We indicate a directive for the HPC to look for in the simulation that will link it to the template.
Go to your Templates page to get started. Open the template you would like to set for your future simulation.
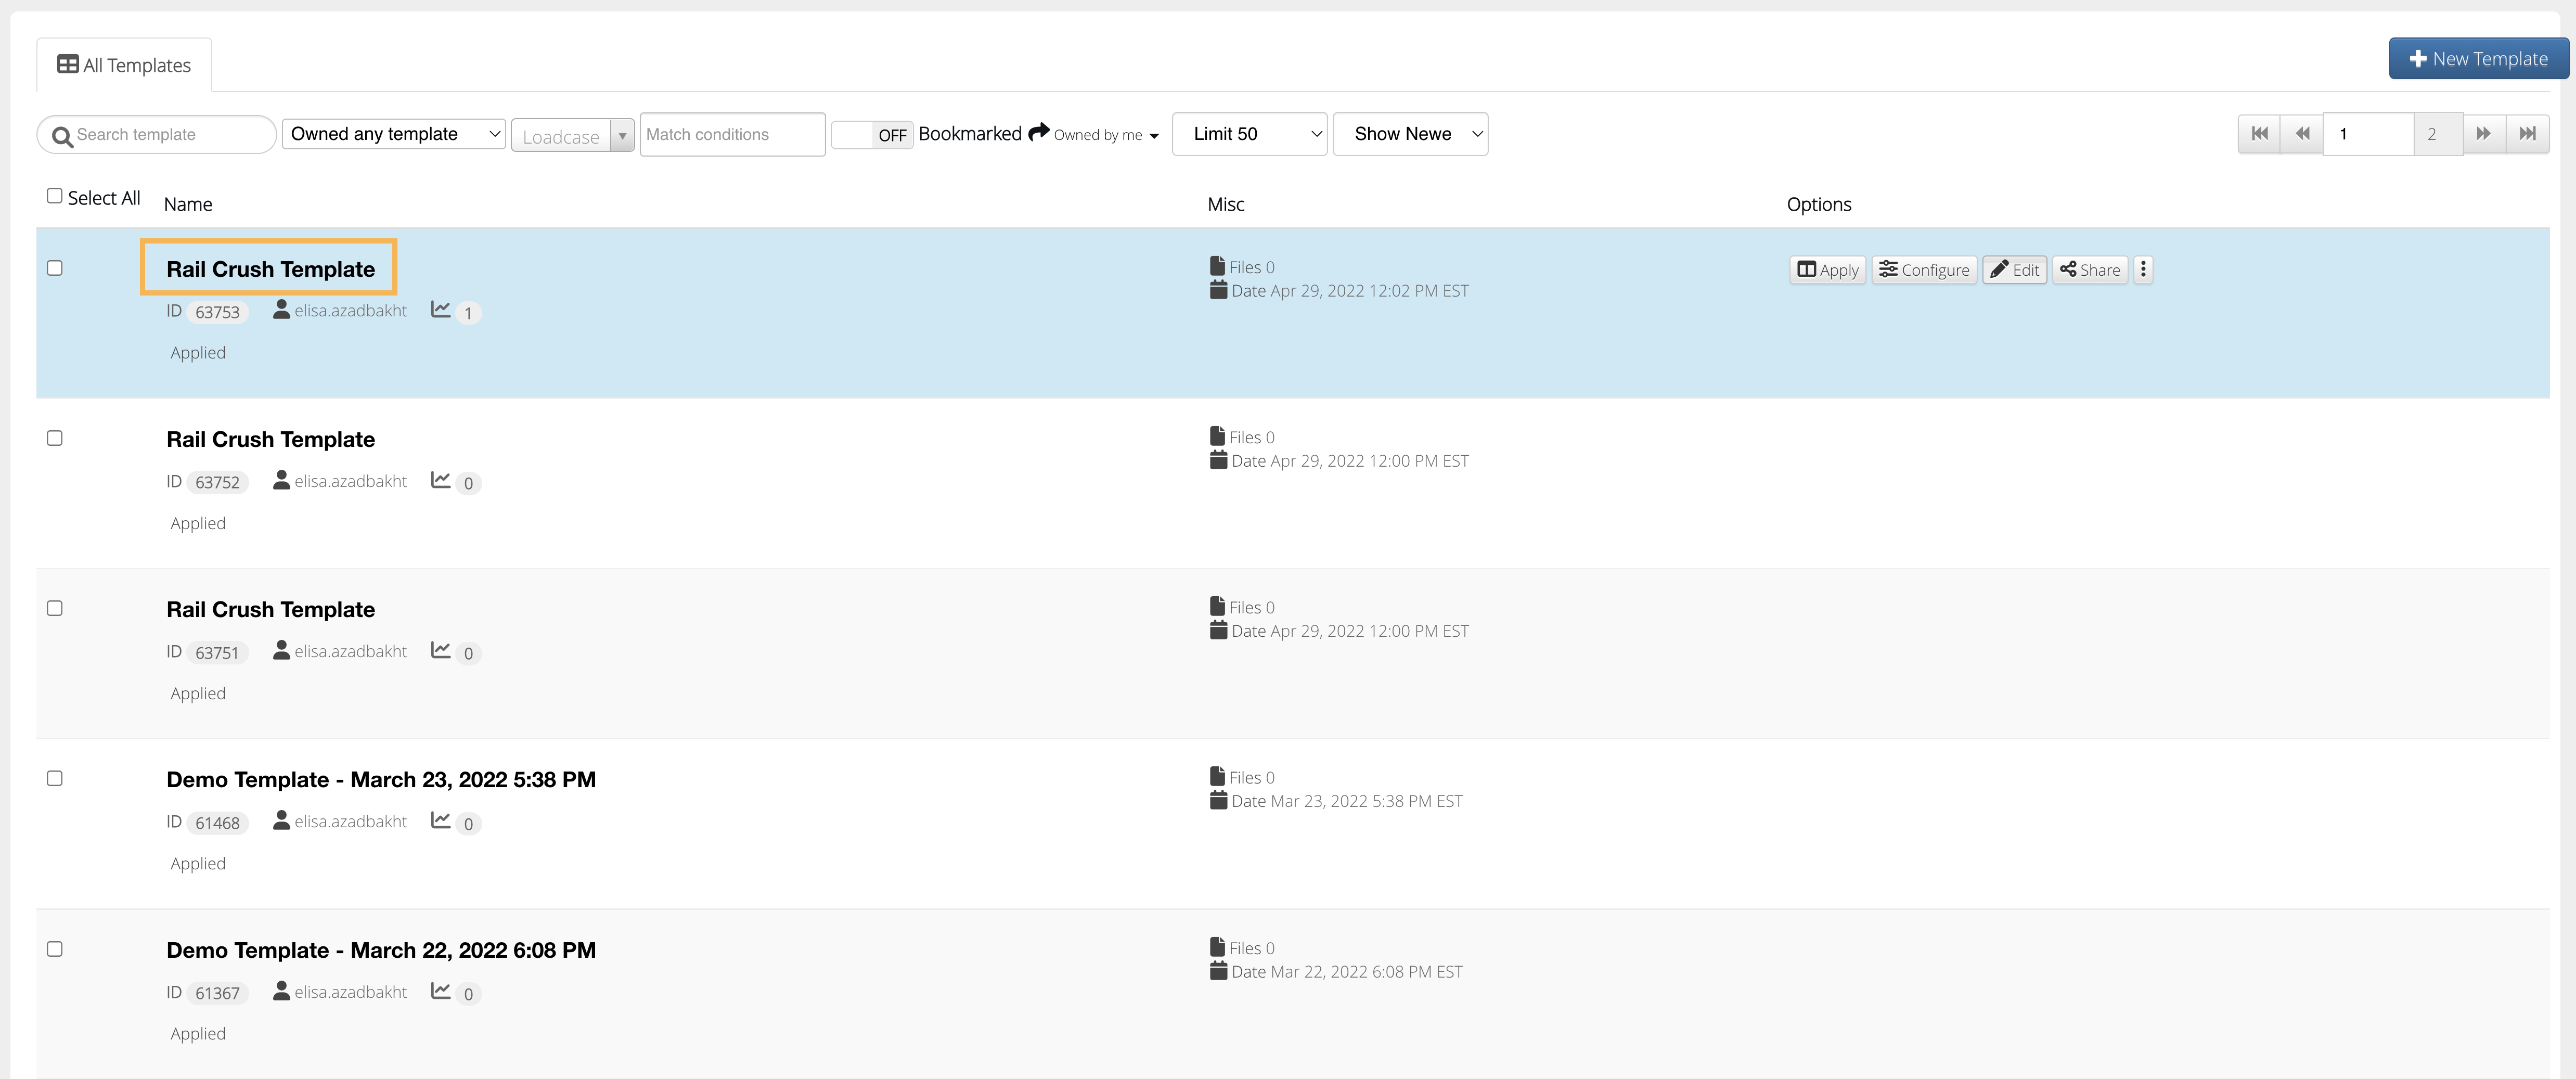
Figure 1: Open Template
Click over to the “Conditions” tab. Fill out the New Condition form based on your future simulation(s). The following image shows choosing “Object Name” that starts with ”HAT” for Simulations that start with the name “HAT”. Click on “create” to officially add the condition to the template. You can add more or delete conditions if needed.
Adding a Condition
NEW as of 2025, there are now more options in template match_type for creating conditions.
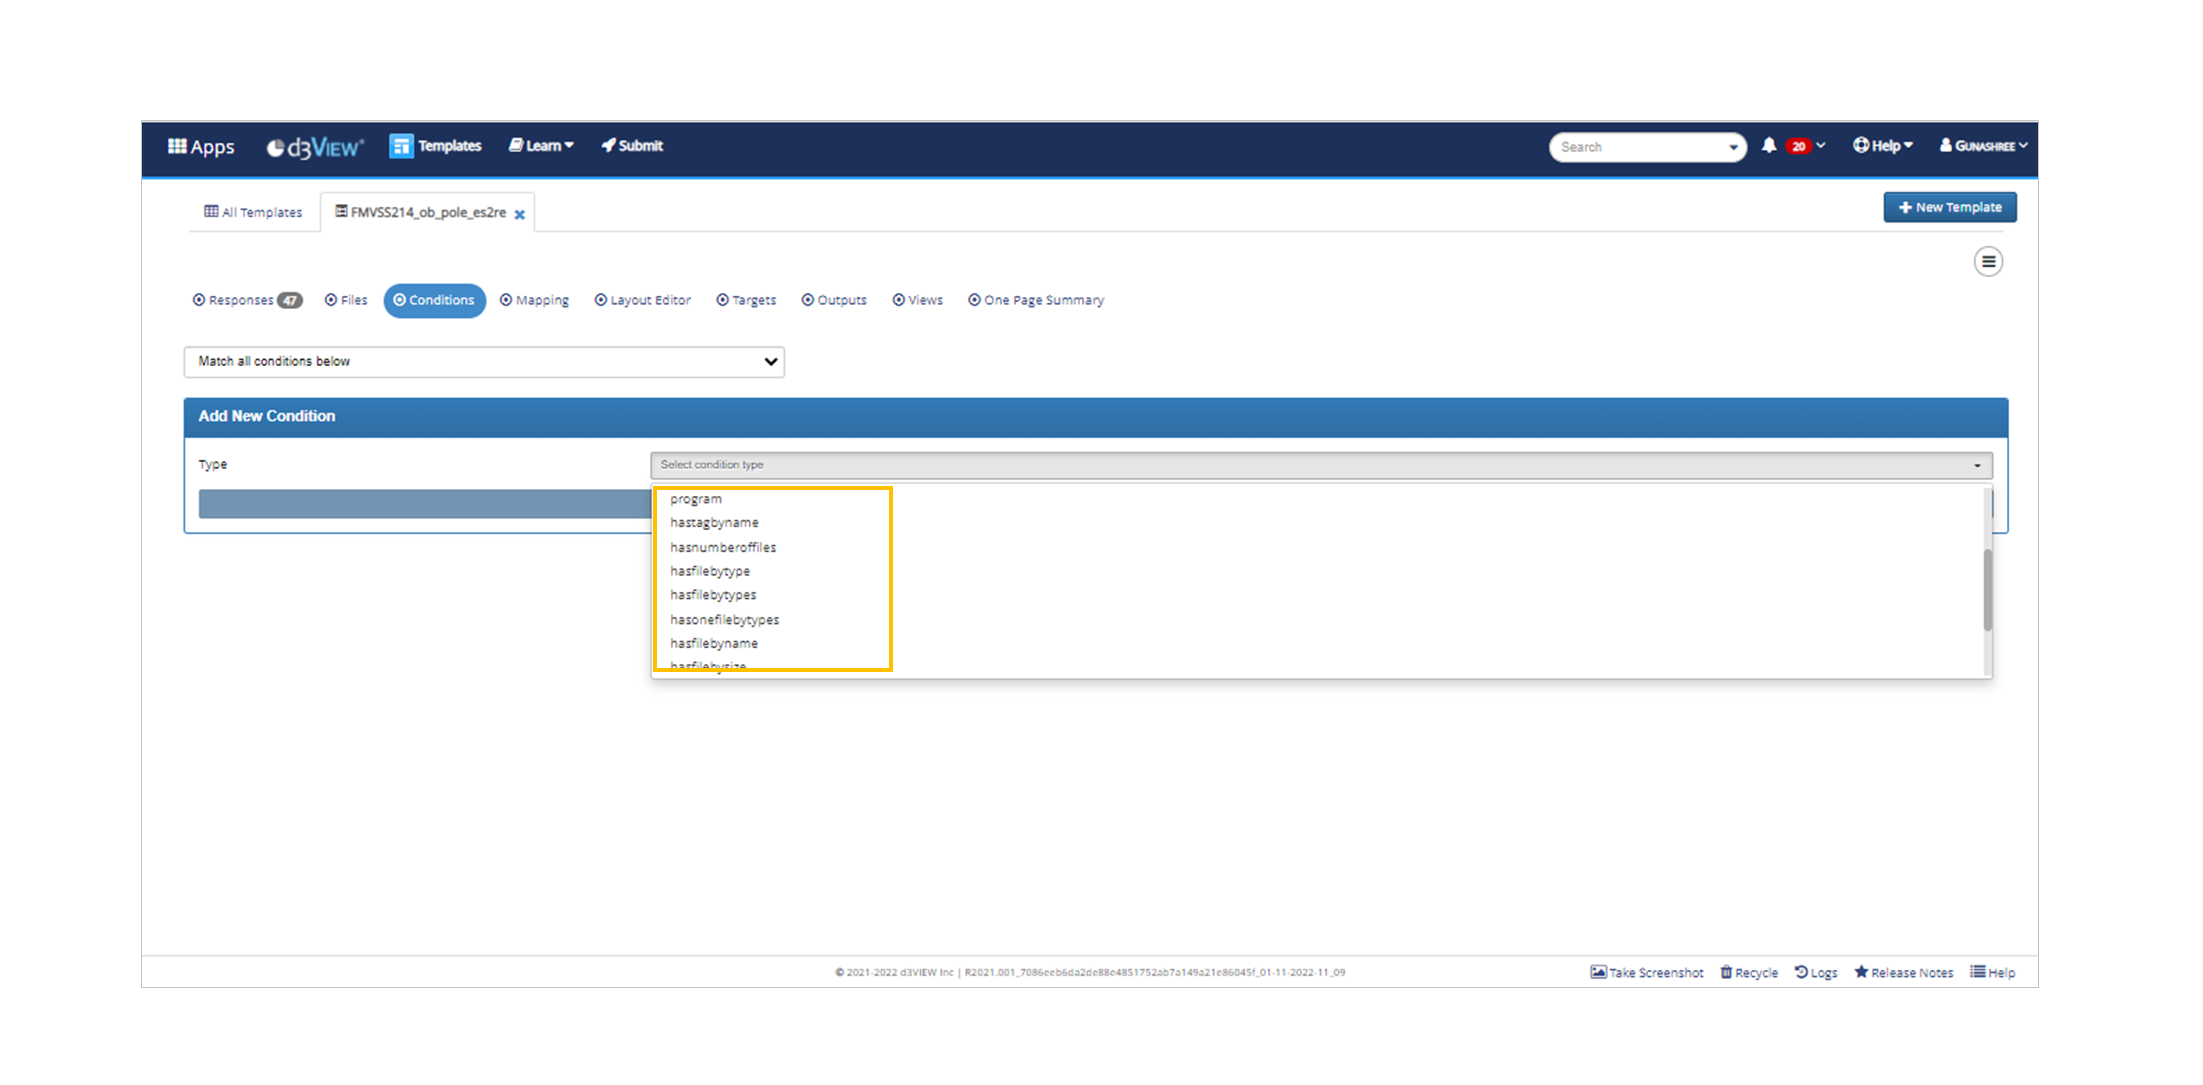
Figure 2: Template Match_Type Options
Apply a Template With a New Physical Test
Go to your Physical Tests page to get started. Start a new Physical Test, add the Physical Test file and choose a template in the drop-down menu as shown in the picture below. Click process to finish, as usual. The Template will be applied to the Physical Test as it processes and uploads.
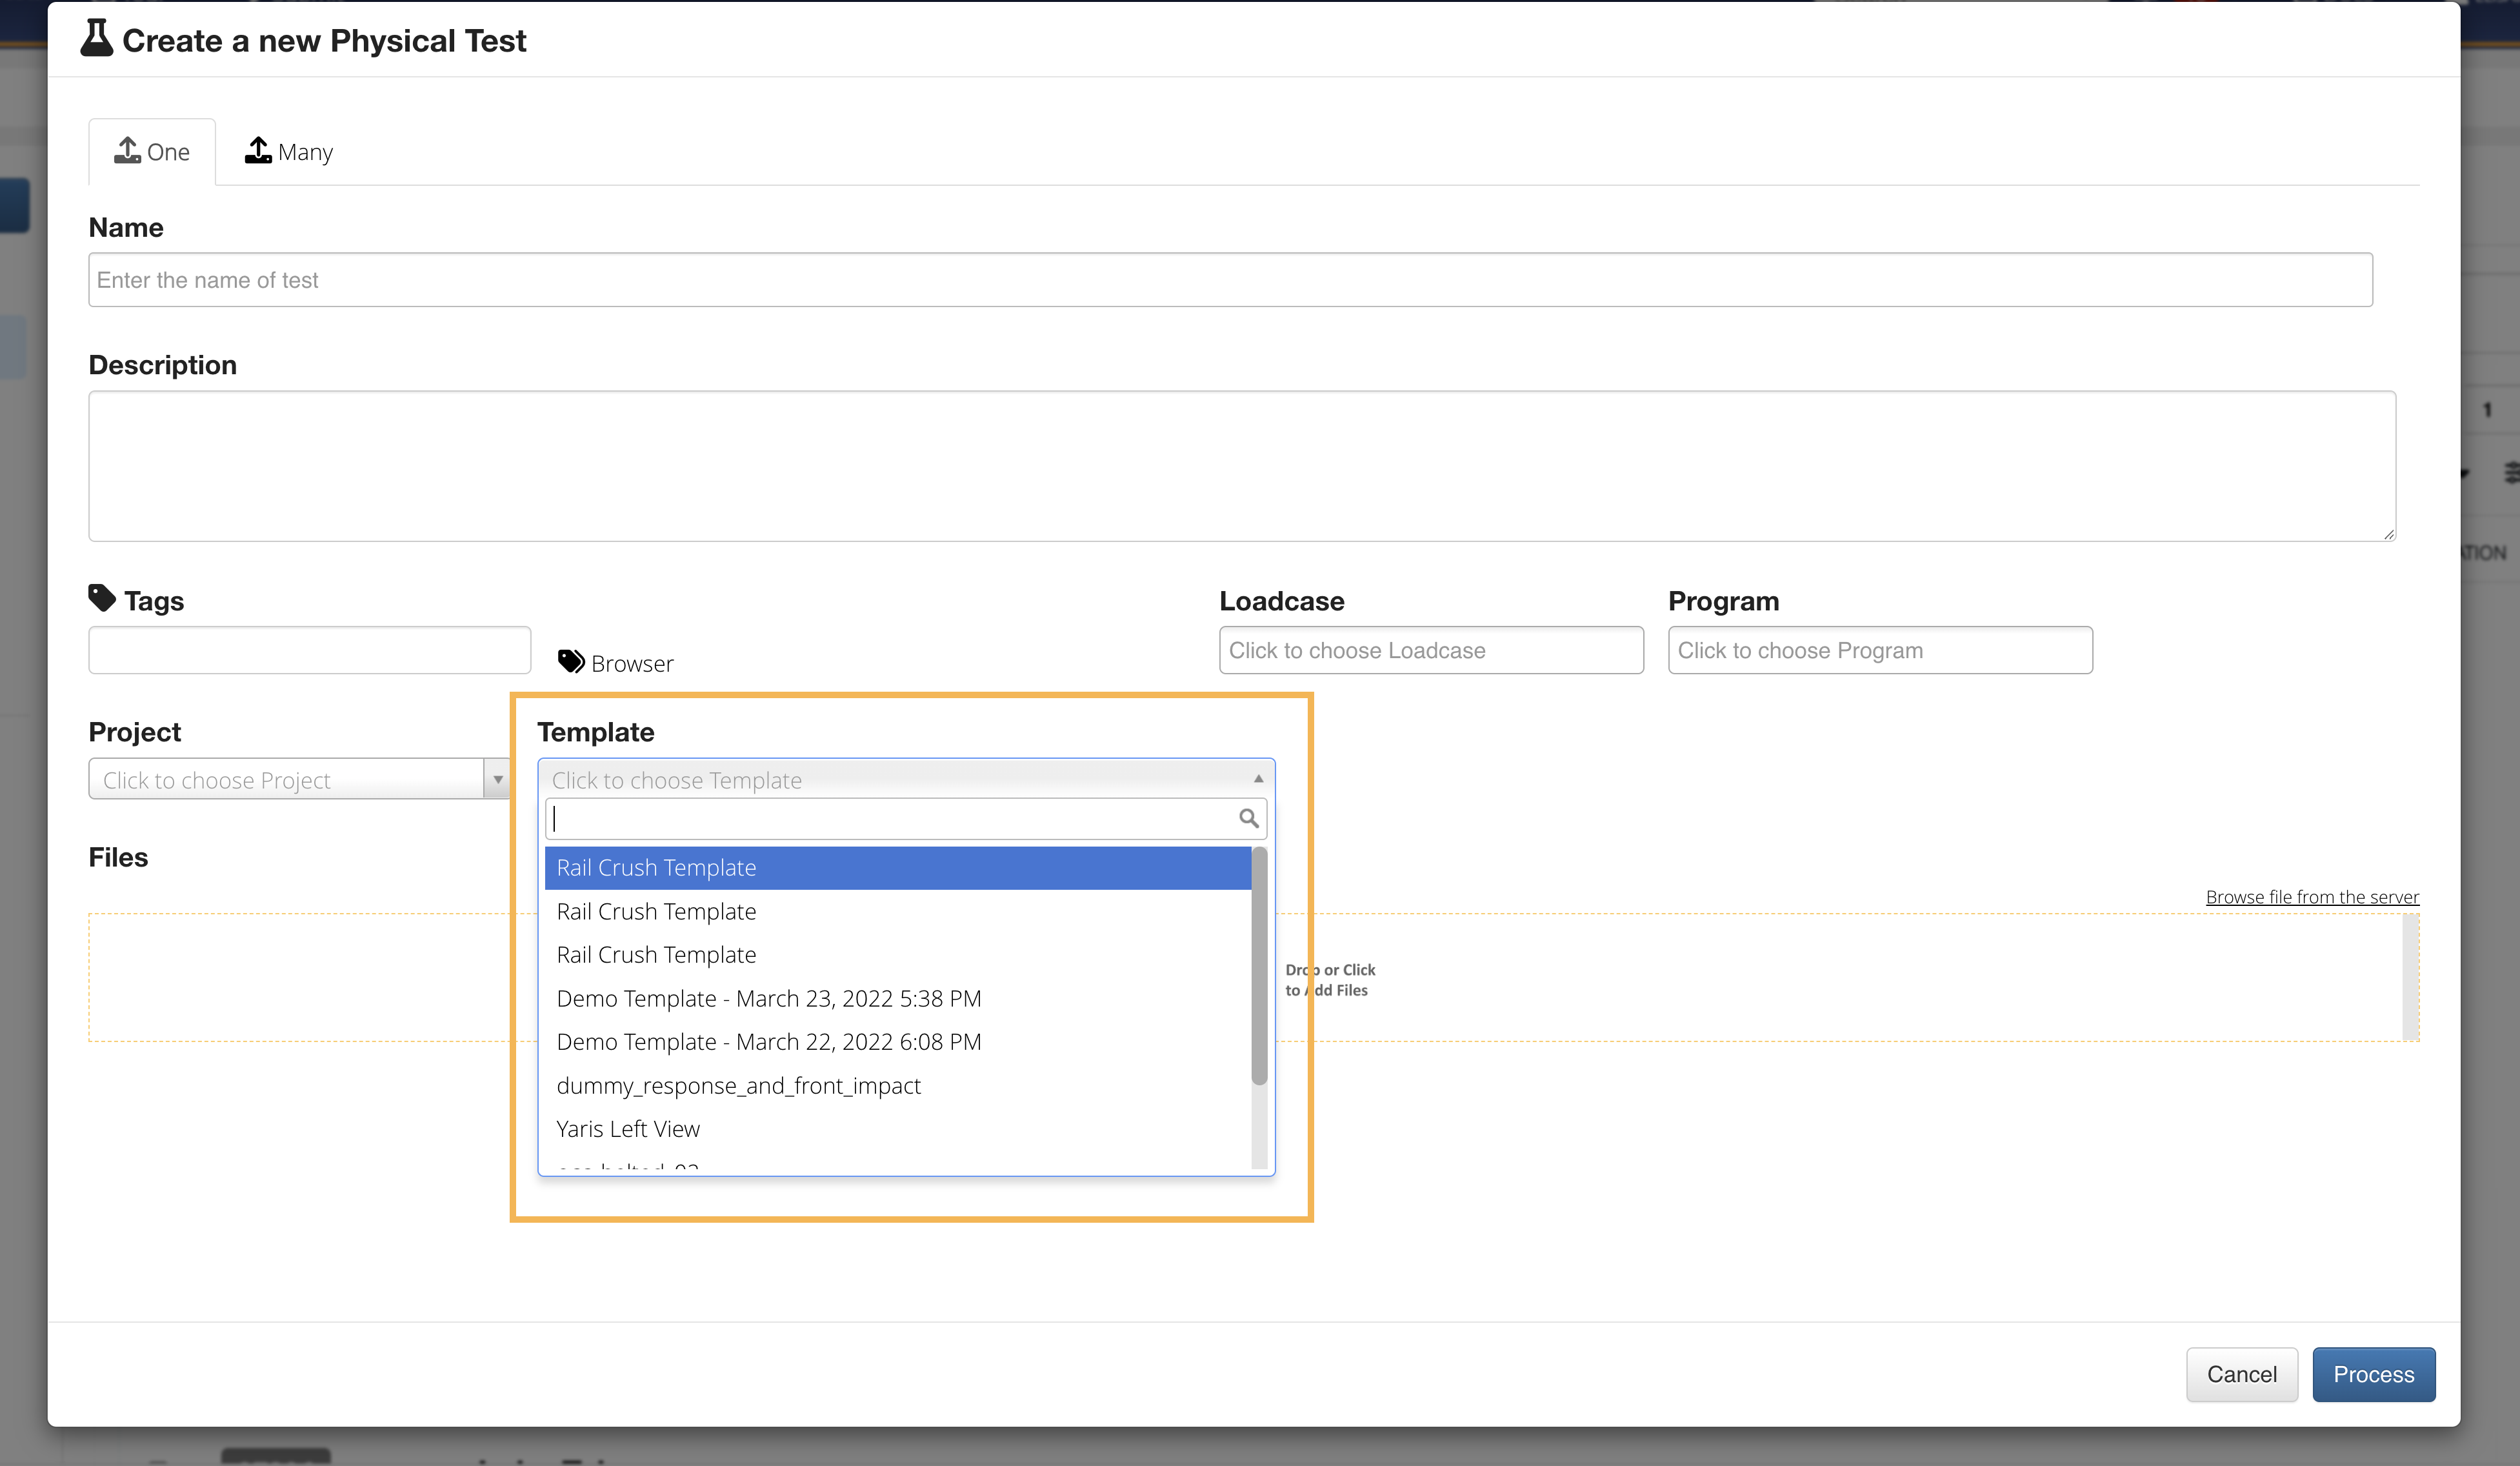
Figure 3: Apply a Template with New Test
Extracting Responses
Start by going to your Simulations page or Physical Tests page and open a Simulation or Physical Test. Go to the Responses tab and click on the “Extract Response” blue button at the top left.
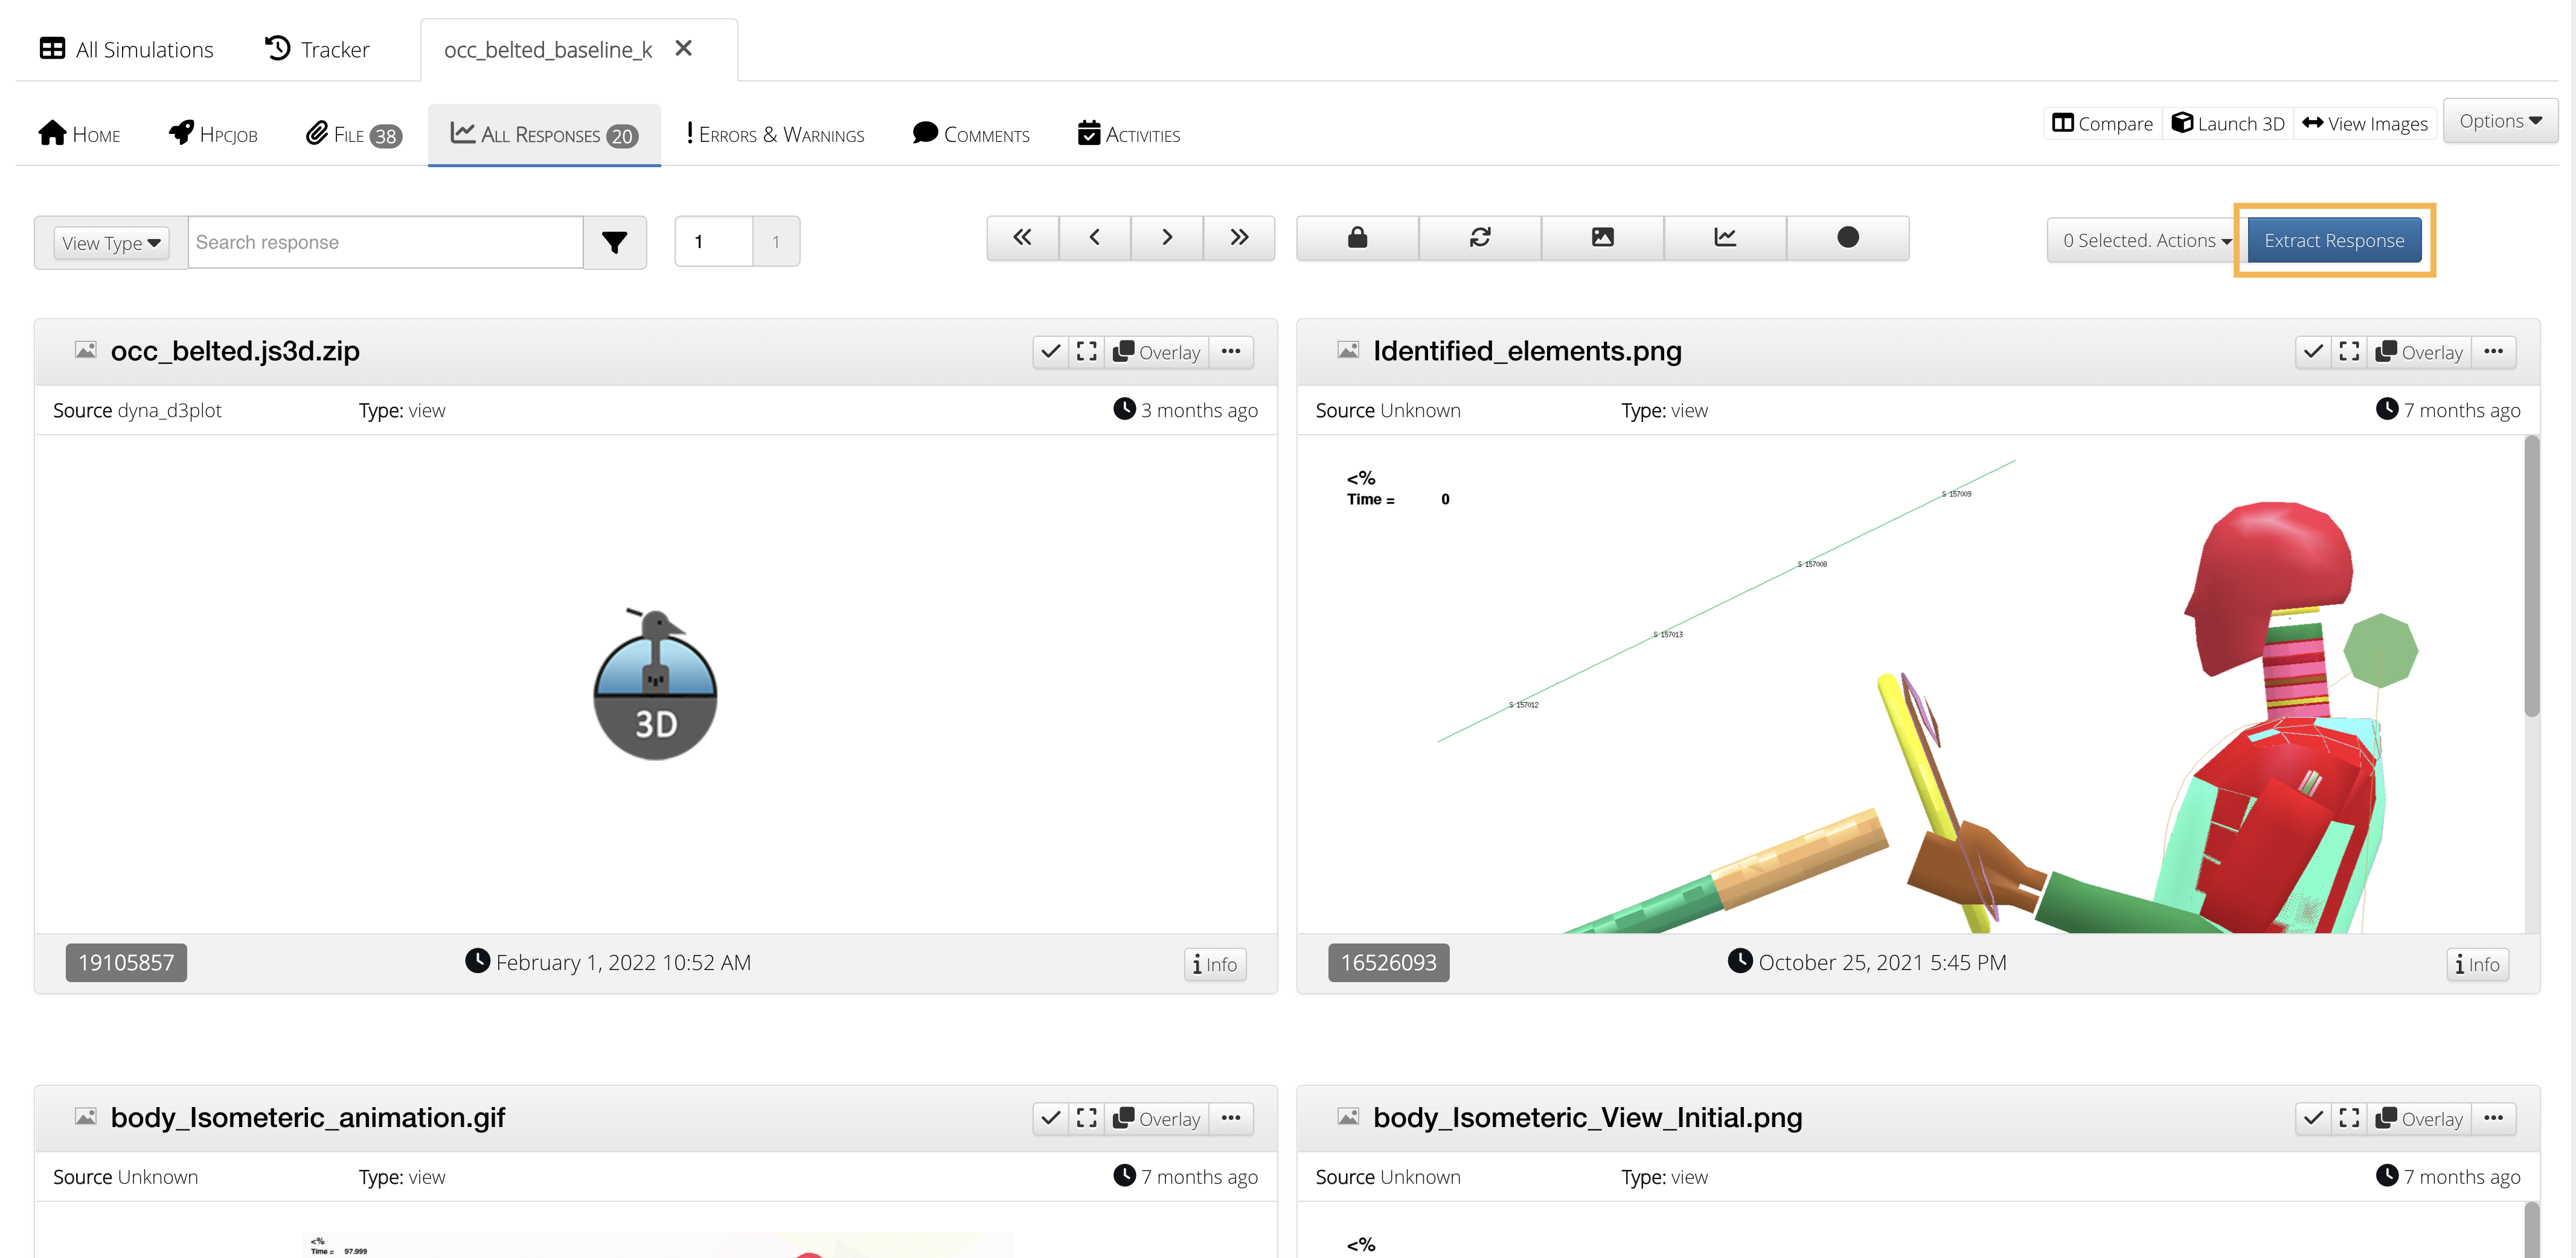
Figure 4: Apply a Template Through Extract Responses Window
Choose the “Response Template” section at the top of the side panel and pick a template in the drop-down. Click on “Process” to finish the extraction.
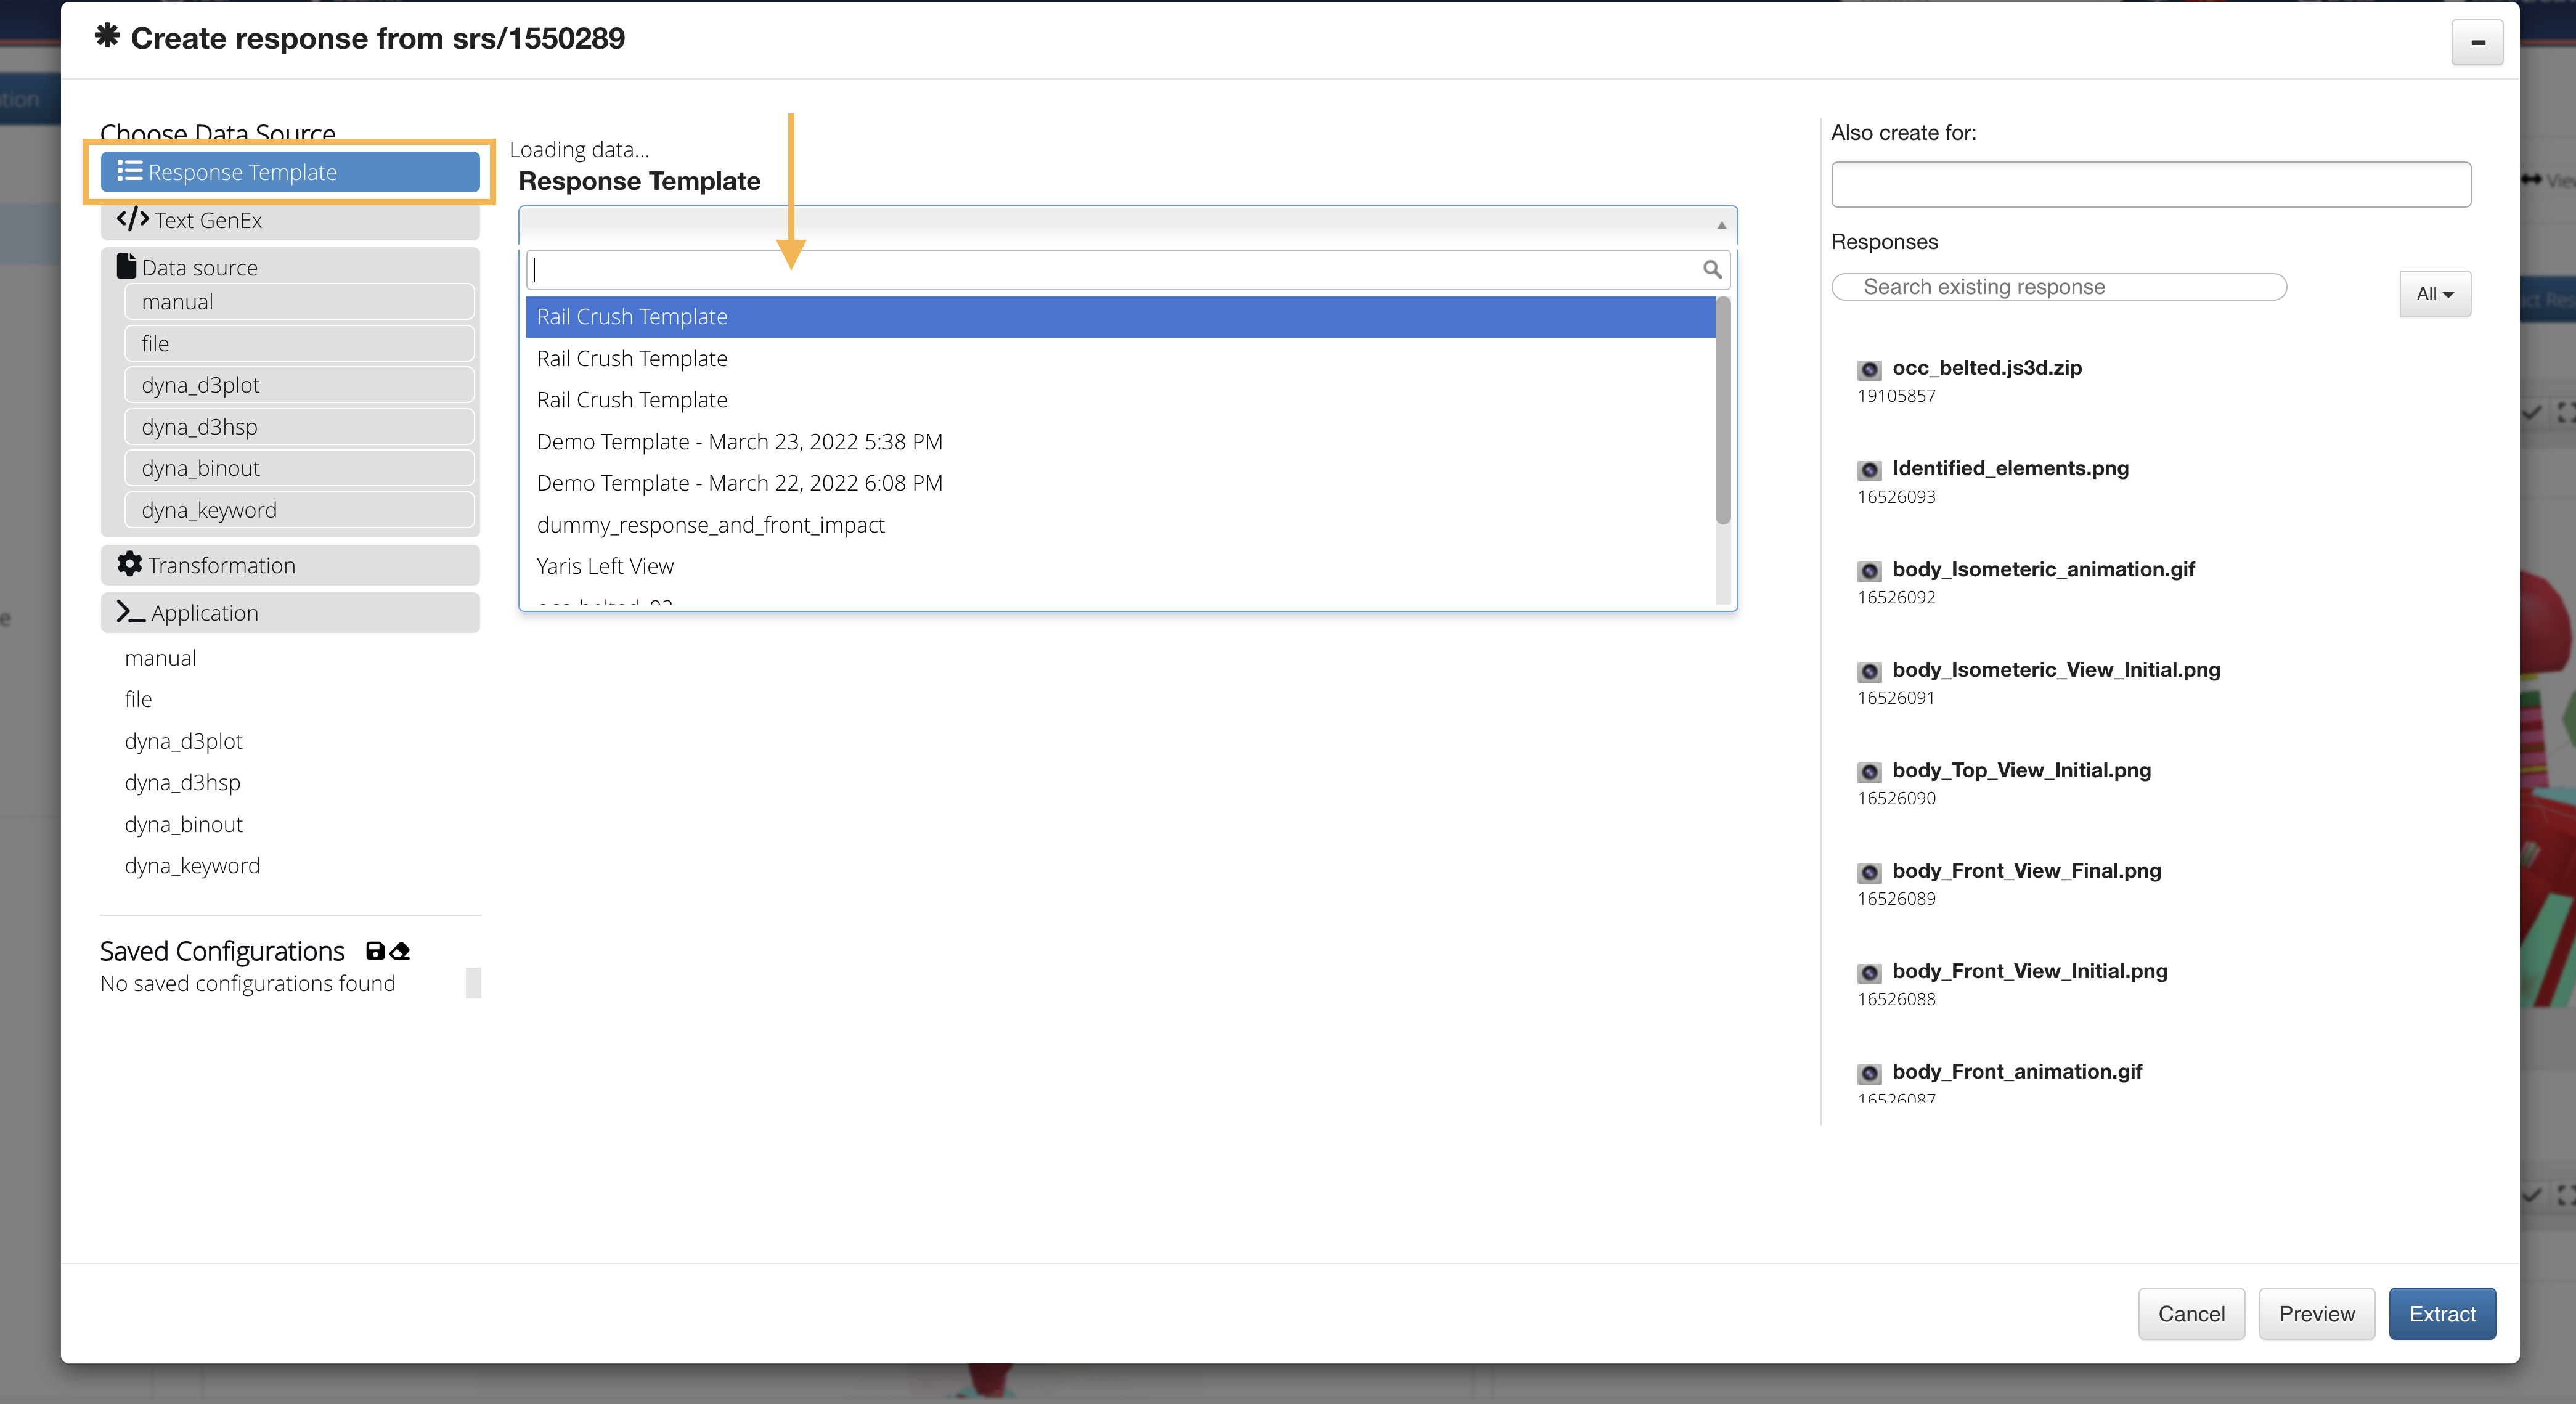
Figure 5: Apply a Template Through Extract Responses Window
New responses should appear now on the response tab.
You can apply multiple templates to a simulation or physical test this way.
Learn how to compare responses in Simlytiks by checking out the Physical Tests section on Comparing Responses.
Comparing simulation responses with template will show the remaining and available responses in the comparison modal.
Cliking on the number on available and remaining responses will show the responses list in the modal.
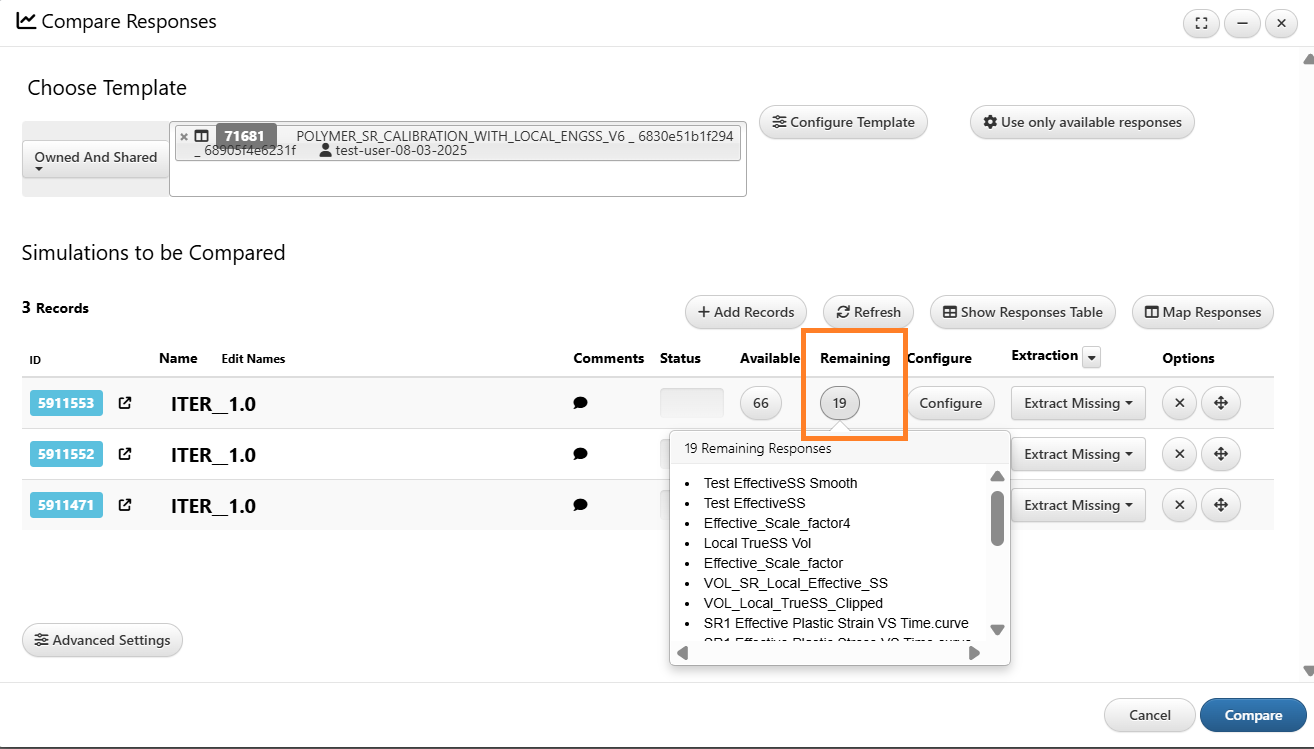
Remaining responses
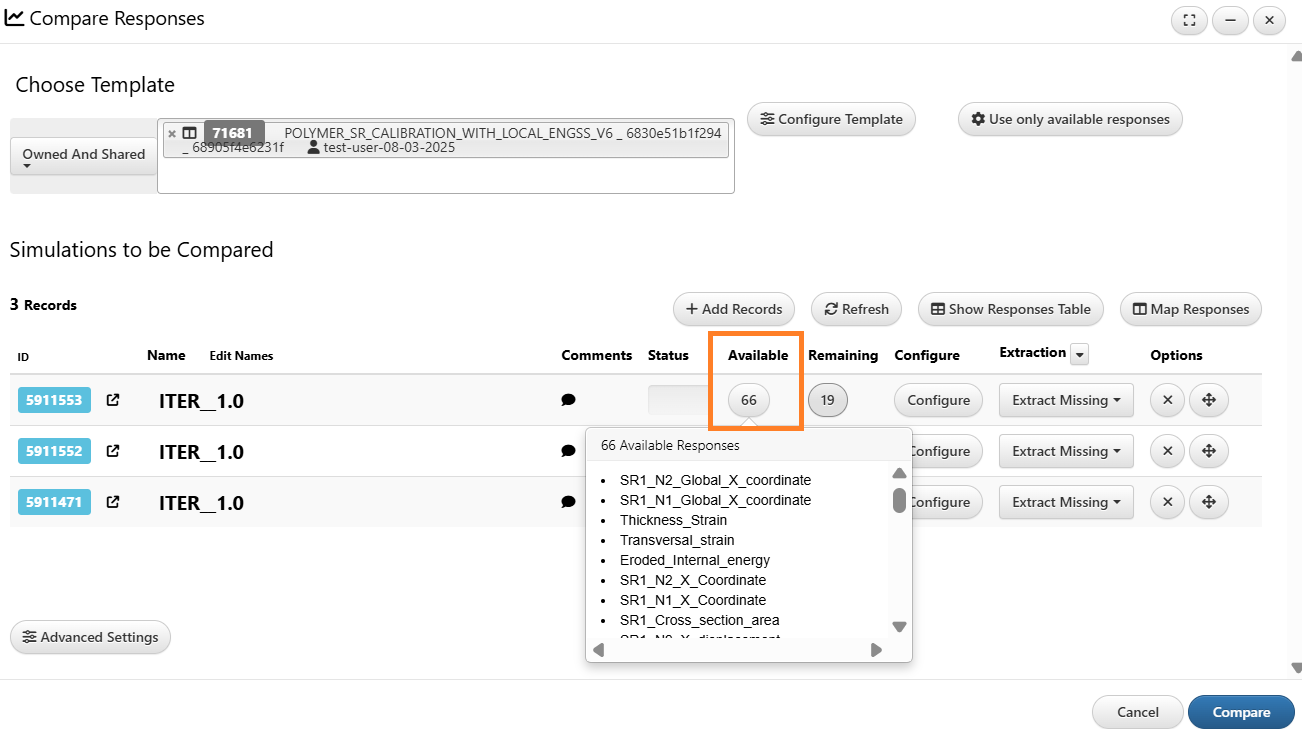
Available responses
17.3. Managing Templates
Go to your Templates main page to review, organize or edit your templates. Right click on a template to perform actions on it like exporting it as a JSON or editing it. Click on a template to open it up into another tab.
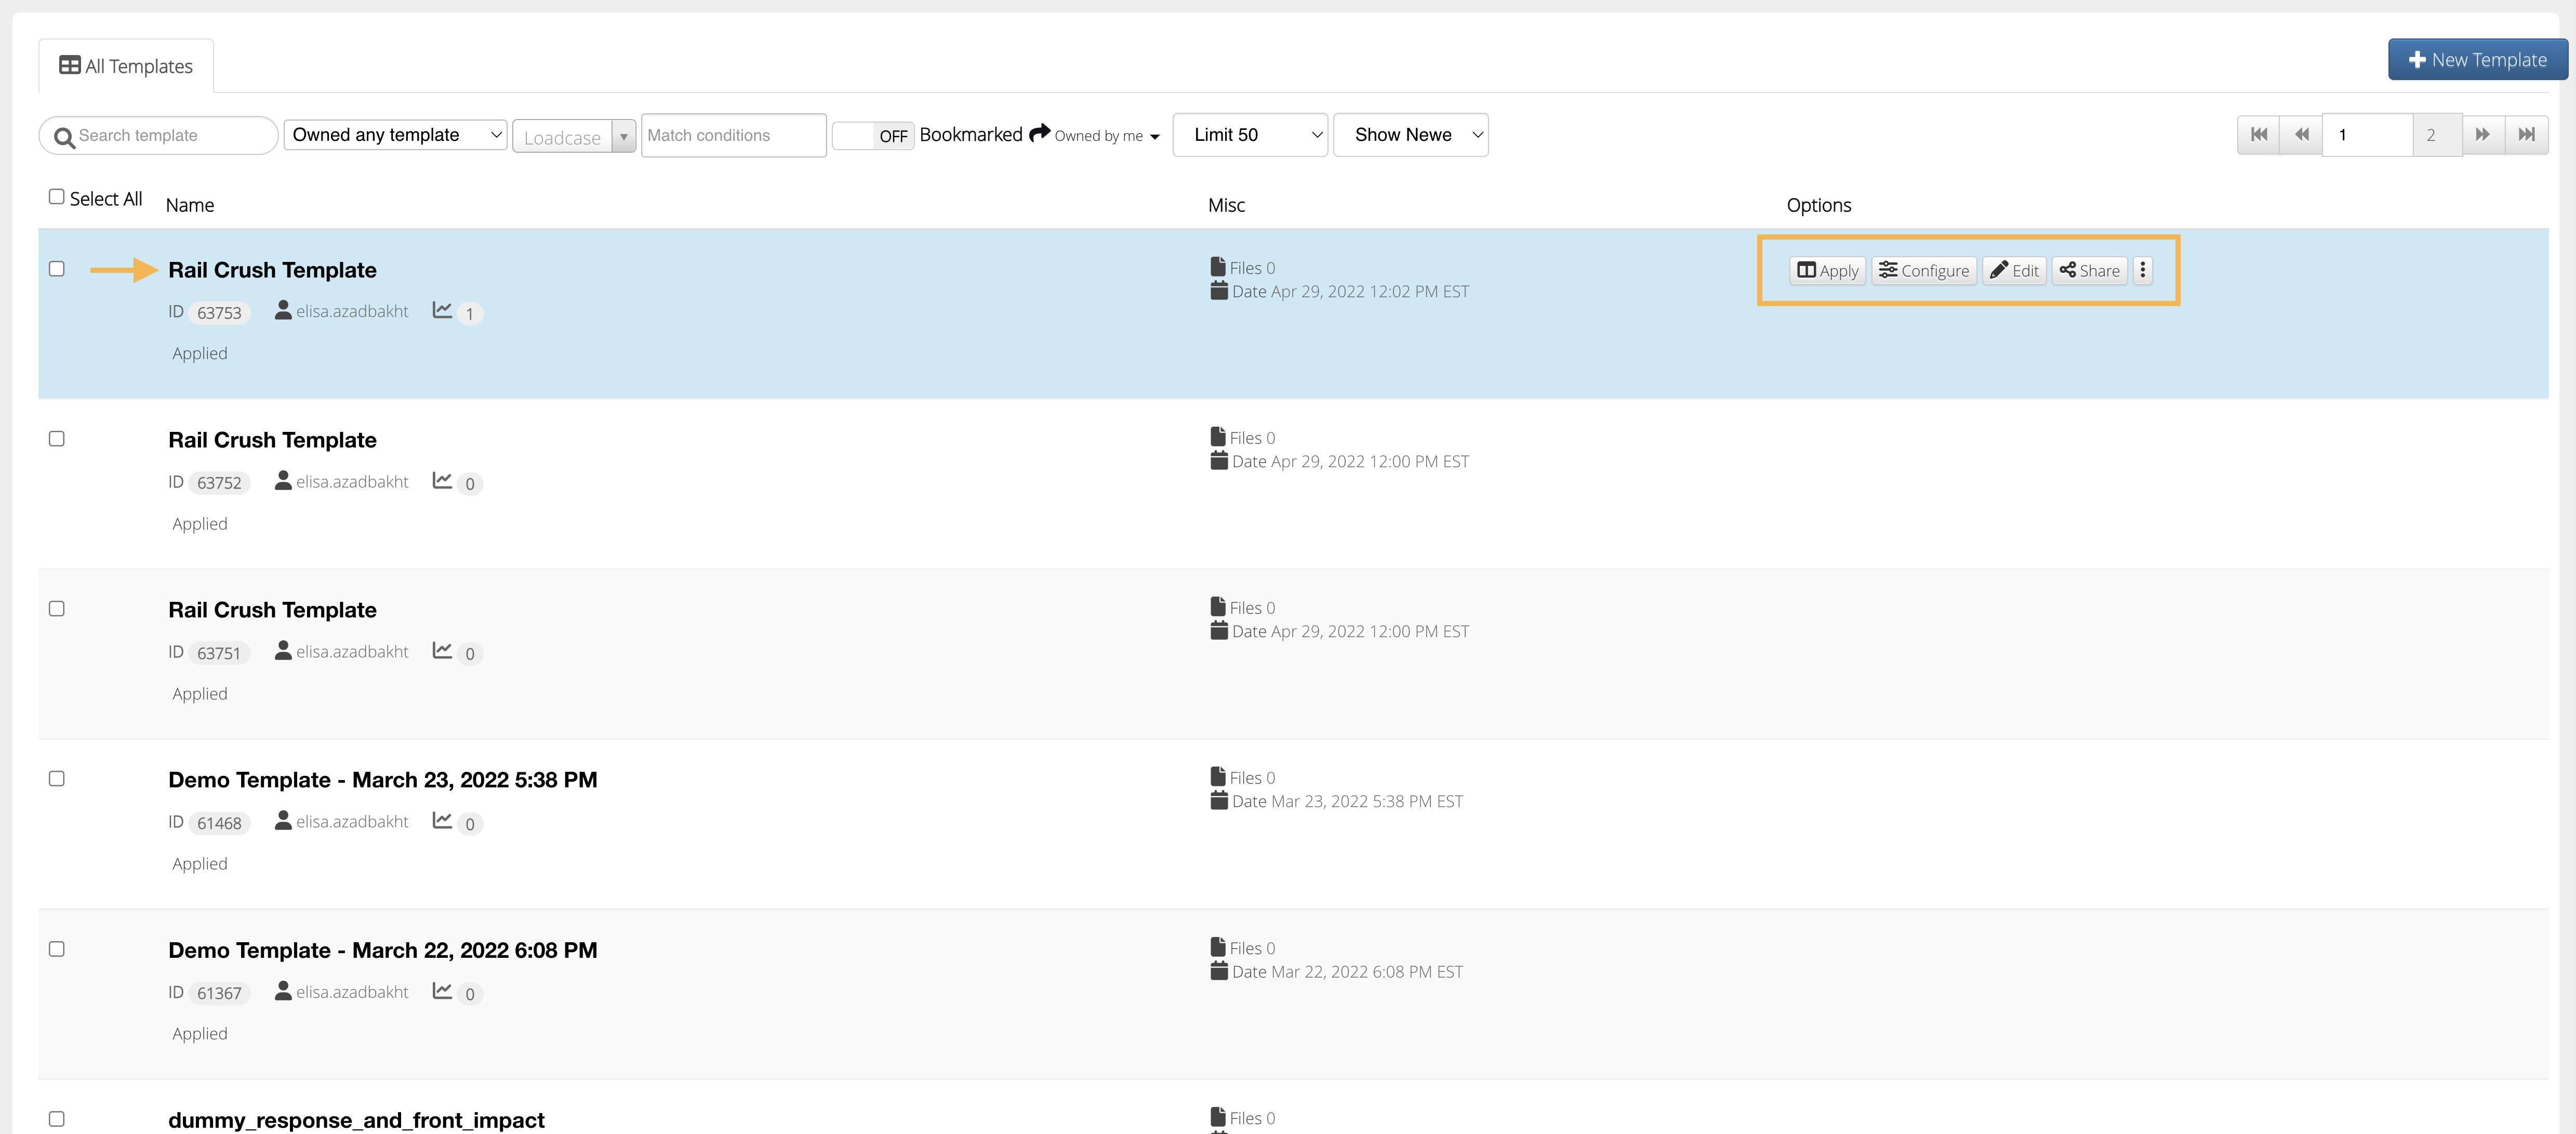
Figure 1: Manage and Open Template
Once the template is open, we can delete or add more responses, as well as perform other actions on the template. Click on the menu in the top right corner to manage and view import aspects of the template. We can export template definitions under this menu.
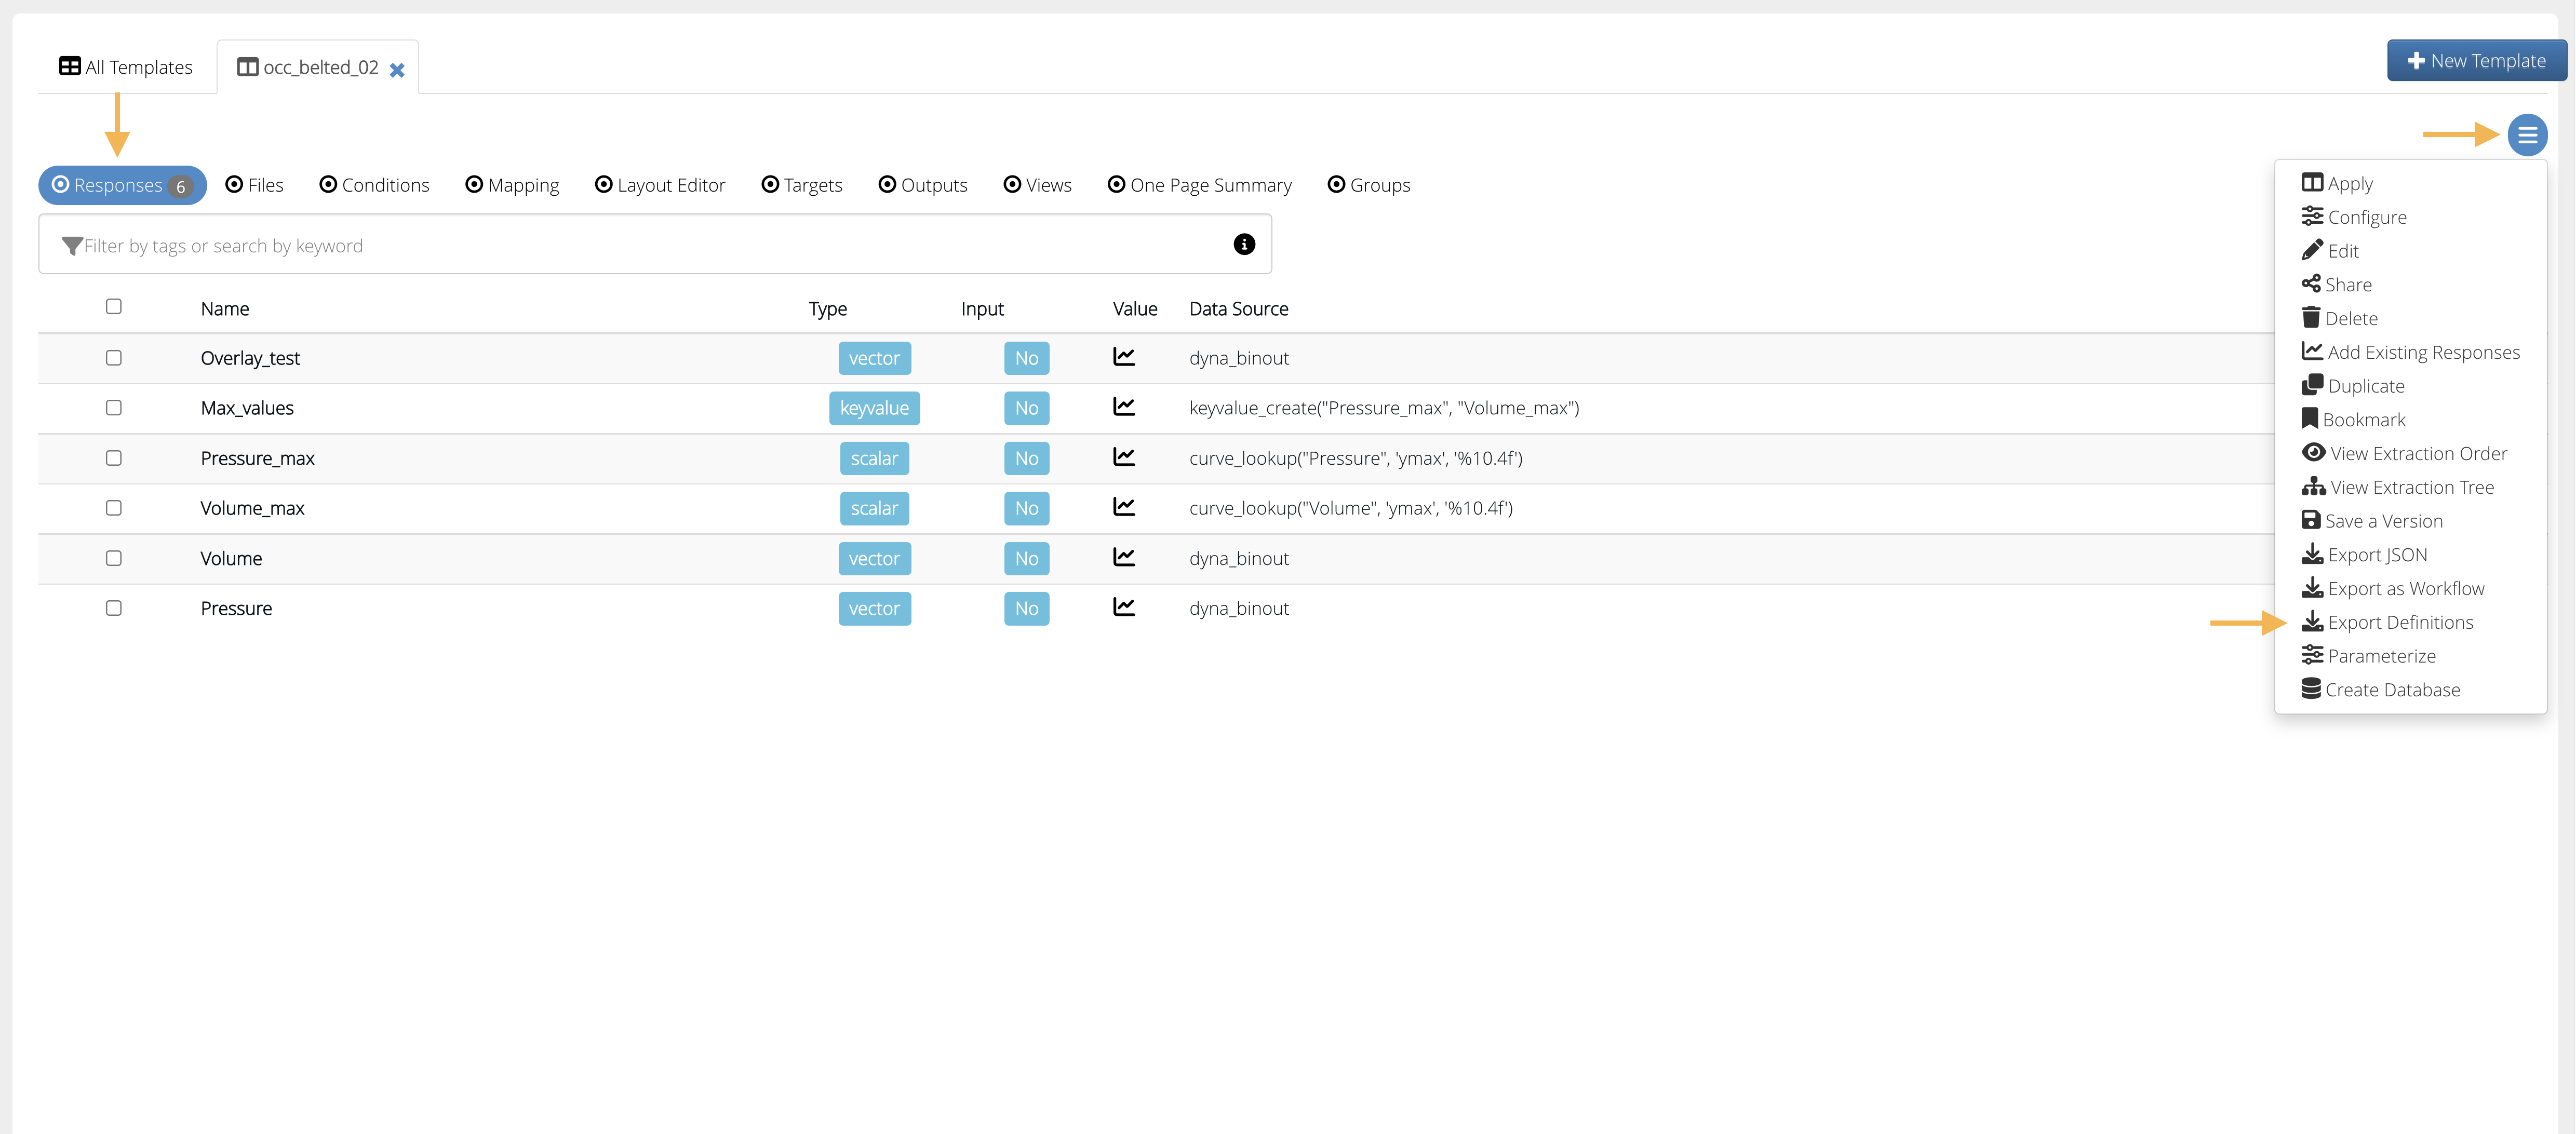
Figure 2: Manage Template and Export Definitions
NEW as of 2025, you can create a database directly from a template under these template options.
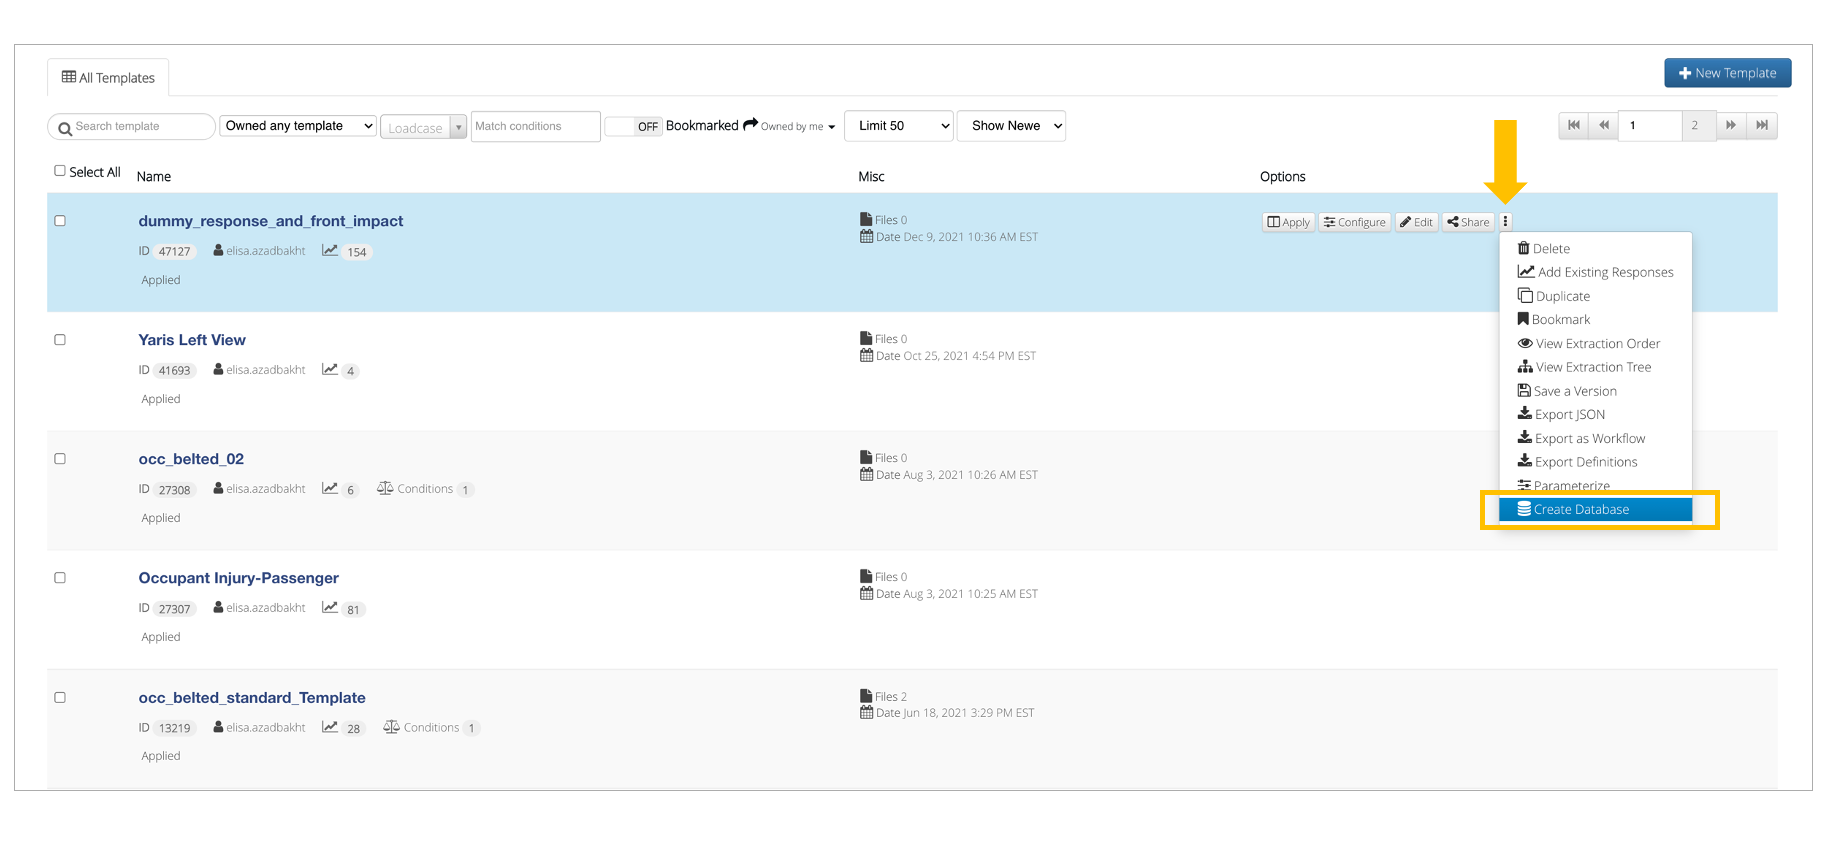
Figure 3: Create a Database from Template
Export Definitions
The File exported from ‘Export Definitions’ in Templates page will have ‘d3pptd’ extension

d3pptd extension
Configure Sensors
Configure the template under the template options menu. Here, you can manually edit the template or export sensors as a CSV to edit and import back again. For certain templates, we’ll need to make sure they can compute node IDs and Labels correctly. d3VIEW processes them by first looking for the label in the NODOUT, and then searches for the ID if the LABEL is not present. If both ID/LABEL are not found, d3VIEW will fail to extract the necessary data.
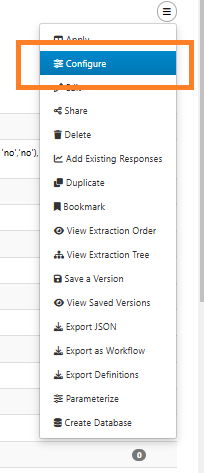
Figure 4: Configure Menu
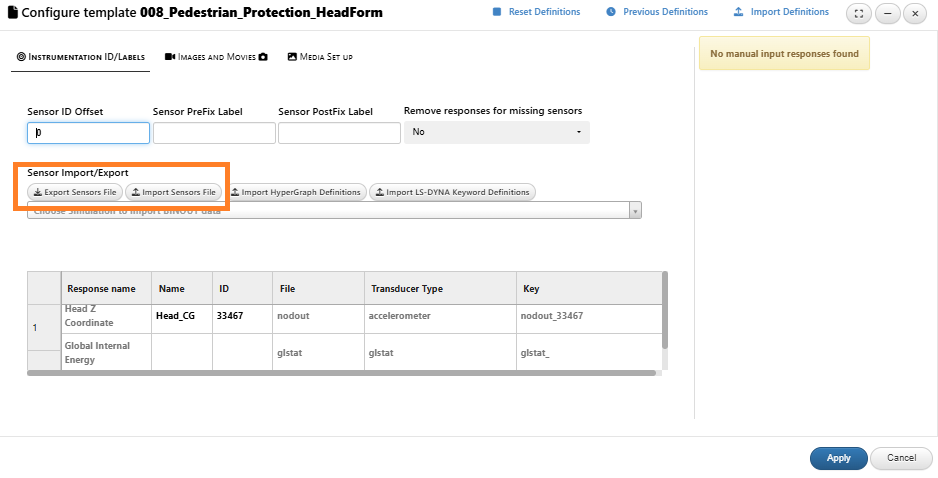
Figure 5: Configure Template
Watch the following video to see how it’s done:
Configure Sensors
In Template configuration, there are 2 types of sensor updates:
- Update only the items listed in the CSV while keeping all other existing sensors unchanged.
- Update only the items in the CSV and remove all others that are not listed.
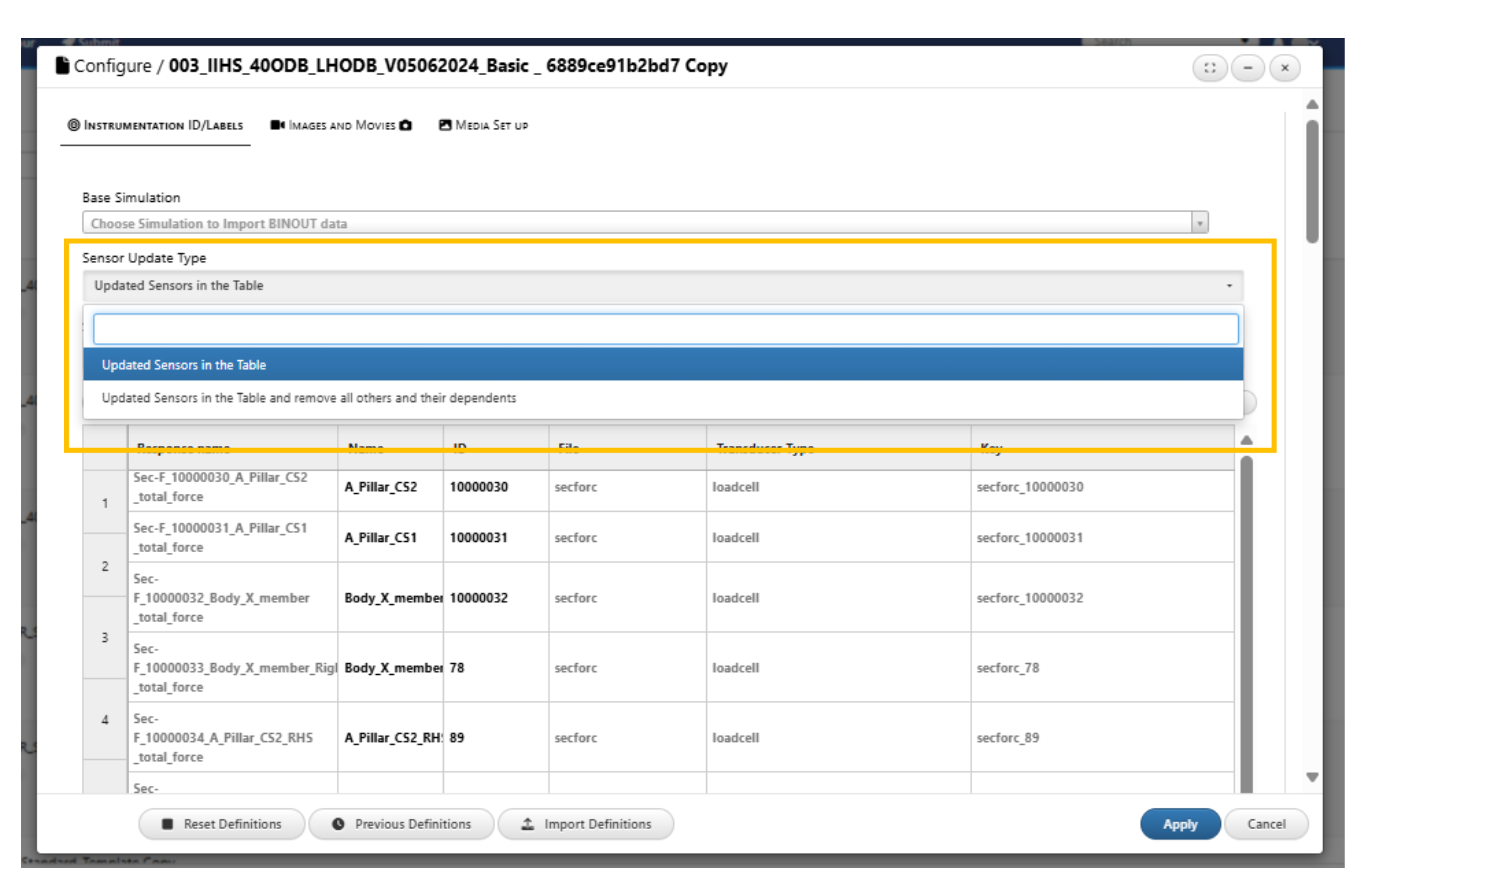
Configure Sensors
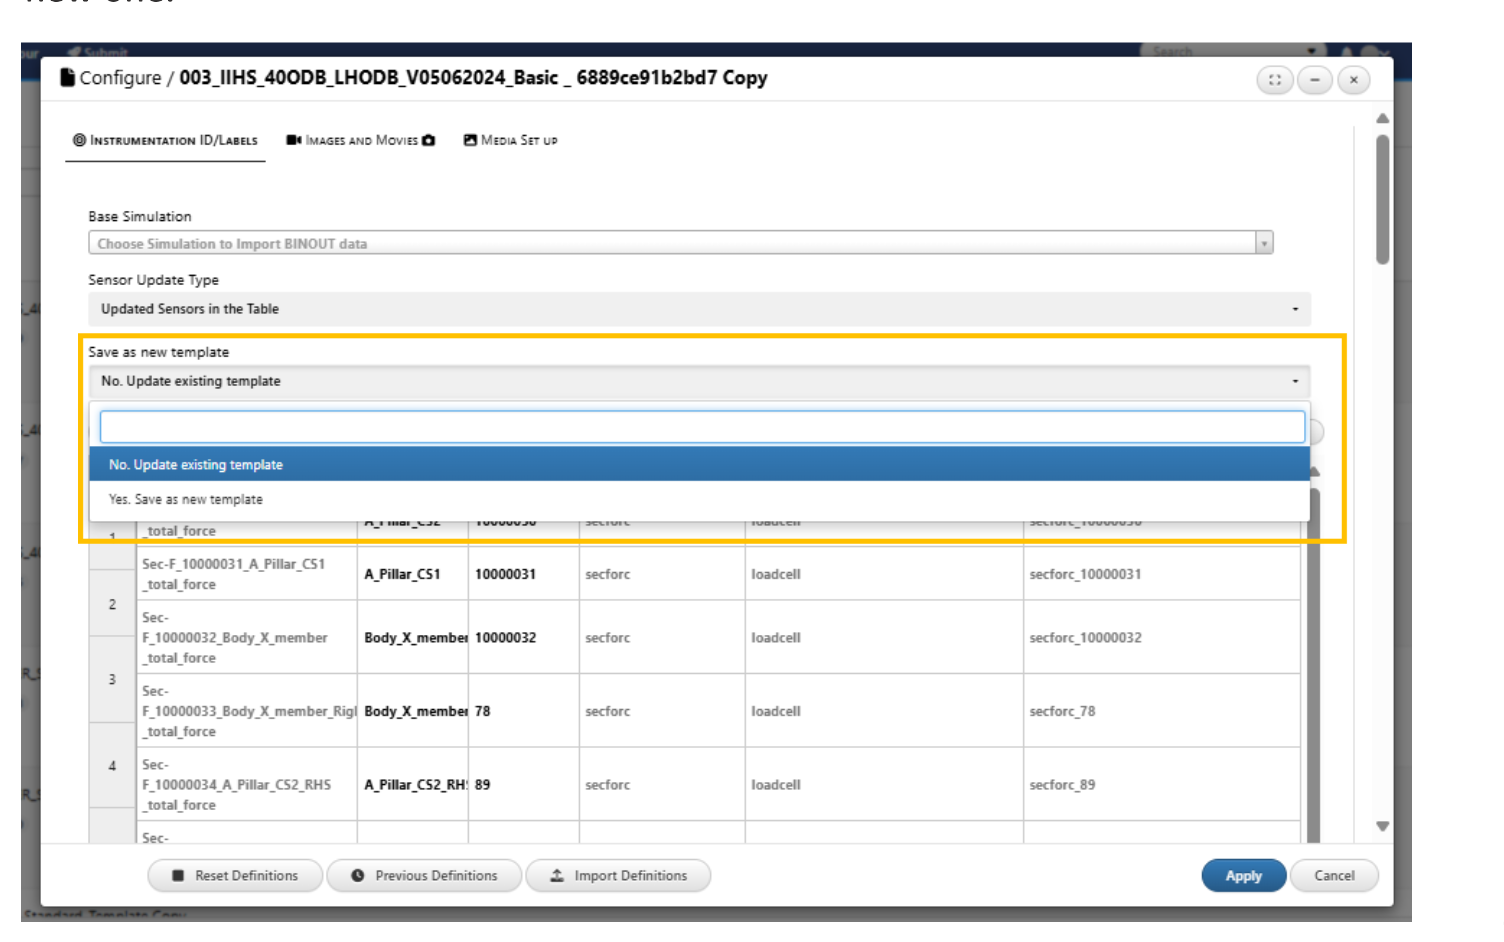
Save template
Saving Template in Template configuration can either overwrite the existing template or save it as a new one.
Configure Sensors
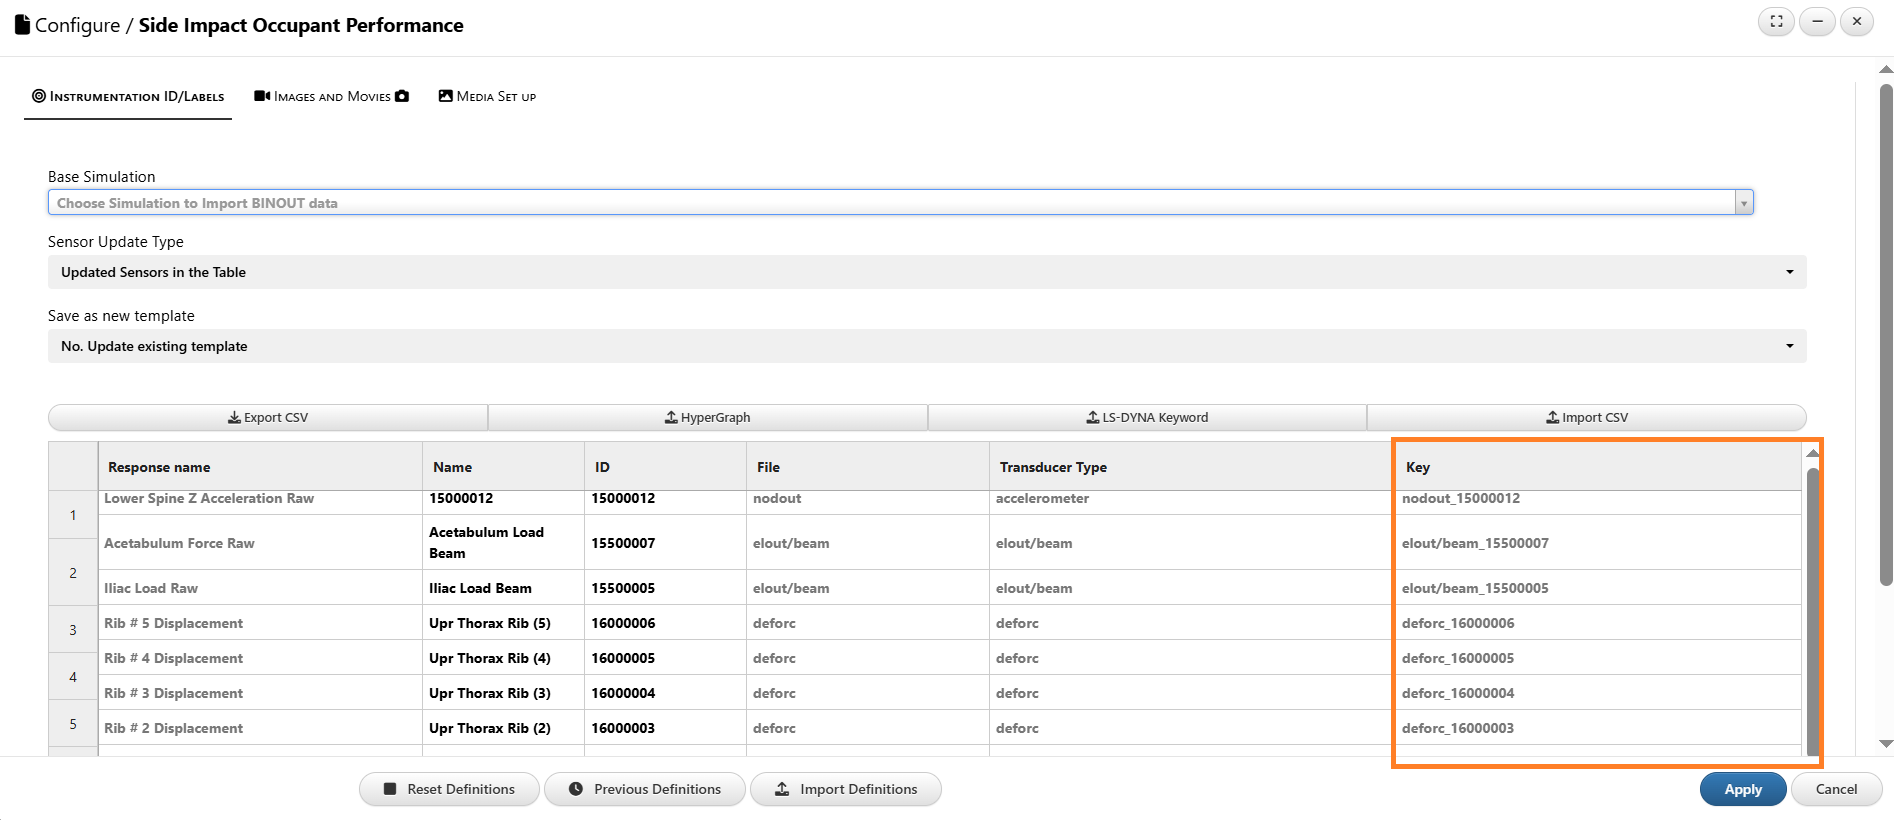
Configure sensor keys
When template sensors are exported and then re-imported after editing, the keys in the sensor definitions may change.
These key changes can prevent the template from being correctly configured and compared with the simulation model.
Configured keys
Template Extraction Logic:
The template extracts simulation responses using a two-stage process:
Stage 1 - Extraction by sensor name (label):
- The template first searches for sensors in the model whose names (labels) match those specified in the template.
- Responses are extracted only for sensors with matching names.
Stage 2 - Extraction by sensor ID (if name match fails):
- If no matching sensor name is found in Stage 1, the template attempts to match based on sensor ID from the model’s database.
- Once a match is found using the sensor ID, the response is extracted for the corresponding sensor.
Failure handling:
If the template fails to extract a response using both the name and the ID, the response remains unextracted
Extraction Order
Review your template’s extraction order under the template options menu as well.
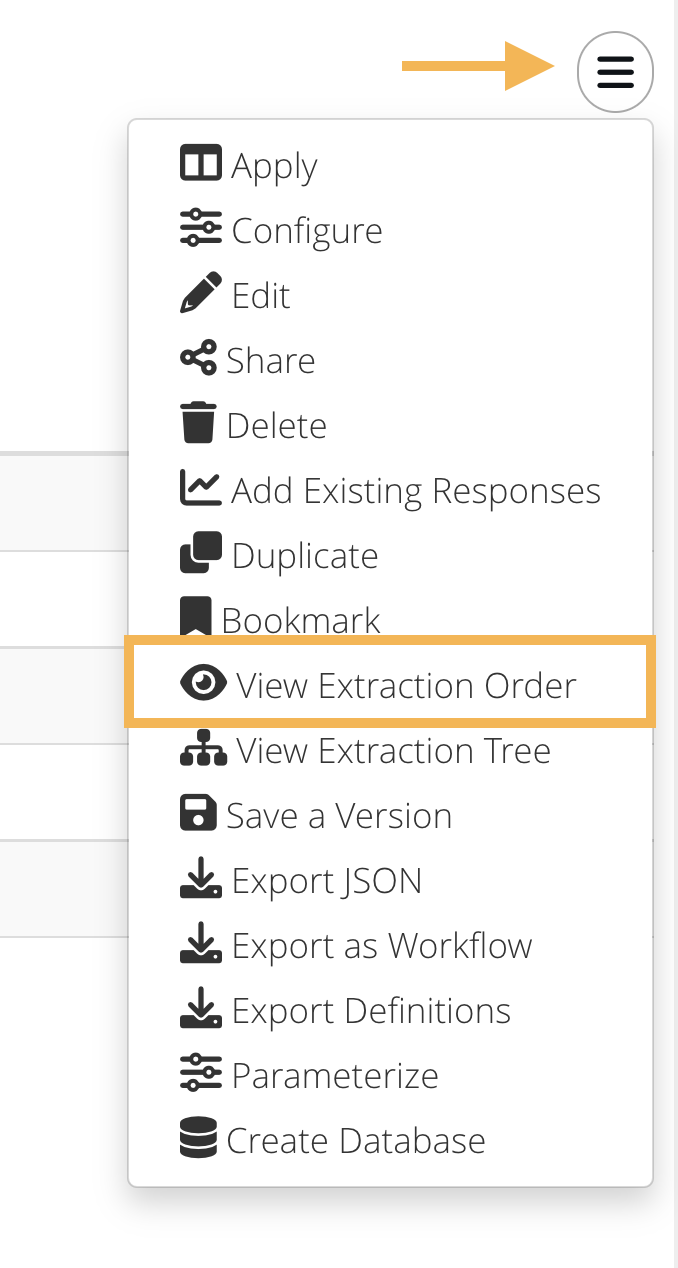
Figure 6: Extraction Order Menu
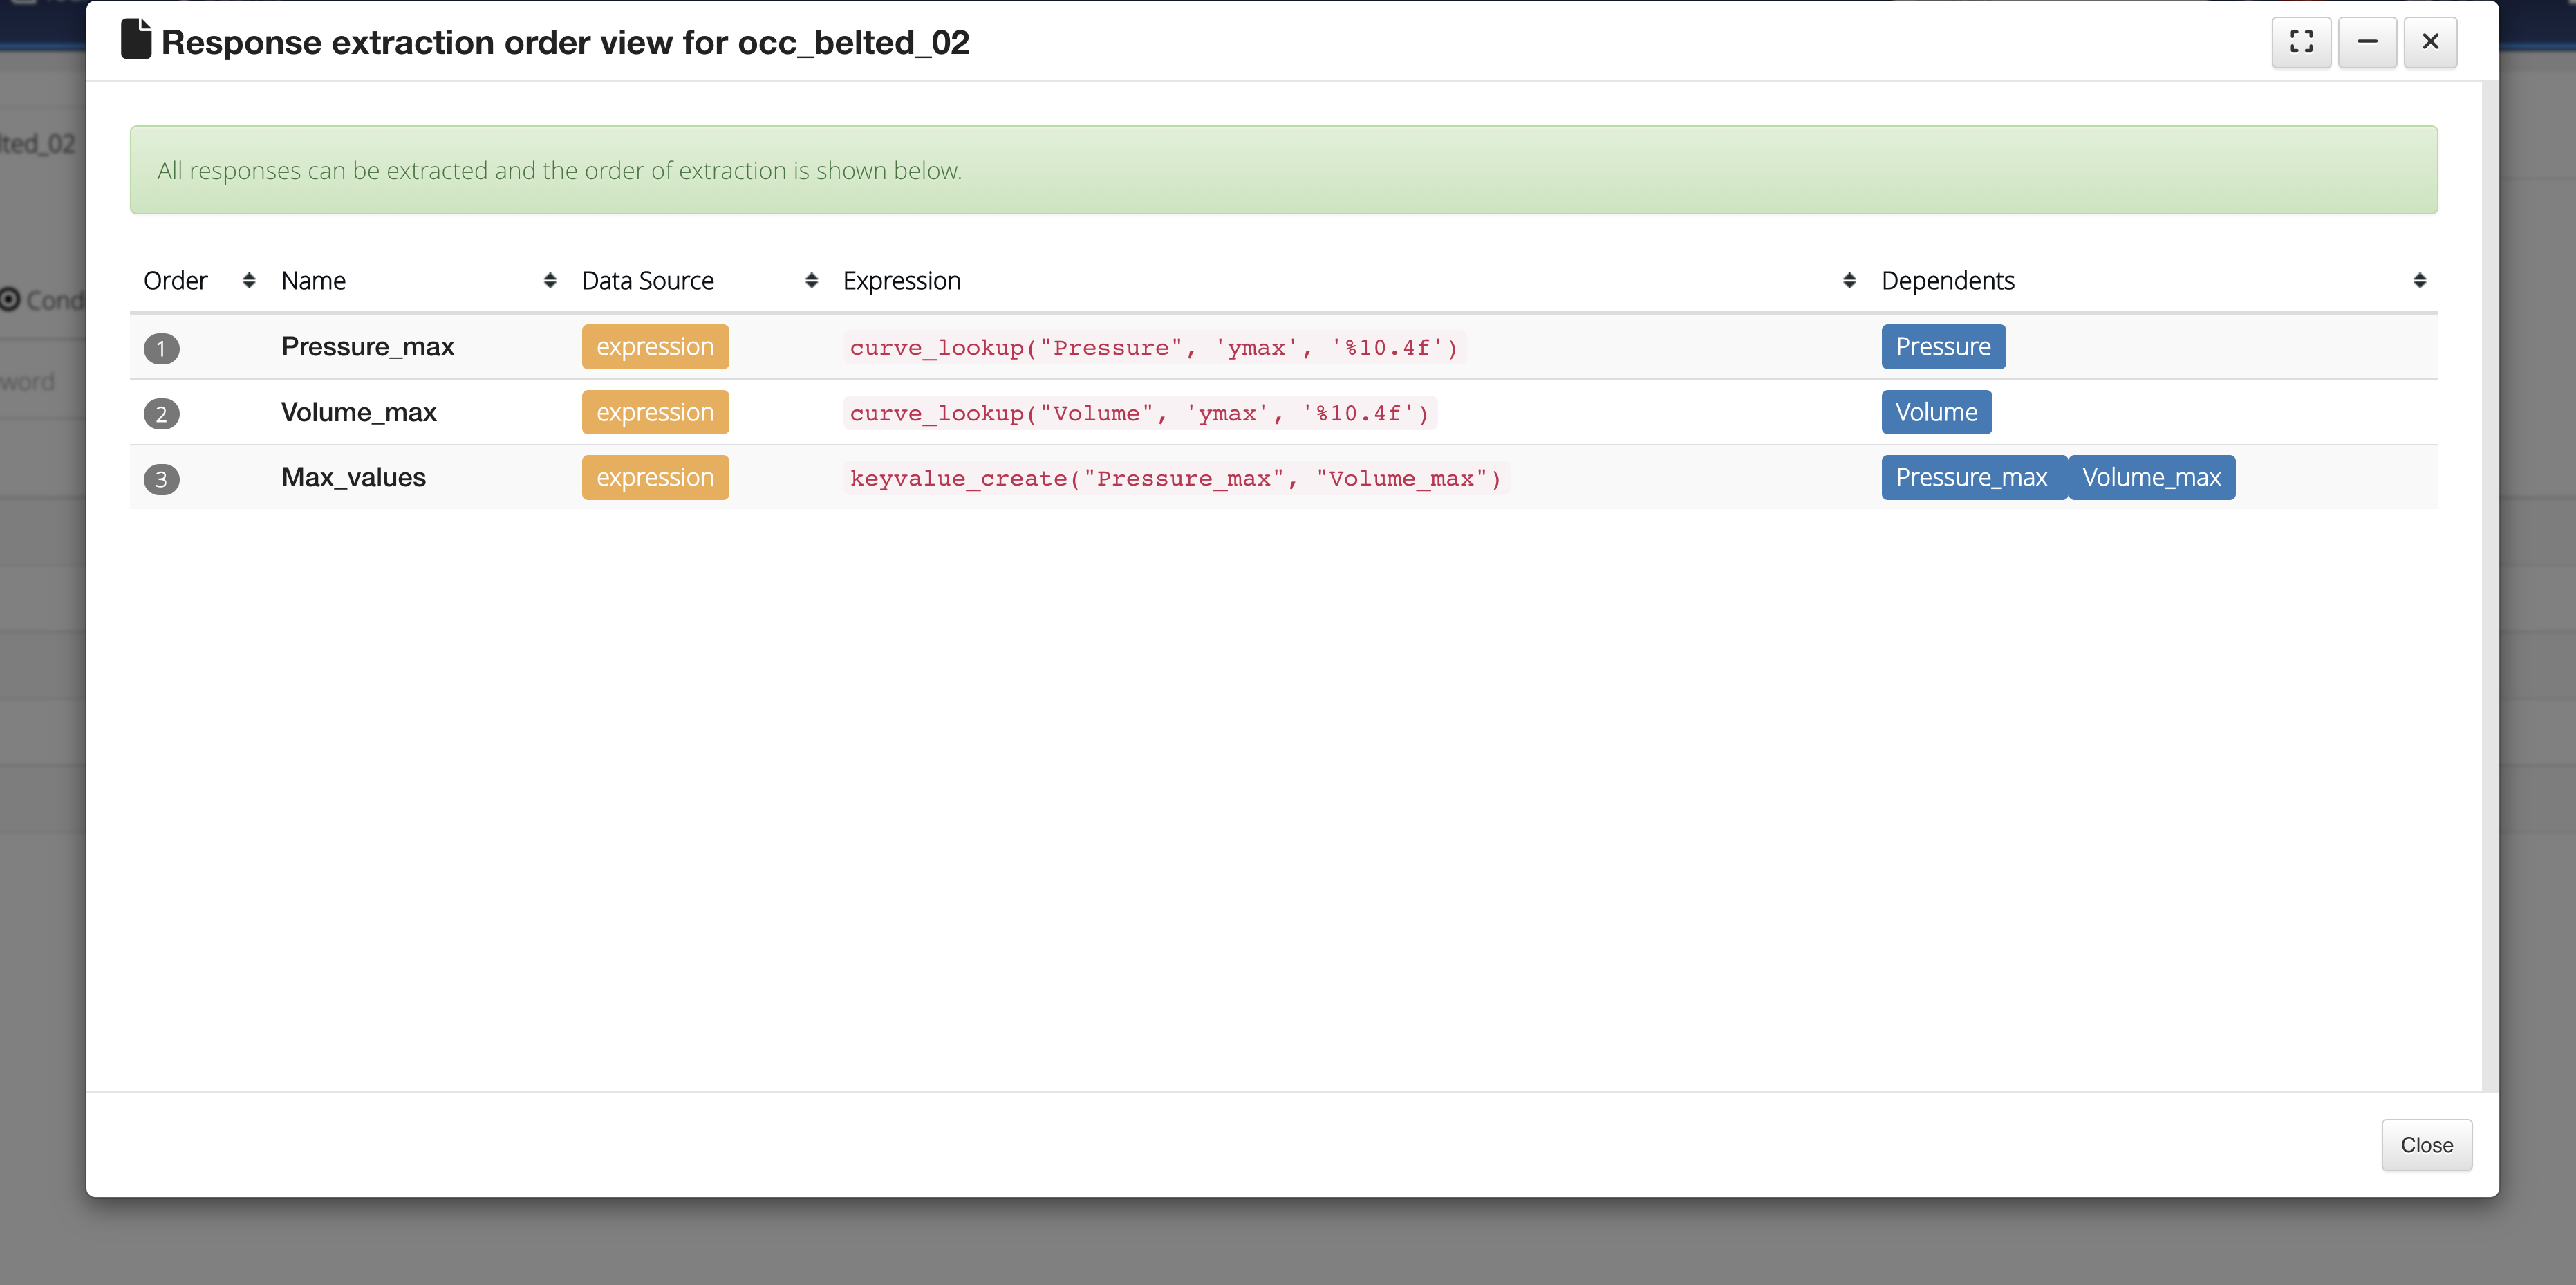
Figure 7: Review Extraction Order
Edit Command Files
To update your templates command files, go to the “View” tab and input/change command values in the form provided.
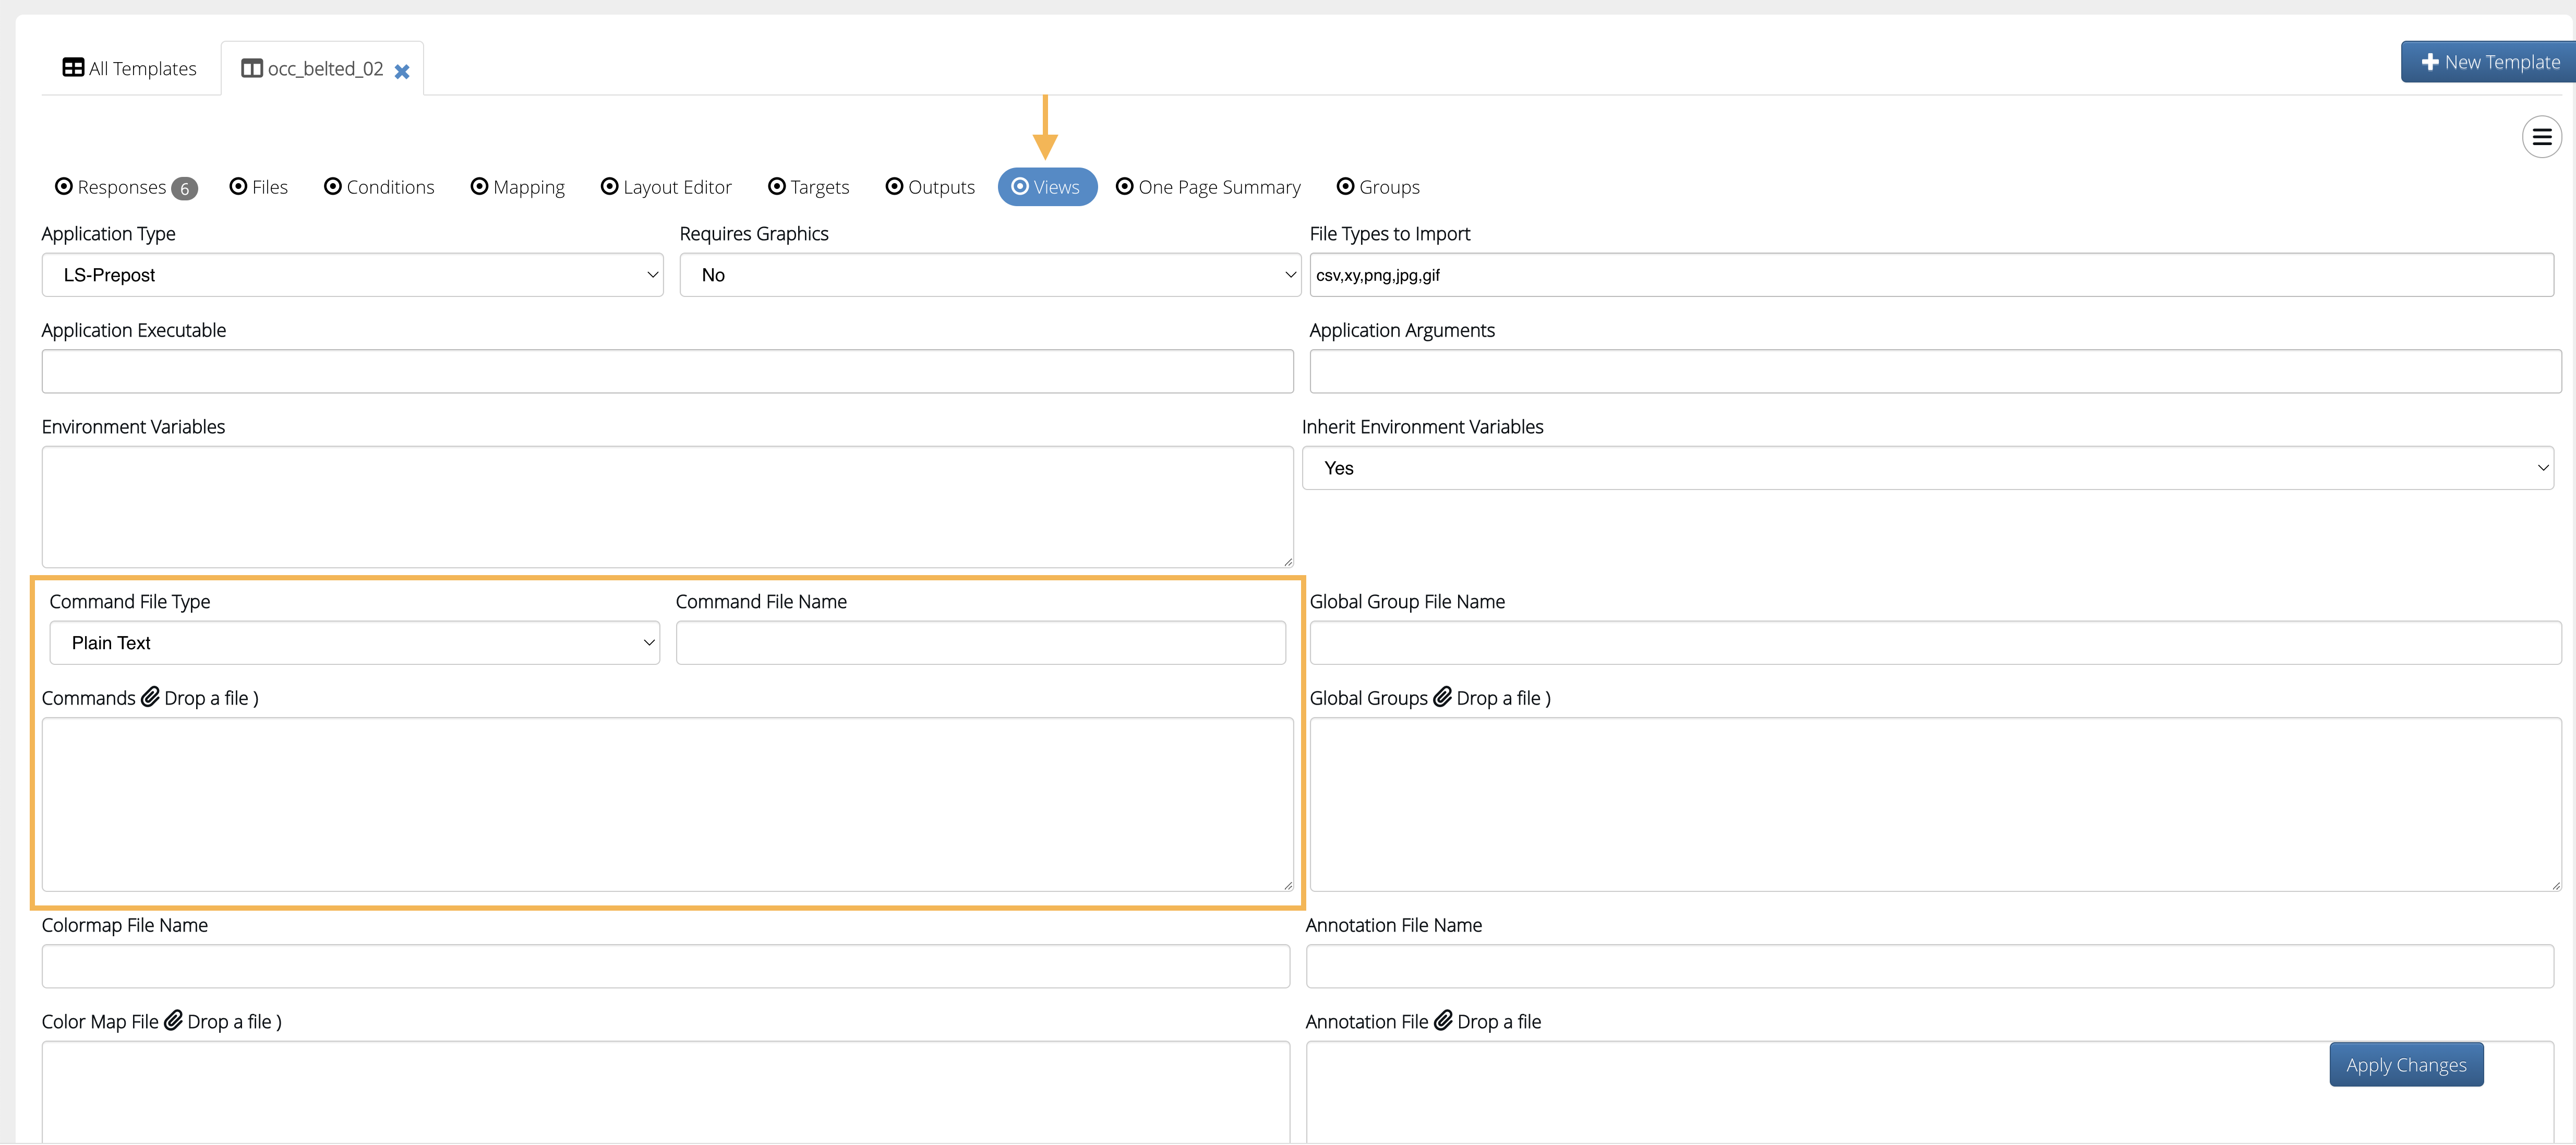
Figure 8: Update Command File
Watch the following video to see how it’s done:
Template Views
Mapping
Under the Mapping tab in the template, use the table provided to map similar responses between physical tests and simulations, so comparison between the two is smooth.
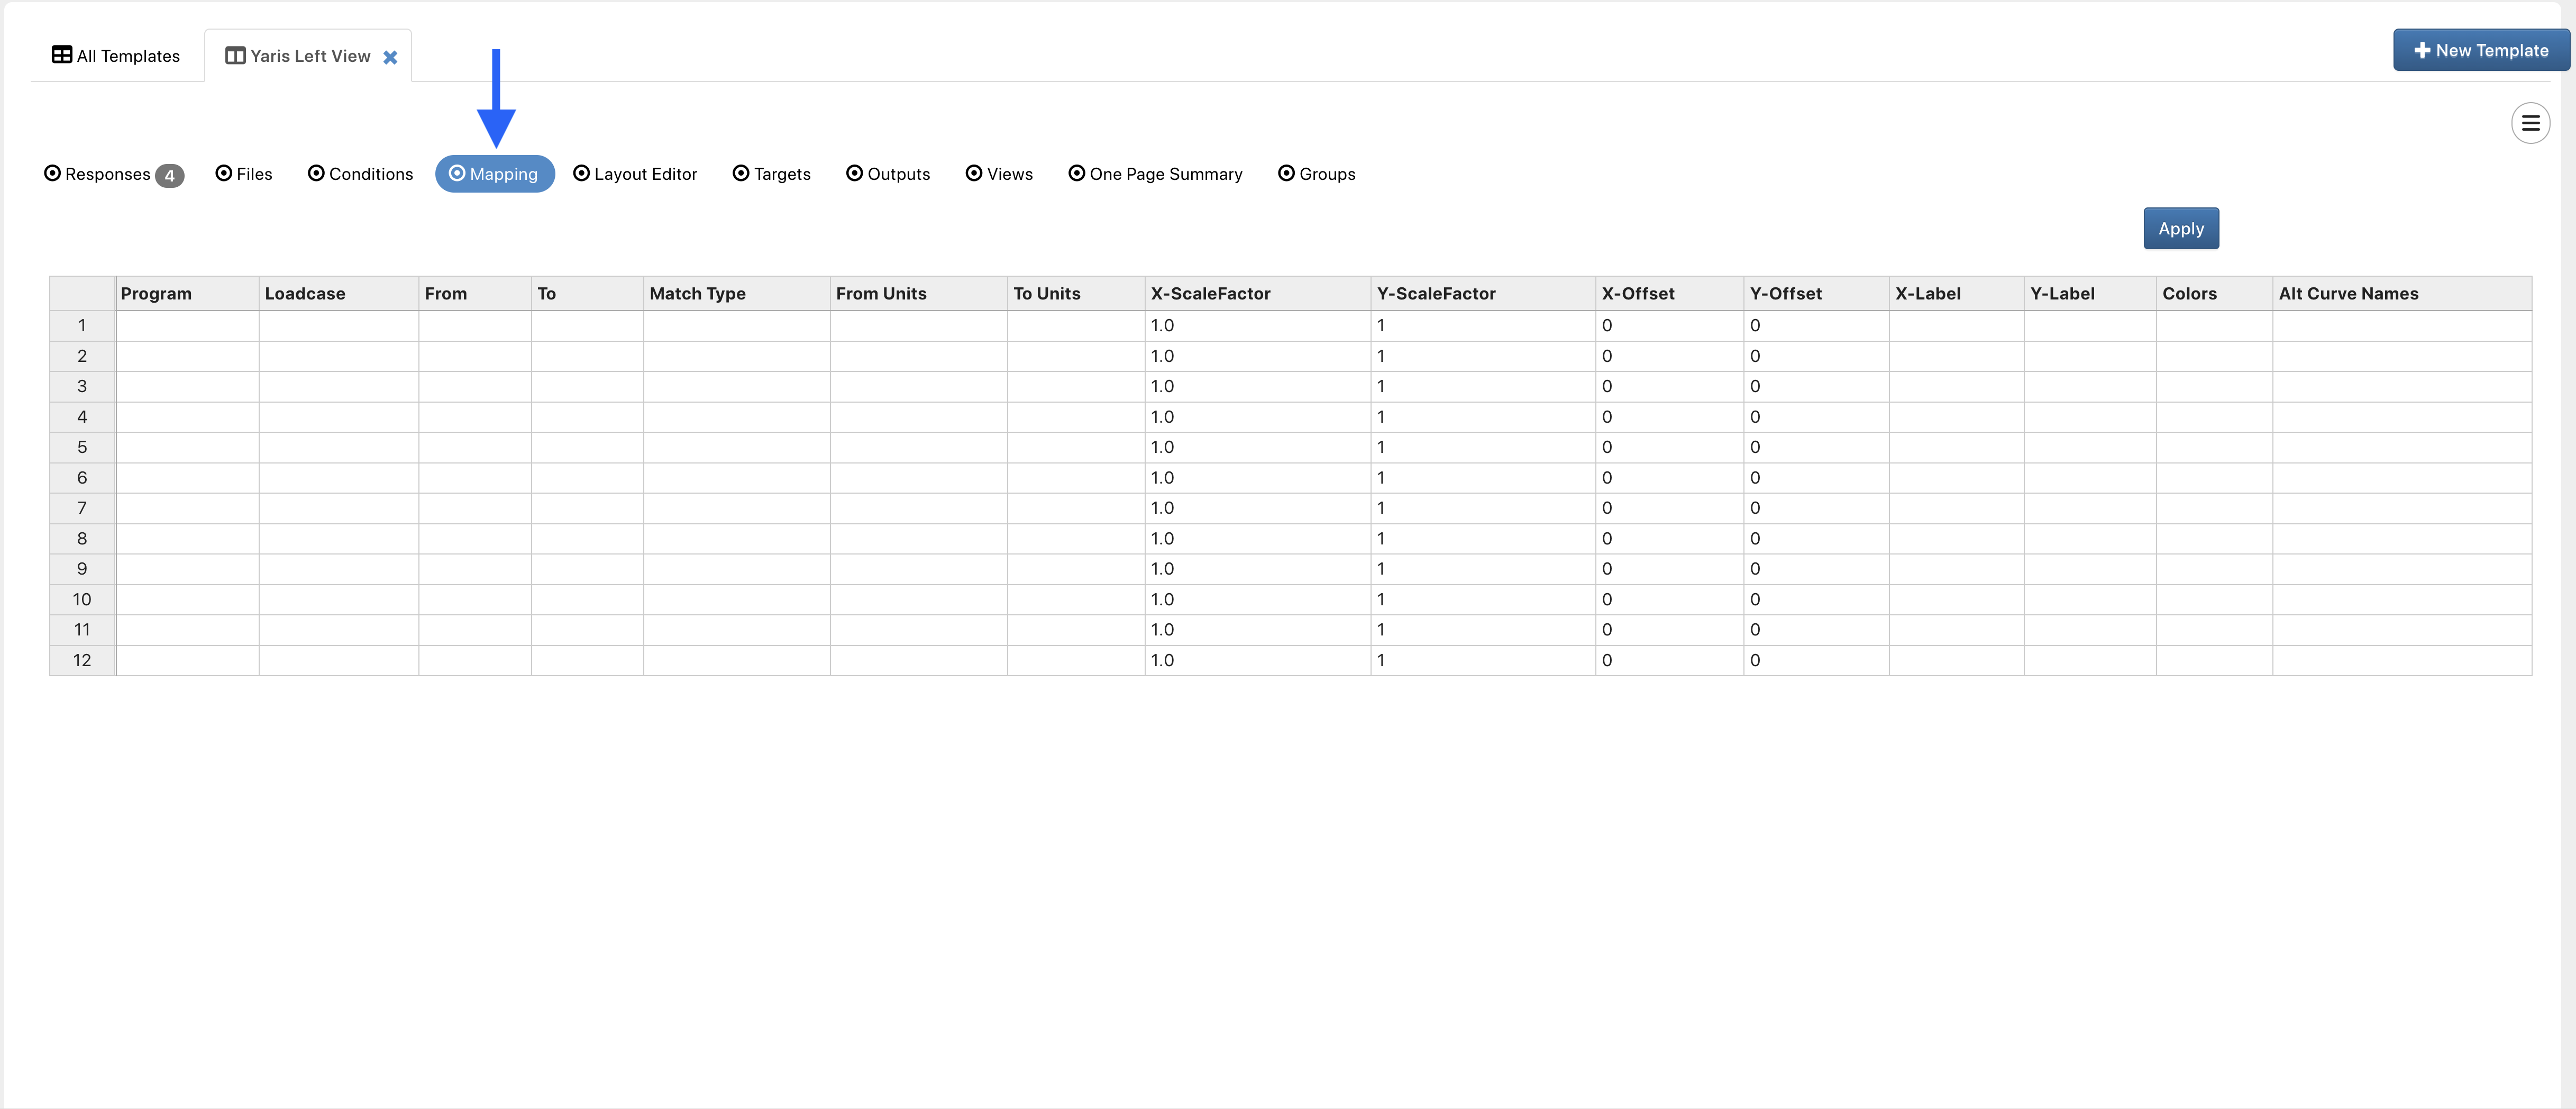
Figure 9: Template Mapping
Assembly Builder
We can import groups in the form of LS-Prepost/Primer and associate them in templates. Do this under the Part groups tab in your template.
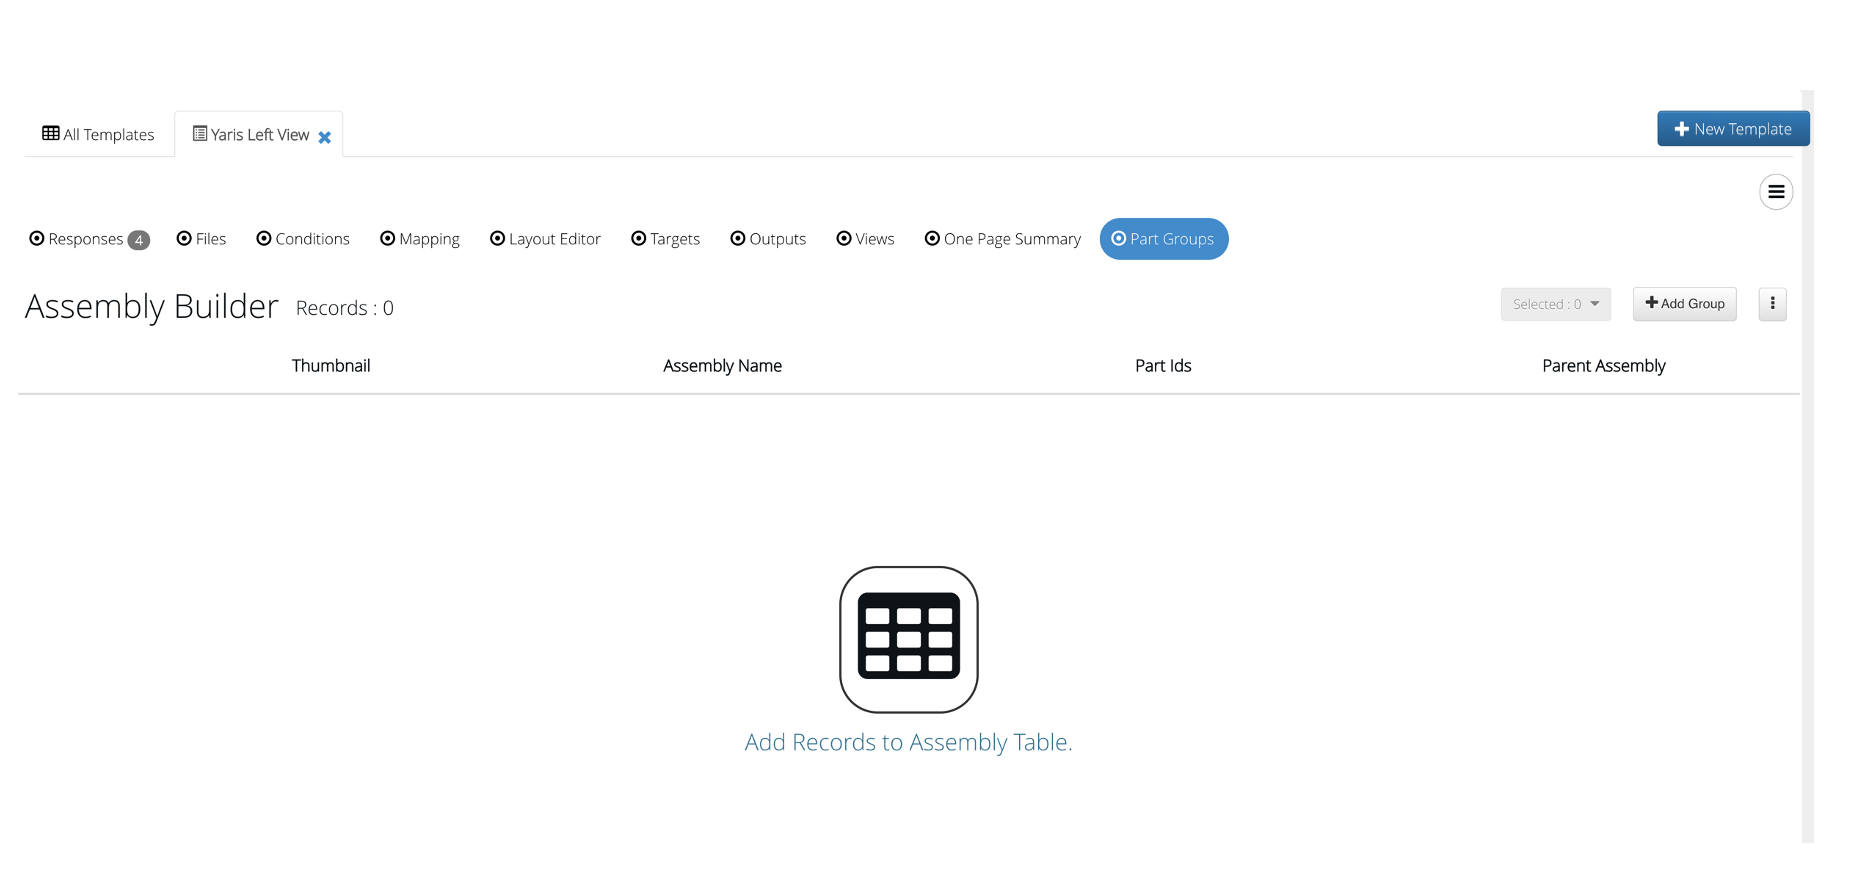
Figure 10: Assembly Builder
Sanitize Template Worker
If you need an efficient way to clean your template when formats may be incorrect, you can use the response template sanitize worker in Workflows. Simply import the template as the input file in the worker configuration and execute.
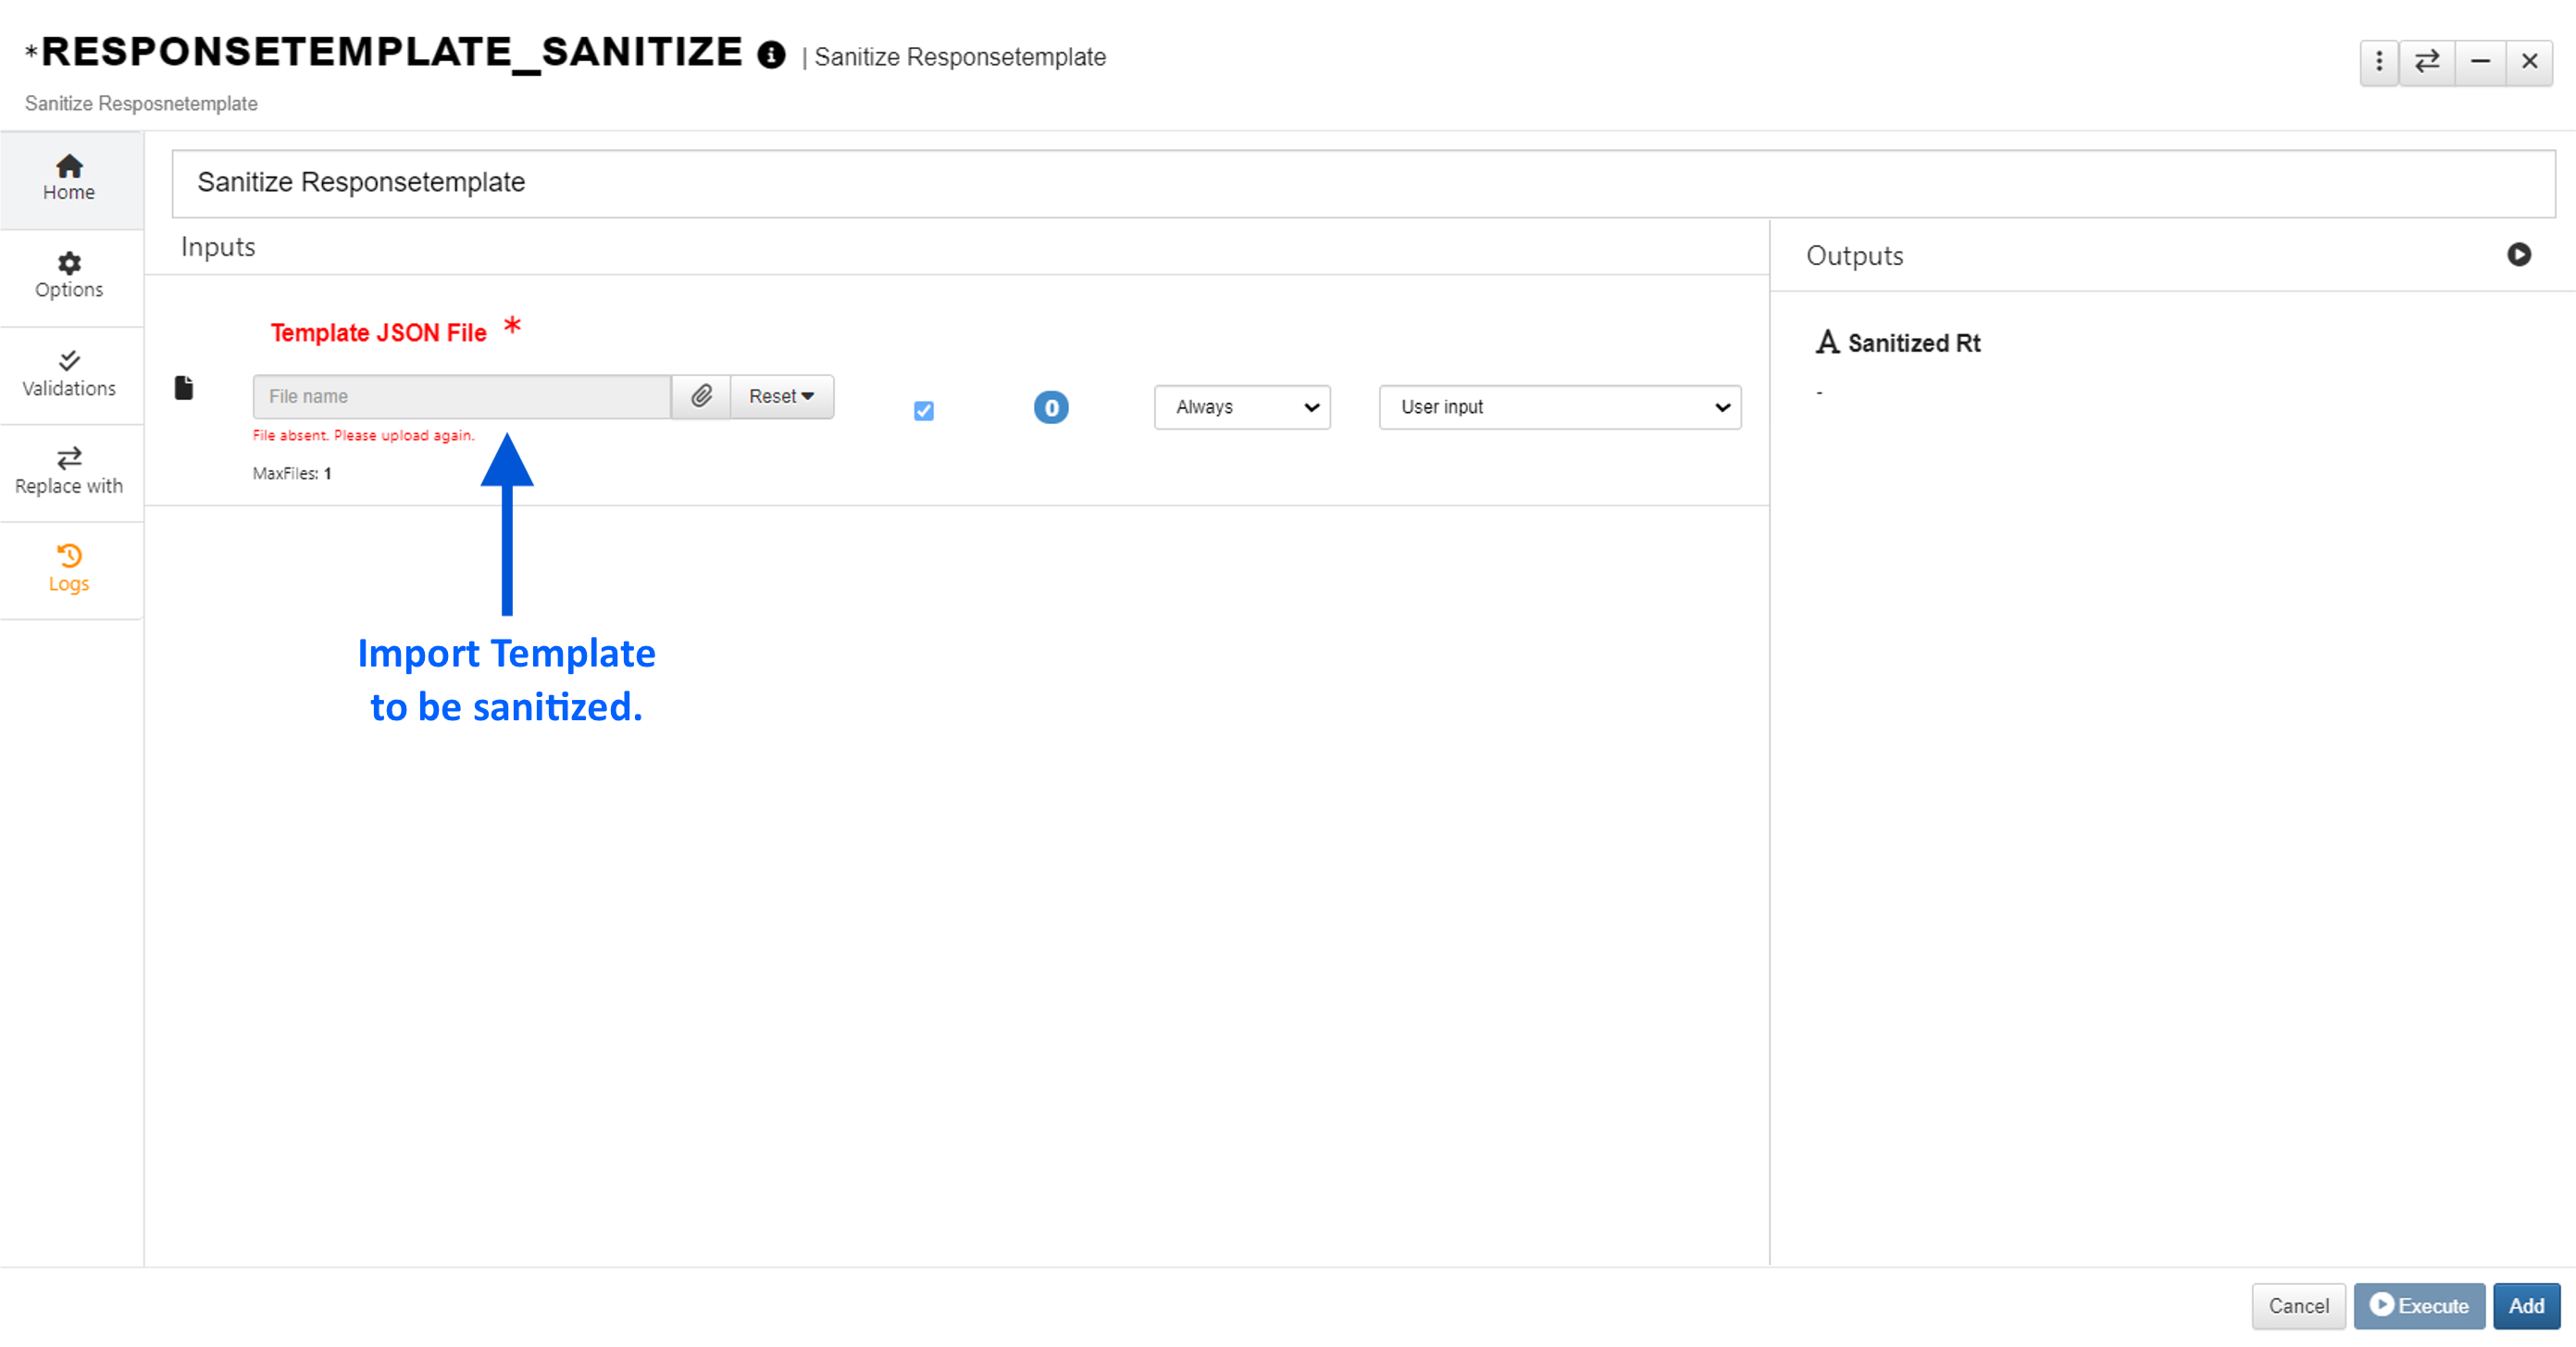
Figure 11: Sanitize Response Template
17.4. Template Configure Views
Create Groups/Asc file using LS-PrePost.
- Open main input file.
- Go to File → Open and select the main keyword file (.k).
- Ensure the model loads completely before proceeding.
Refer the below video for the steps:
- Selecting Parts for the Model
- Click on Set Part from the right-side menu options.
- Select the parts you want to include.
- Click Apply to confirm your selection.
- Finally, click Done to complete the proces.
Refer the below video for the steps:
Creating an entity
On the right-side menu options, click Create Entity.
From the dropdown, select Set Data.
Choose the Set Part option and click Create.
Select the area/region for which the parts need to be grouped.
Provide a title/name for the new set.
Click Apply to save the changes.
Refer the below video for the steps:
- Creating and Saving a Group/Asc file
- From the right-side menu options, click on Groups.
- Select the created entity (Set Part).
- Click Create Group to generate a new group from the selected entity.
- Once the group is created, click Save.
- The group will be saved automatically in the user’s directory.
- Loading Saved Groups
The groups that were saved in the user’s directory can also be reloaded when needed
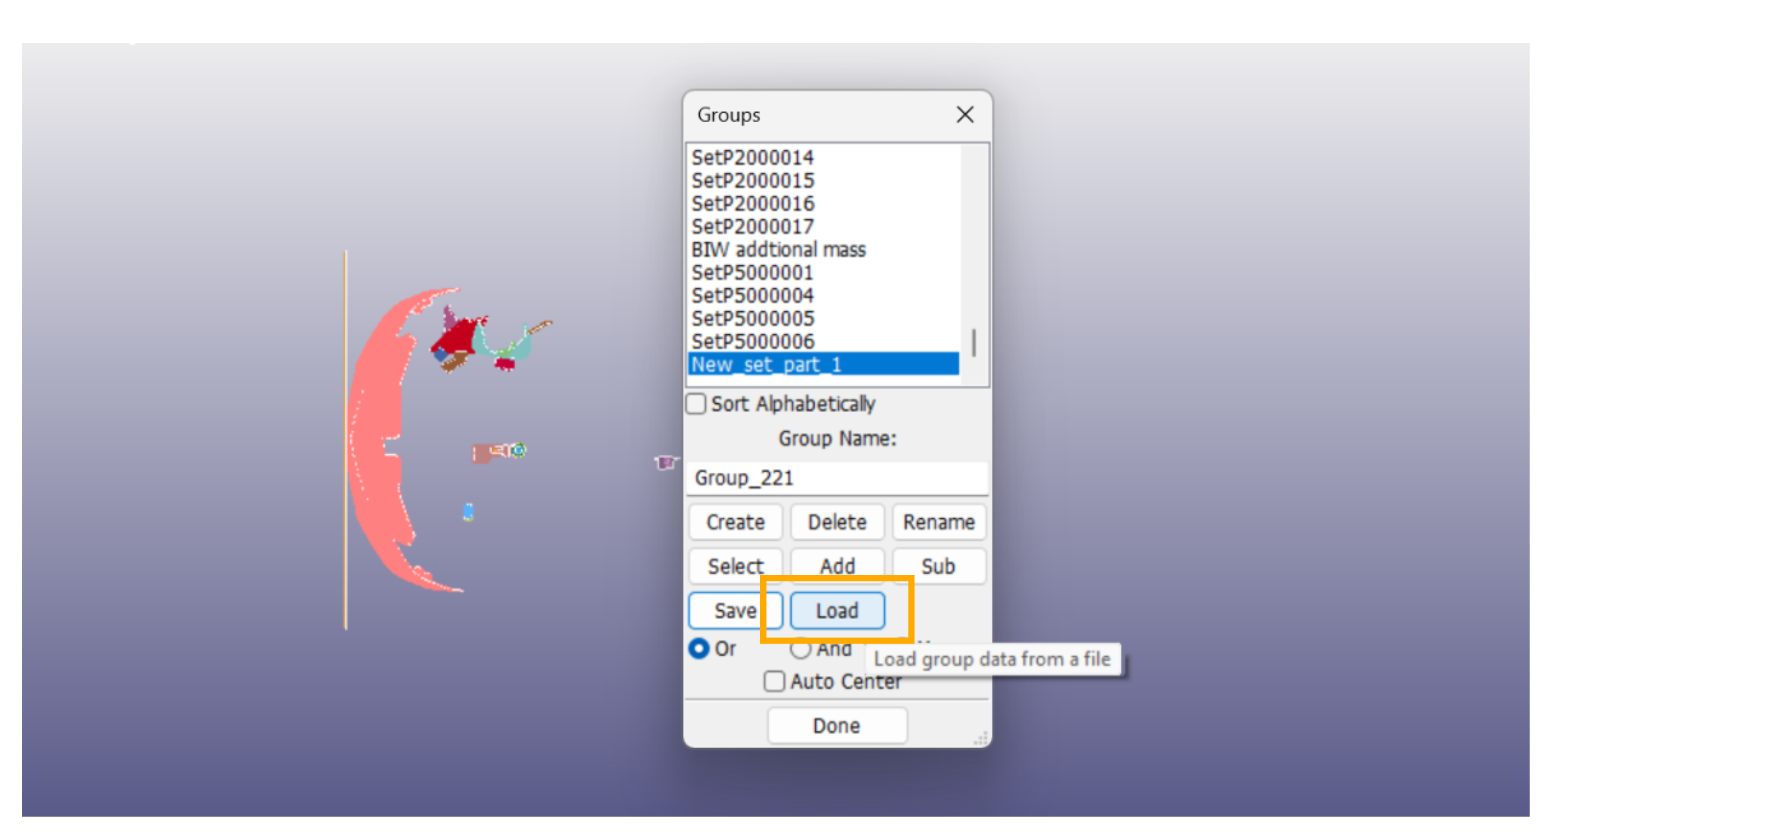
Loading Saved Groups
Recording Animation Commands in LS-PrePost - Creating Cfile/Command file
- Open LS-PrePost.
- Load the results by opening the d3plot file.
- Go to the Misc tab in the top menu.
- Click on Start Recording Commands.
- Provide a name for the command file in the dialog box.
- Click OK – this will begin recording all the actions you perform as commands.
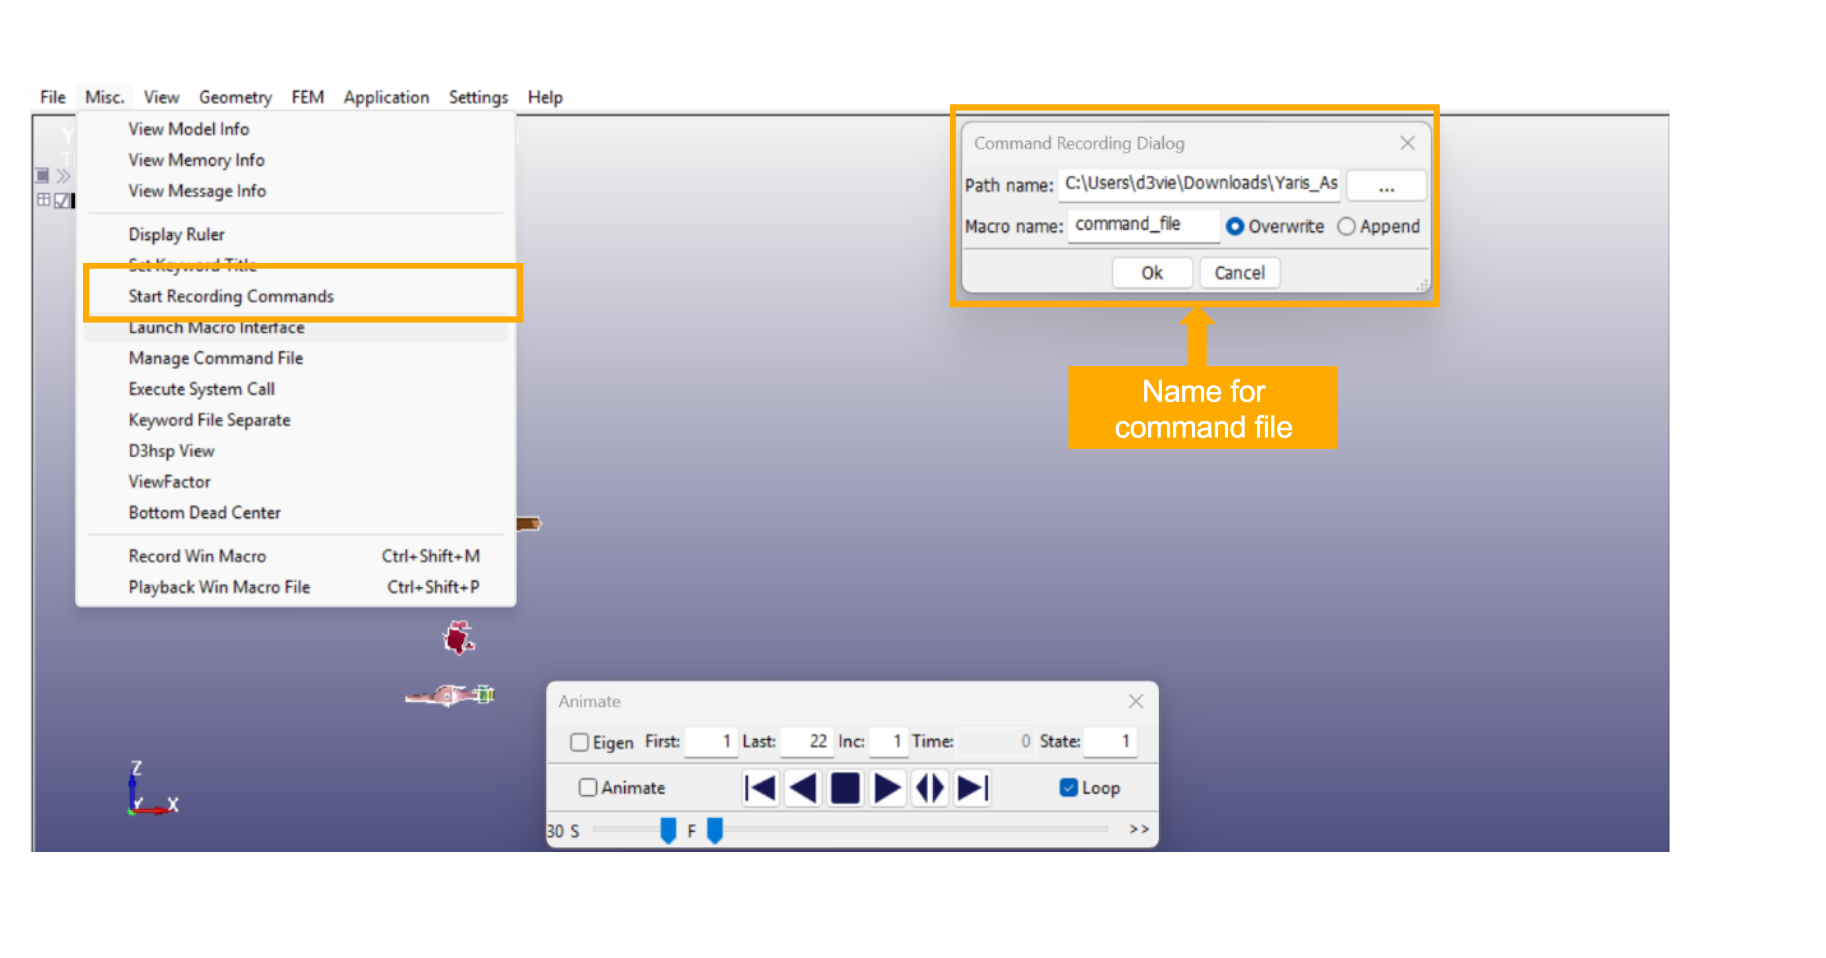
Recording Animation Commands
Creating a Movie and saving cfile
Open the Groups menu.
Click Load and select the group that was created previously.
Go to File → Movie.
Provide a name for the movie file.
Click Start to begin recording the animation.
Once complete, the movie will be generated and saved.
After finishing, return to the Misc tab.
- Click Stop Recording Commands to end the command recording session.
- The command recording process saves a .cfile (command file) in the user’s directory.
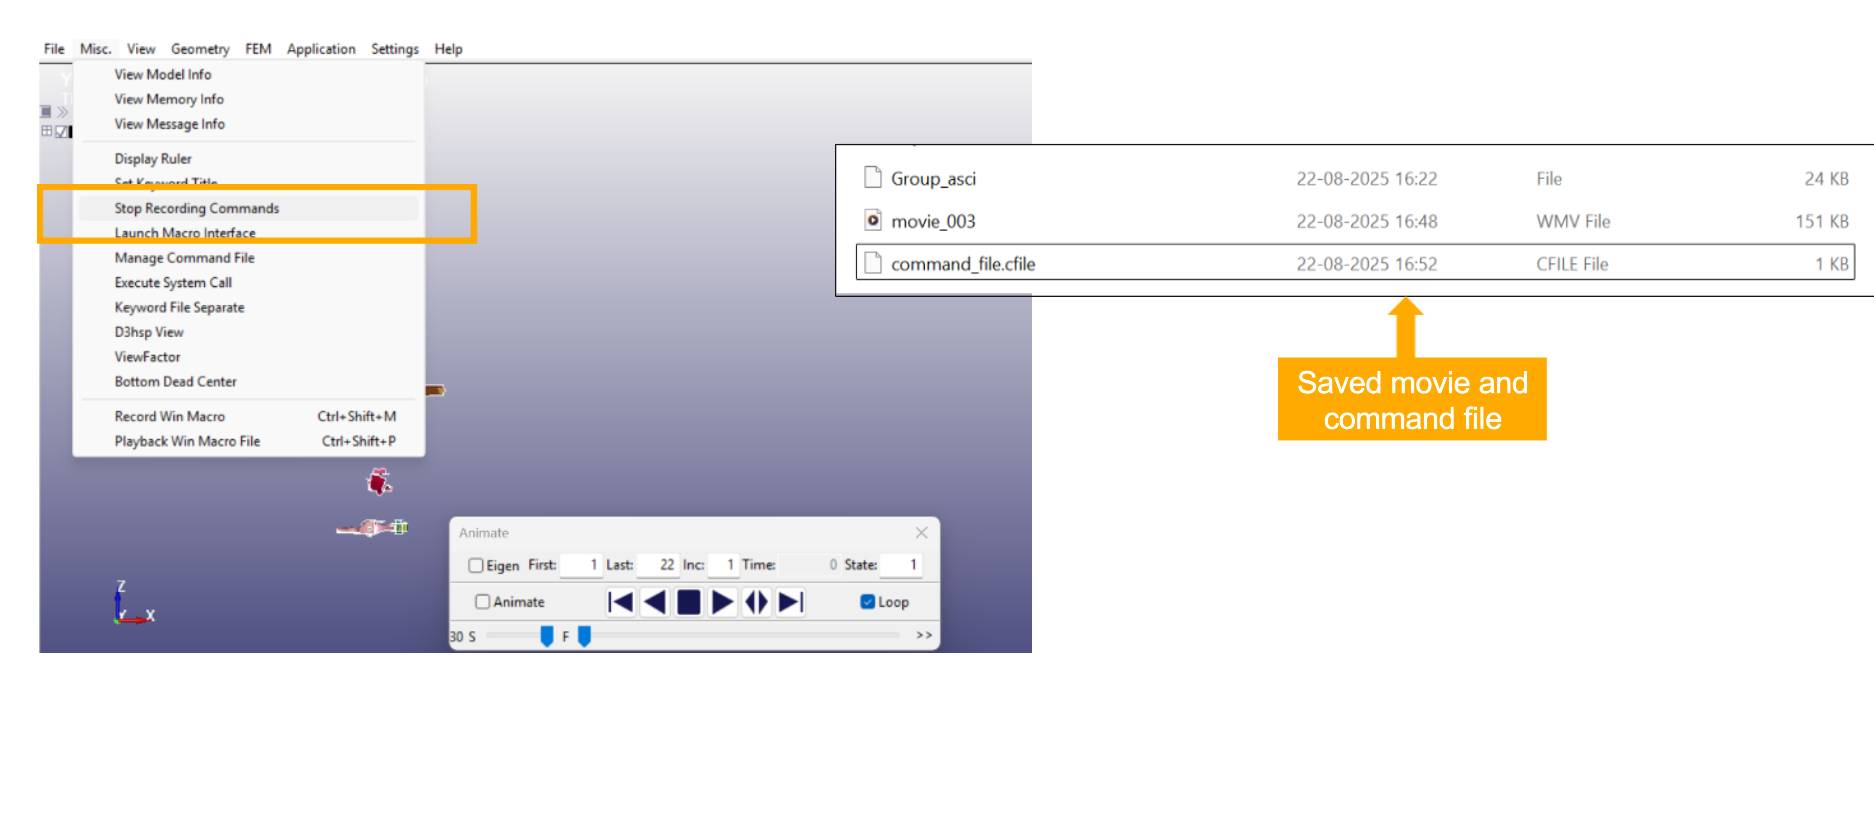
Recording Animation Commands
Using Command and ASC Files in d3VIEW
Go to the Templates page in d3VIEW and open the Template.
In the opened Template, navigate to the Views tab and change the requires graphic option to yes.
In the Template → Views tab, drag and drop the command file (.cfile) into the Command File input field.
The file name will automatically appear.
Change the Command File Type to Jinja.
Next, drag and drop the ASC file (.asc) into the Global Groups input field.
The ASC file name will be fetched automatically.
Once both files are attached, click Apply Changes.
This saves the configuration to the template.
Refer the below video for the steps:
17.5. Duplicate template
New option is available to add prefix or postfix to Responses while duplicating a template in Templates page.
For additional questions about how to navigate the d3VIEW platform, please feel free to email our team at: support@d3view.com.
17.7. Library Template
IIHS template with ID 003 is now available in templates Library
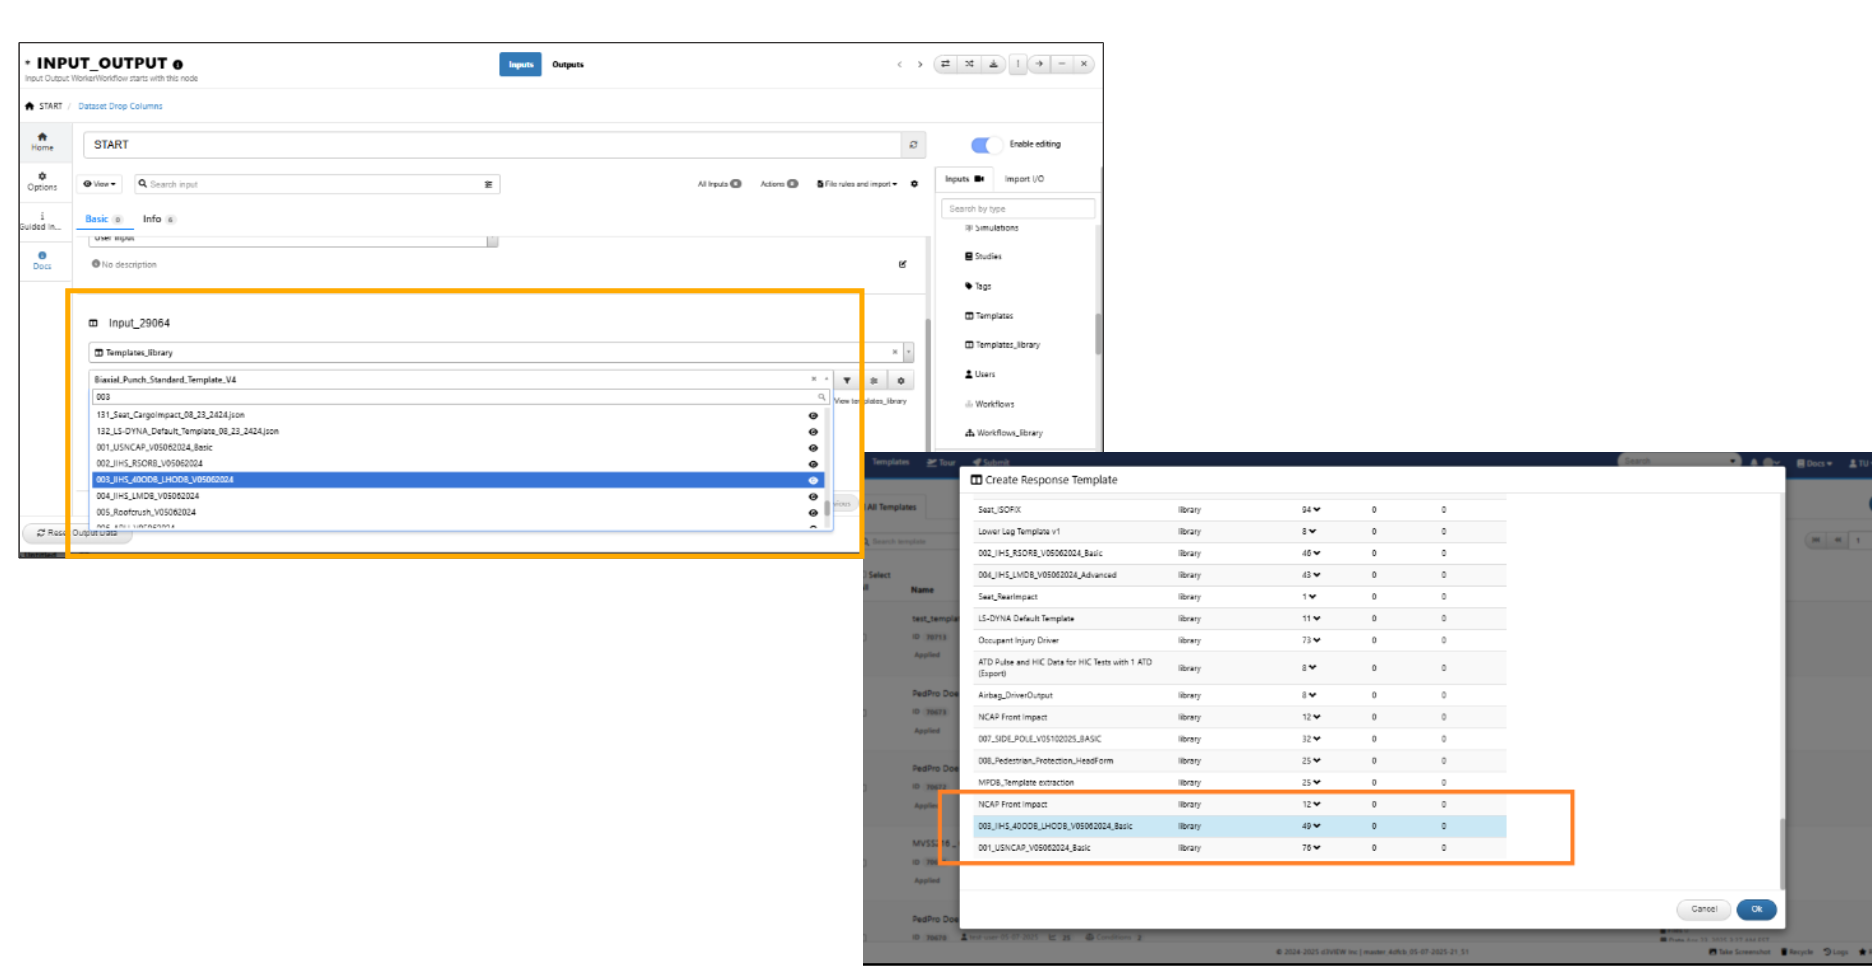
003 IIHS
A new library template called Occupant Injury with ID 010 has been added to the Templates library.
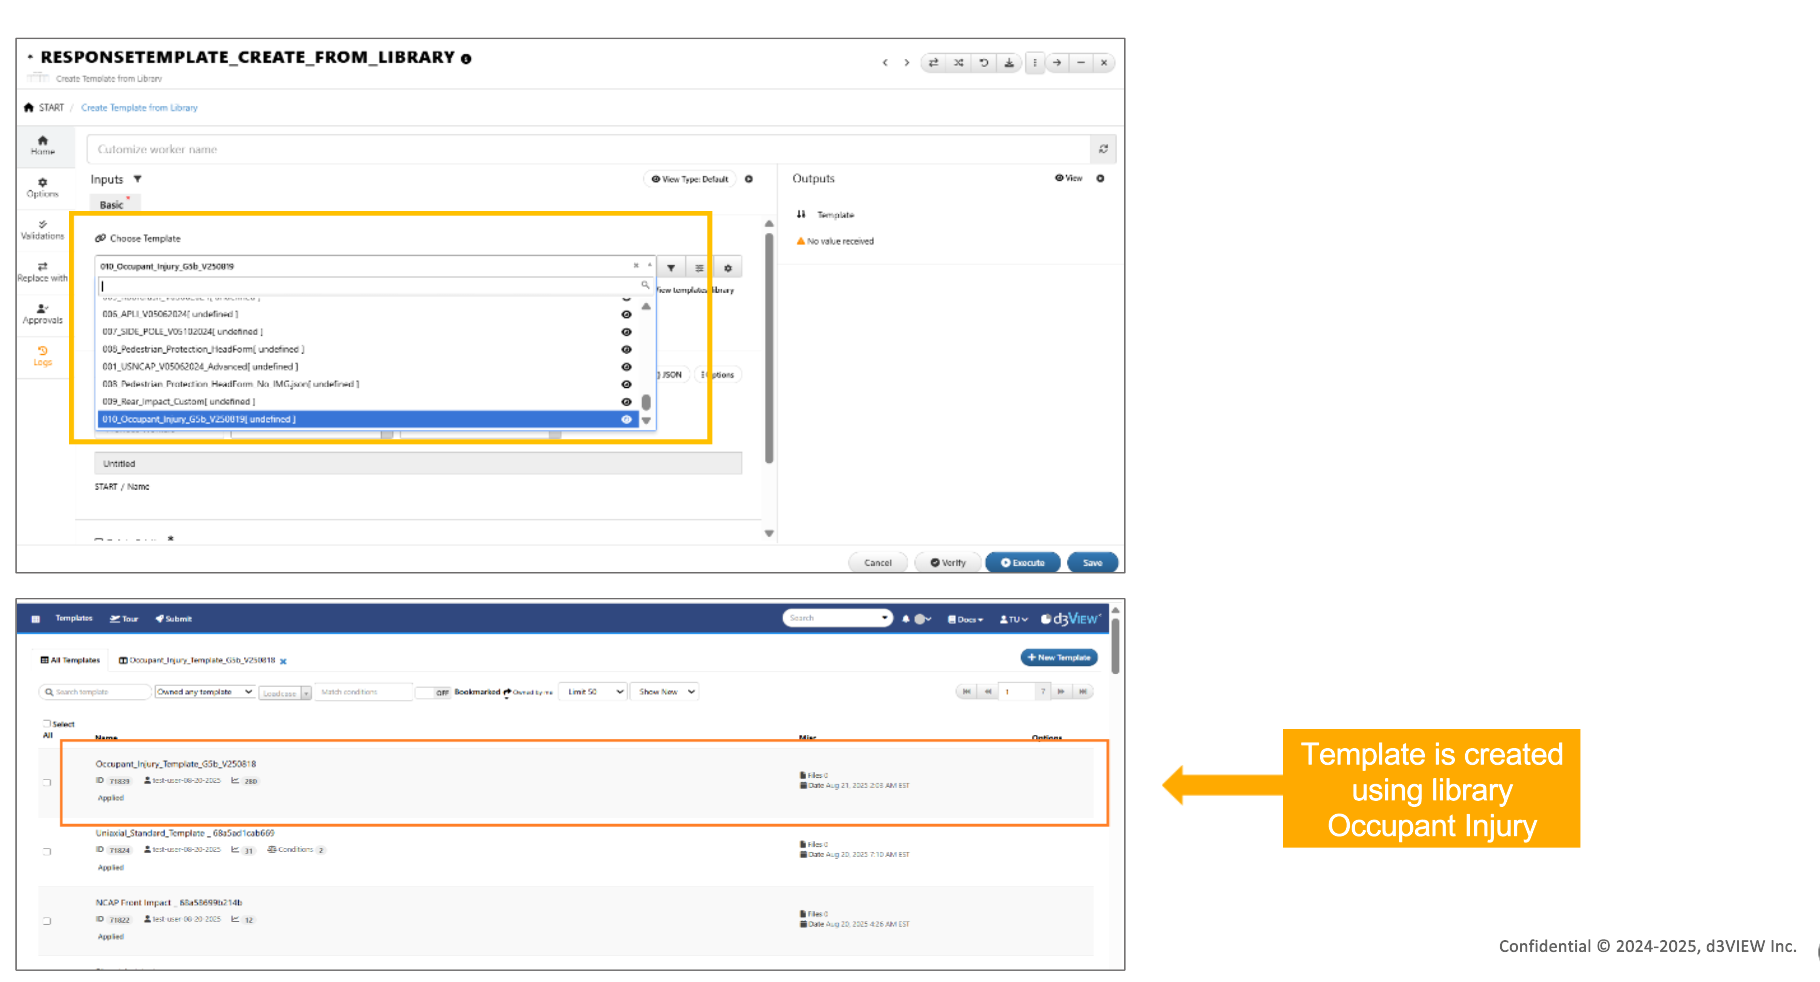
010 Library
New library templates are added with IDs 162, 163, 164, and 165.
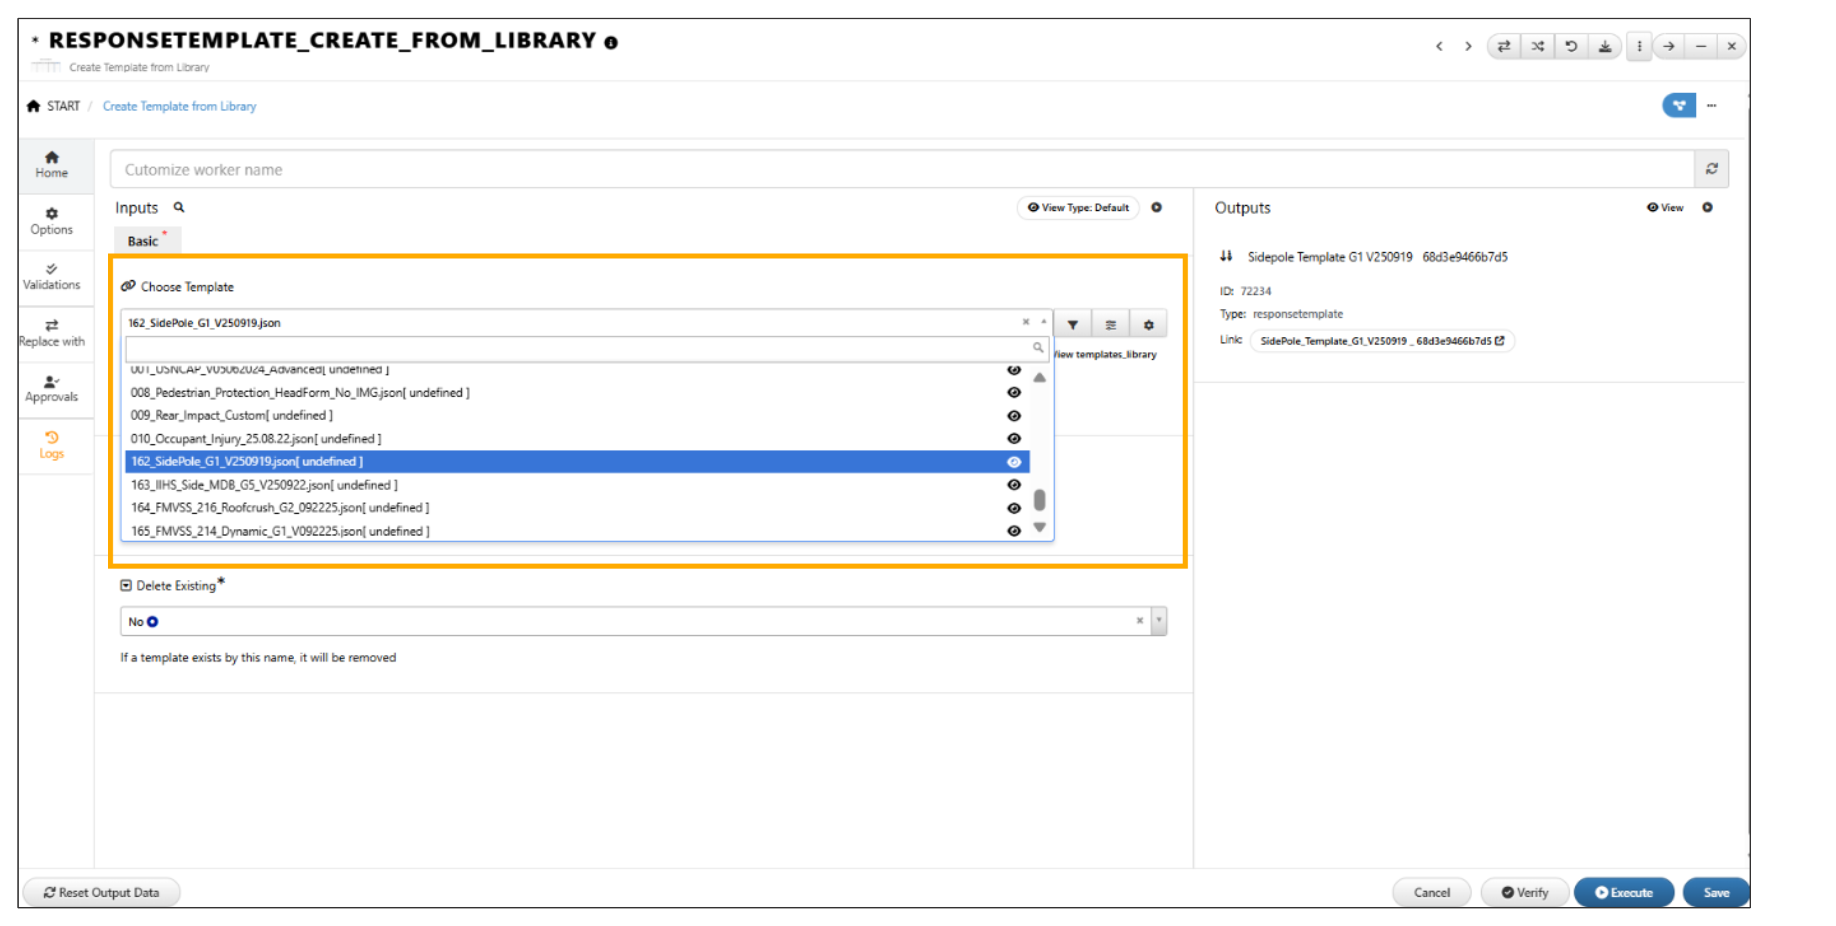
Library templates
Added new Library template with ID 170 for Humanetics Occupant Template.
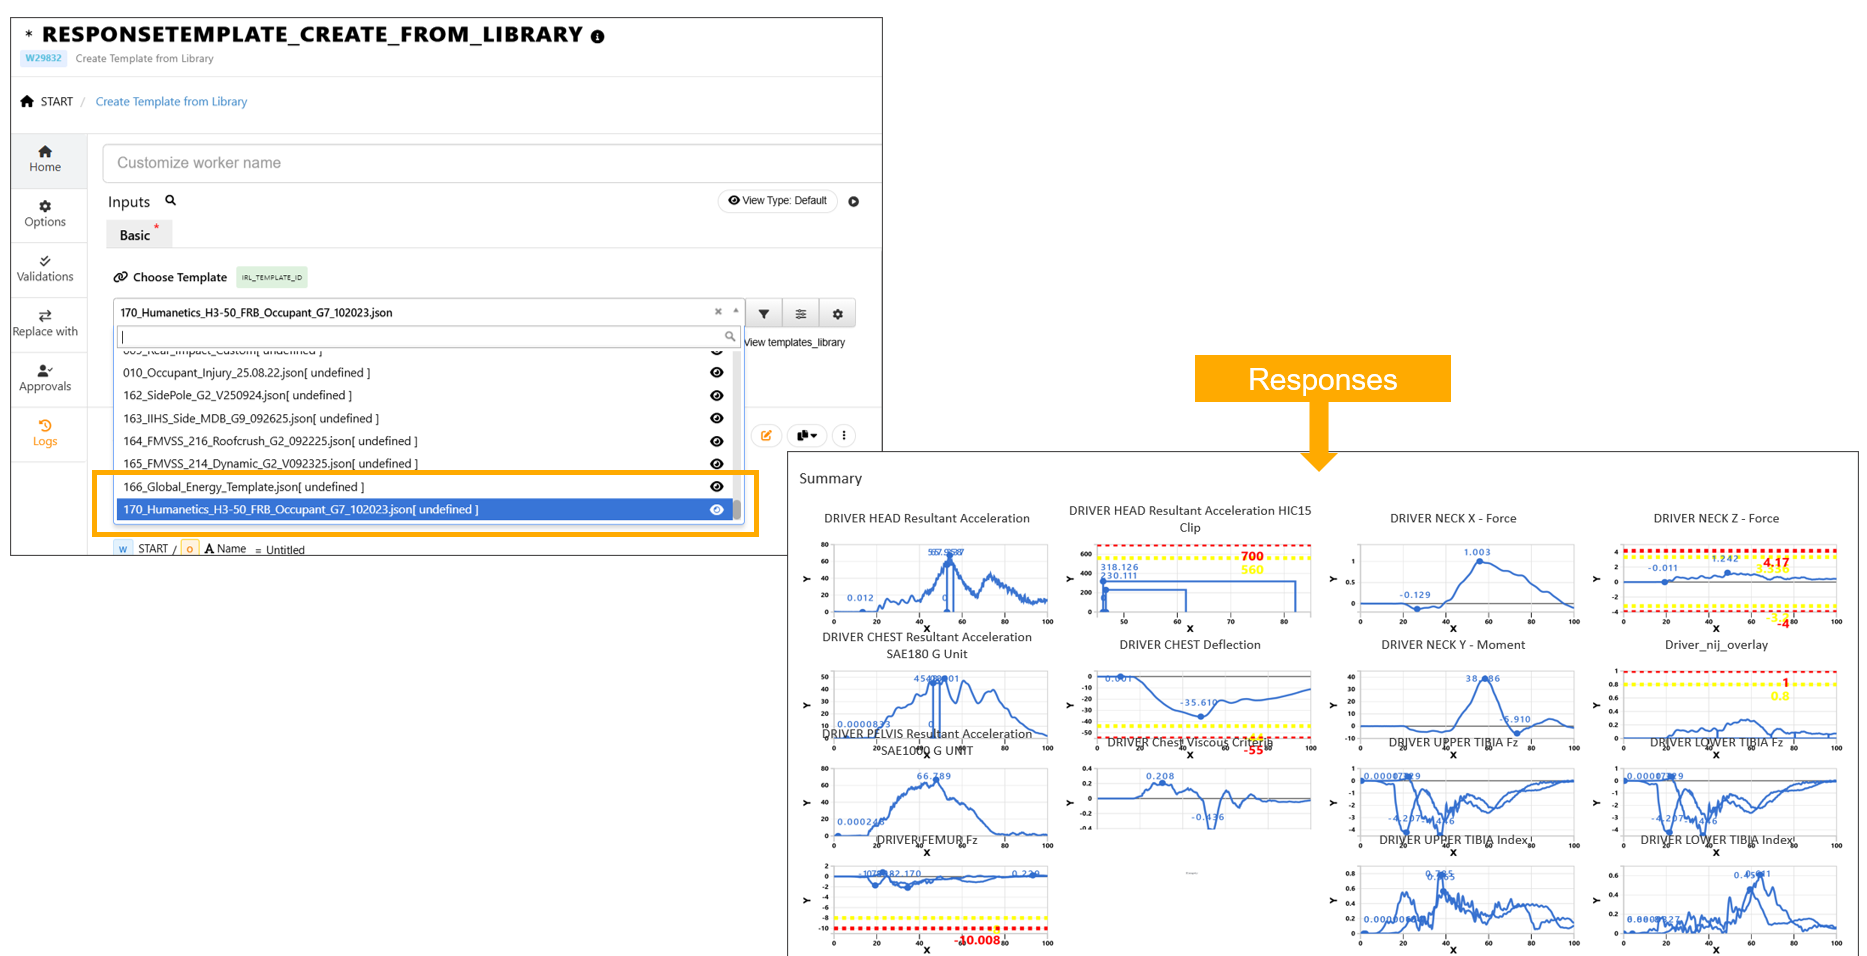
Humanetics Occupant Template
The IIHS SORB template is now available in the library with ID 002.
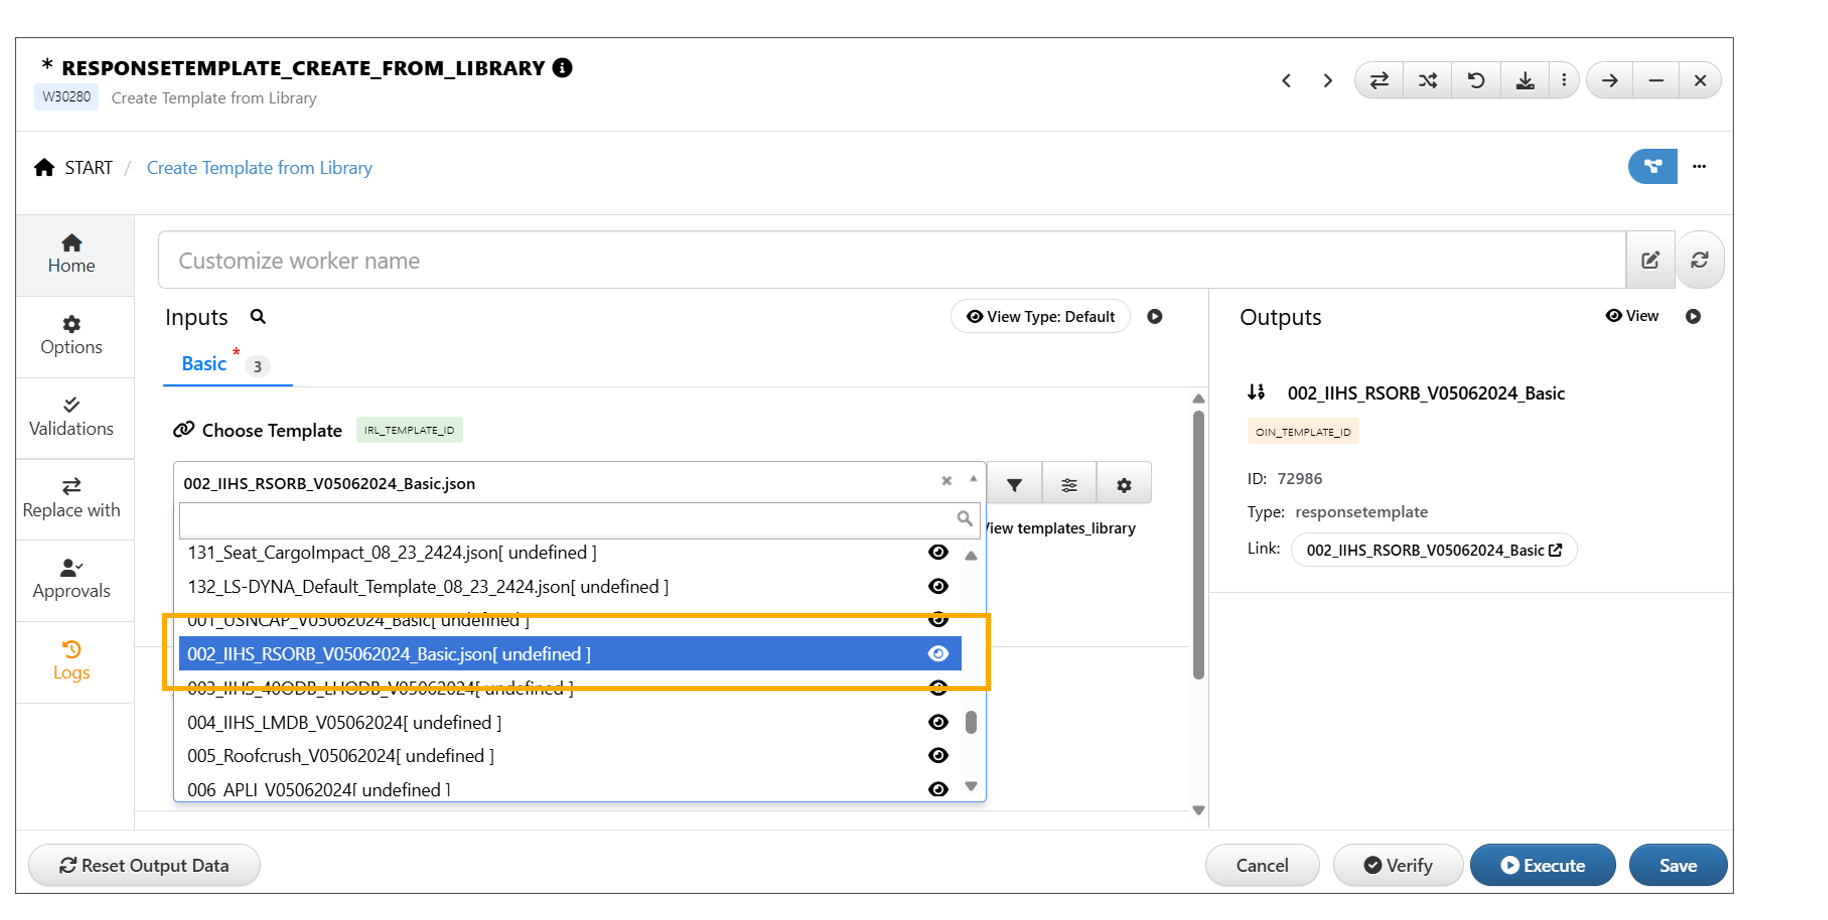
IIHS SORB
17.8. Alternate Name
The alternate name provided in the *RESPONSETEMPLATE_CREATE_FROM_LIBRARY worker will be used as the template name in the Templates page after execution.

Alternate Name
17.9. Templates used in d3VIEW
17.10. Pedestrian Protection Data Processing and Visualization
In this section, we’ll take a step-by-step look at Pedestrian Protection data processing and visualization using PedPro templates.
What Will Be Covered
- Introduction
- Setting up Ped Pro template in d3VIEW
- Using Ped Pro template
- Viewing Comparison in Simlytiks
- Reporting and Sharing
What you will need in this tutorial
- URL and a valid account for d3VIEW
- Pedestrian Protection template from d3VIEW - Pedpro.json
- An LS-DYNA Pedpro input file for a single or multiple impact on the hood – Pedpro.k
About Pedestrian Protection Template
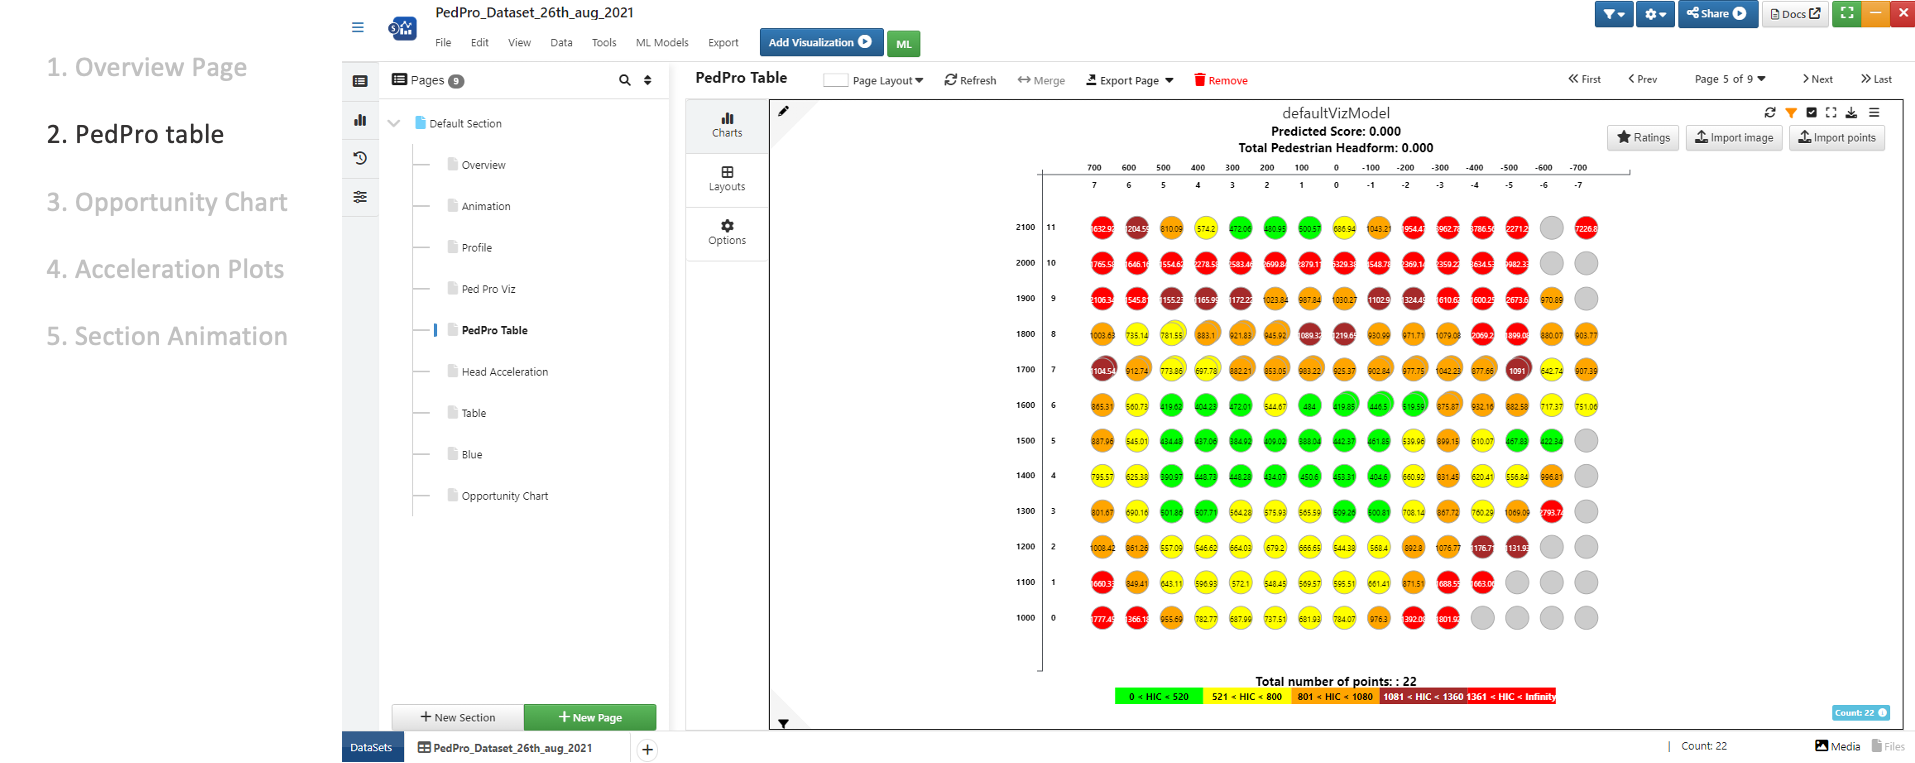
Pedestrian template helps to extract head-injury-criteria (HIC) and prepare a score-card and an opportunity chart for a full-sweep of runs. This tutorial will guide you to configure a template to suite your model id/labels, select necessary conditions such that the template can be applied to your simulations, and to view the score card.
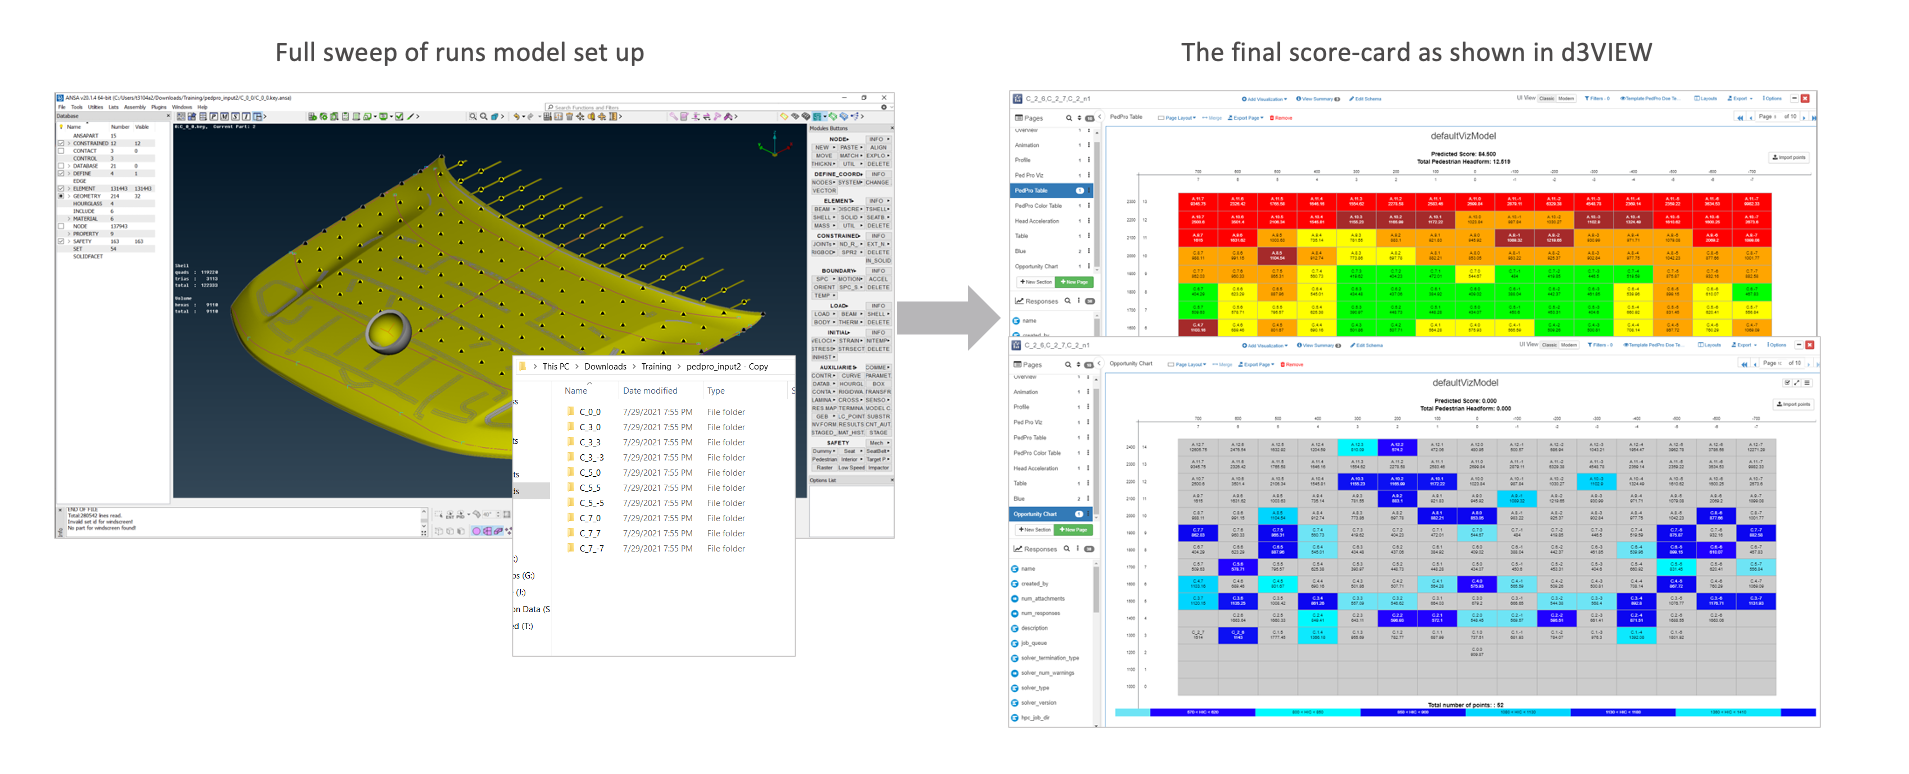
Figure 1: Model Set-up and Final Score Cards
Step 1. Setting Up Ped Pro template
For this section, we will use the Templates application and upload a PedPro template file from our local machine and review the following.
- Upload Template
- Configure IDS/Labels
- Specify conditions
Step 1a. Uploading the Ped Pro template
To get started using our Ped Pro Template, we’ll need to upload it onto the platform under the Templates Application. Use the application menu at the top left corner of the webpage and click on the Templates icon to navigate to the page.

Figure 2: Access Templates Page
Once in the Templates app, click on the blue New Template button at the top right corner of the page to start uploading the template.

Figure 3: Create New Template
Once the template creation window pops up, we’ll navigate to the Upload tab (1). Click-to-upload or drag-and-drop the JSON file onto the drop zone indicated by the orange dashed box (2).
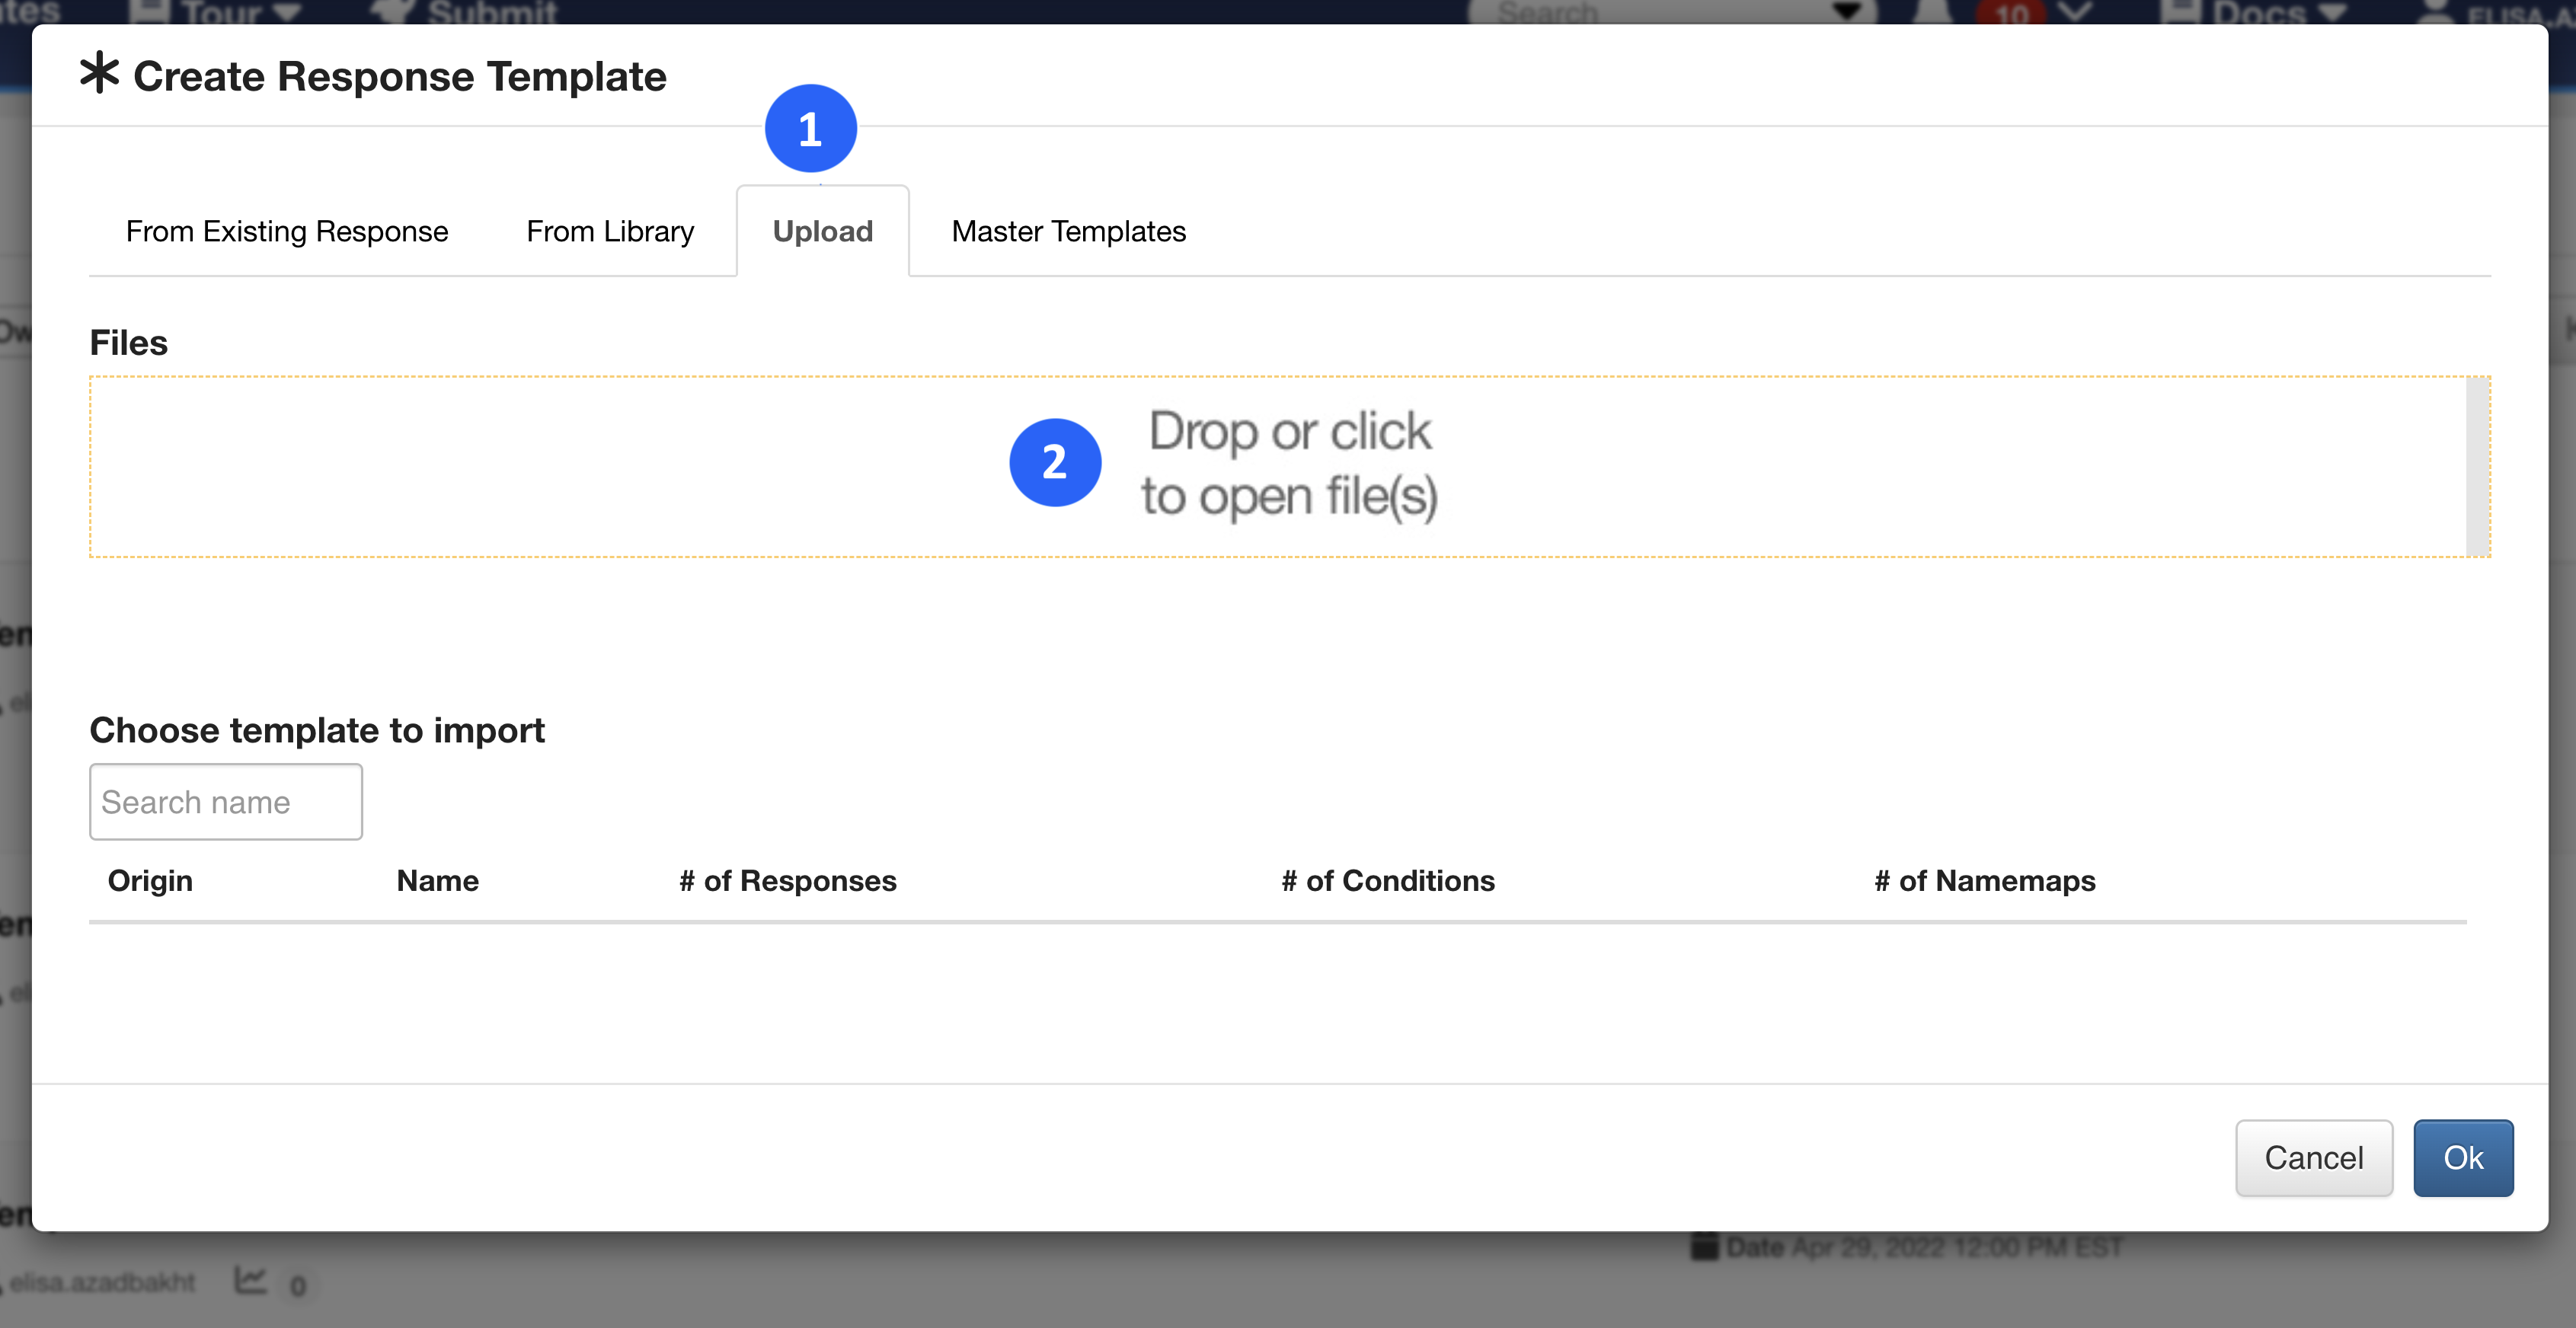
Figure 4: Upload Template File
Once uploaded (1), make sure the template is highlighted in blue at the bottom of the window (2), and then press OK (3).
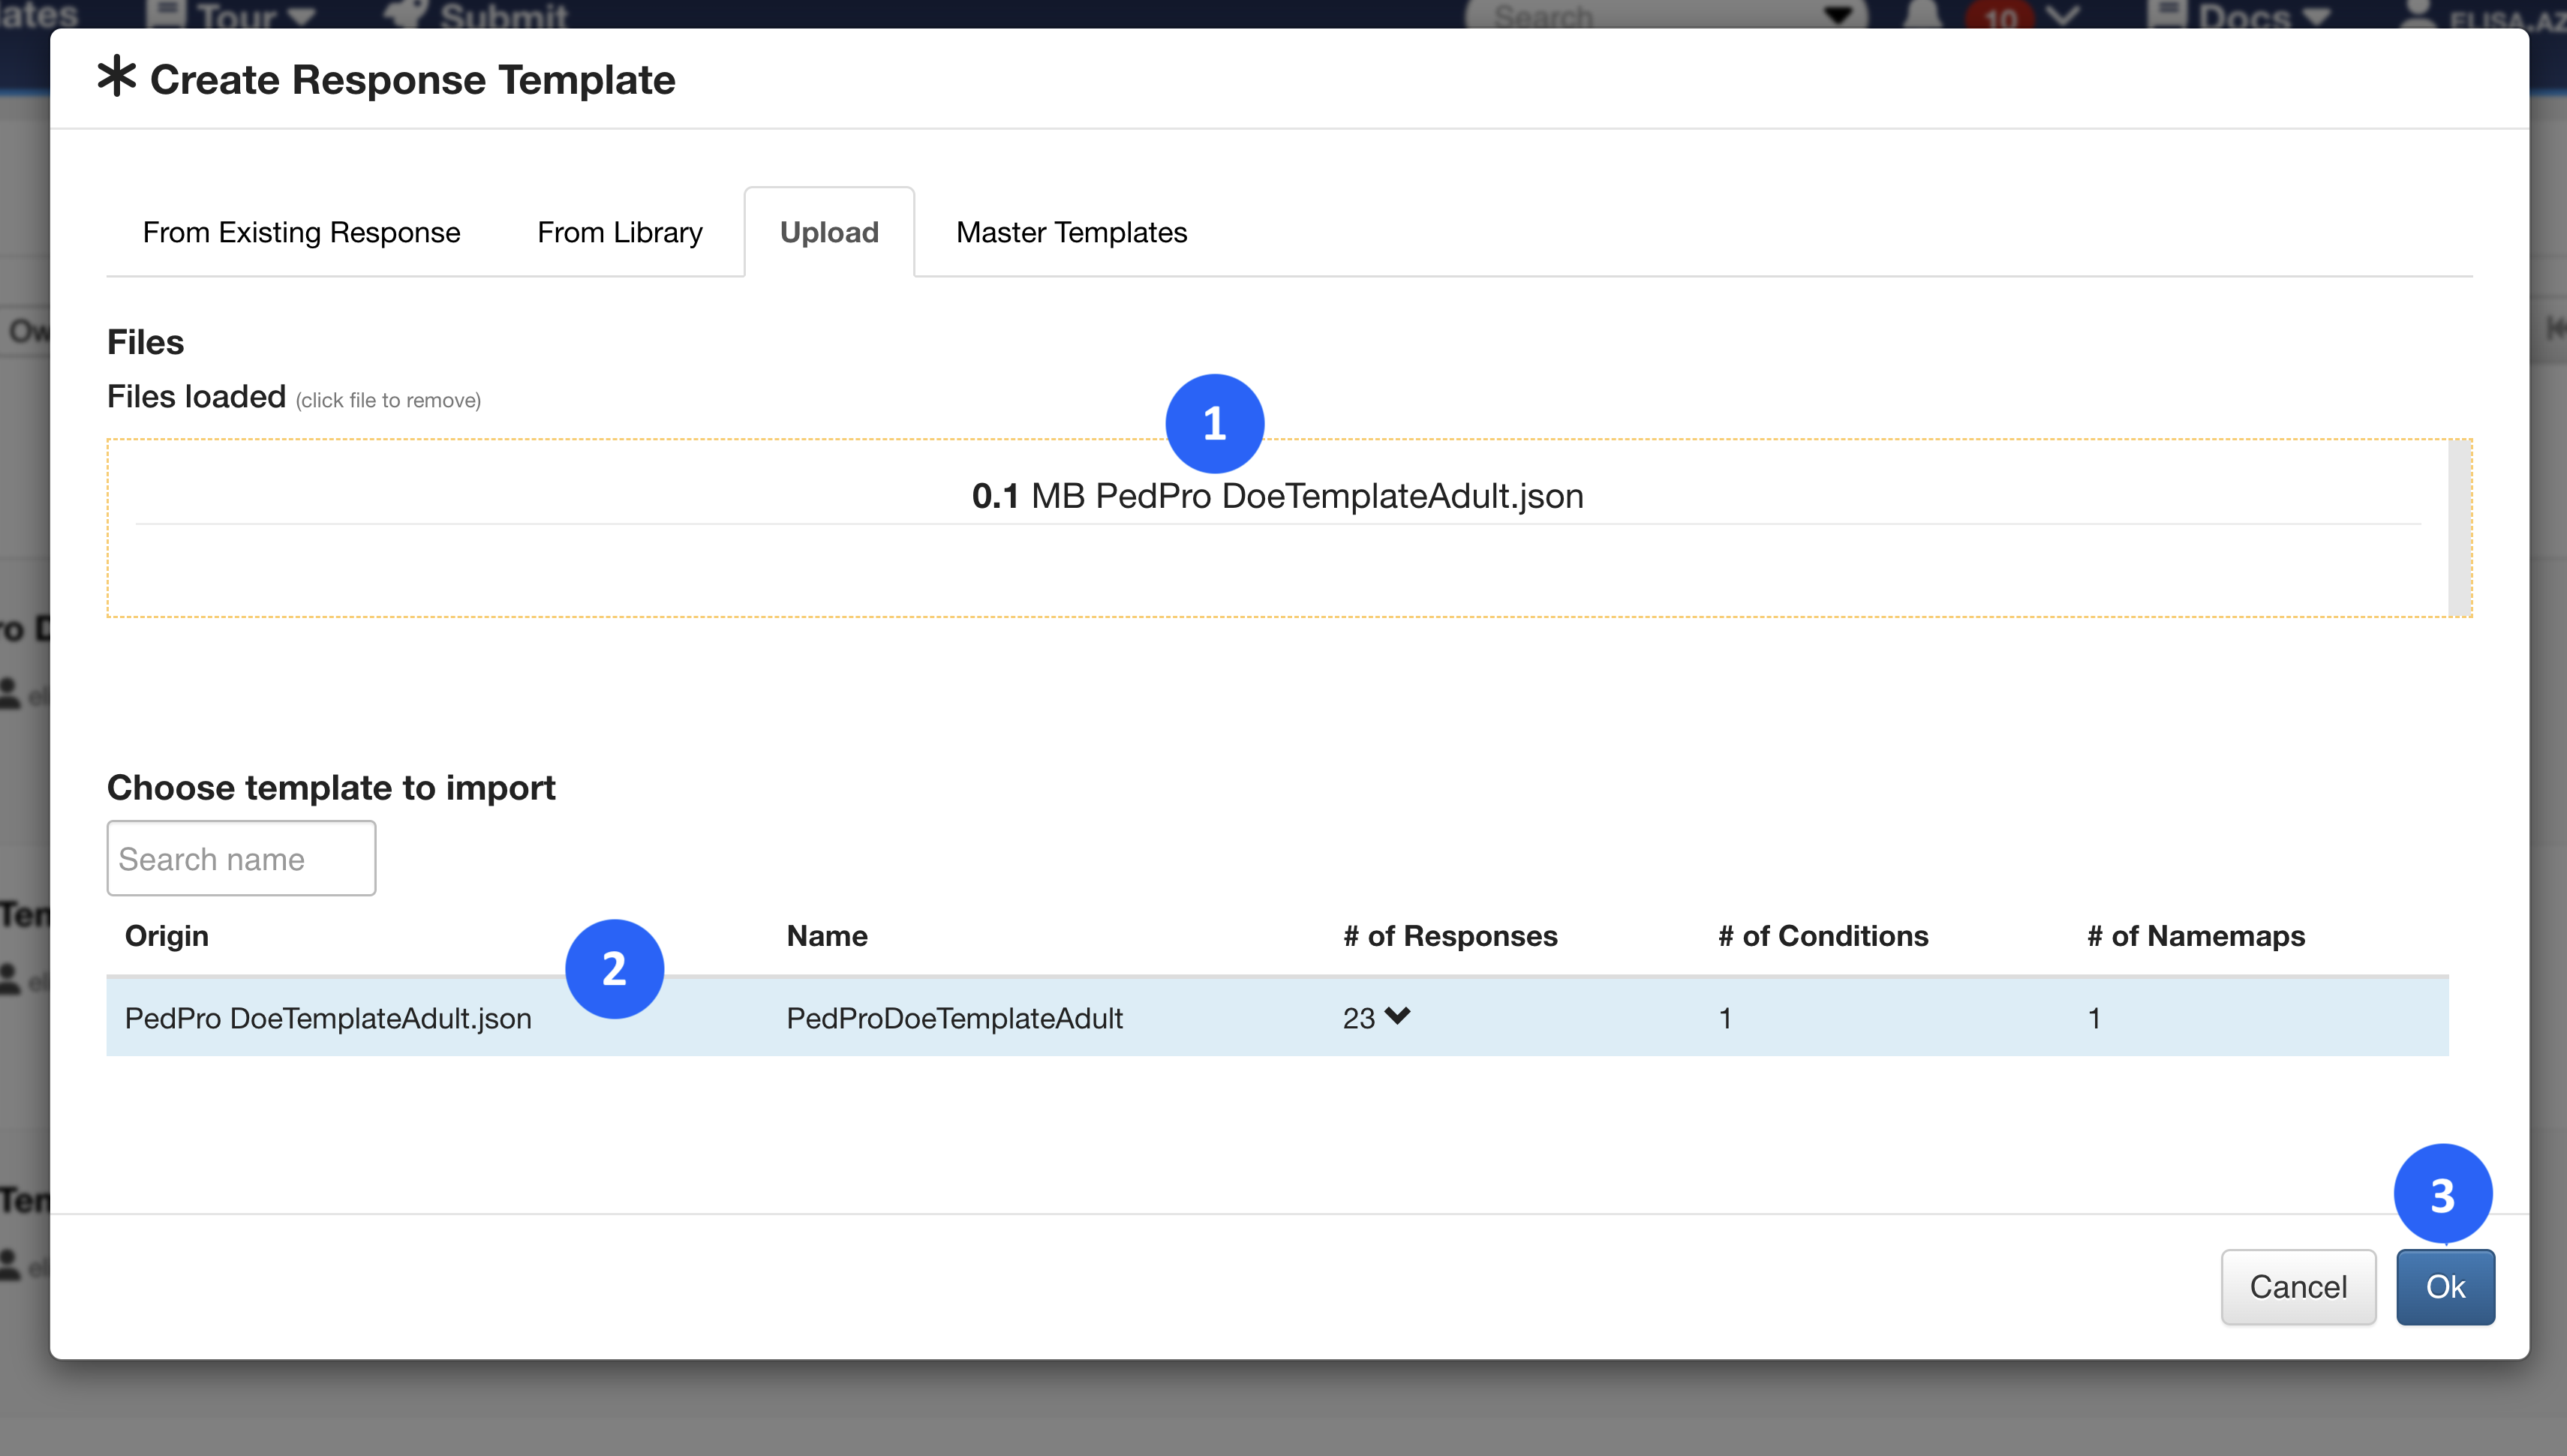
Figure 5: Upload Template File
We should see the upload template at the top of the Templates homepage. (Refresh the page if it’s not visible immediately). Click on the template name to open and review its contents.
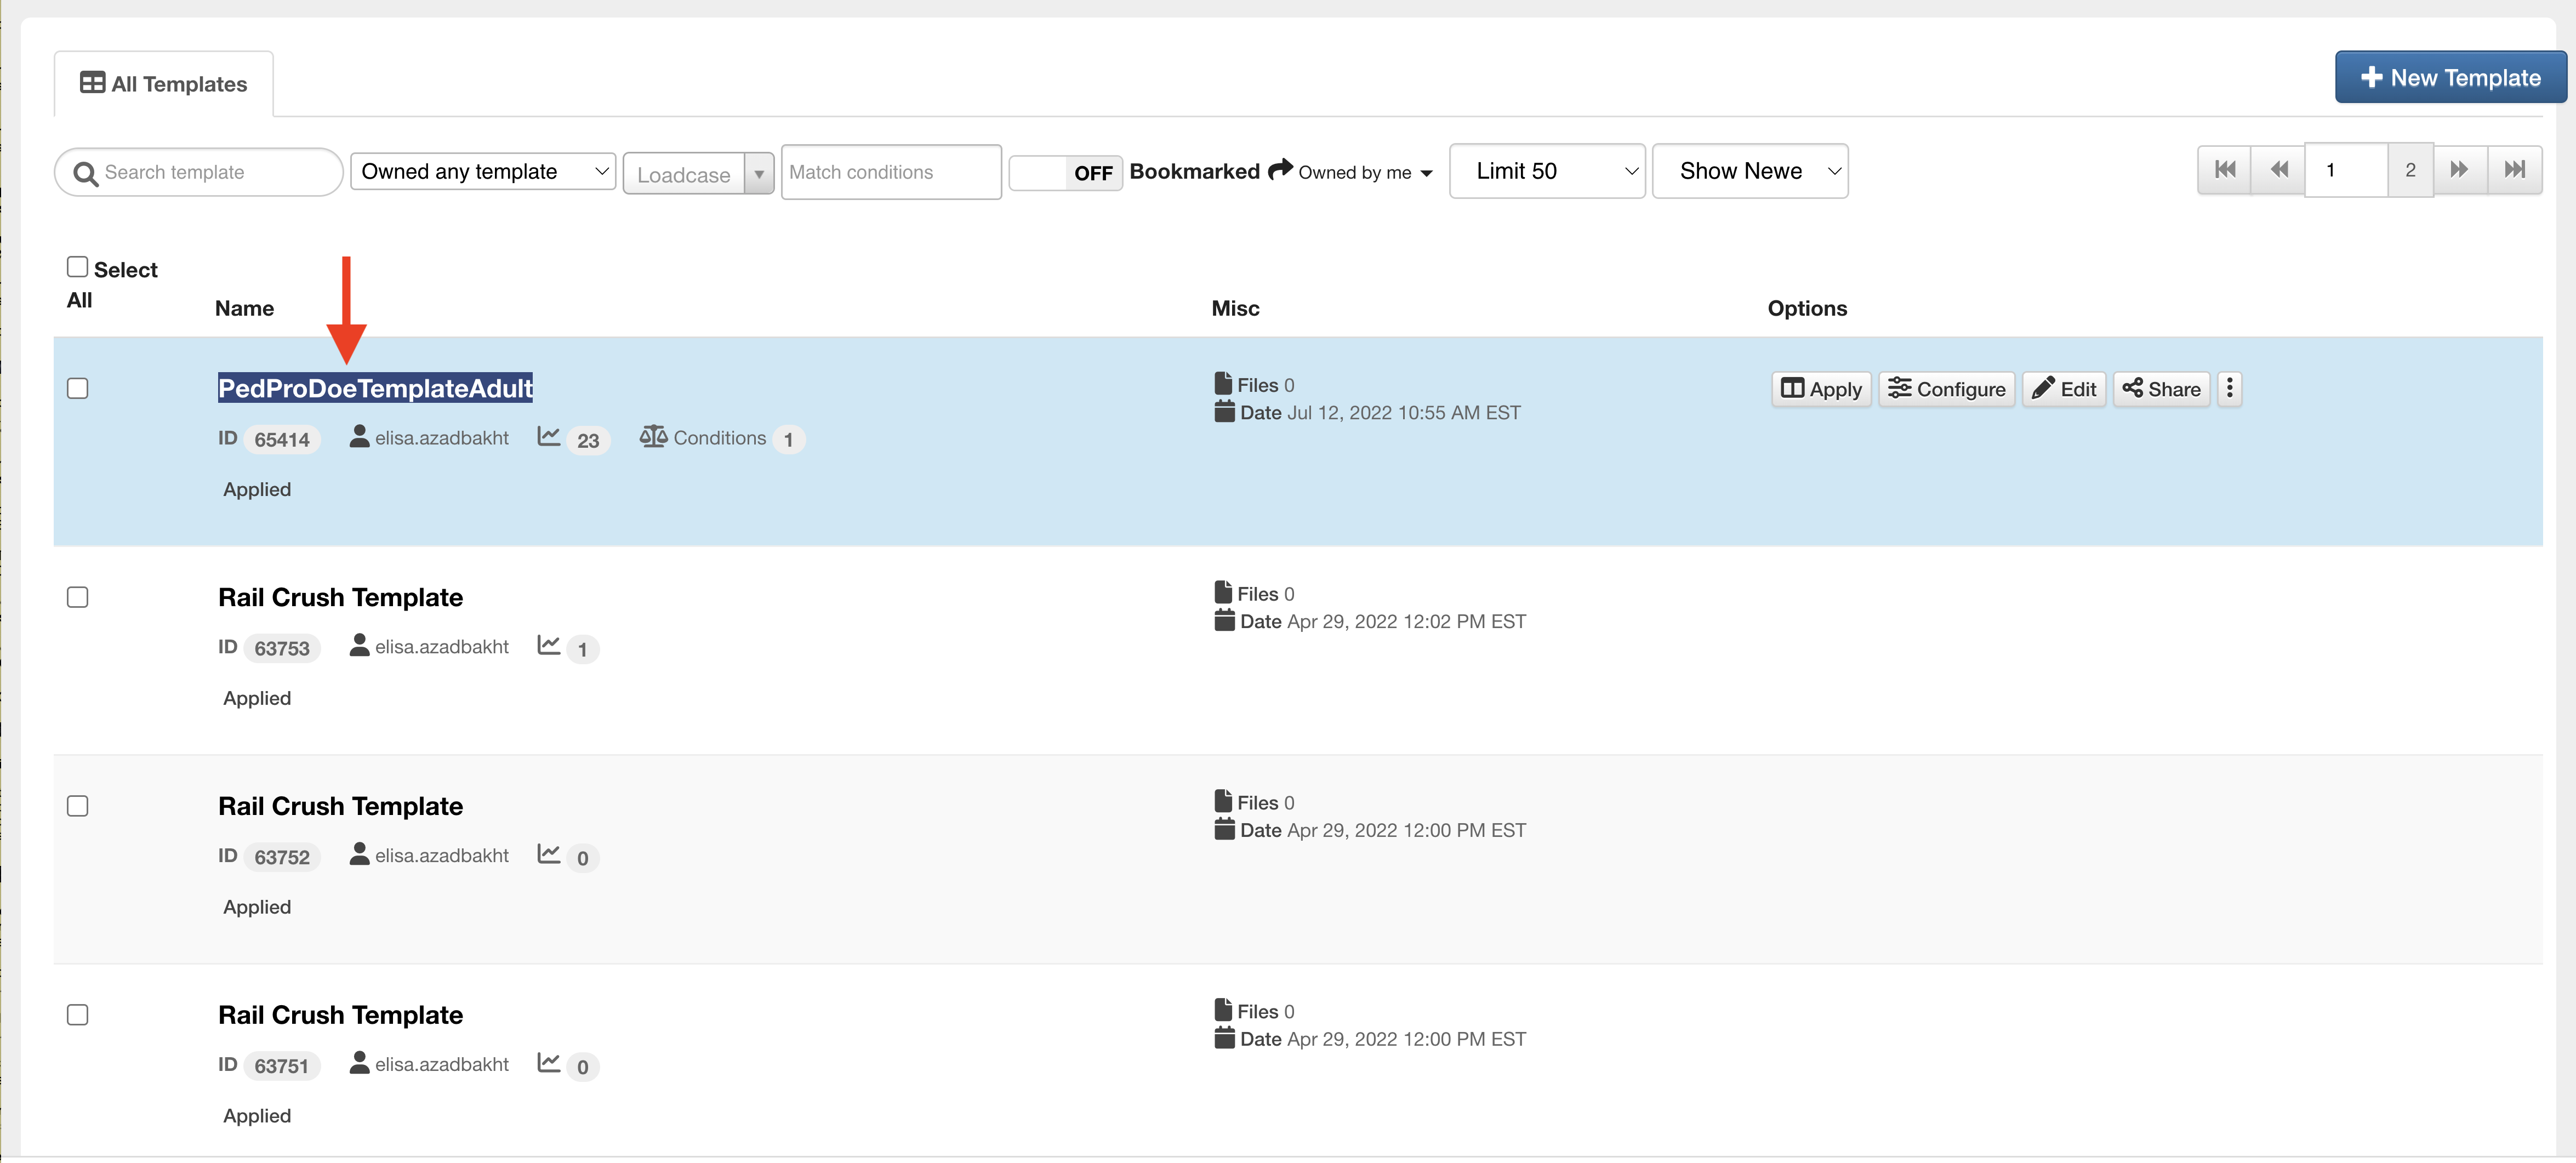
Figure 6: Open Template
Step 1b. Ped Pro Responses that will be extracted
Upon opening the template, we’ll see under the Responses Tab all the data outputs that will be extracted from our simulation when applying this template.
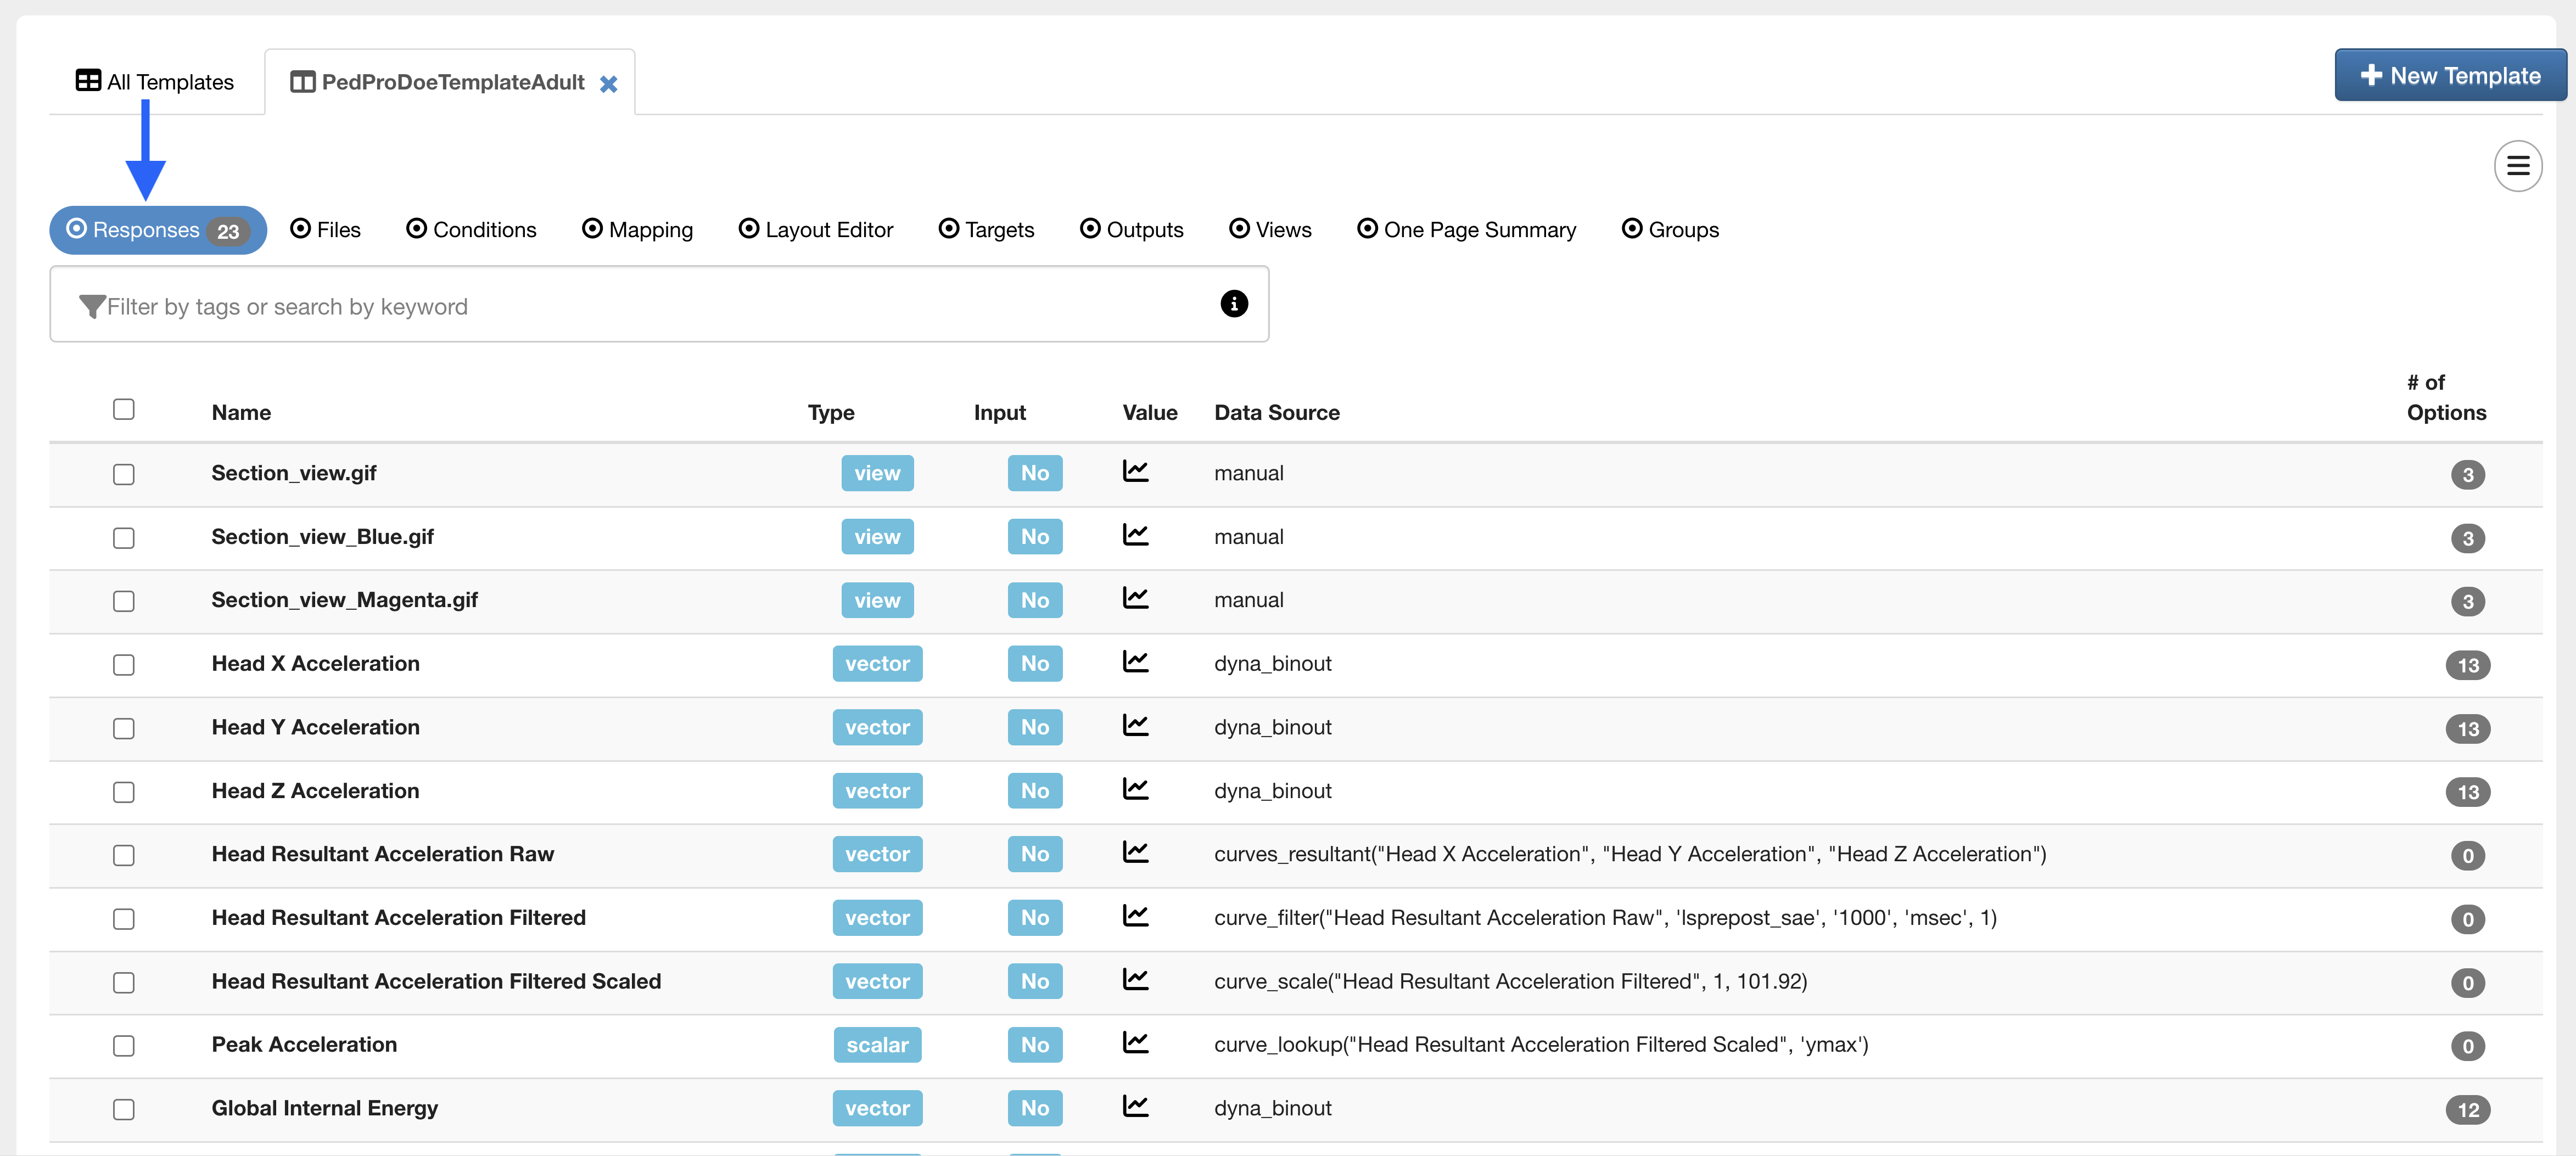
Figure 7: Pedestrian Protection Template
Step 1c: Configuring IDs/Labels for head-CG
The head C.G nodal displacement, velocity and, accelerations used to compute the score-card are based on the *DATABASE_HISTORY_NODE id and labels. The default node label and id is ‘Head_CG’ and ‘8000010’ as shown below. Based on the model, the label or the id can be used to suit your model. d3VIEW processes them by first looking for the label in the NODOUT, and if the LABEL is not present, the ID is searched for. If both ID/LABEL are not found, d3VIEW will fail to extract the necessary head-acceleration.
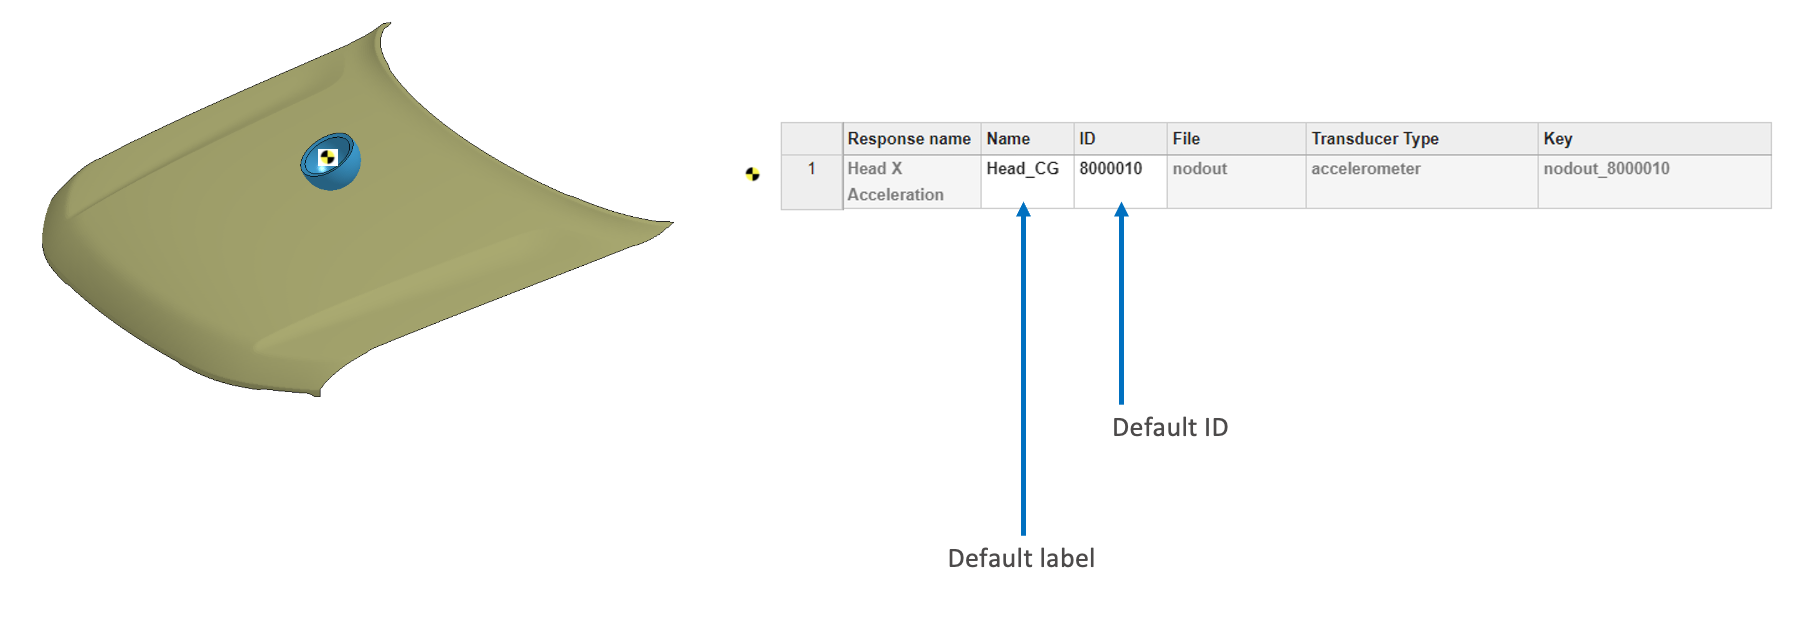
Figure 8: Head C.G Nodal Displacement
In this step, you can choose Configure to customize the NODE ID/LABEL to suite you model. Once this option is clicked, you will be directed to a table that allows you to view and edit your model specific ids/labels. Under the hamburger menu in the opened Template, click on Configure to get started.
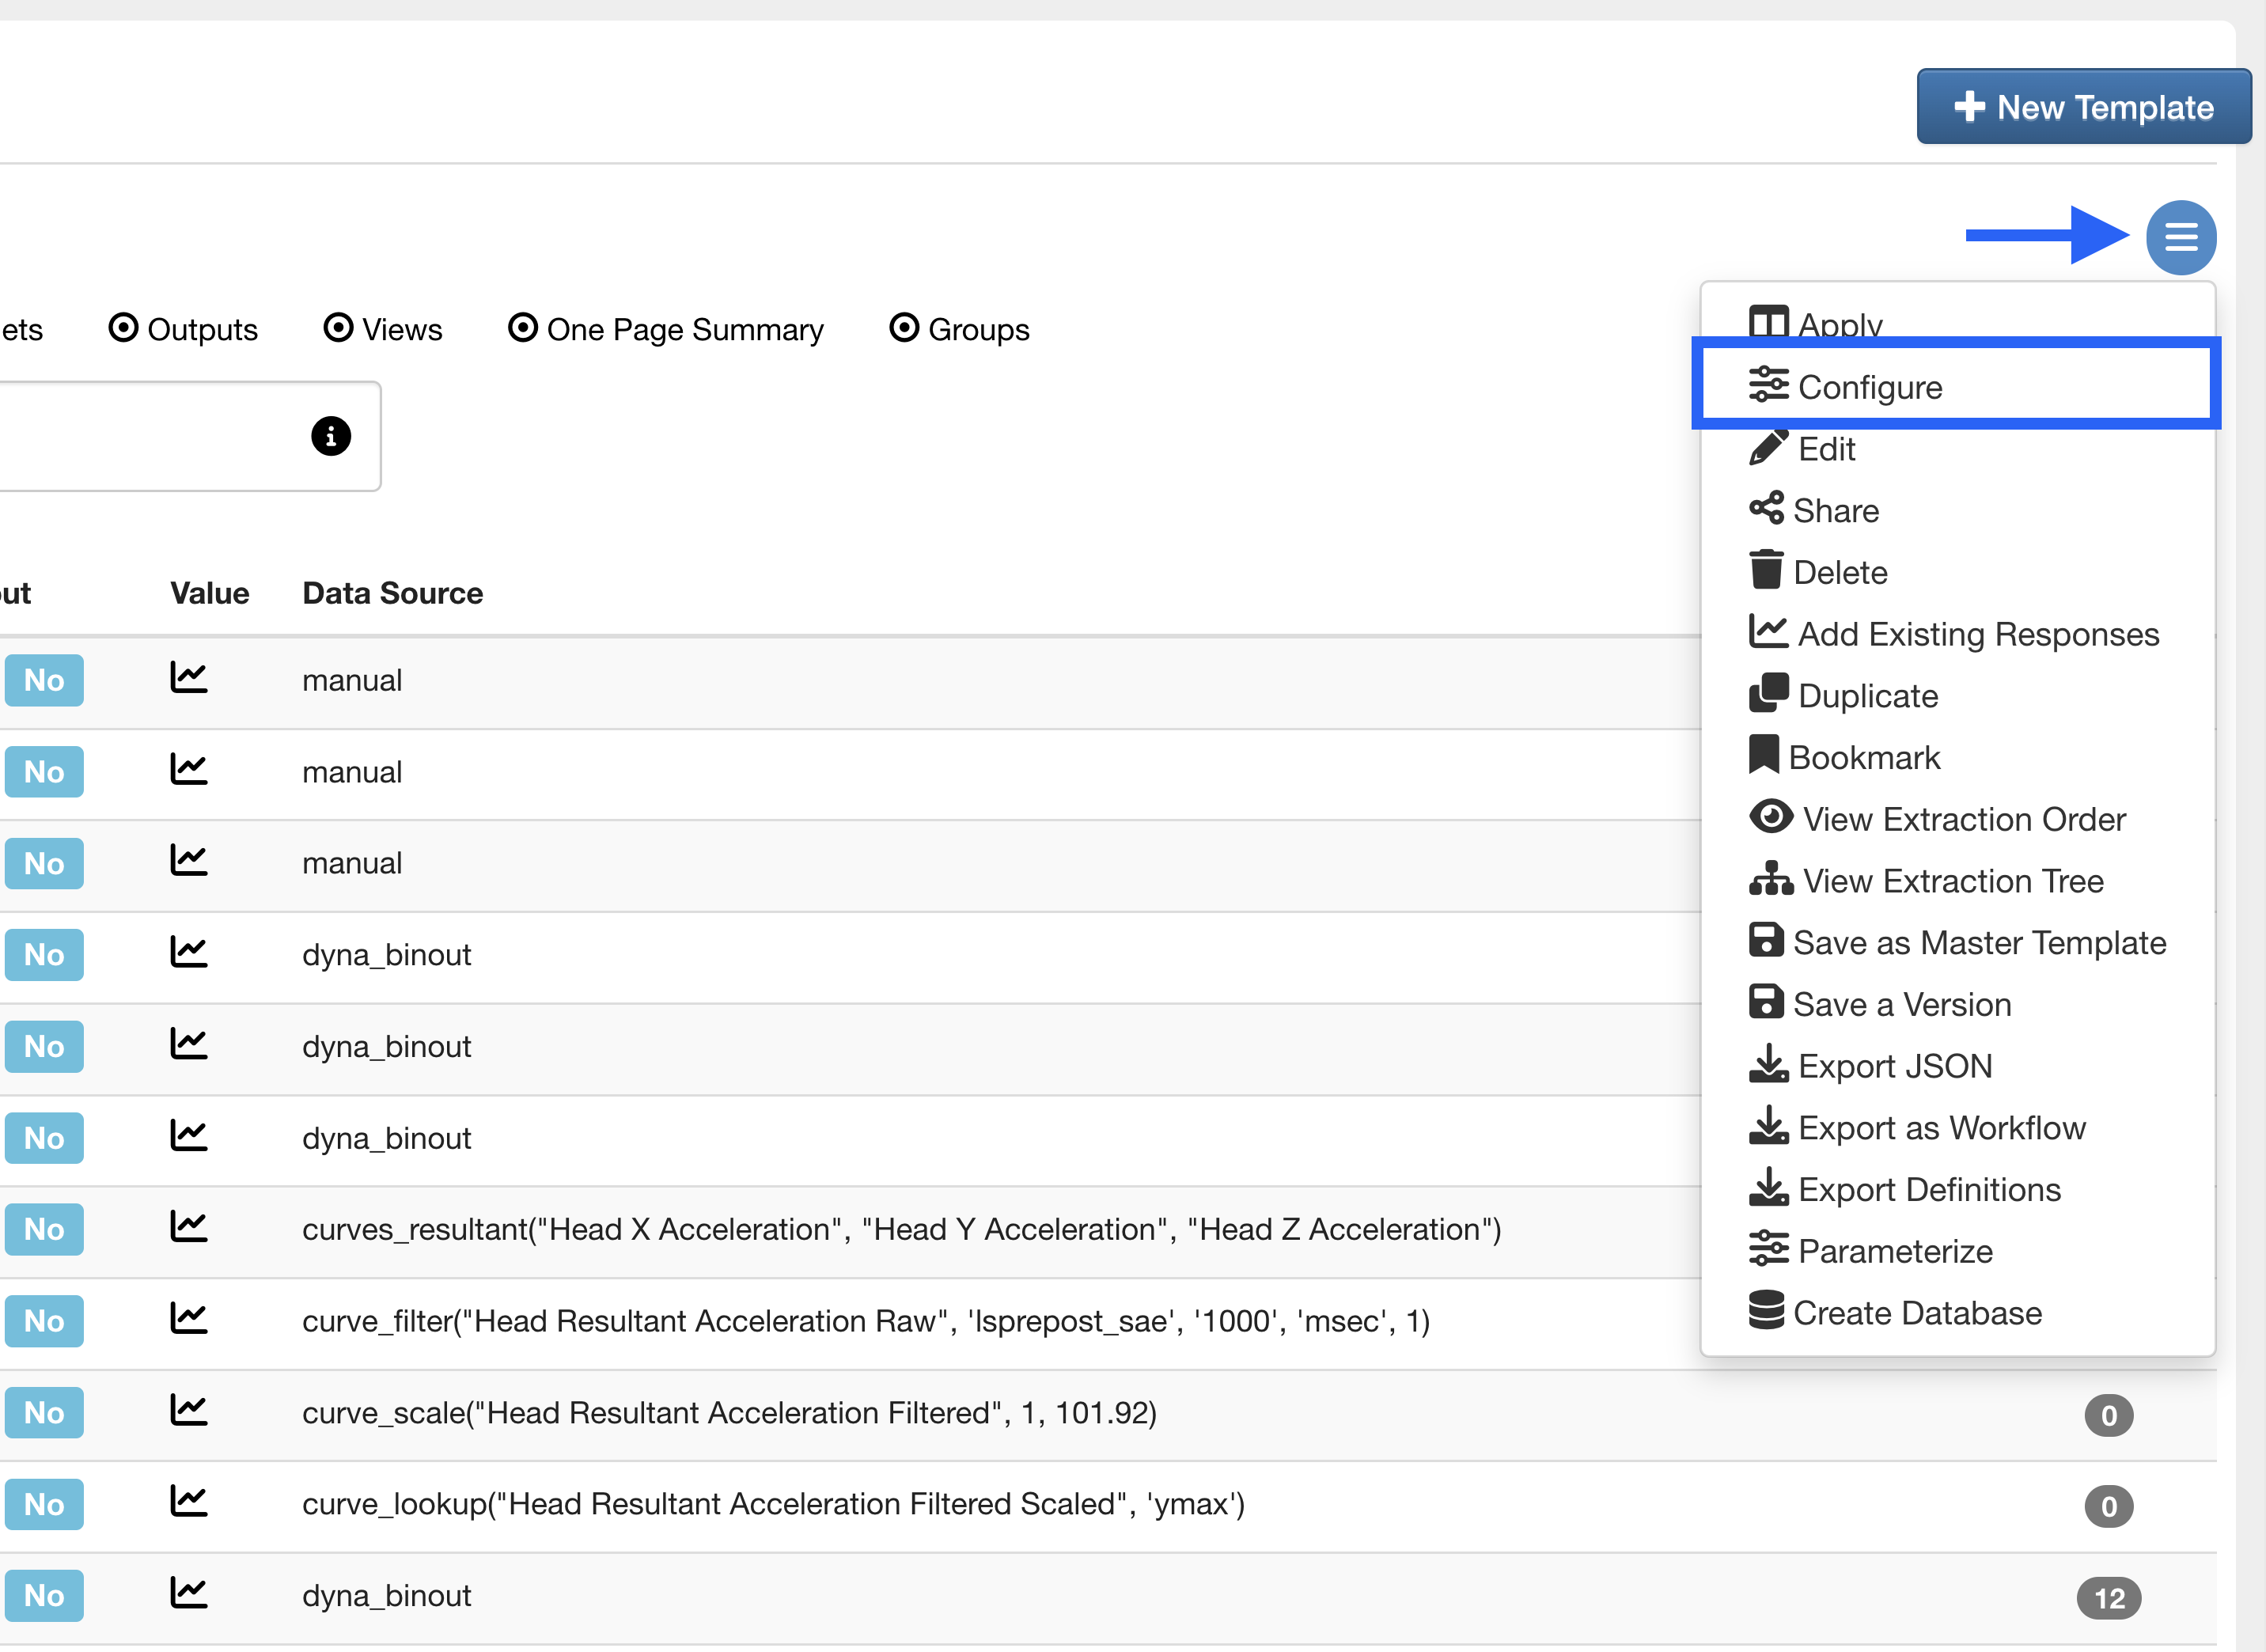
Figure 9: Configure Template
Our table will be shown towards the bottom of the newly opened window. We can edit the IDs manually by first clicking Export Sensors File.
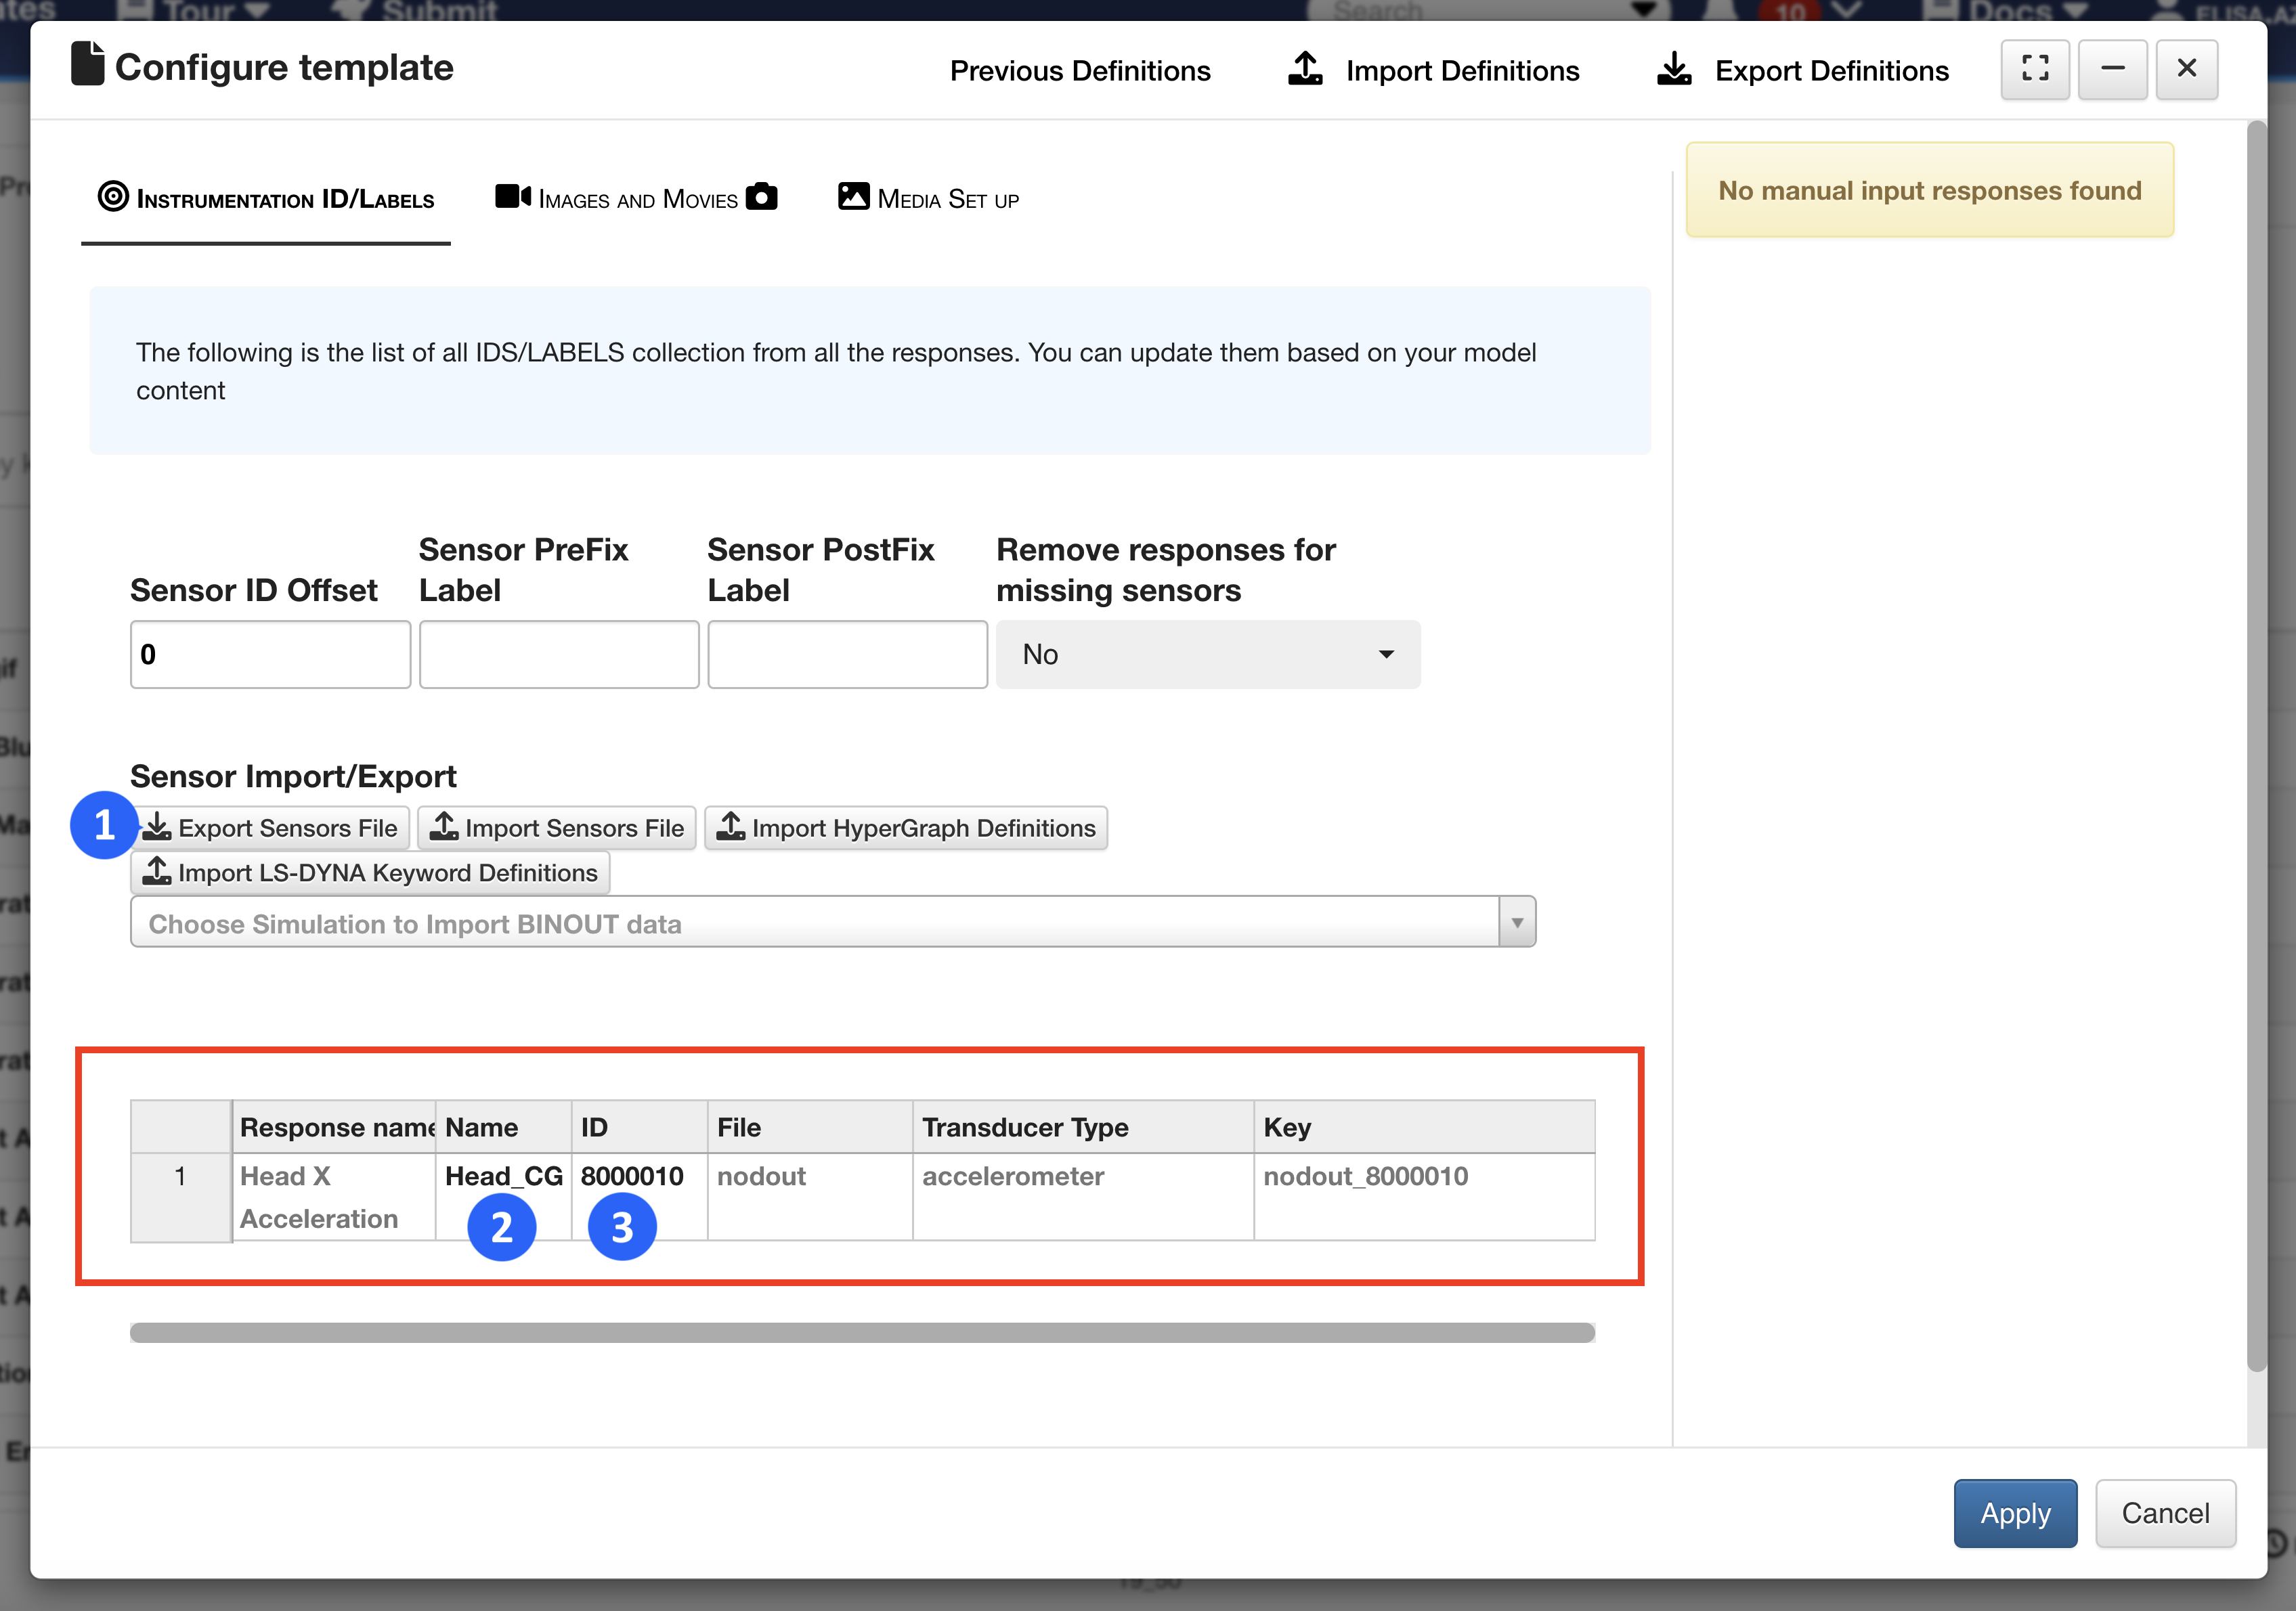
Figure 10: Export Sensors File
We’ll go back to our Configure Template window and upload the updated file by choosing the Import Sensors File option. The ID should update on the table. Finish by clicking Apply.
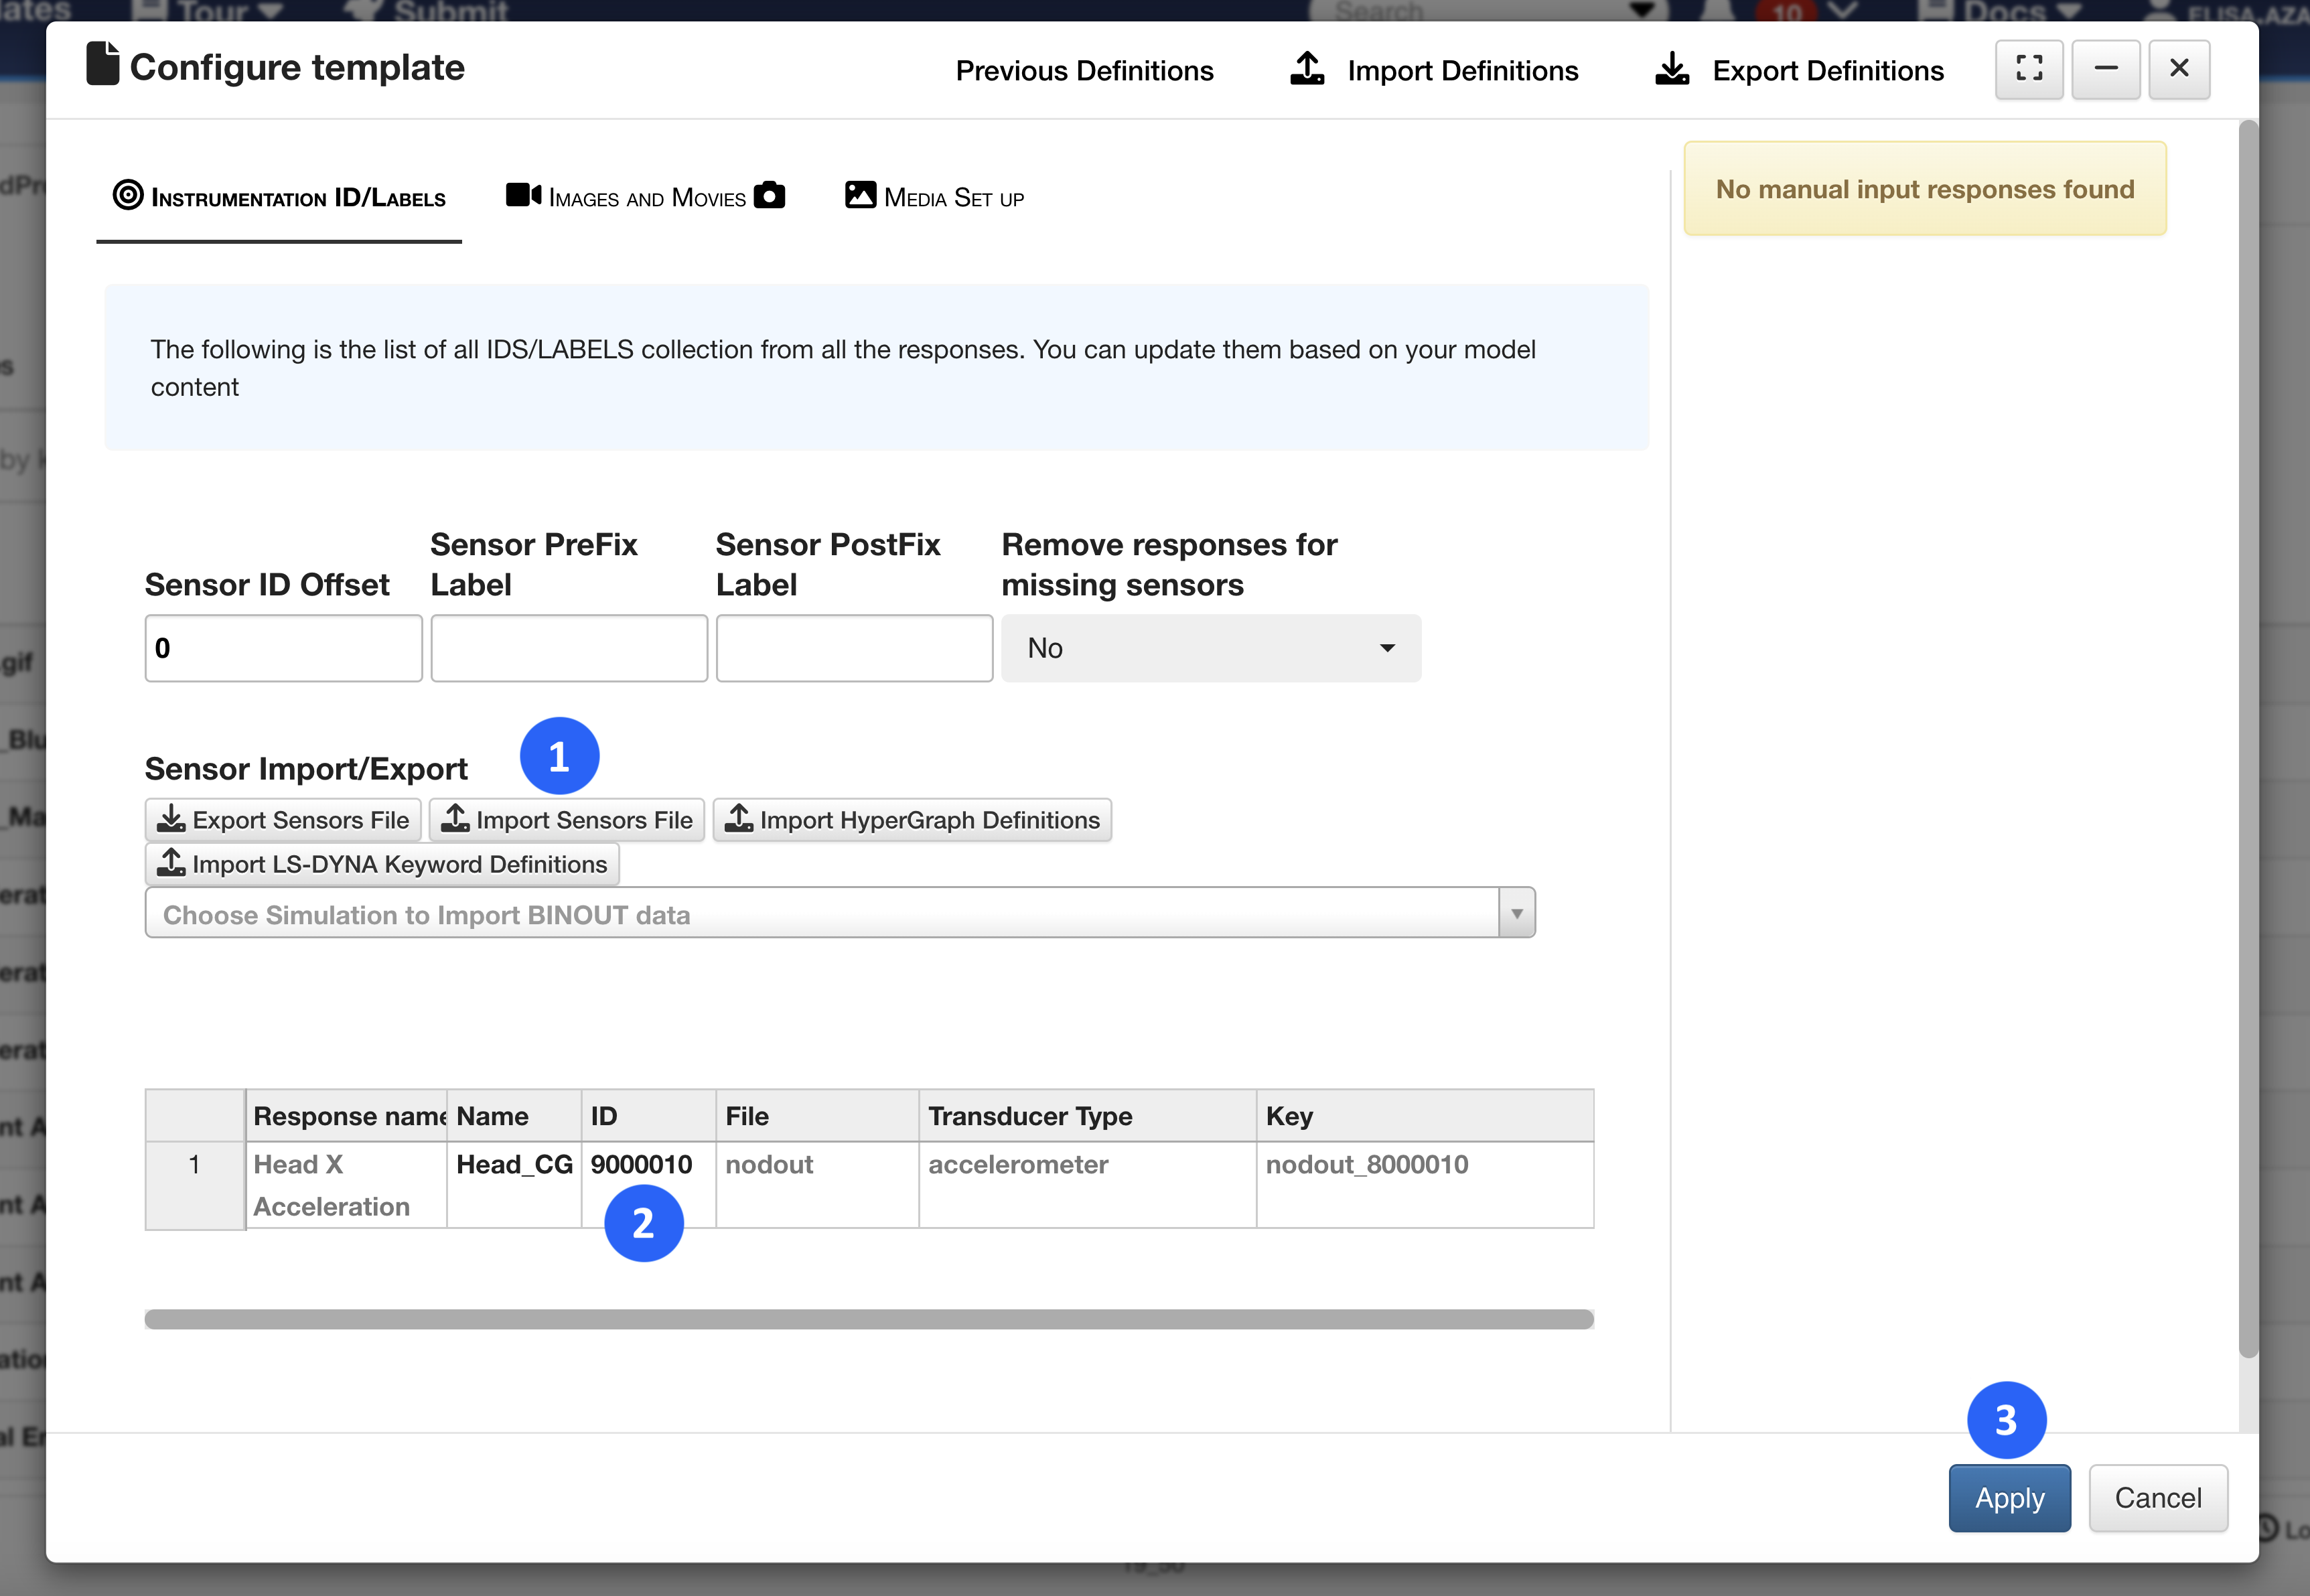
Figure 11: Import Sensors File
Step 1d. Add Template Condition for Simulation application
Let’s go to the Conditions tab in our Template so it can automatically be applied to specified Simulations. Conditions allow us to tell the HPC to apply a template automatically to a solving simulation. We indicate a directive for the HPC to look for in the simulation that will link it to the template. This template has a condition to look for “Ped” in the simulation name. Feel free to edit or add any conditions. To learn how to add a condition navigate to this section.

Figure 12 Example Submit Command: With the above condition, the following simulation named ‘pedpro.k’ will use the Pedpro template since the simulation name contains is ‘ped’: Submit –i pedpro.k –d3pub y
Step 2. Using Ped Pro Template
Once our template has been configured, we can now submit our simulation for comparing our template responses. Check out this section to learn how to submit a simulation.
Once our simulation is solved (click here to see how to preview data while it’s solving), we’ll navigate to the Simulations application page to compare our responses and visualize them in Simlytiks.

Figure 13: Navigate to Simulations
Step 2a. Choose Simulation and Compare
Select the simulations we want to compare (1), then right-click to choose Compare Responses (2).
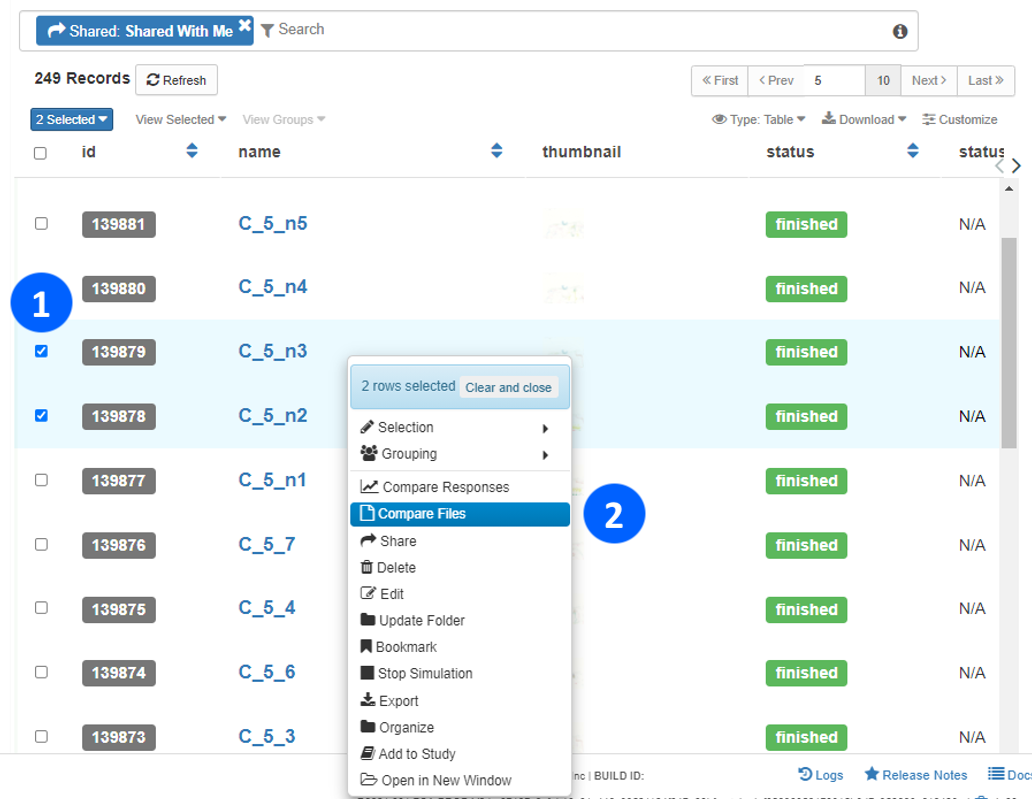
Figure 14: Choose Simulations and Compare Responses
Step 2b. Choose Simulation and Compare
Select the template that has been applied or needs to be applied to the simulation (1), then click Compare (2).
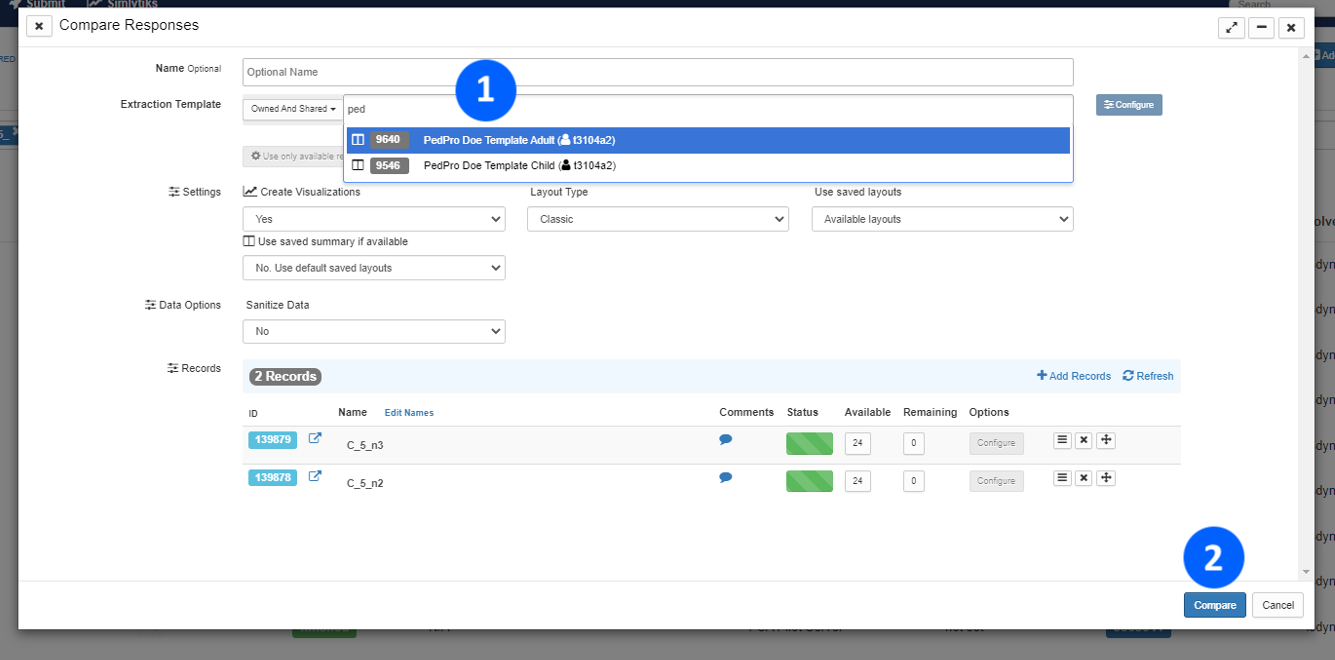
Figure 15: Choose Template and Compare
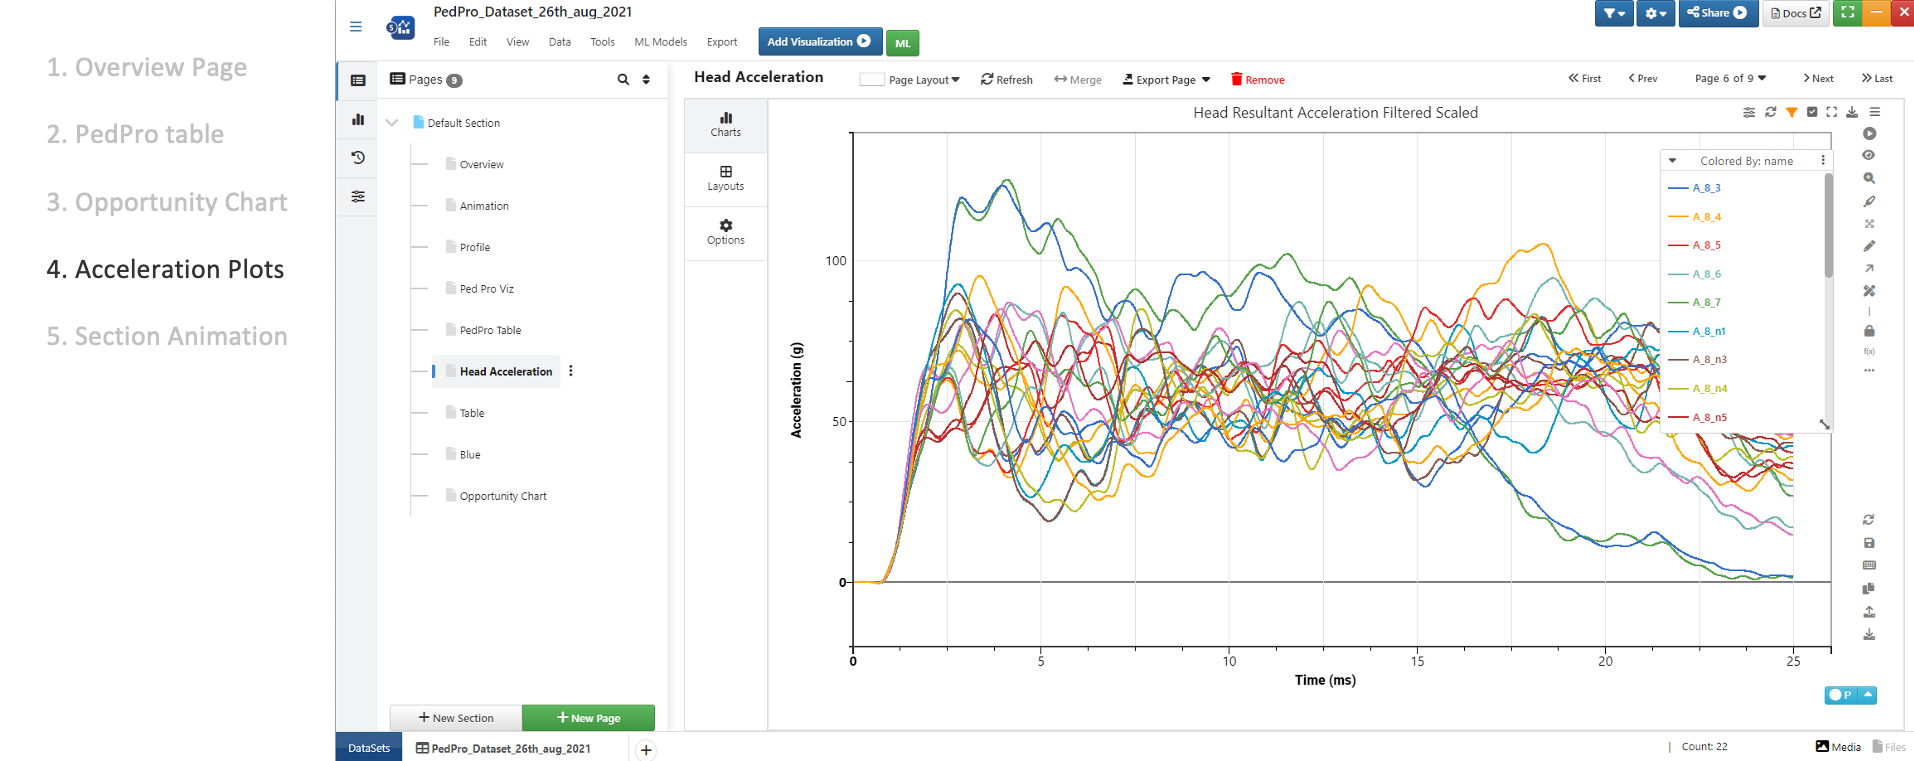
Step 3. Viewing Comparison in Simlytiks
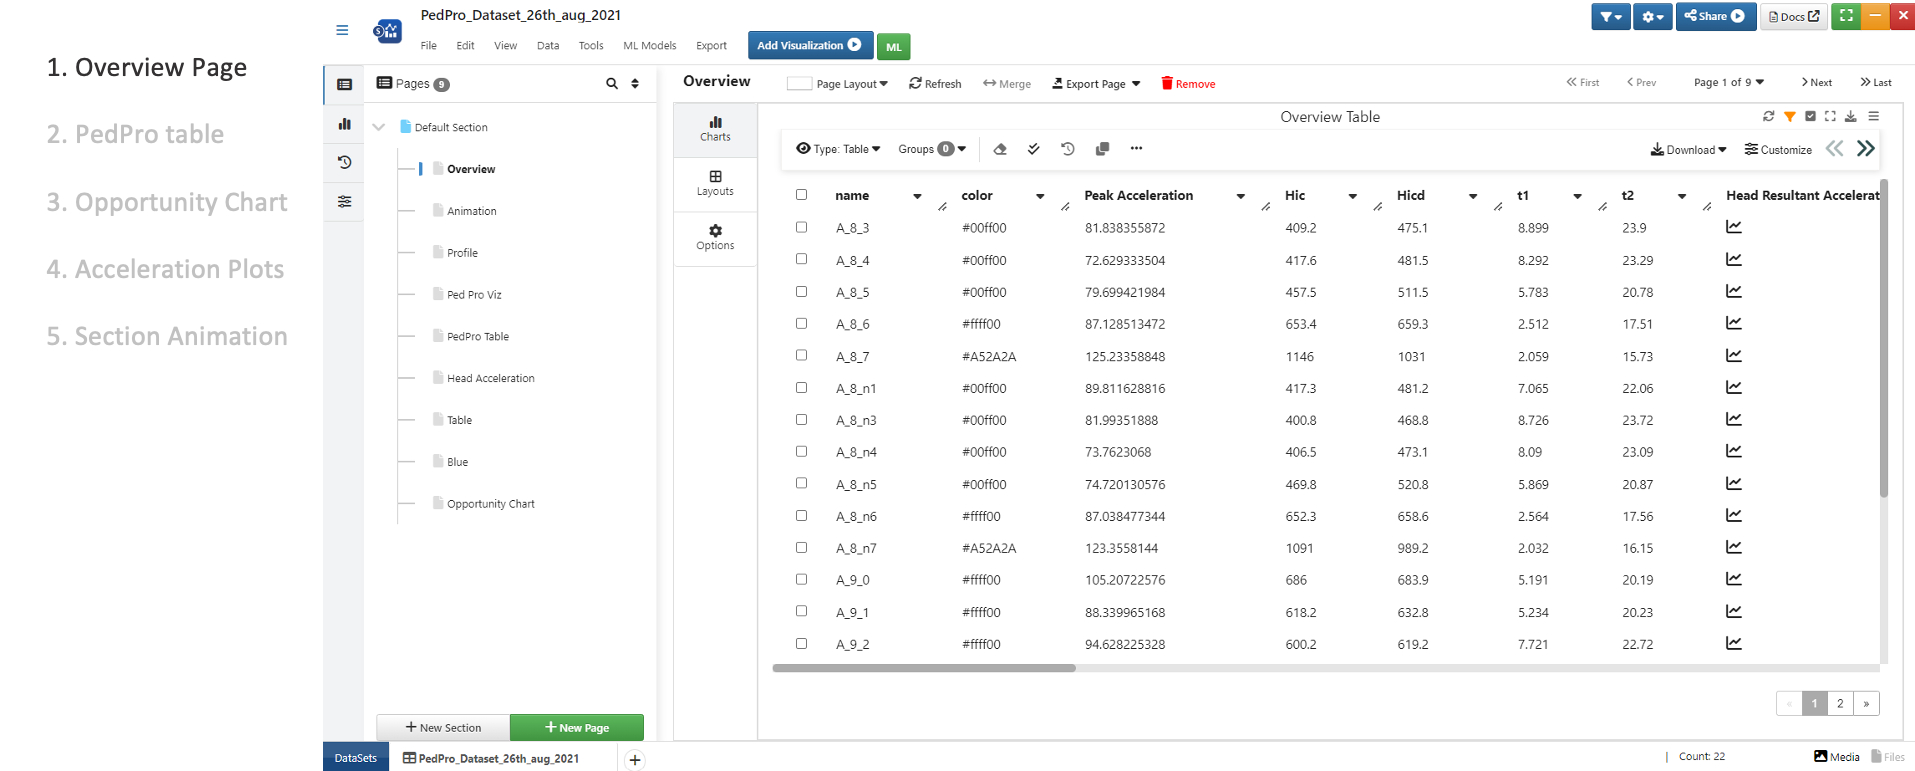
Here are some visualizations we’ll see in Simlytiks using the PedPro template.

Step 4. Exporting and Sharing Comparison
Easily export the visualizations as a PowerPoint (1) file in the Export menu. Or, share a public web link of the entire exploration with no data-transfer with anyone by clicking on the blue Share button (2).
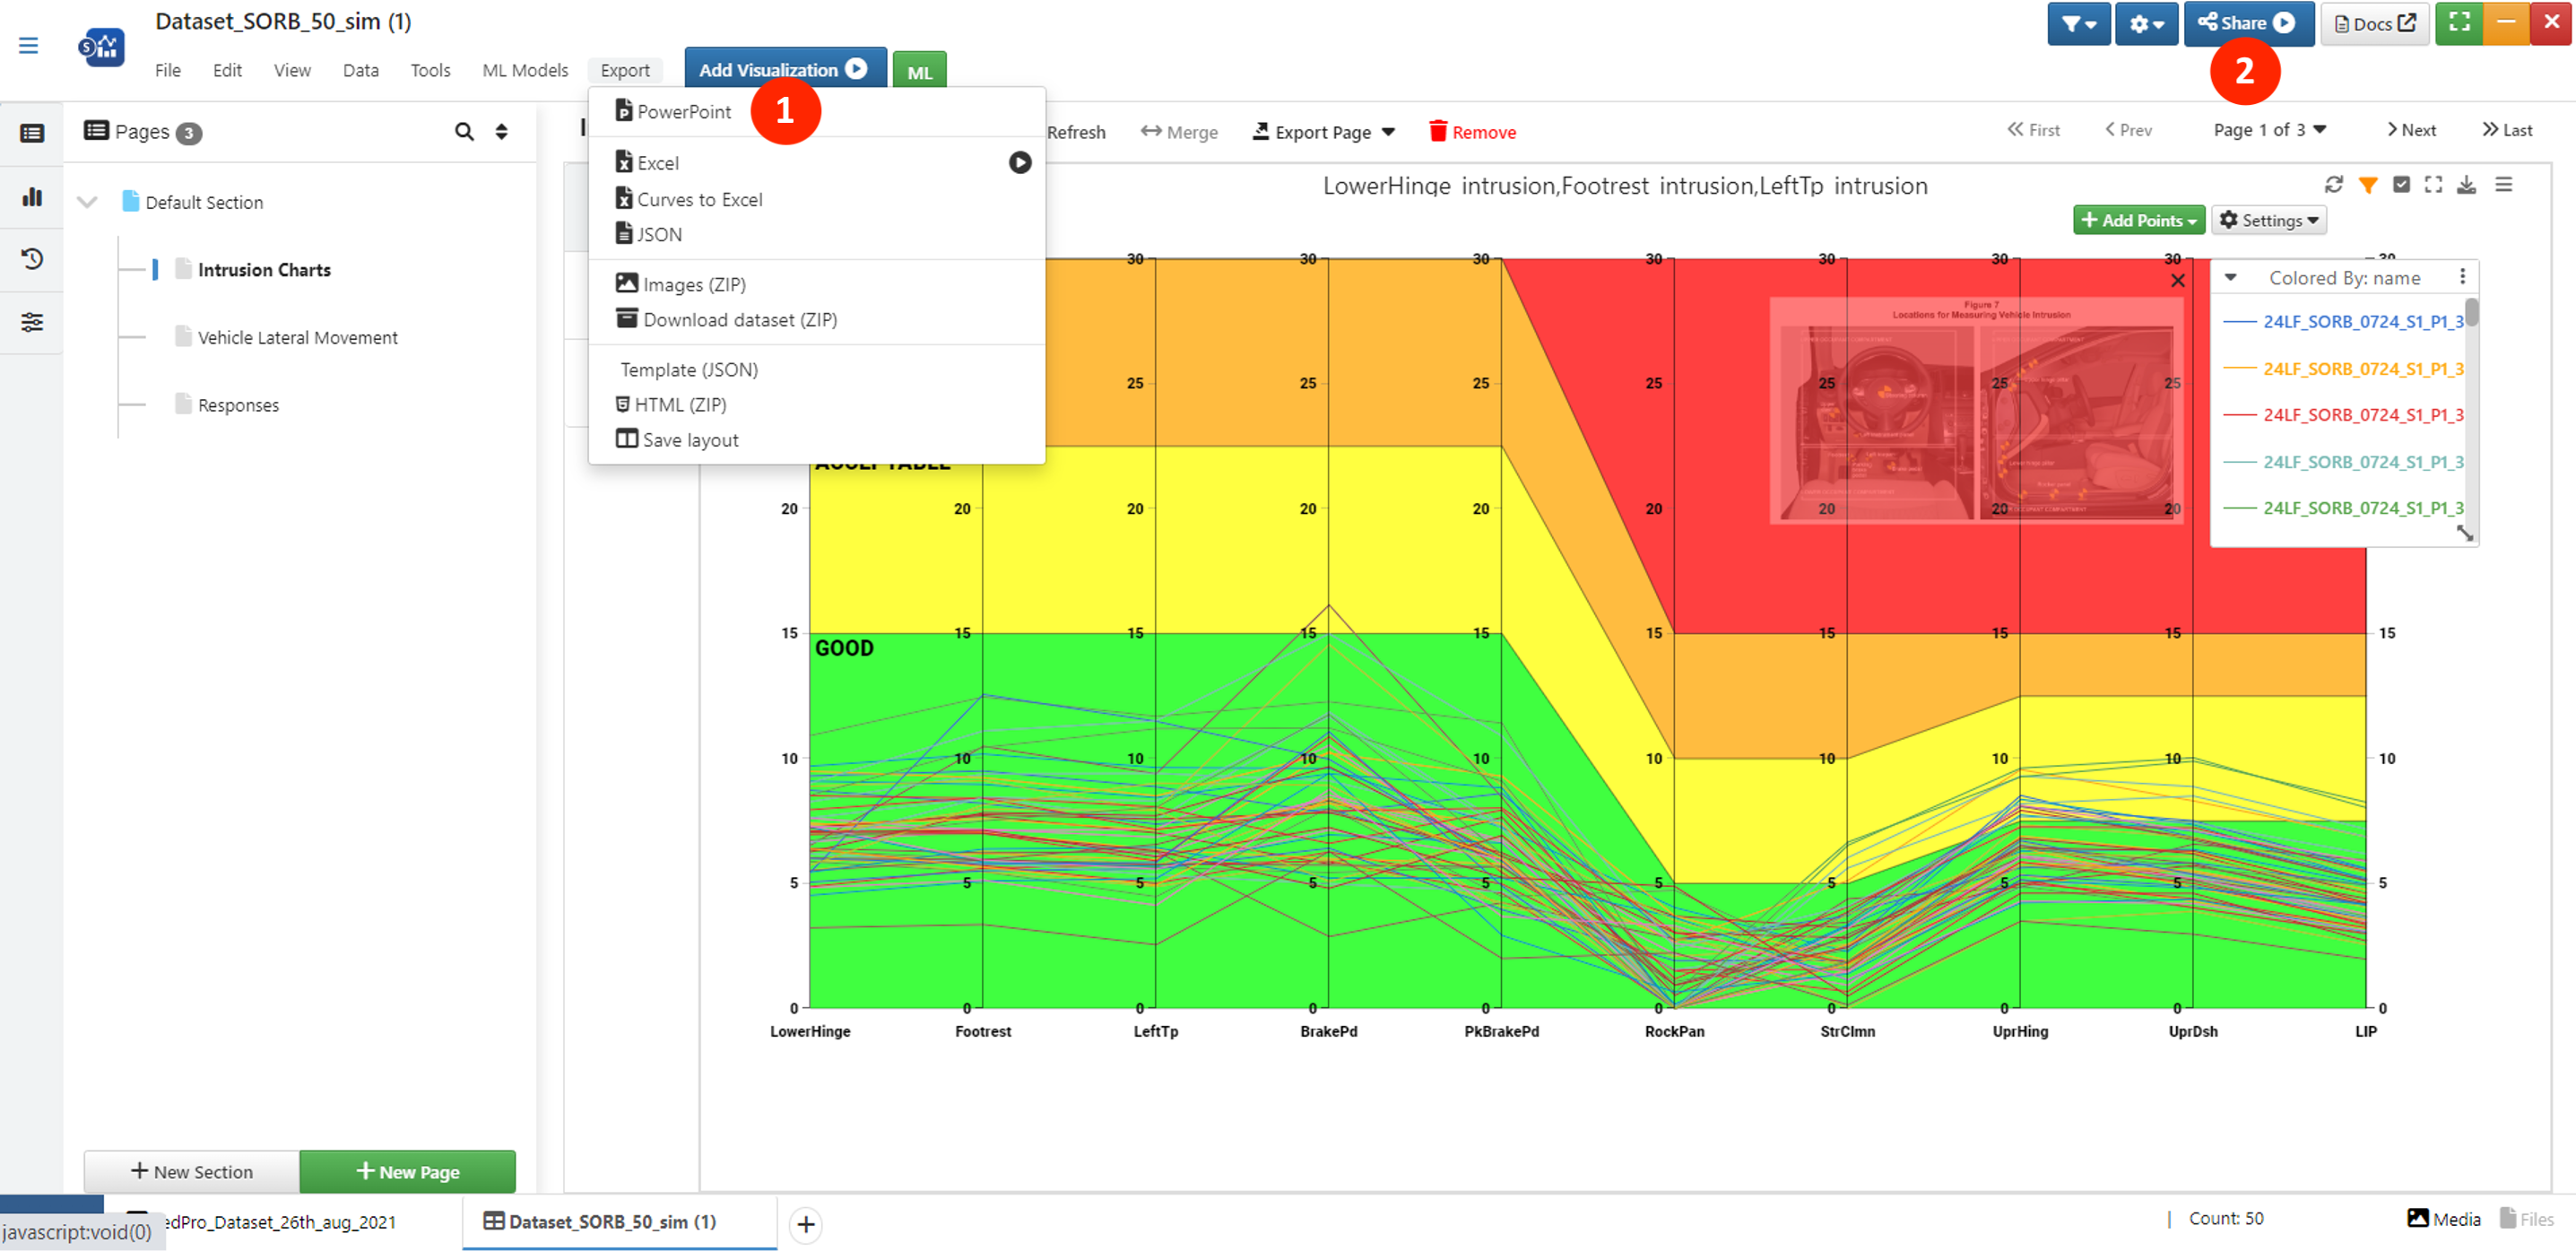
Figure 16: Export and Share
17.11. IIHS Small Offset Rigid Barrier Data Processing and Visualization
In this section, we’ll take a step-by-step look at IIHS Small offset rigid barrier data processing and visualization using IIHS SORB templates.
What Will Be Covered
- Introduction
- Setting up IIHS SORB template in d3VIEW
- Using IIHS SORB template
- Viewing Comparison in Simlytiks
- Reporting and Sharing
What you will need in this tutorial
- URL and a valid account for d3VIEW
- IIHS Small Offset Rigid Barrier template from d3VIEW
- An LS-DYNA IIHS SORB input file
About IIHS Small Offset Rigid Barrier Template
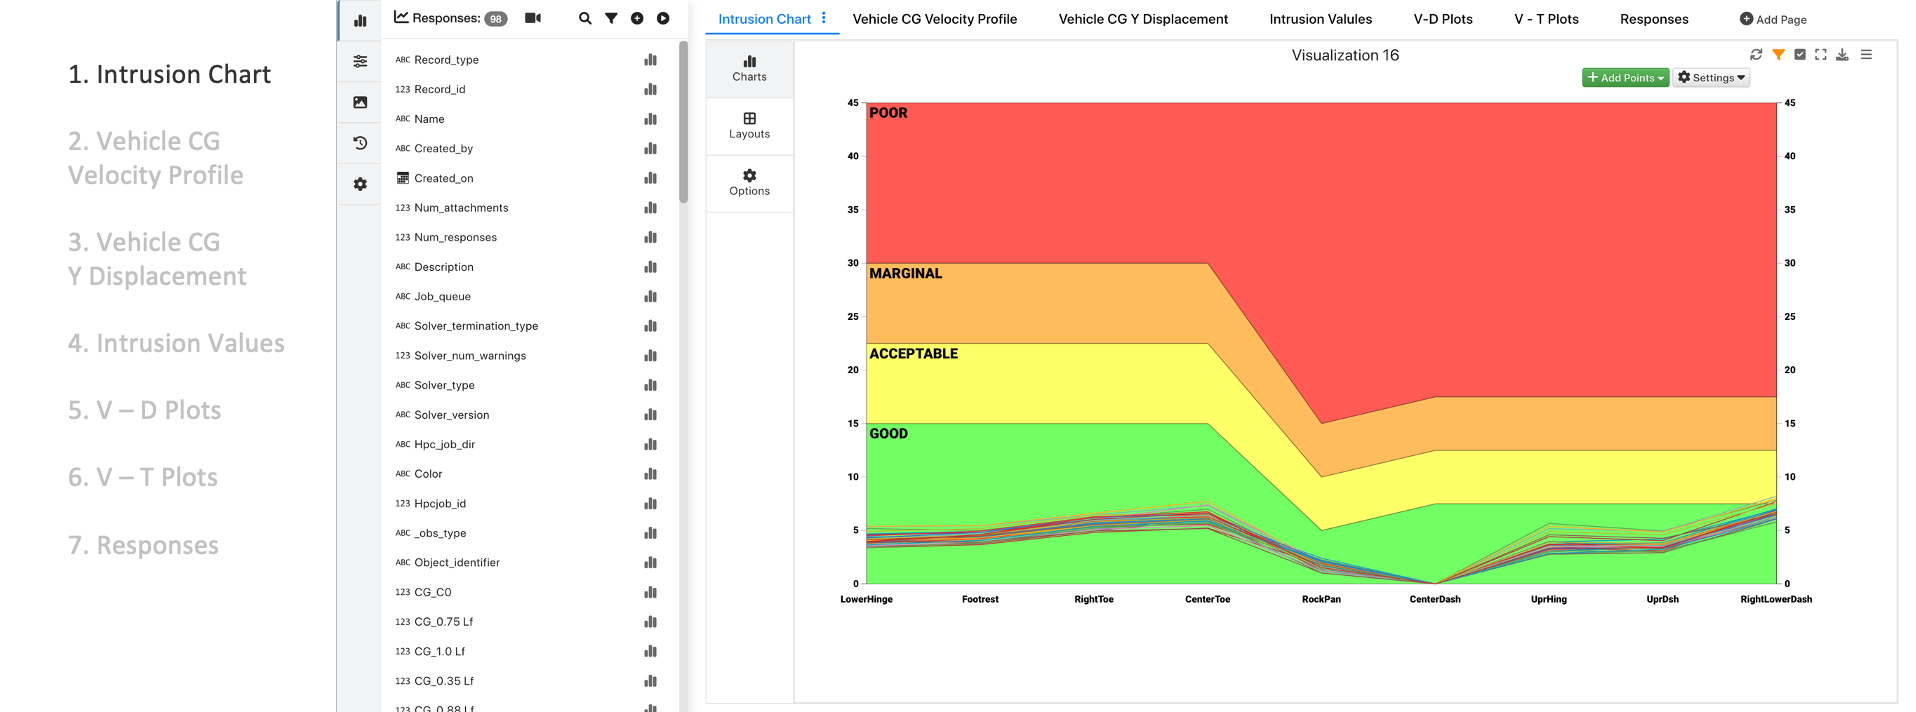
d3VIEW’s IIHS SORB standard template helps to extract the intrusions from all the important structural points according to the IIHS Test protocols and prepare the IIHS intrusion chart. This tutorial will guide you to configure a template to suite your model id/labels, select necessary conditions such that the template can be applied to your simulations, and to view the intrusion chart.
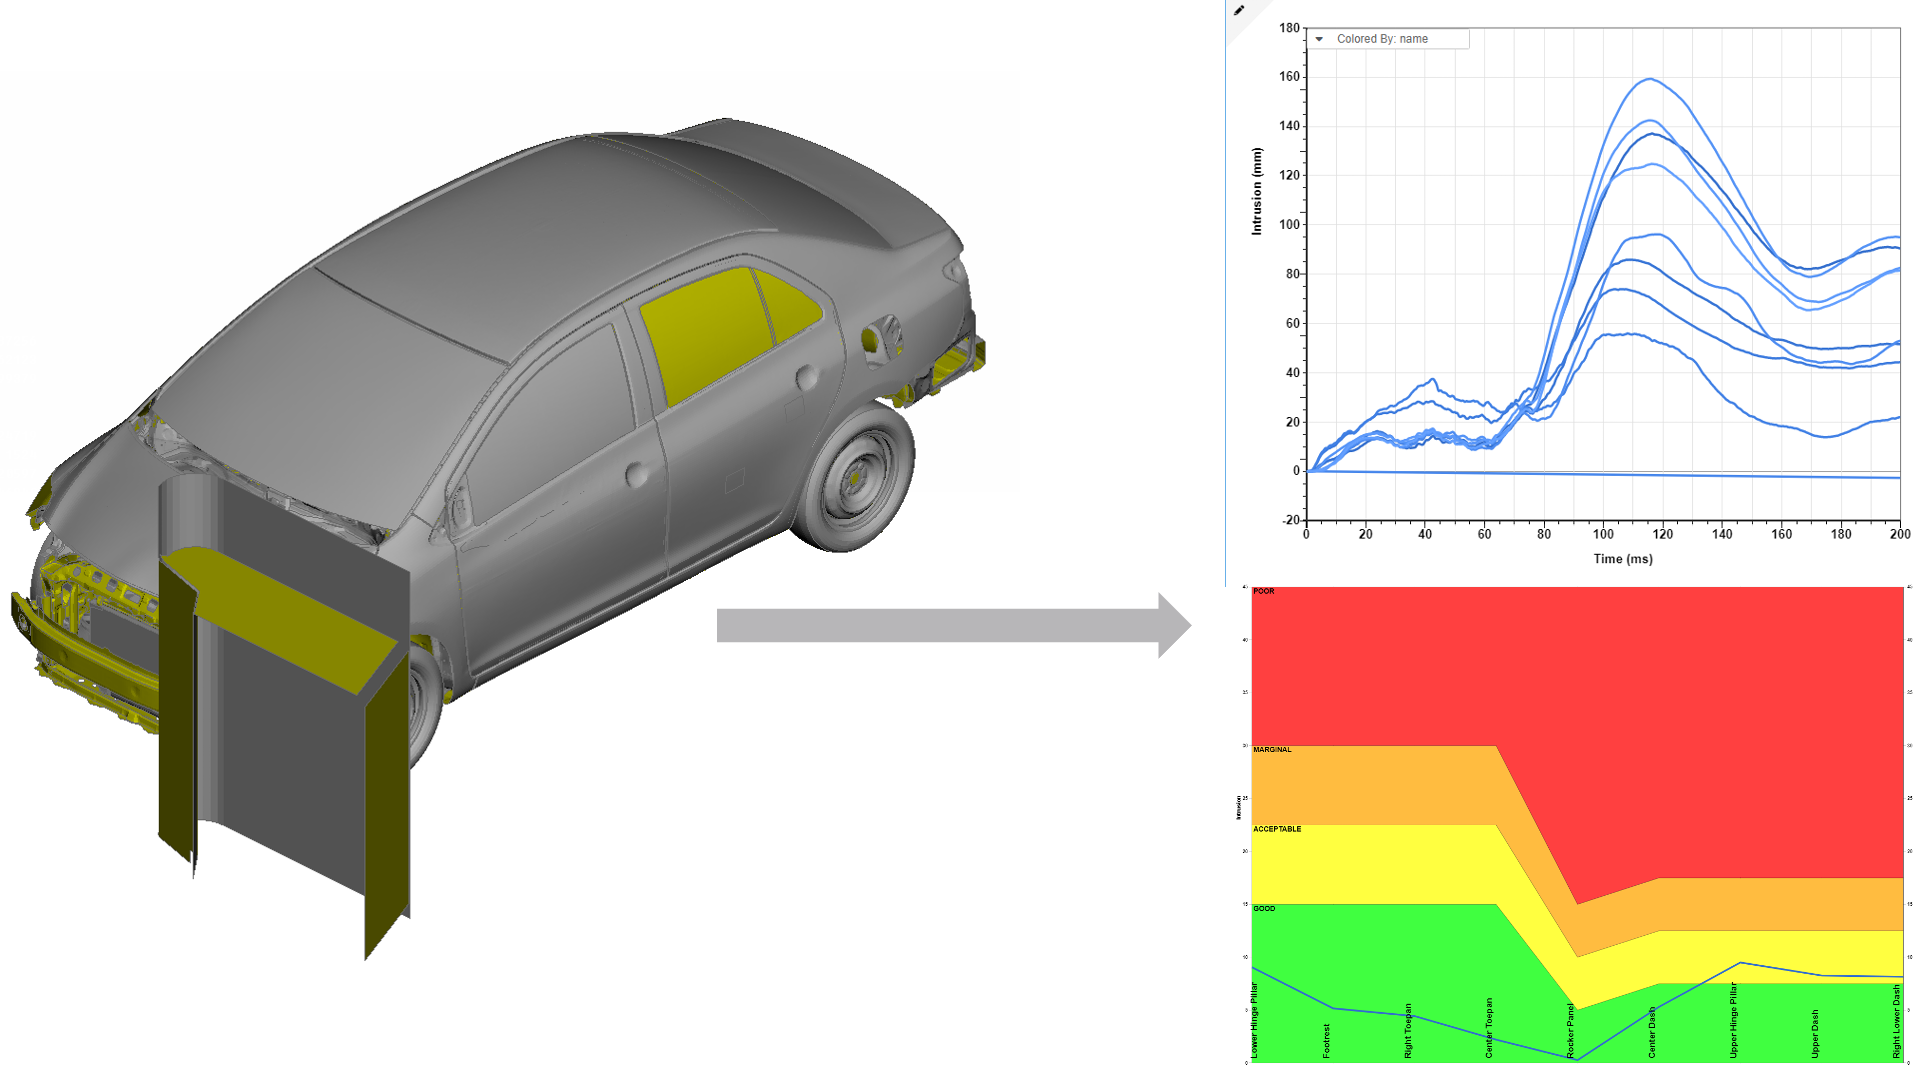
Figure 1: Model Set-up and Final Intrusions Charts
Simulation Post-processing Workflow
The follow image illustrates the workflow in d3VIEW for IIHS small offset rigid barrier data post-processing:
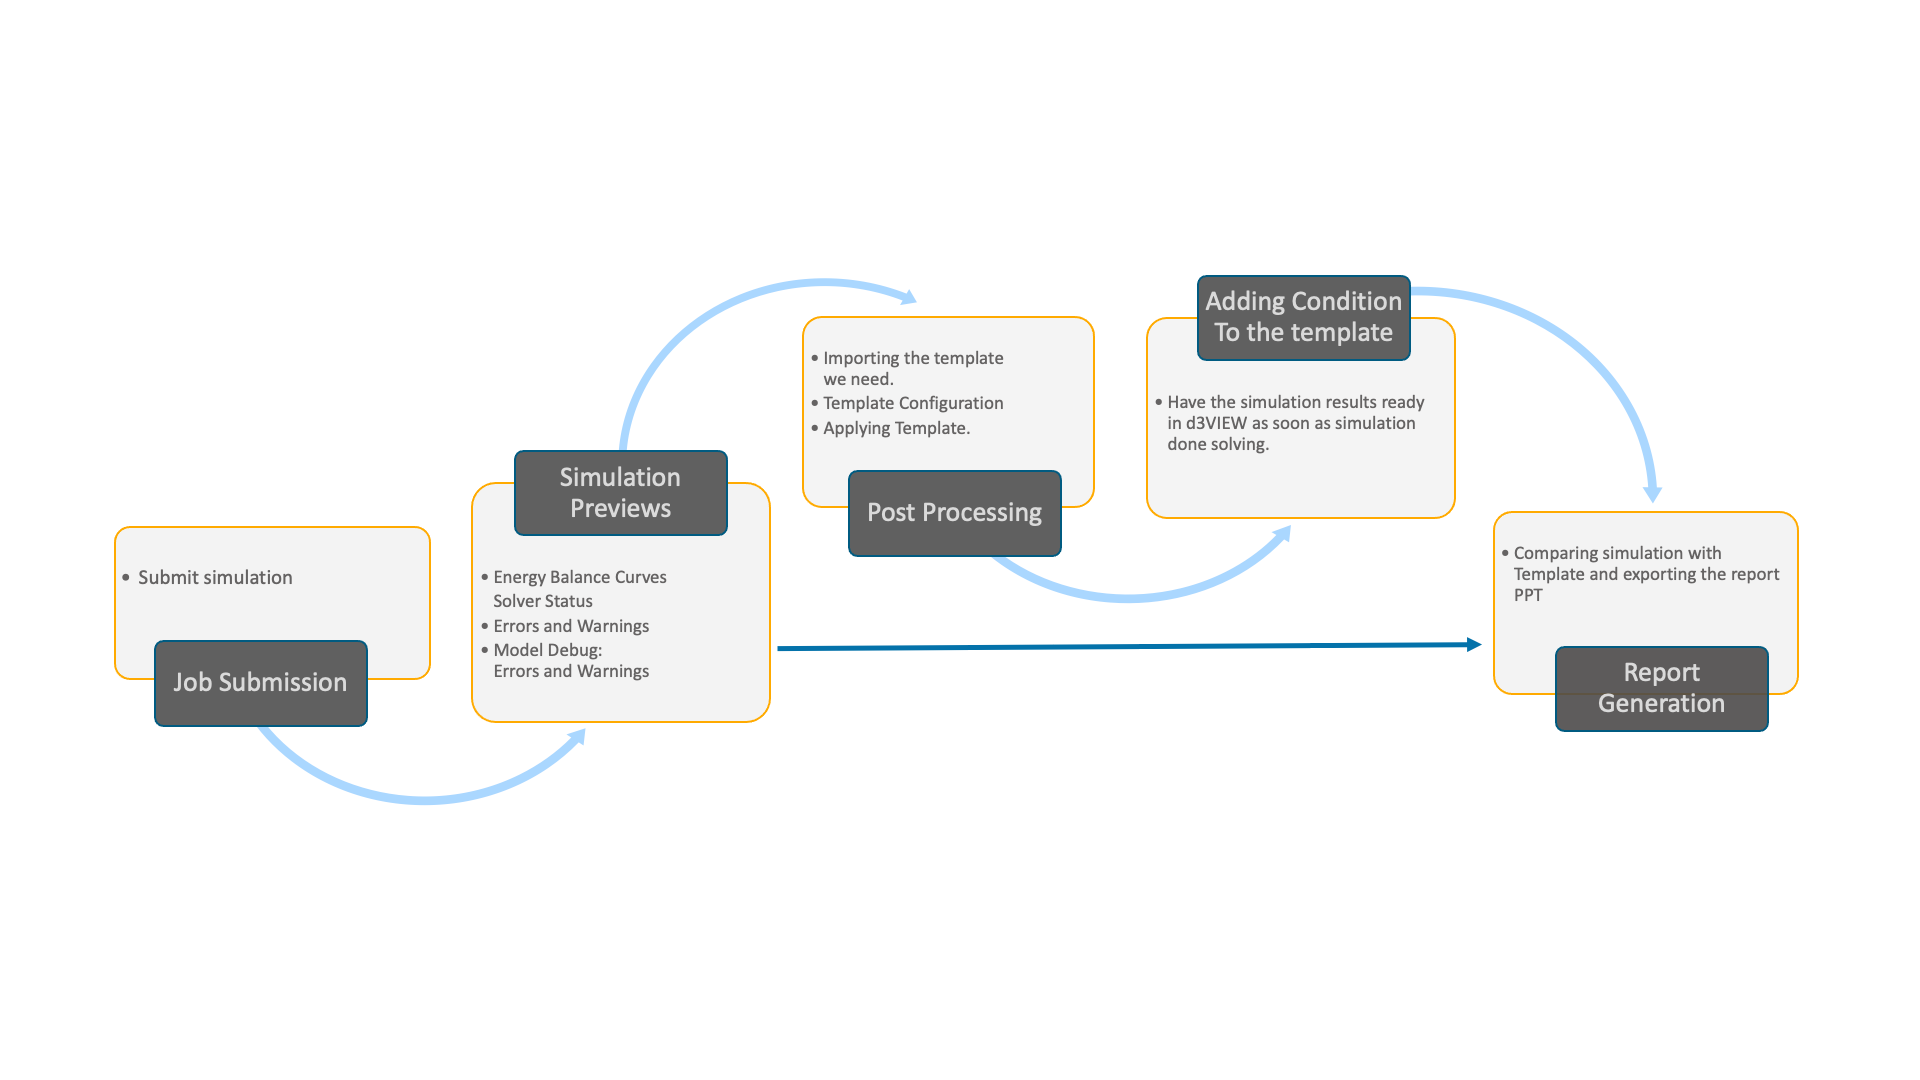
Figure 2: Simulation Post-processing Workflow
To learn how to submit a job, follow this link. To learn how to submit a job with a simulation preview, follow this link.
Step 1. Setting Up IIHS SORB template
For this section, we will use the Templates application and upload a IIHS SORB template file from our local machine and review the following.
- Upload Template
- Configure IDS/Labels
- Specify conditions
Step 1a. Uploading the IIHS SORB template
To get started using our IIHS SORB Template, we’ll need to upload it onto the platform under the Templates Application. Use the application menu at the top left corner of the webpage and click on the Templates icon to navigate to the page.
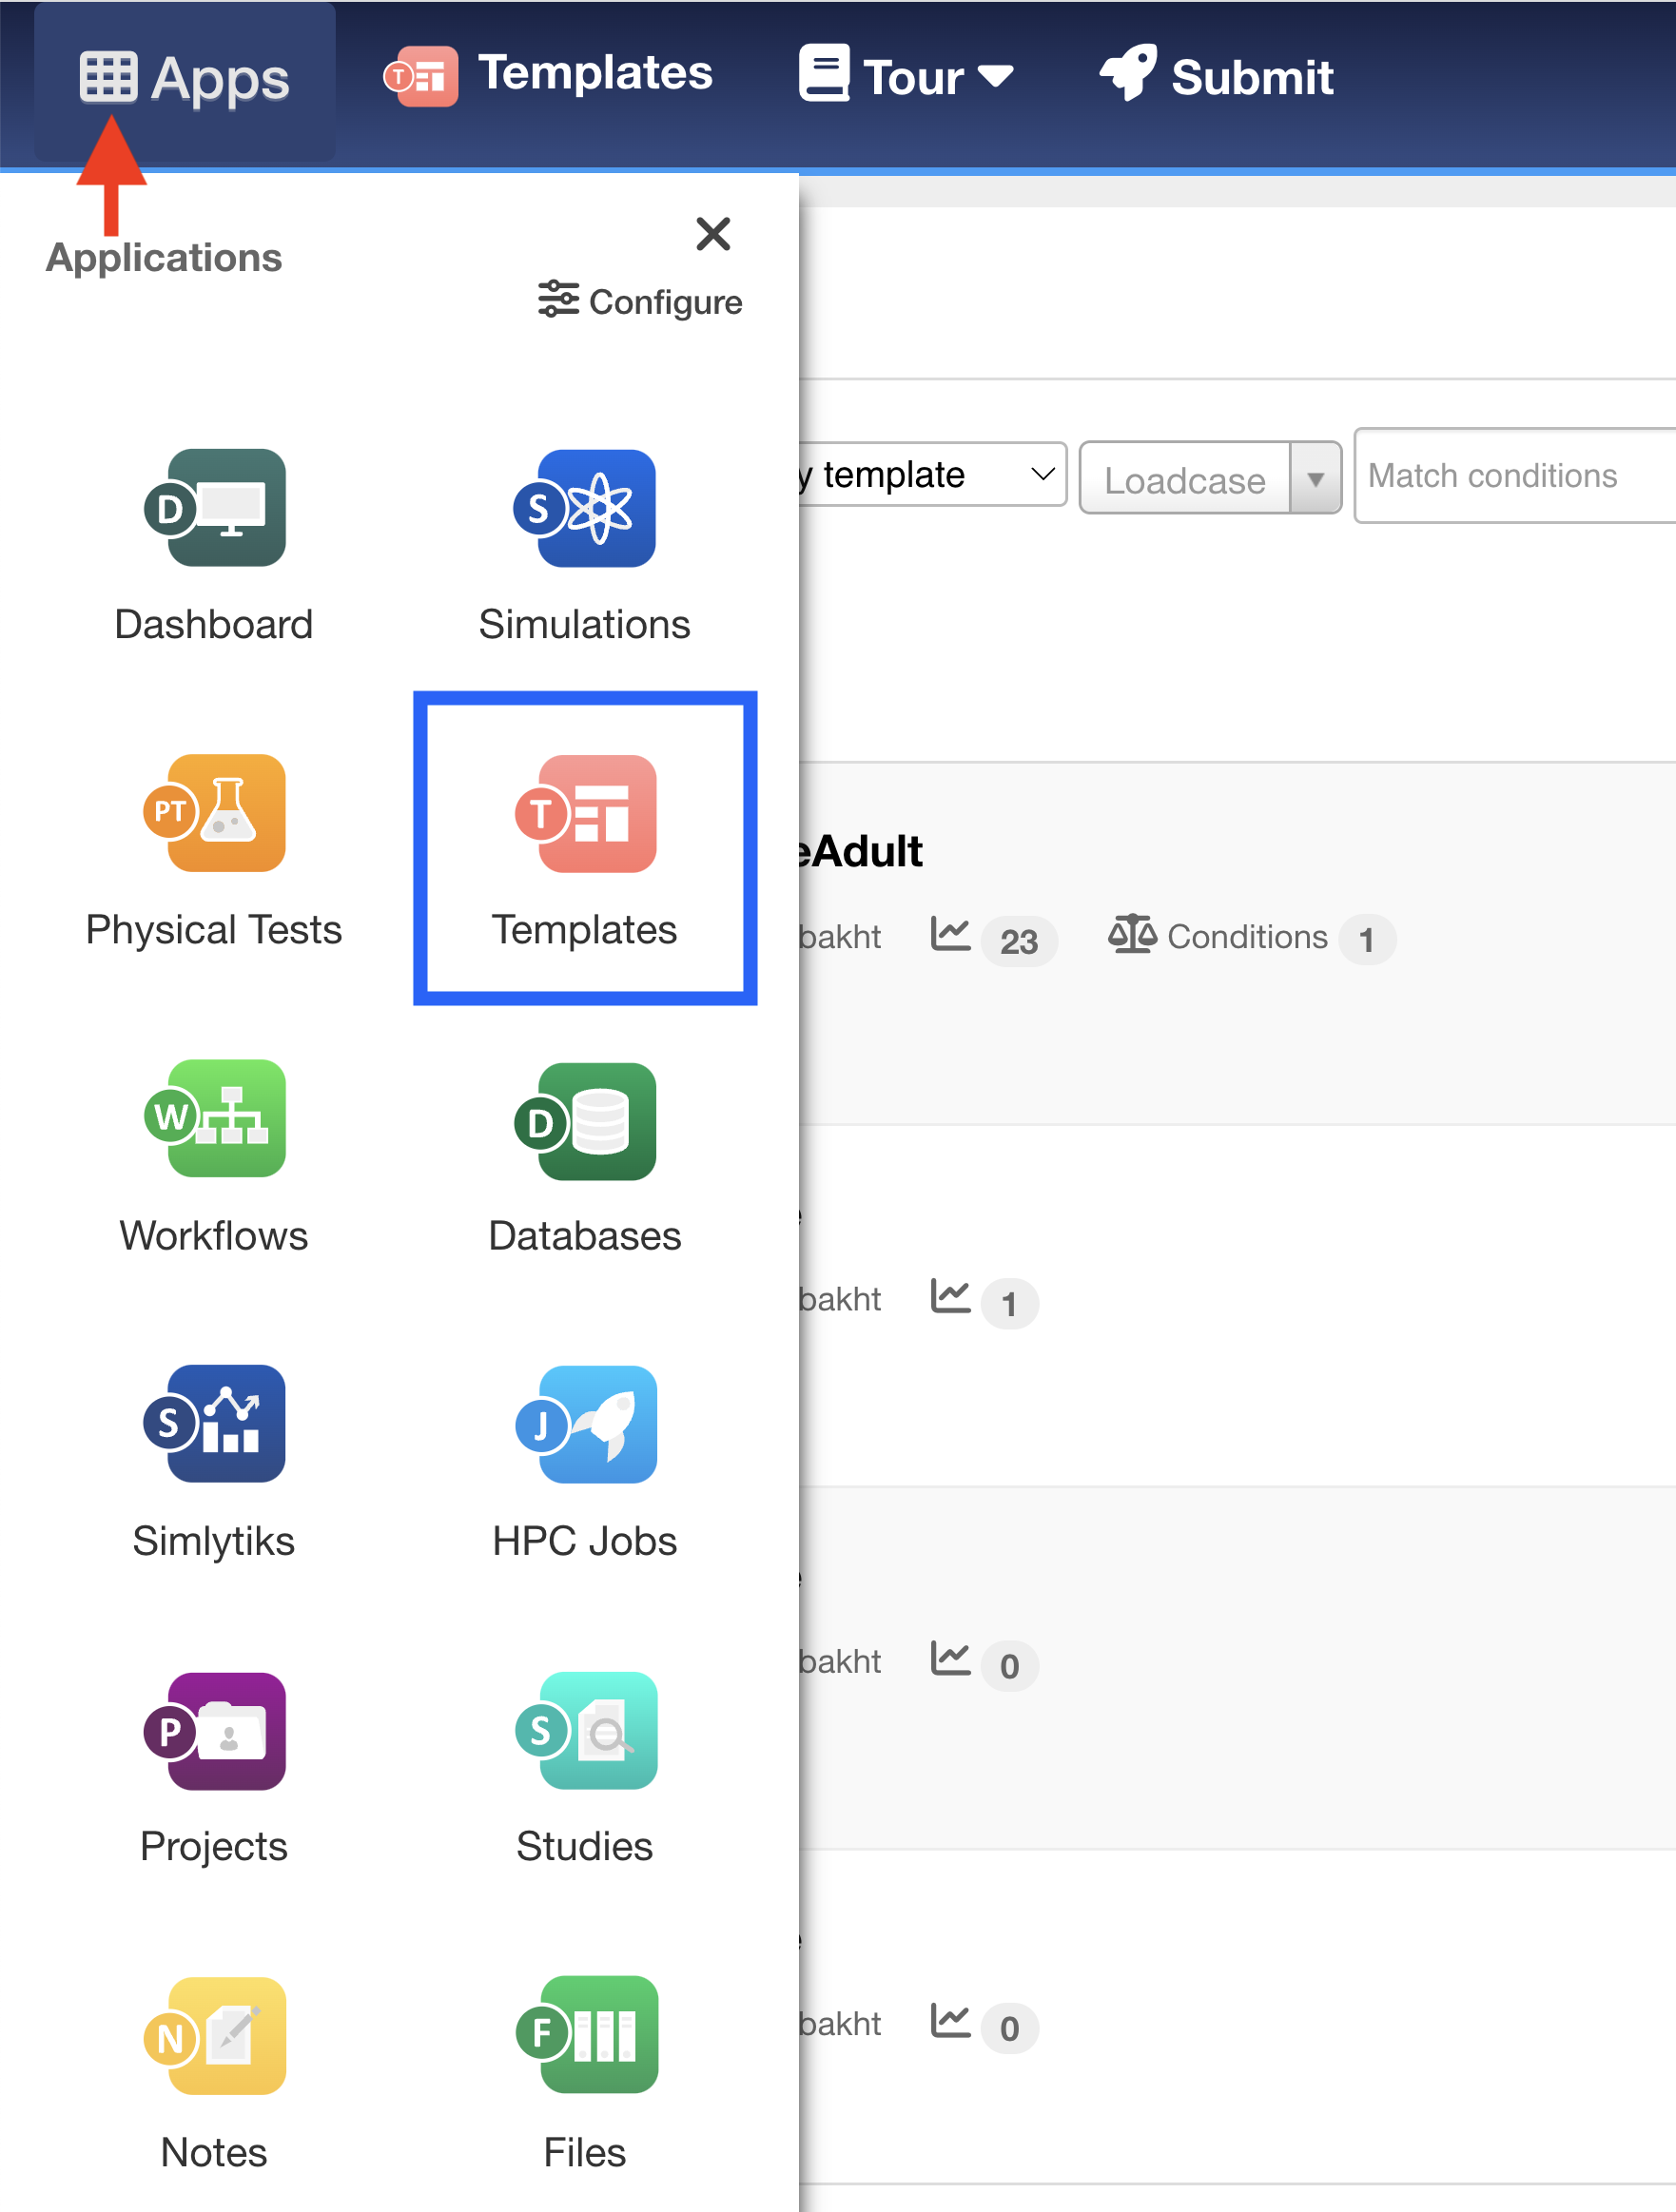
Figure 3: Access Templates Page
Once in the Templates app, click on the blue New Template button at the top right corner of the page to start uploading the template.
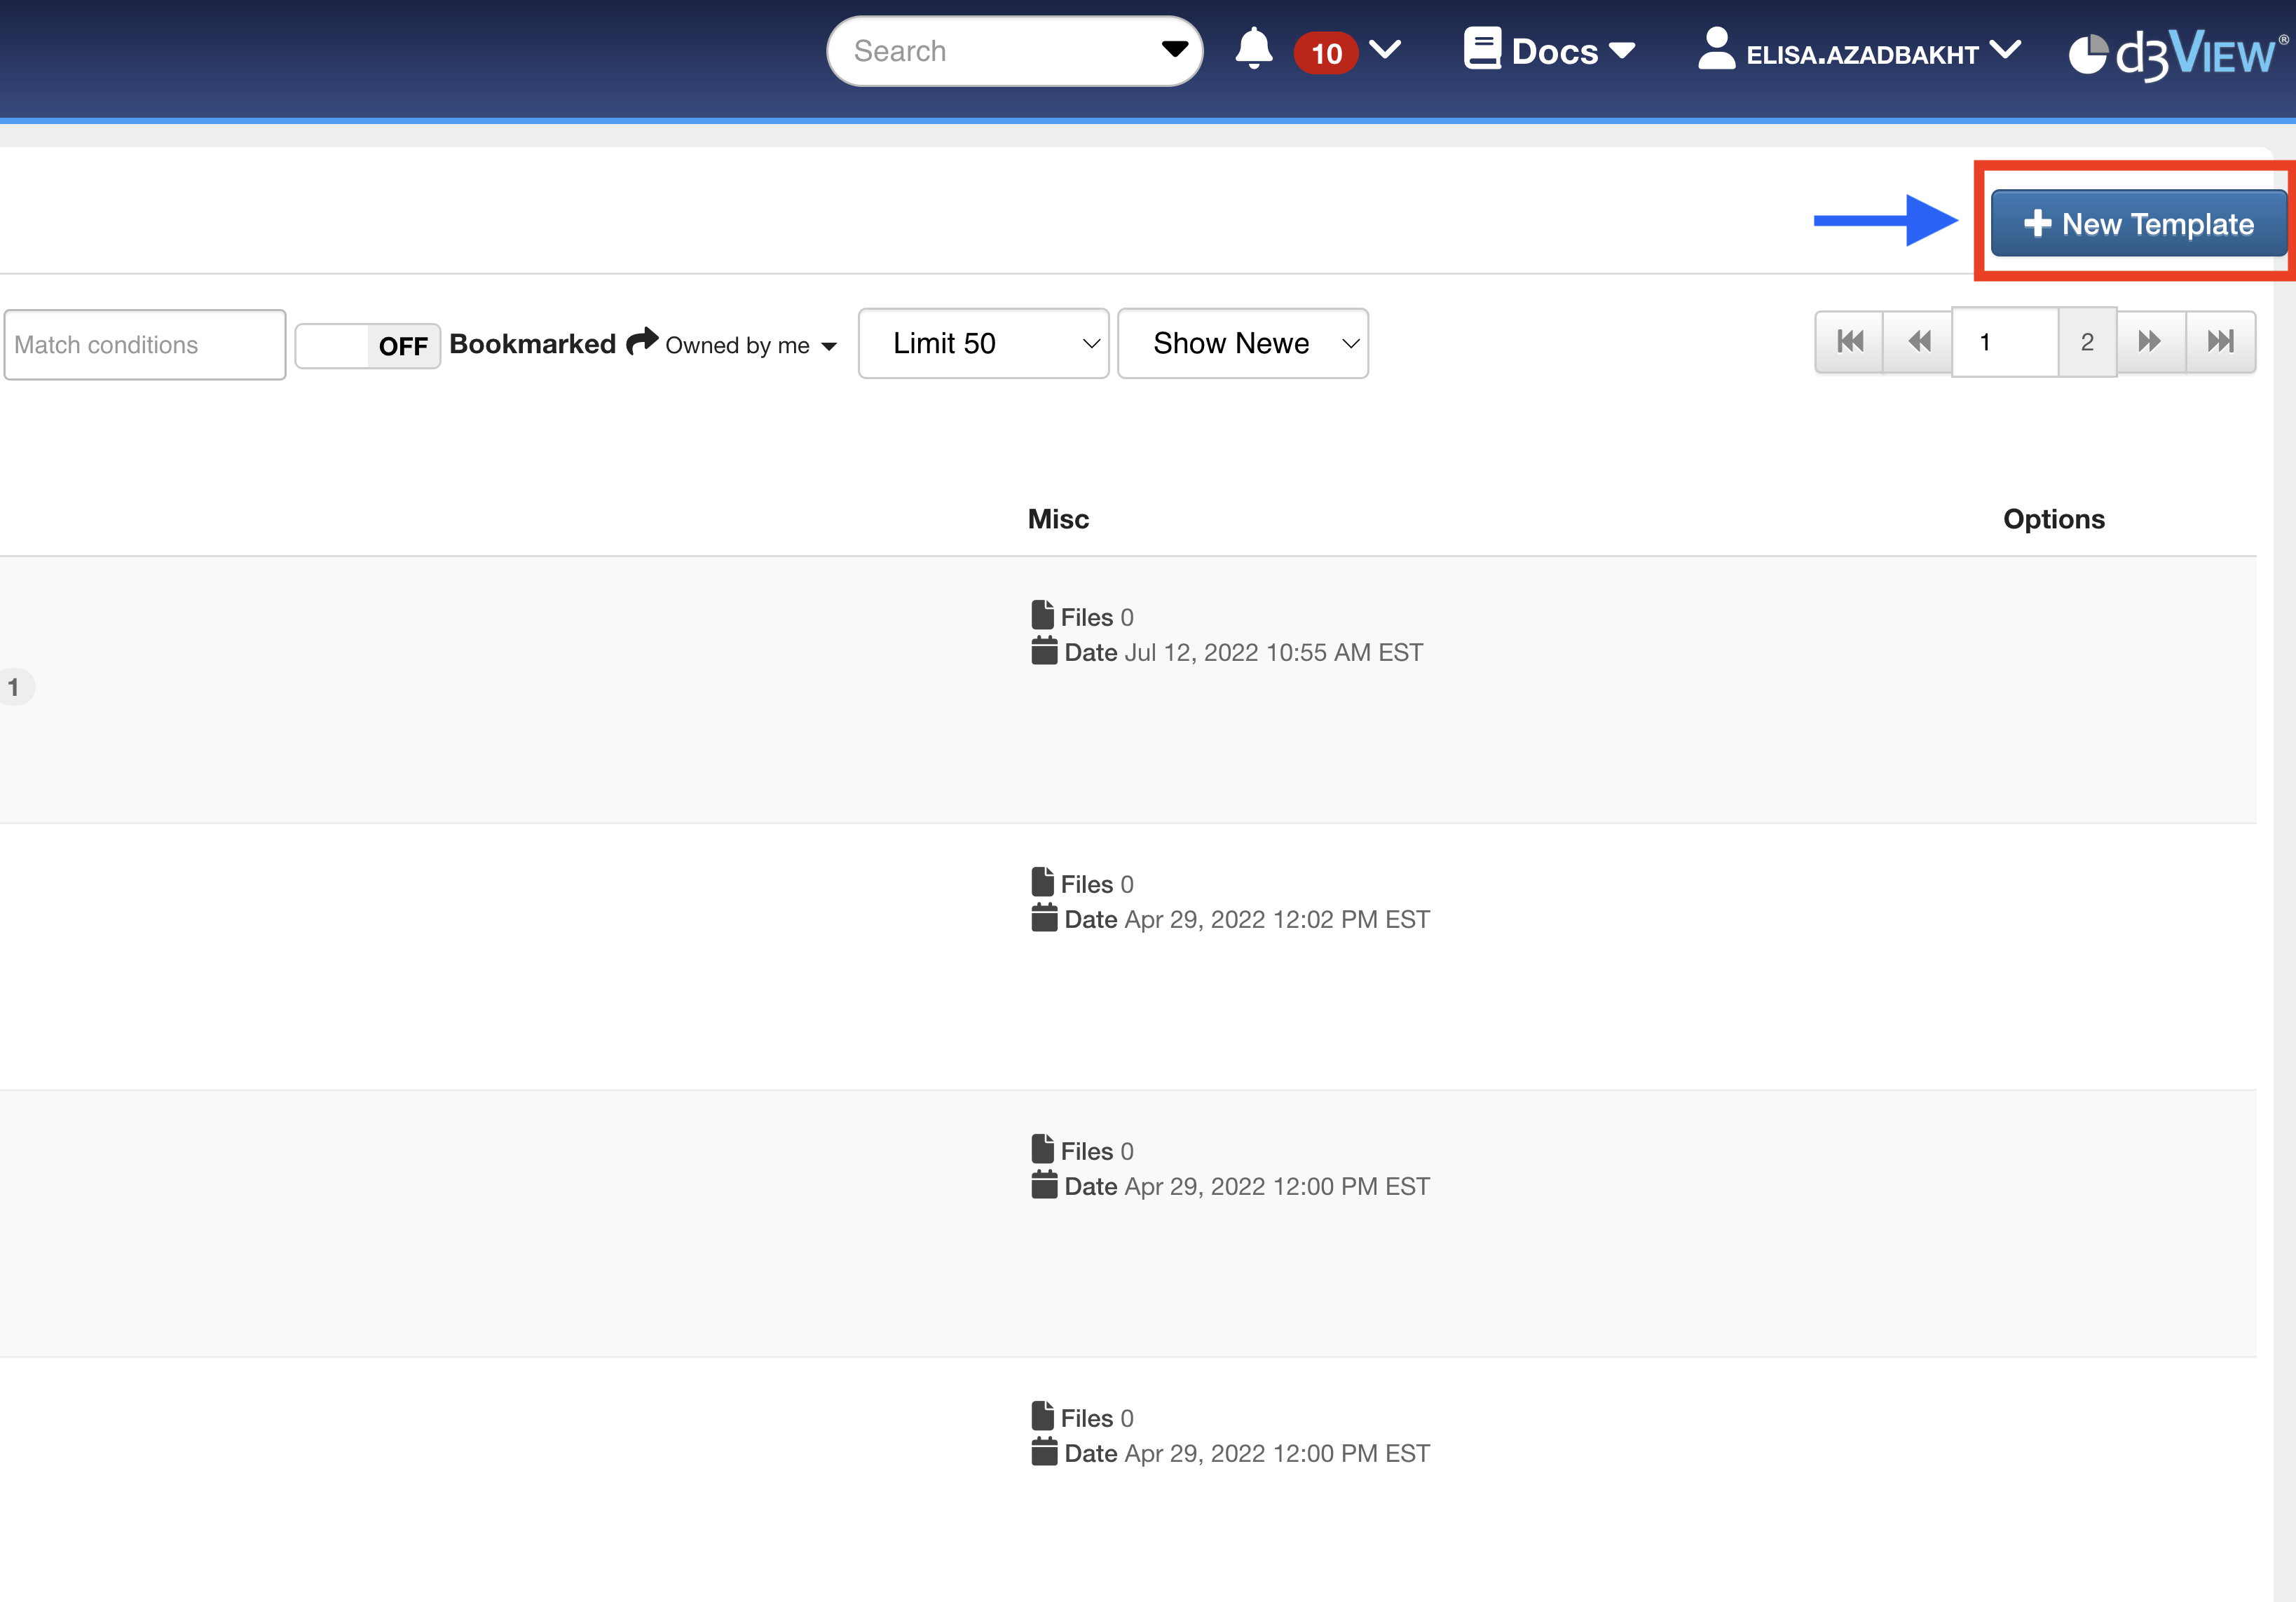
Figure 4: Create New Template
Once the template creation window pops up, we’ll navigate to the Upload tab (1). Click-to-upload or drag-and-drop the JSON file onto the drop zone indicated by the orange dashed box (2).

Figure 5: Upload Template File
Once uploaded (1), make sure the template is highlighted in blue at the bottom of the window (2), and then press OK (3).
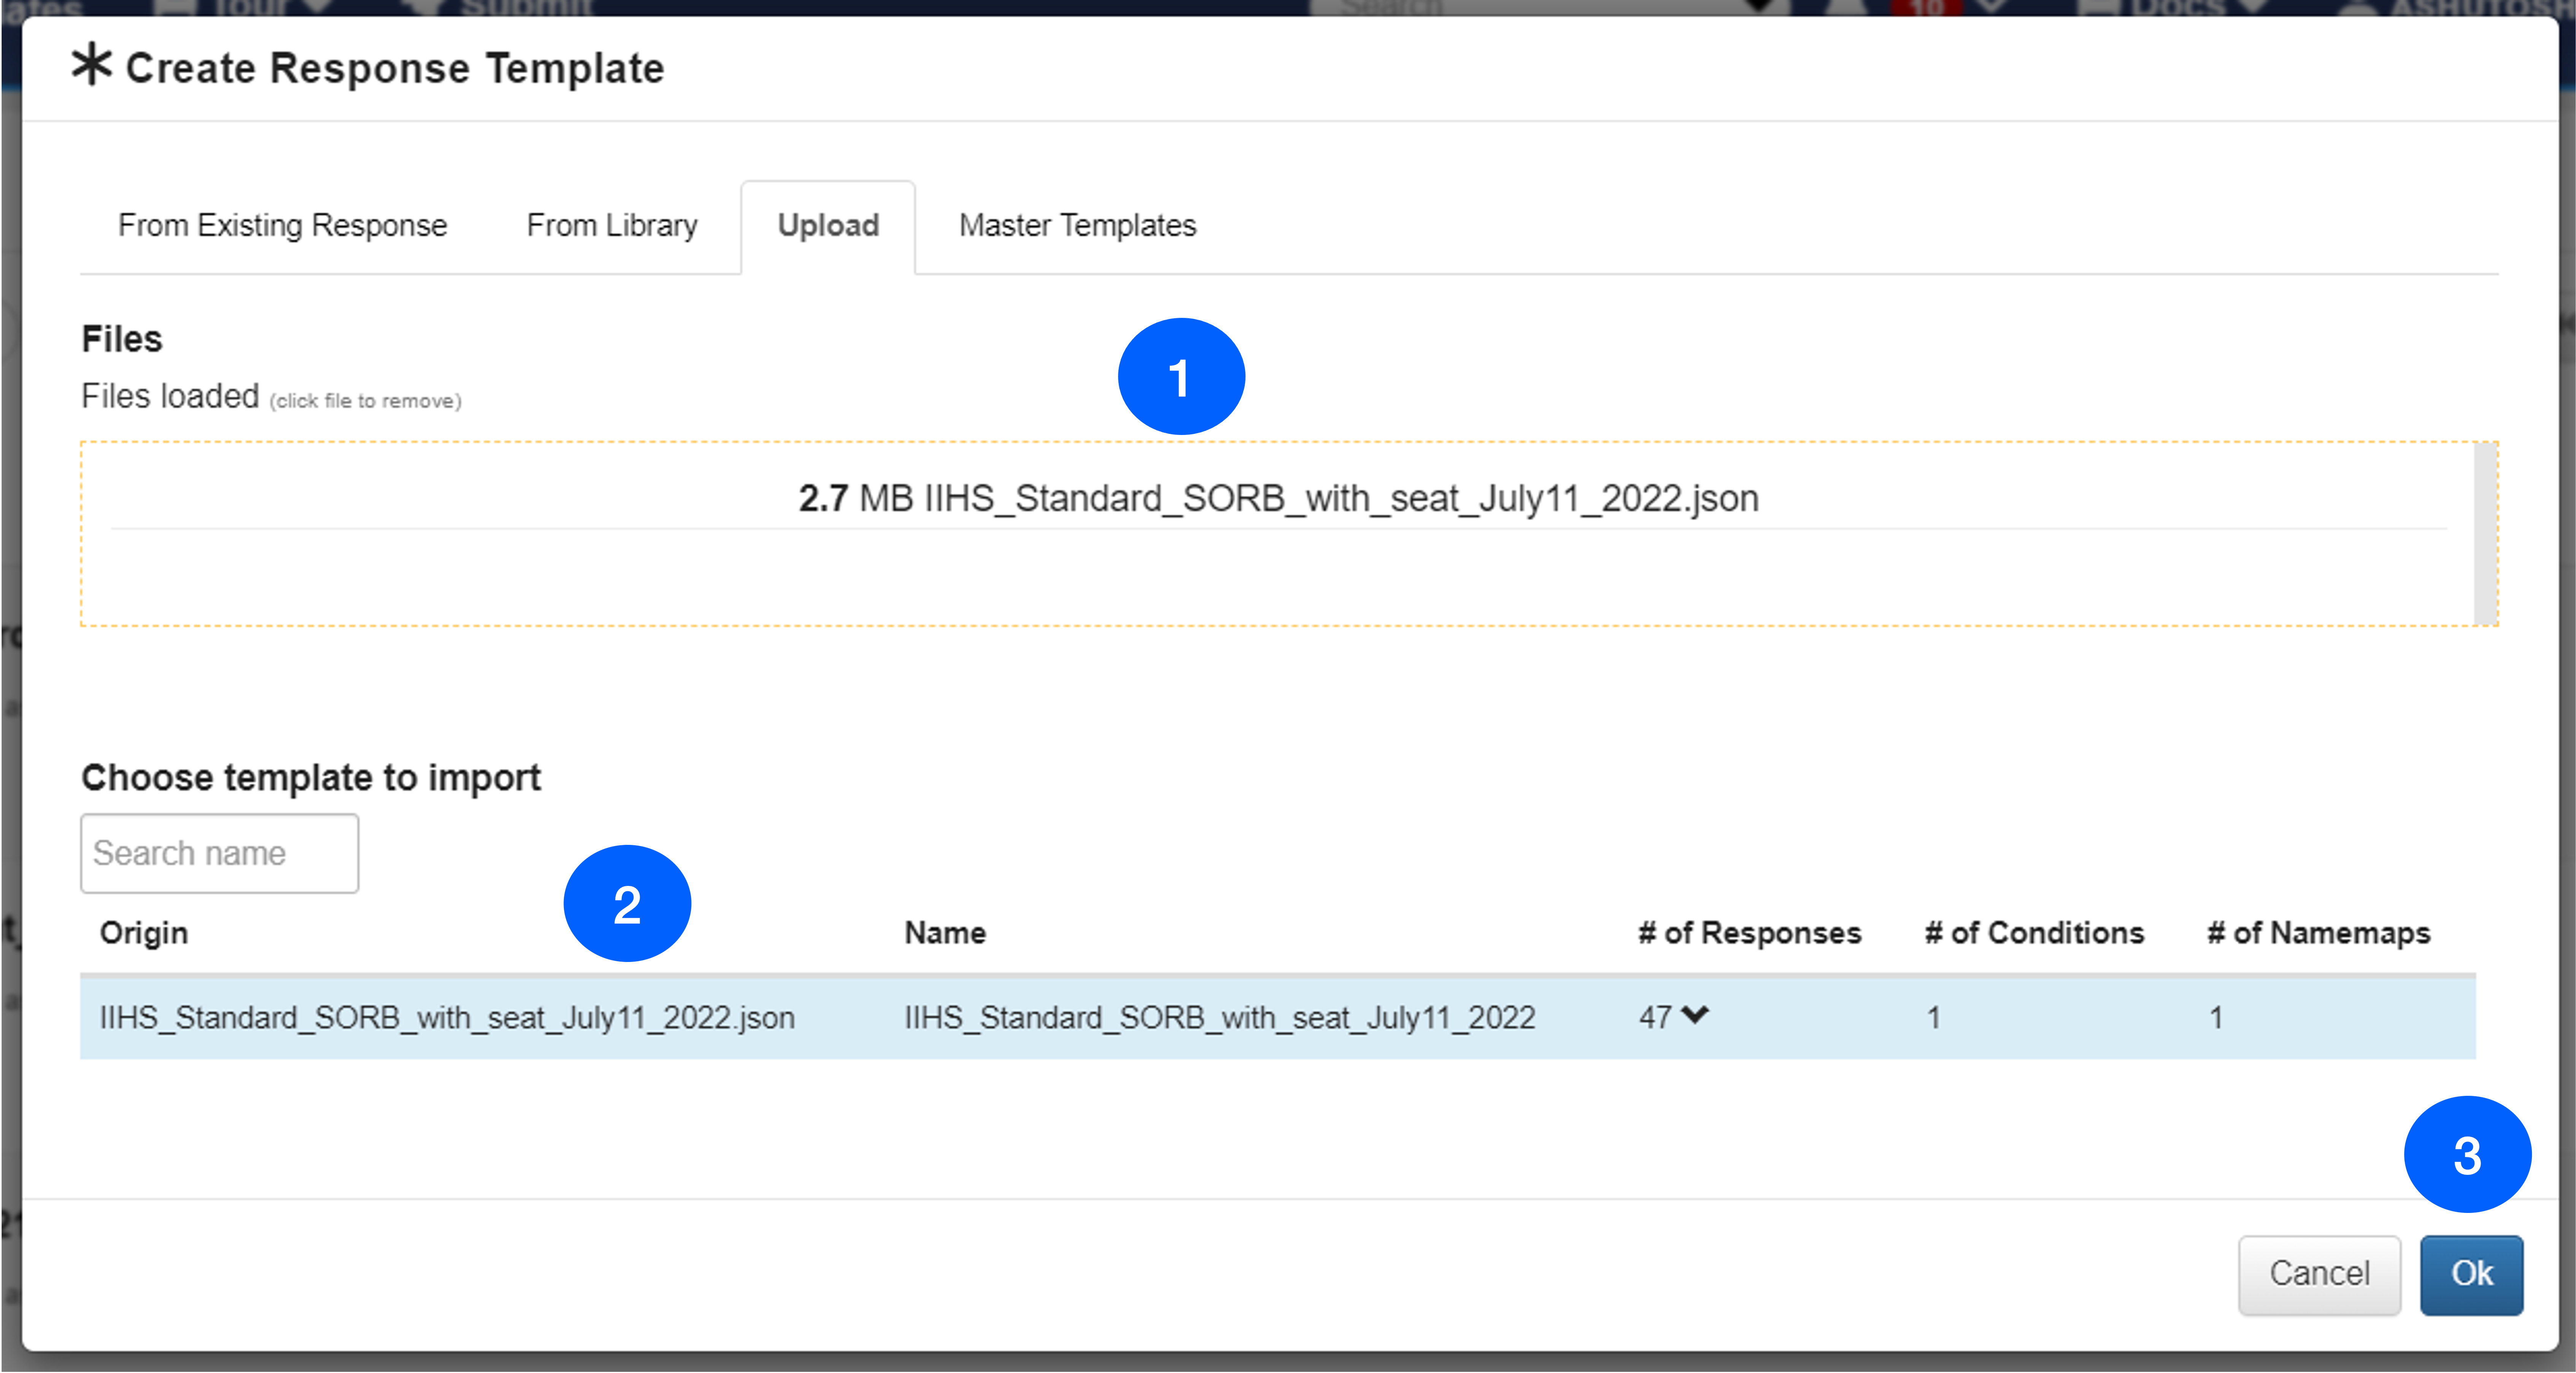
Figure 6: Upload Template File
We should see the upload template at the top of the Templates homepage. (Refresh the page if it’s not visible immediately). Click on the template name to open and review its contents.
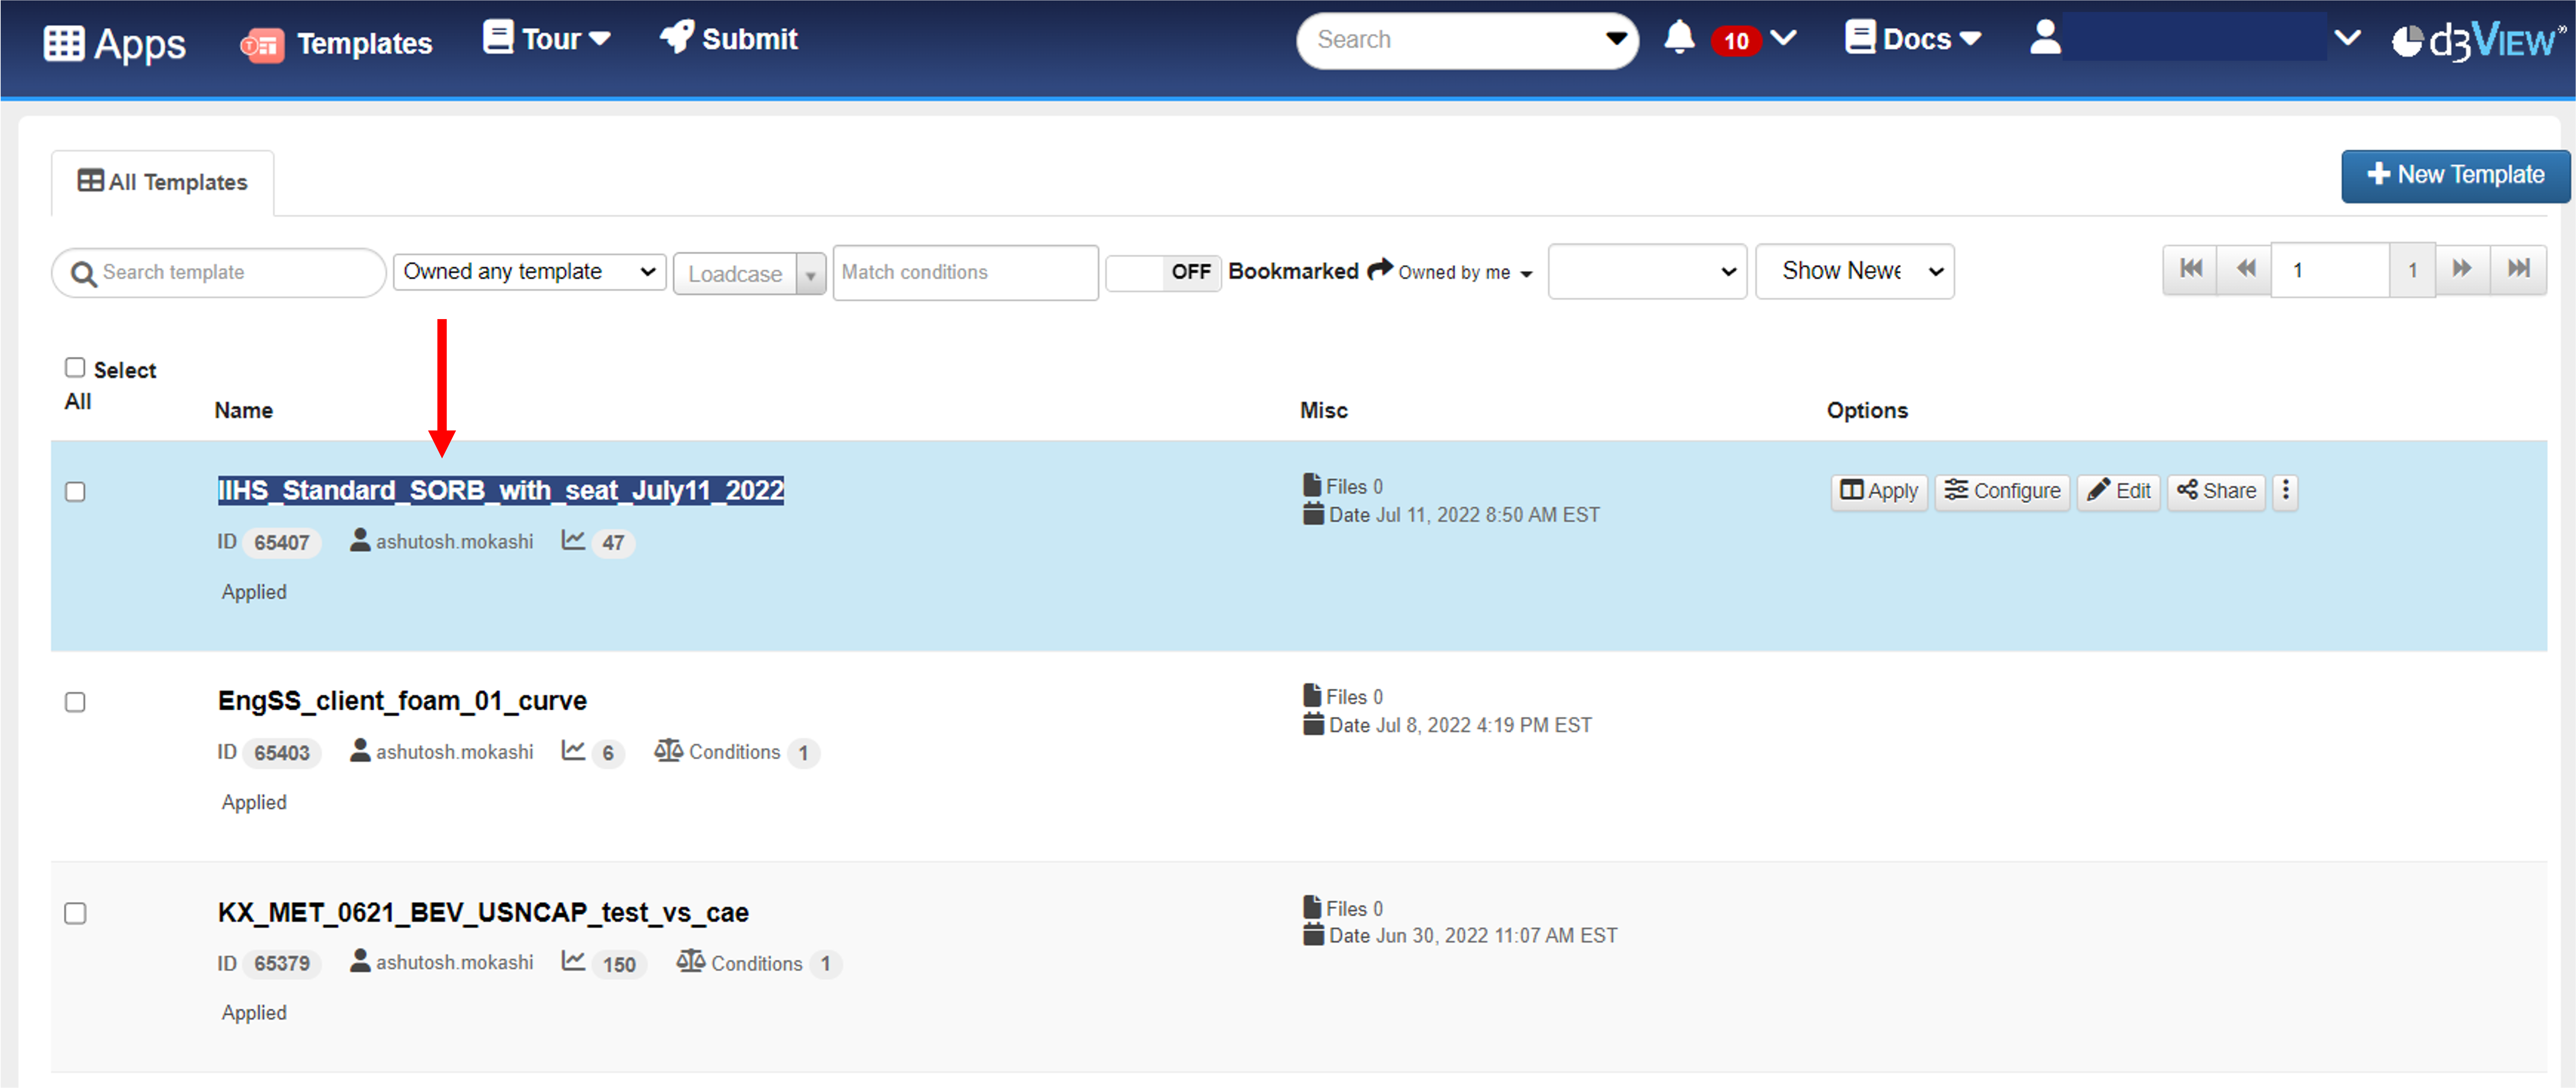
Figure 7: Open Template
Step 1b. IIHS SORB Responses that will be extracted
Upon opening the template, we’ll see under the Responses Tab all the data outputs that will be extracted from our simulation when applying this template.
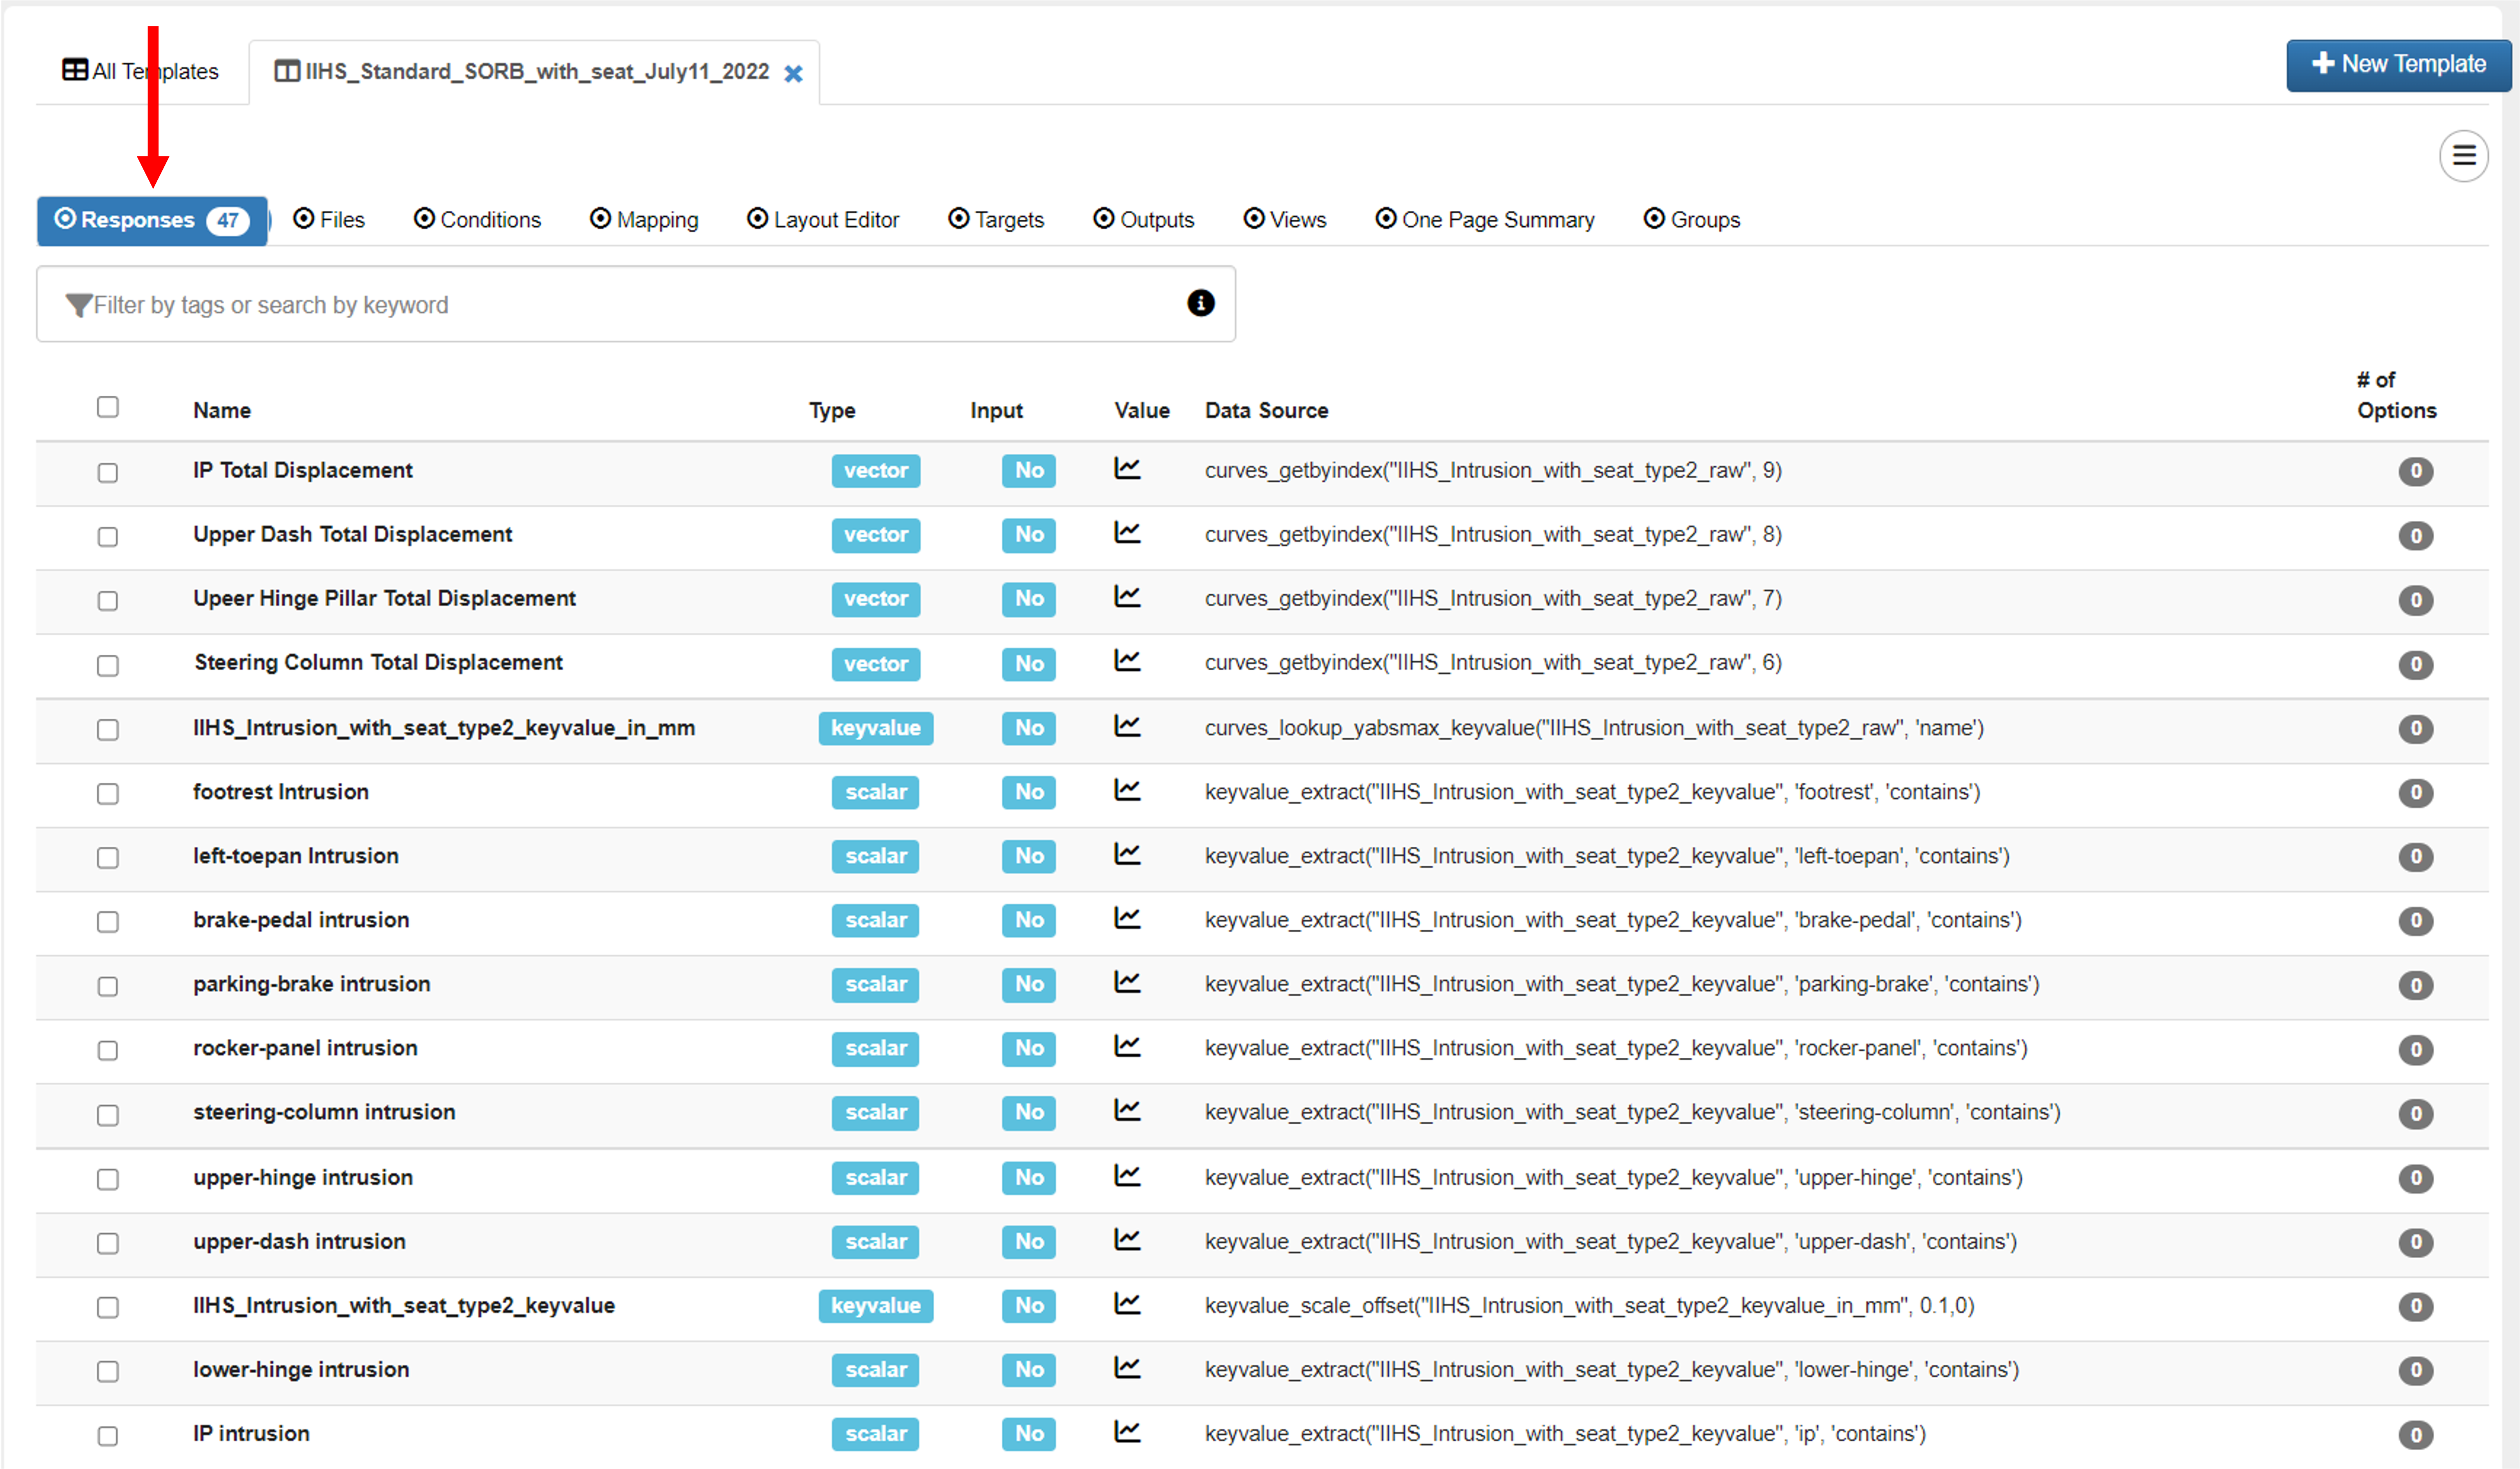
Figure 8: IIHS SORB Template Responses
Step 1c: Configuring IDs/Labels for Sensors
d3VIEW’s IIHS SORB template extract and plot intrusions of the target locations by using the sensors defined as *DATABASE_HISTORY_NODE_ID in the model. In order to extract all the intrusions, the model must have all the sensors defined at all the appropriate target locations as shown in the screenshot below. d3VIEW will use the label in the NODOUT, and if the label is not present, then it will search for the ID. If both ID/LABEL are not found, then d3VIEW will fail to extract the intrusions.

Figure 9: Sensor Point Locations for Measuring Vehicle Intrusion
In this step, you can choose Configure to customize NODE IDs/LABELs to suite you model. Once this option is clicked, you will be directed to a table that allows you to view and edit your model specific ids/labels. Under the hamburger menu in the opened Template, click on Configure to get started.
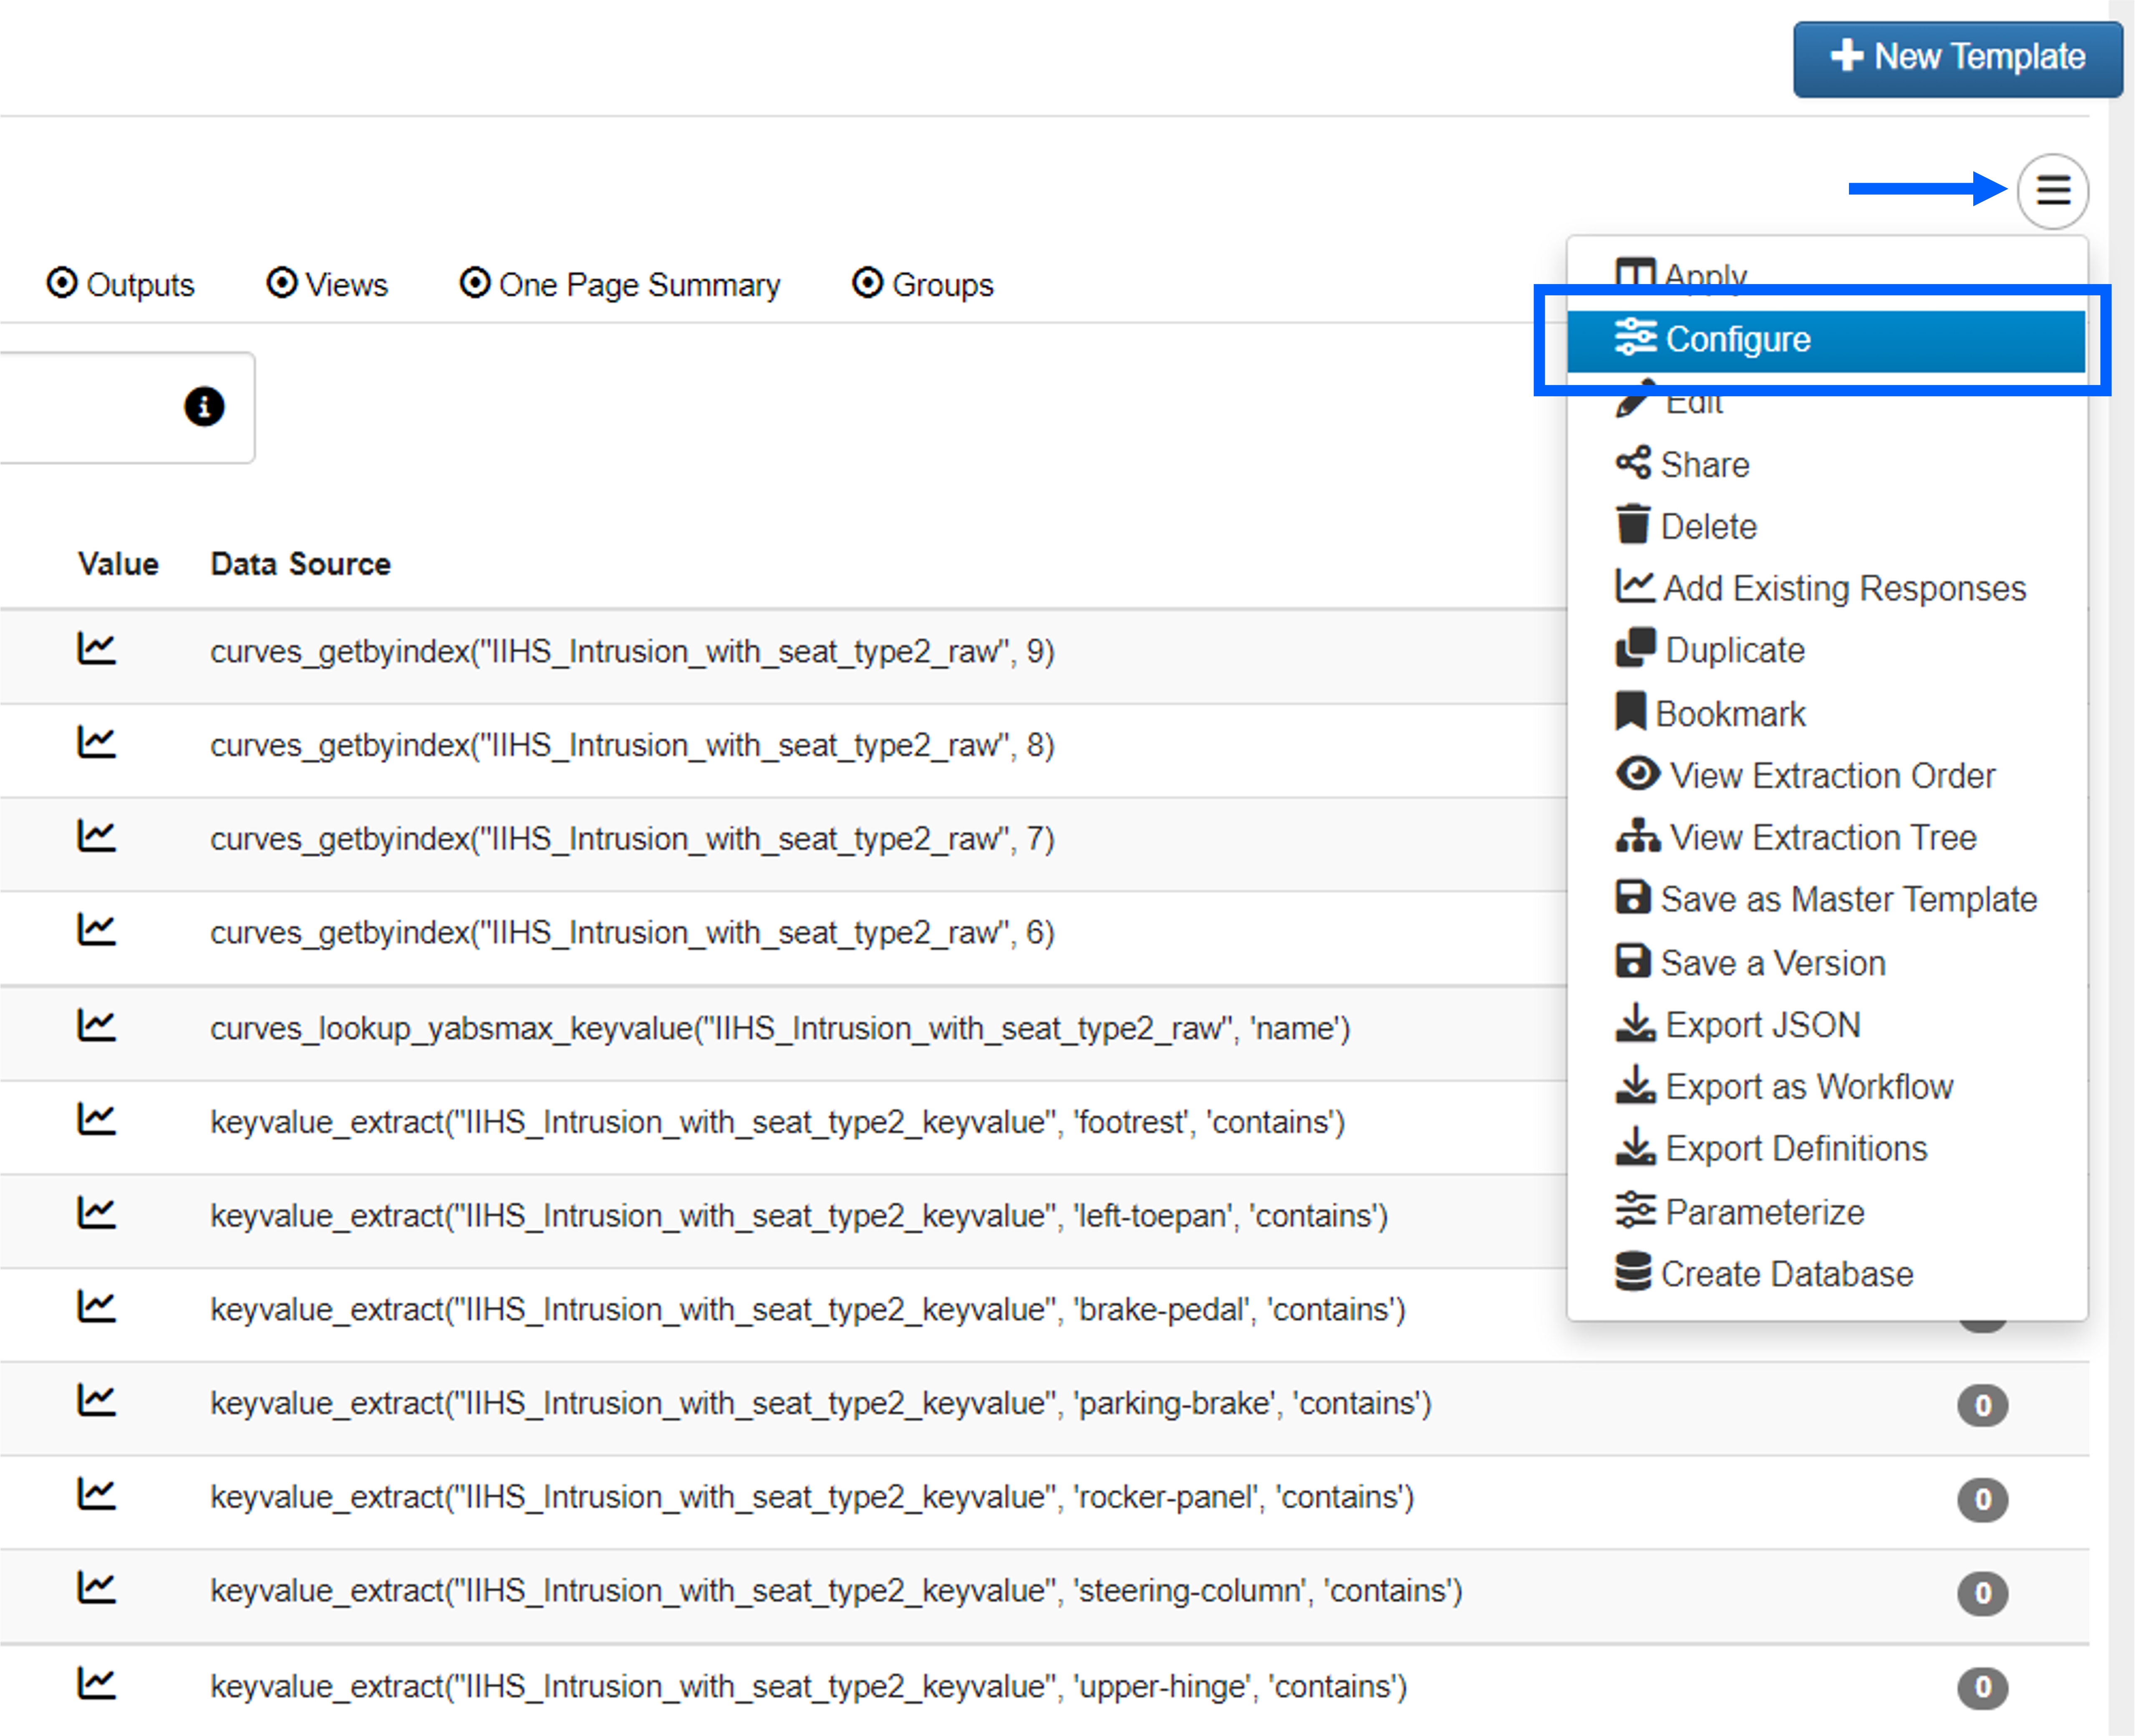
Figure 10: Configure Template
Our table will be shown towards the bottom of the newly opened window. We can edit the IDs manually by first clicking Export Sensors File.
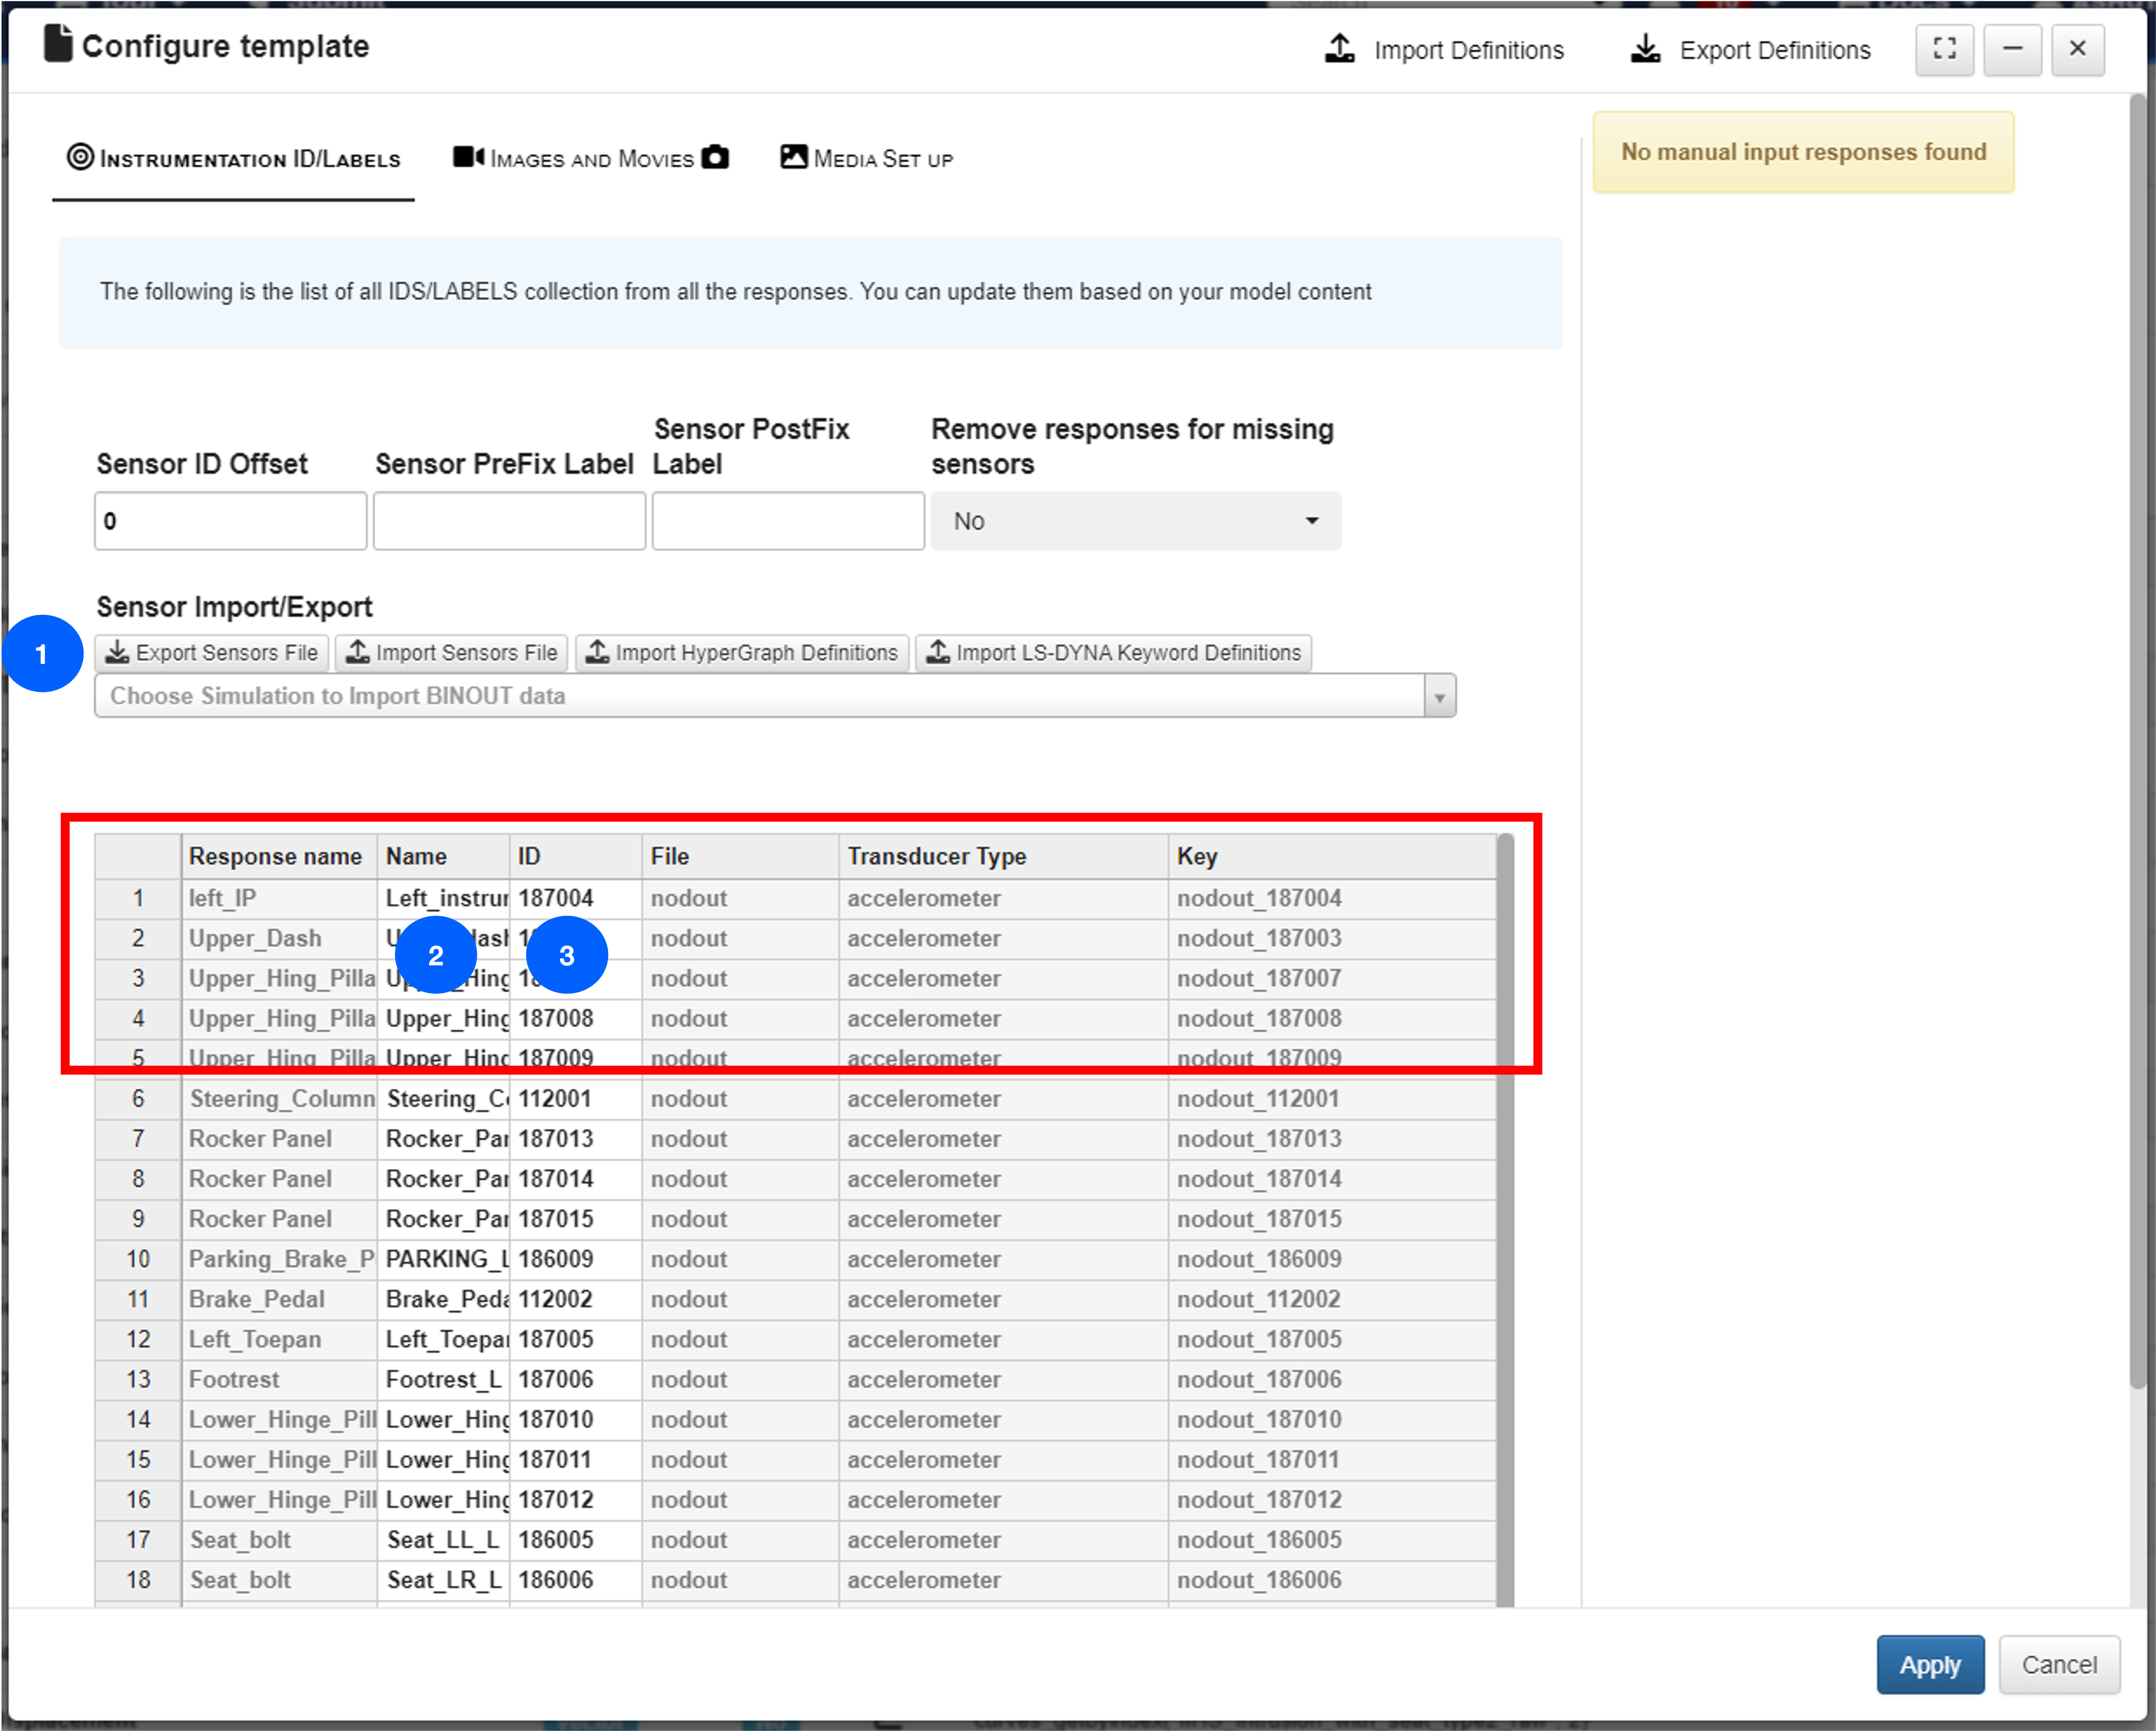
Figure 11: Export Sensors File
We’ll go back to our Configure Template window and upload the updated file by choosing the Import Sensors File option. The ID should update on the table. Finish by clicking Apply.
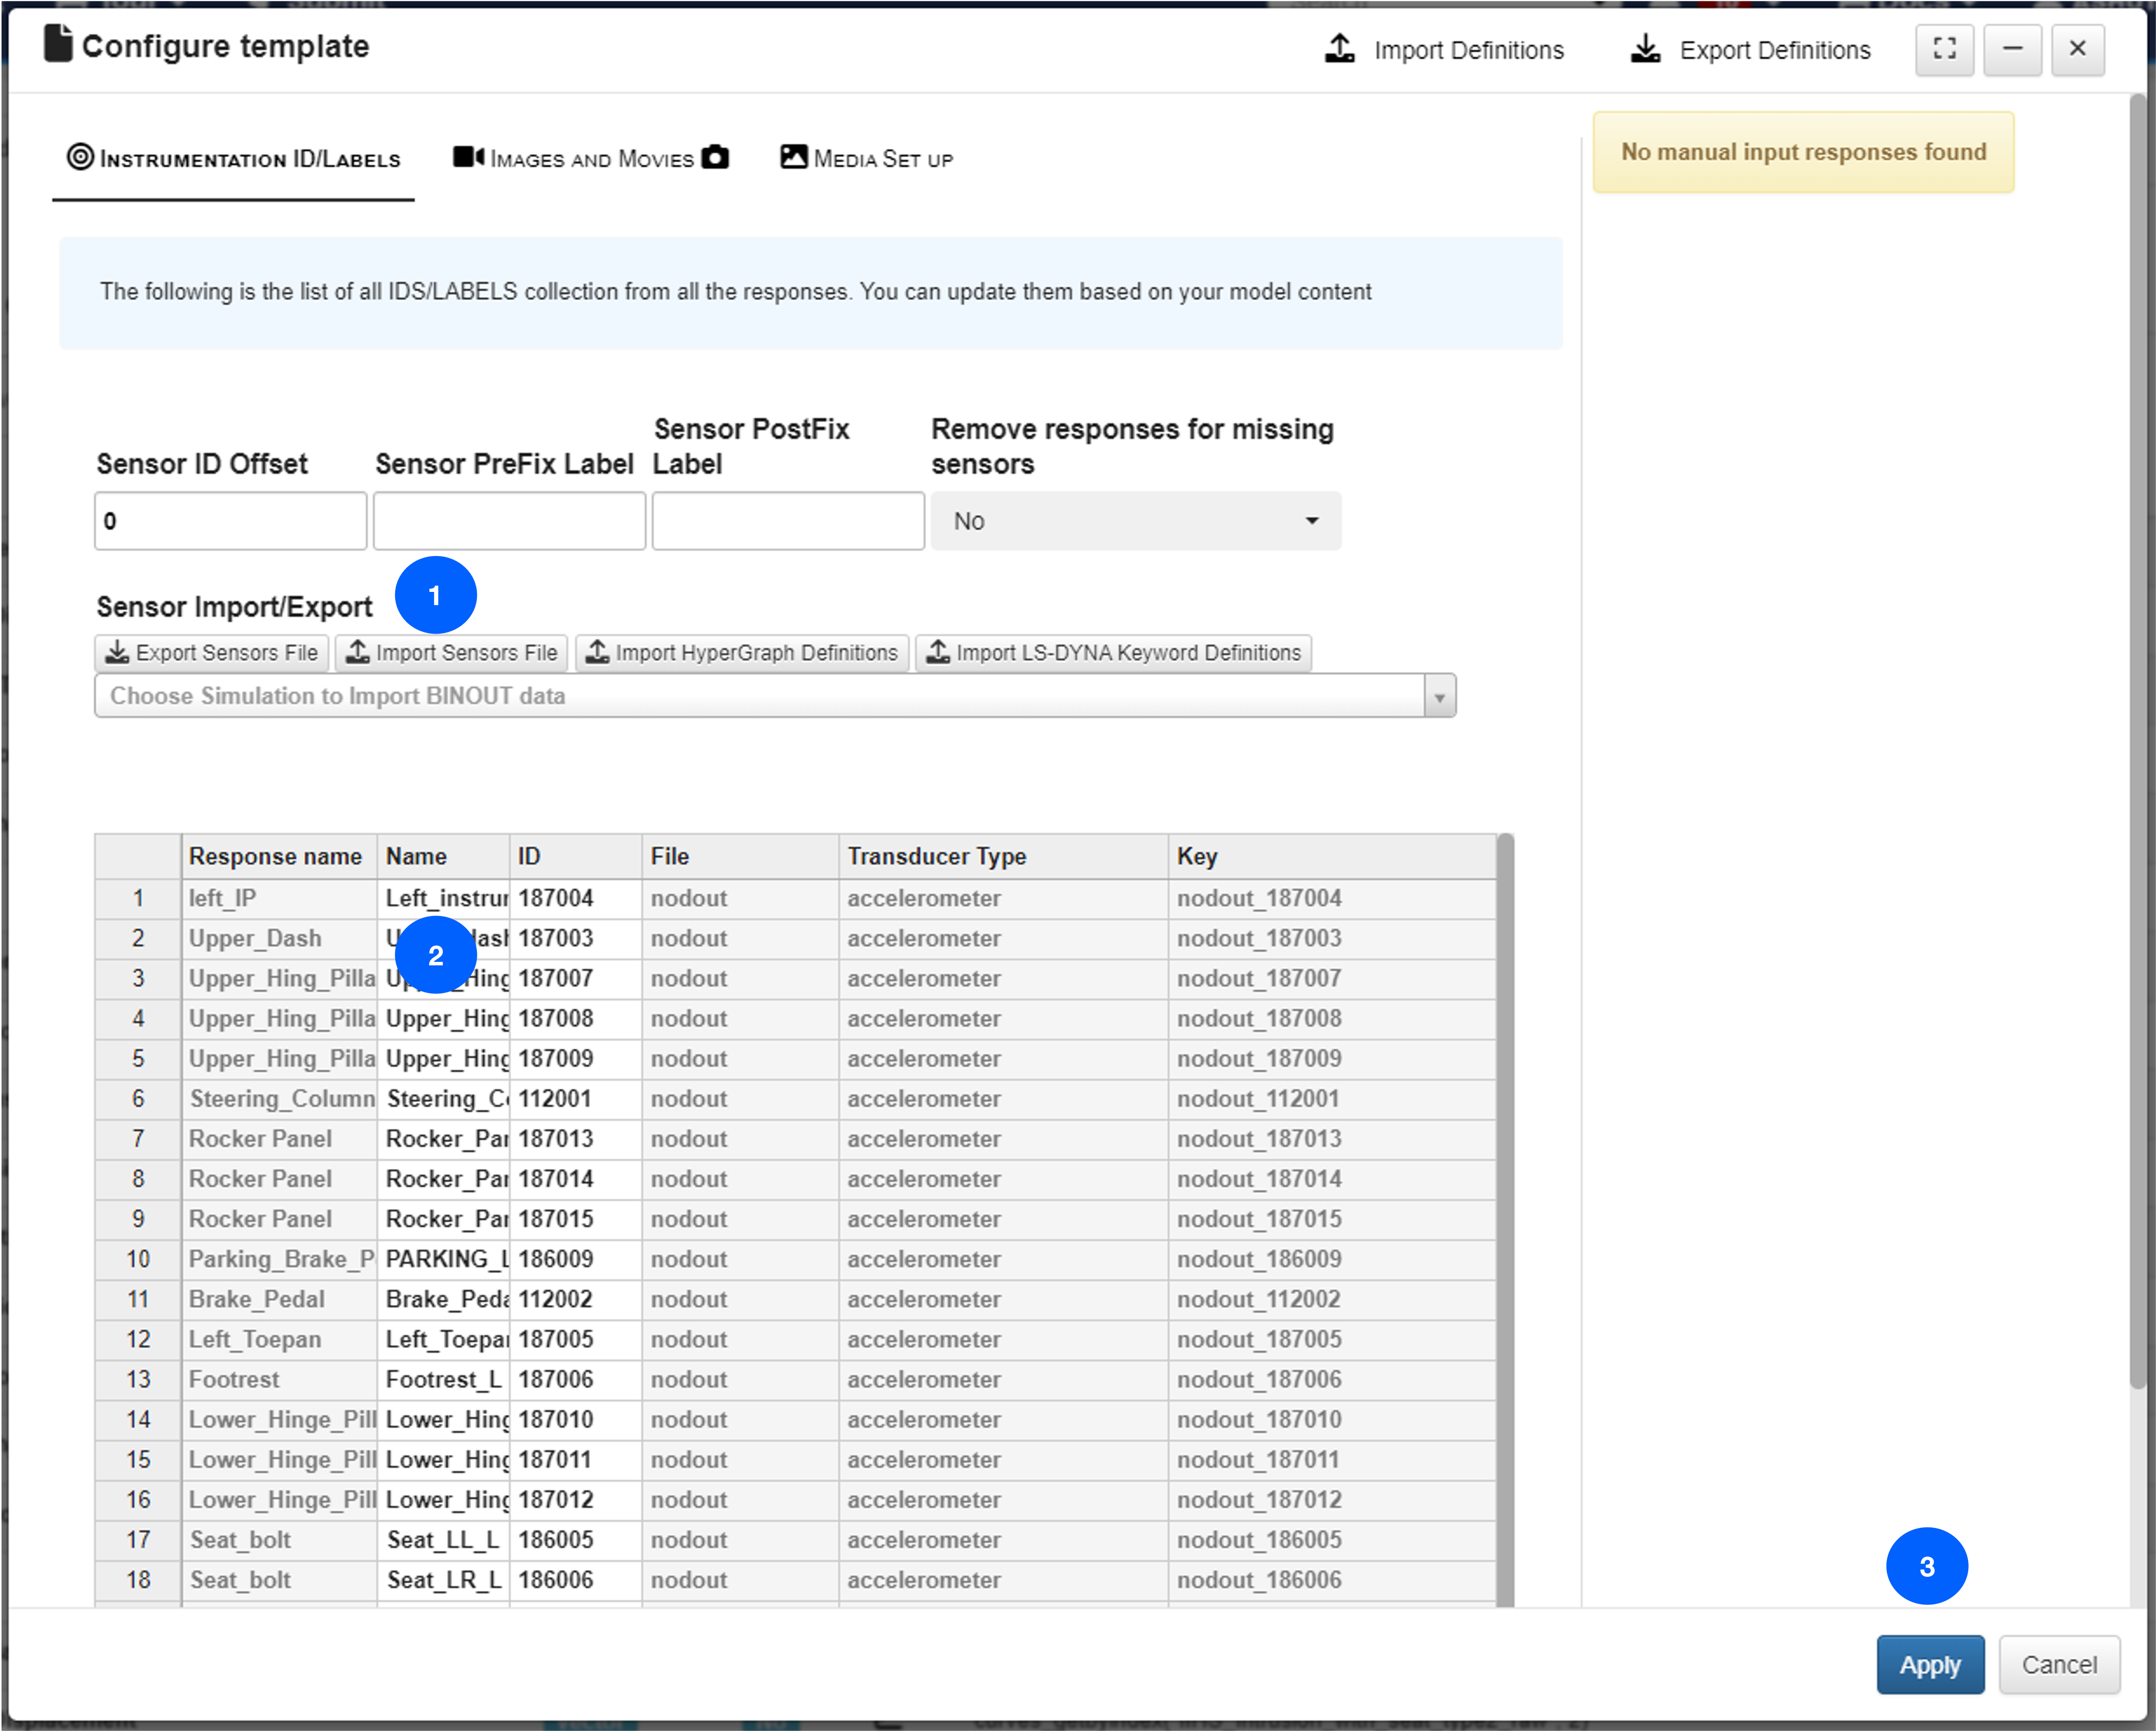
Figure 12: Import Sensors File
Step 1d. Add Template Condition for Simulation application
Let’s go to the Conditions tab in our Template so it can automatically be applied to specified Simulations. Conditions allow us to tell the HPC to apply a template automatically to a solving simulation. We indicate a directive for the HPC to look for in the simulation that will link it to the template. This template has a condition to look for “SORB” in the simulation name. Feel free to edit or add any conditions. To learn how to add a condition navigate to this section.
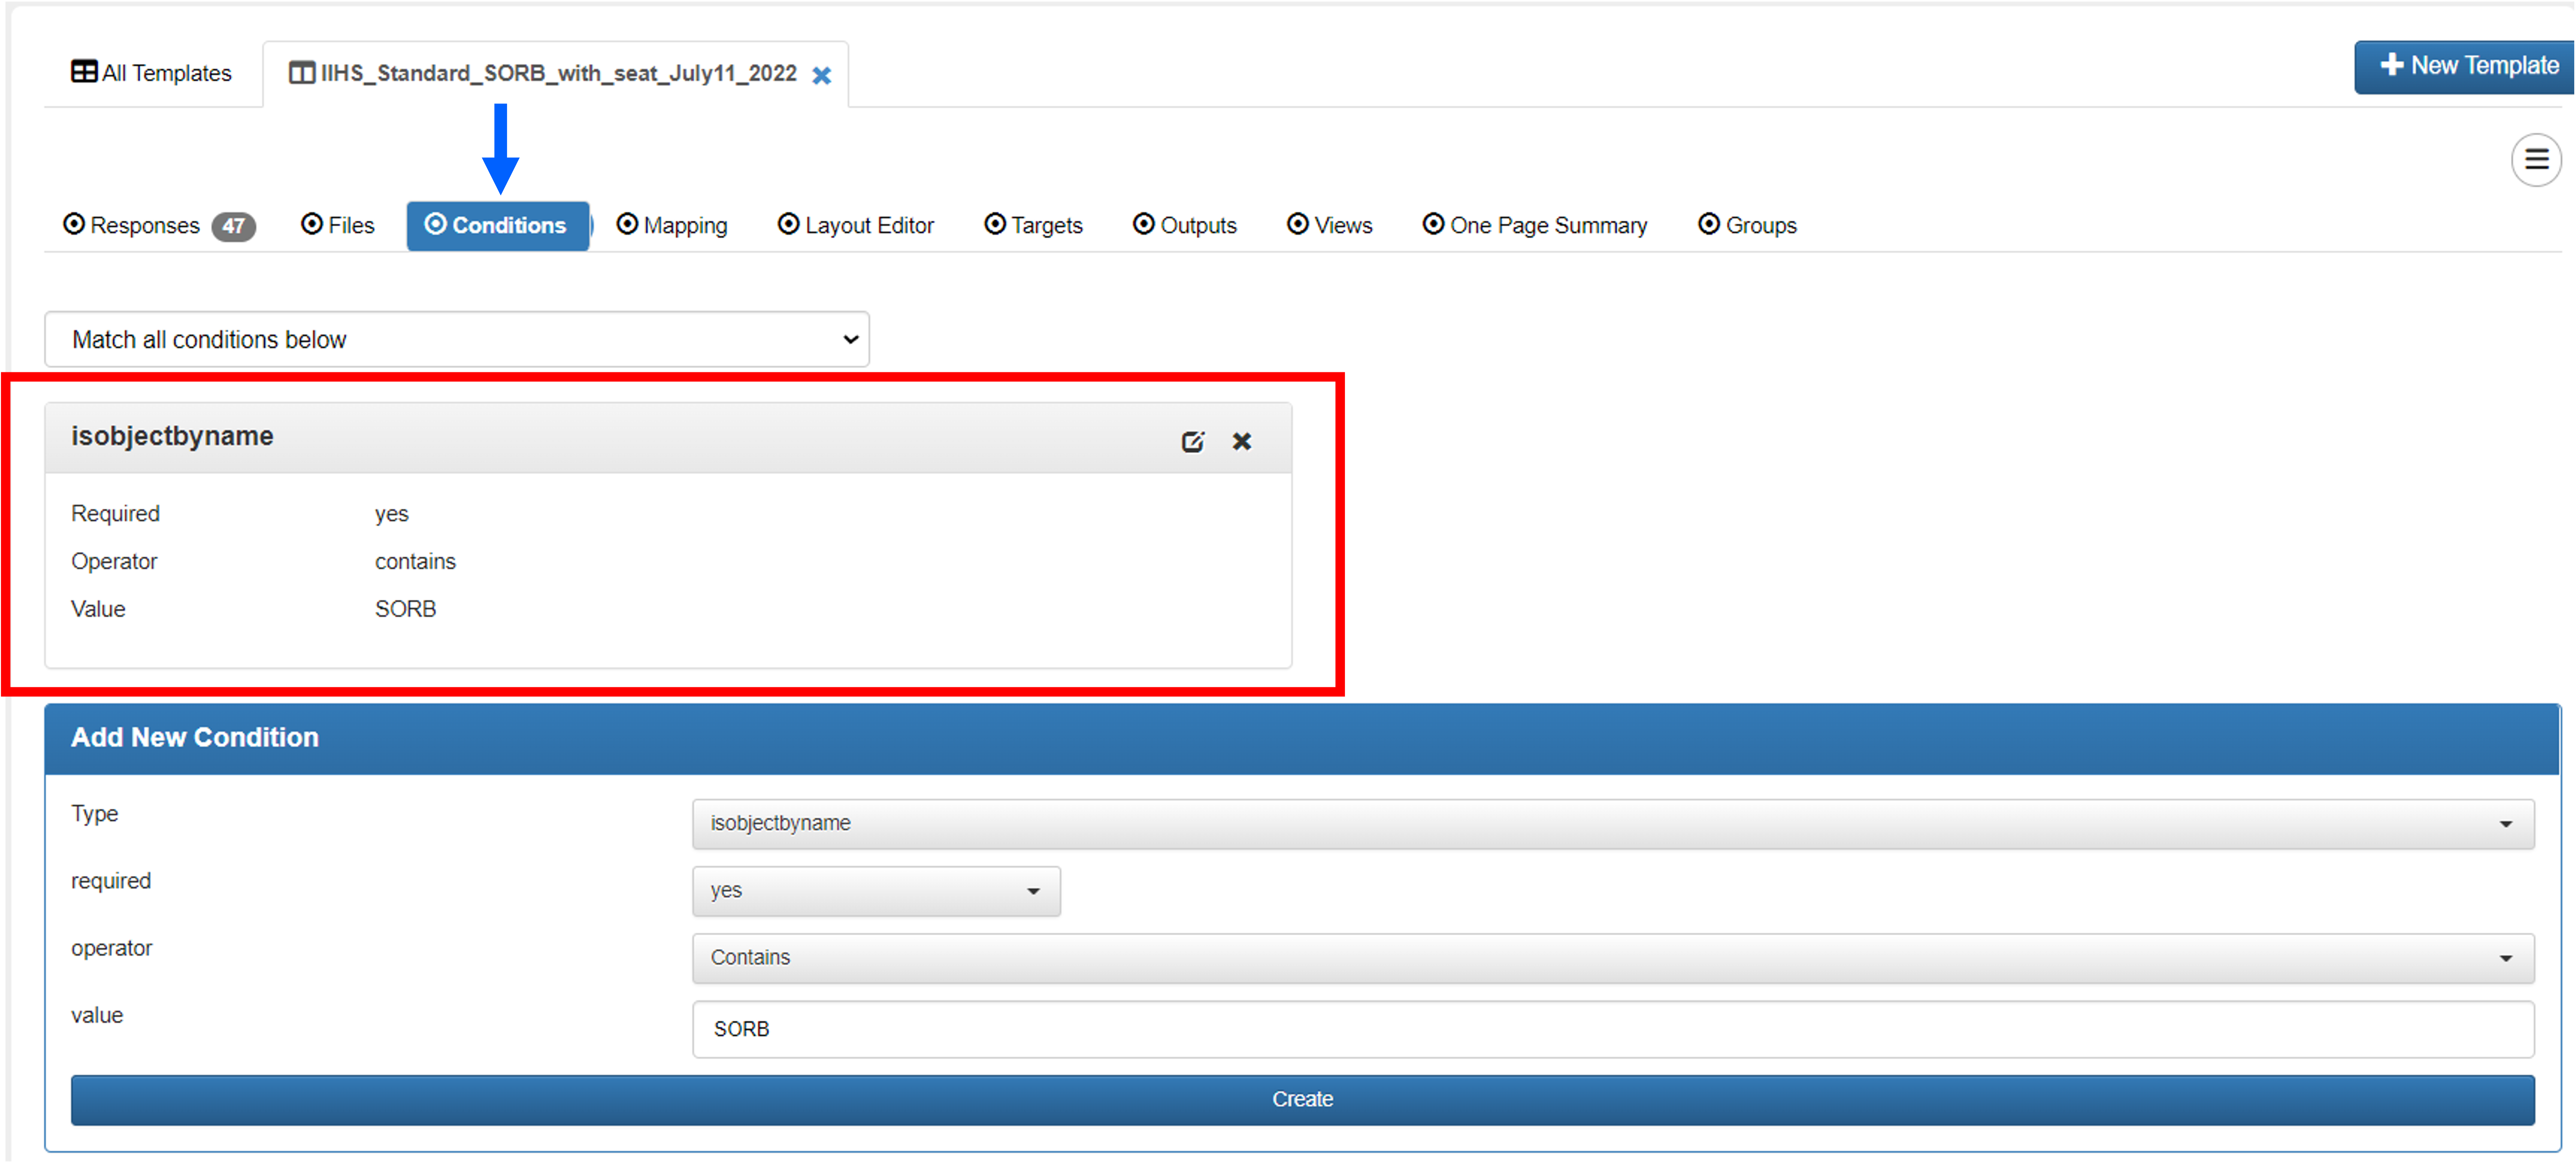
Figure 13 Example Submit Command: With the above condition, the following simulation named ‘IIHS_SORB.k’ will use the SORB template since the simulation name contains is ‘SORB’
Step 2. Using IIHS SORB Template
Once our template has been configured, we can now submit our simulation for comparing our template responses. Check out this section to learn how to submit a simulation.
Once our simulation is solved (click here to see how to preview data while it’s solving), we’ll navigate to the Simulations application page to compare our responses and visualizer them in Simlytiks.
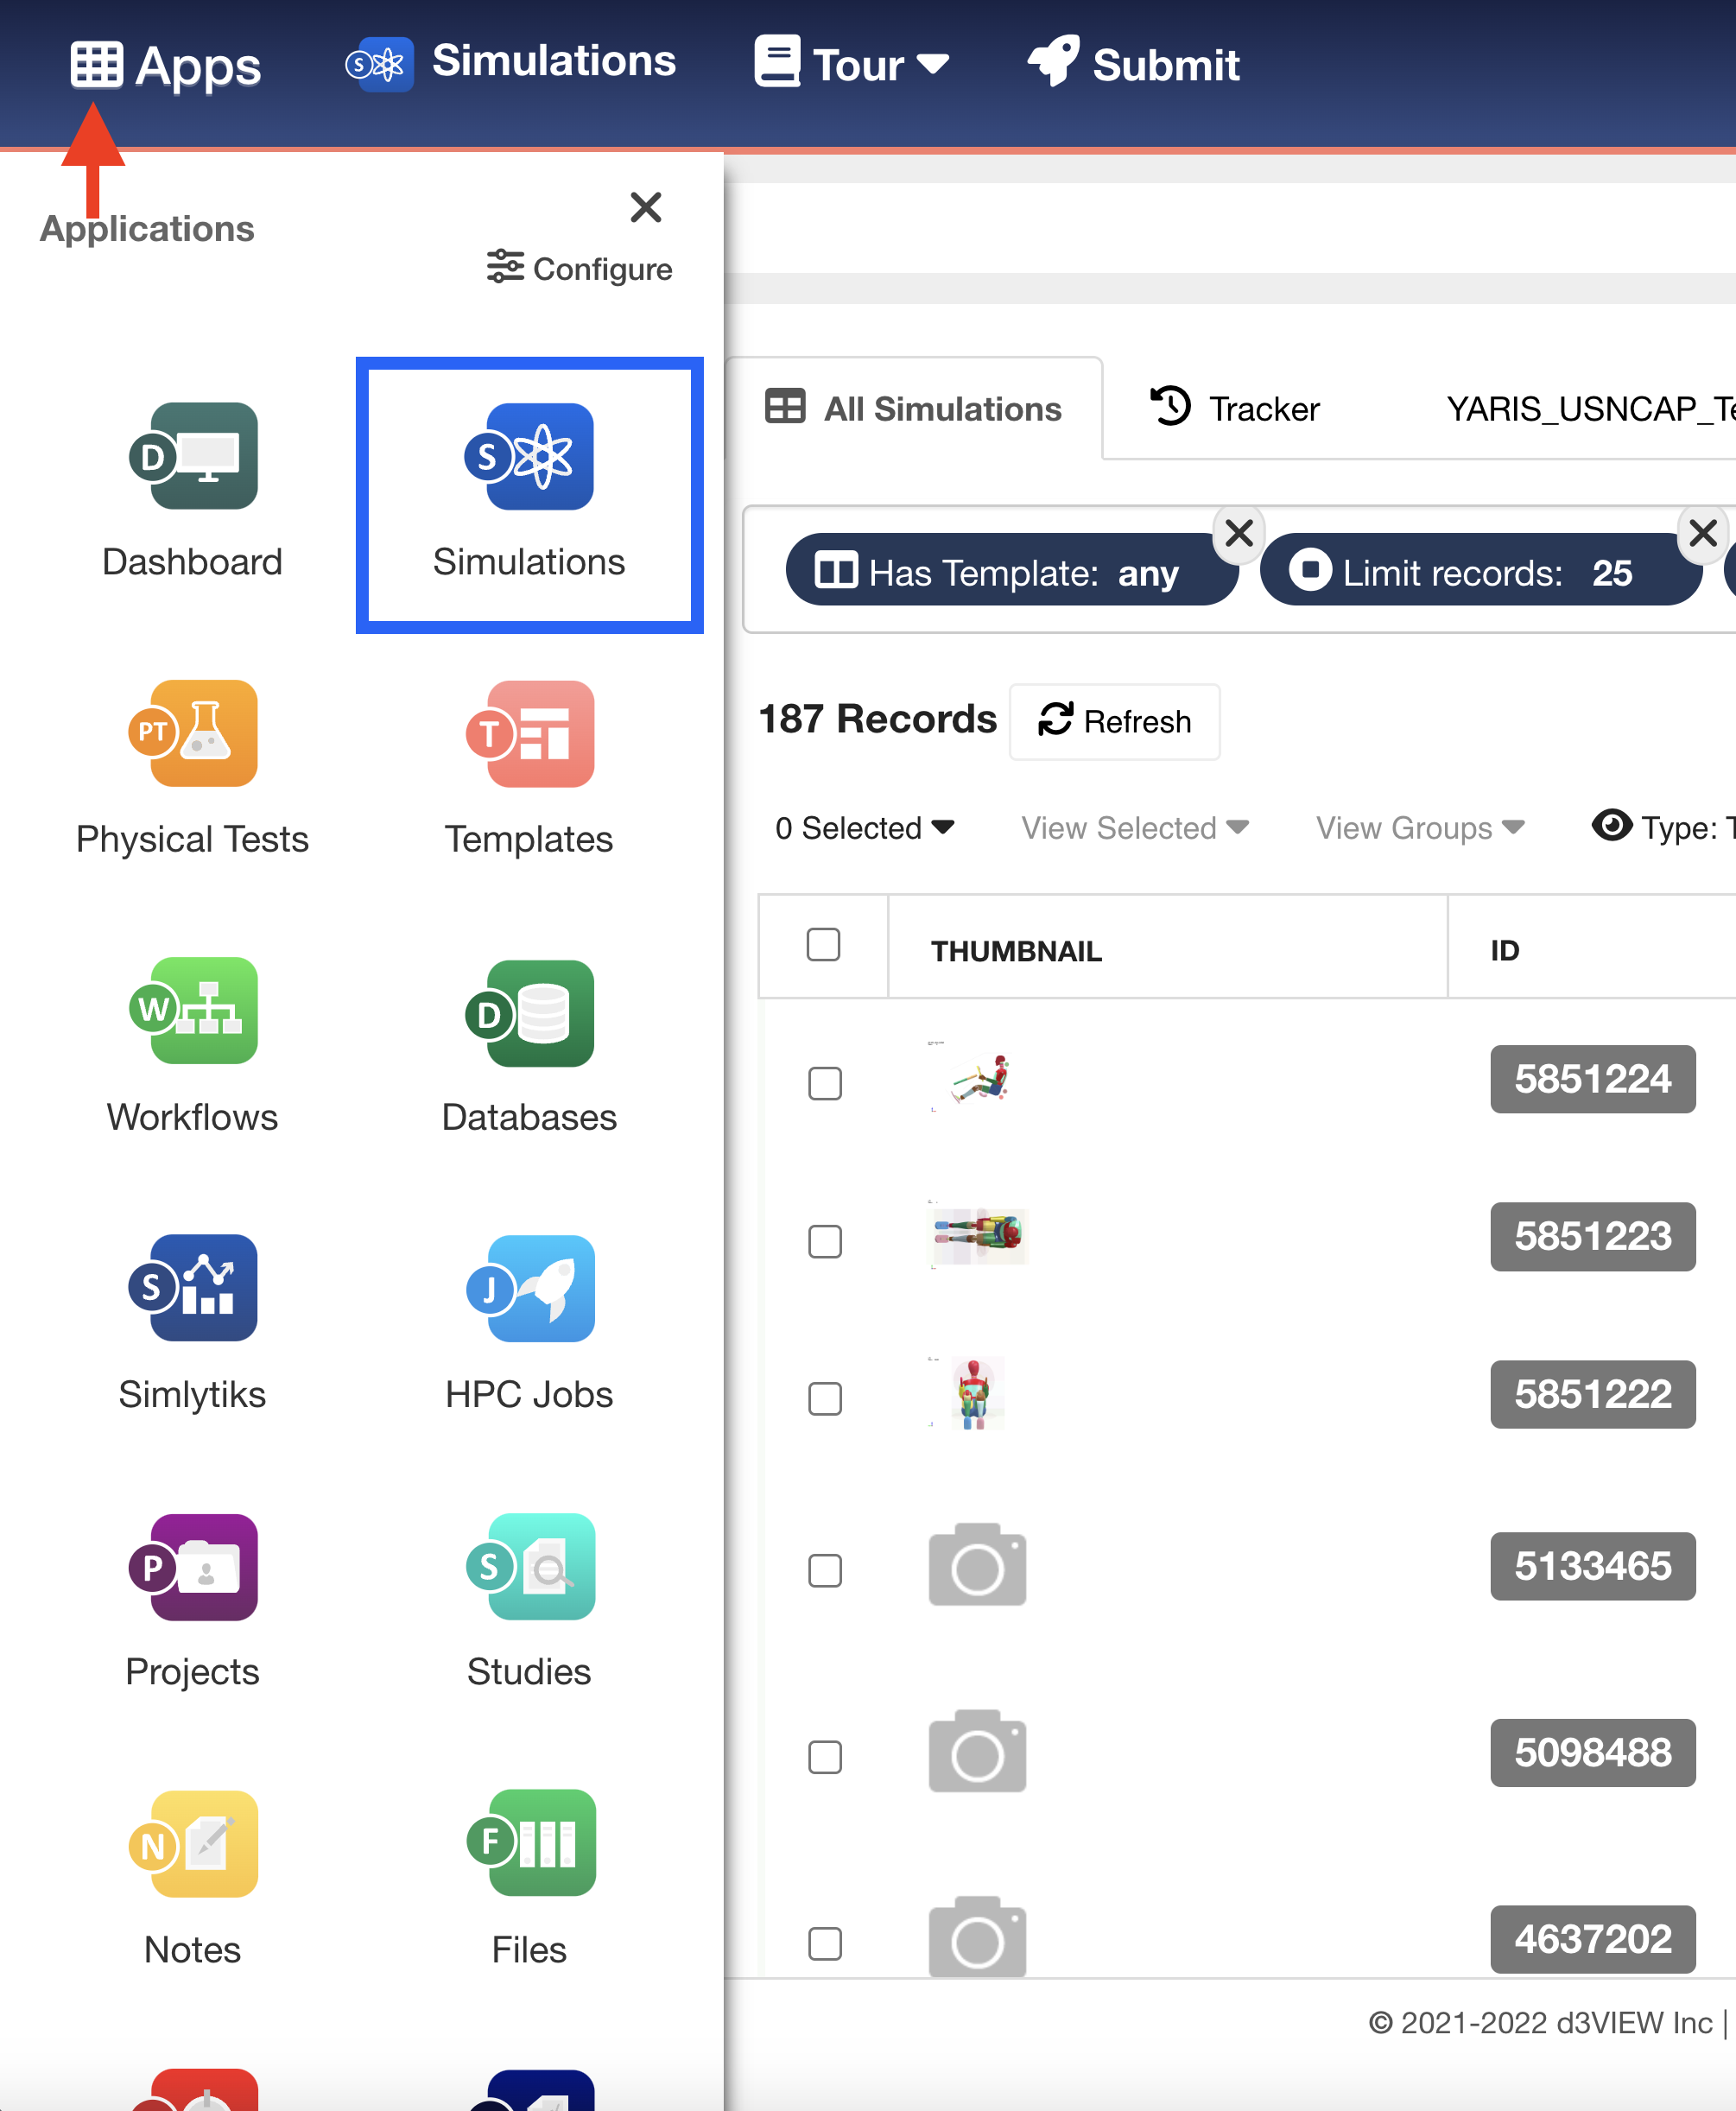
Figure 12: Navigate to Simulations
Step 2a. Choose Simulation and Compare
Select the simulations we want to compare (1), then right-click to choose Compare Responses (2).
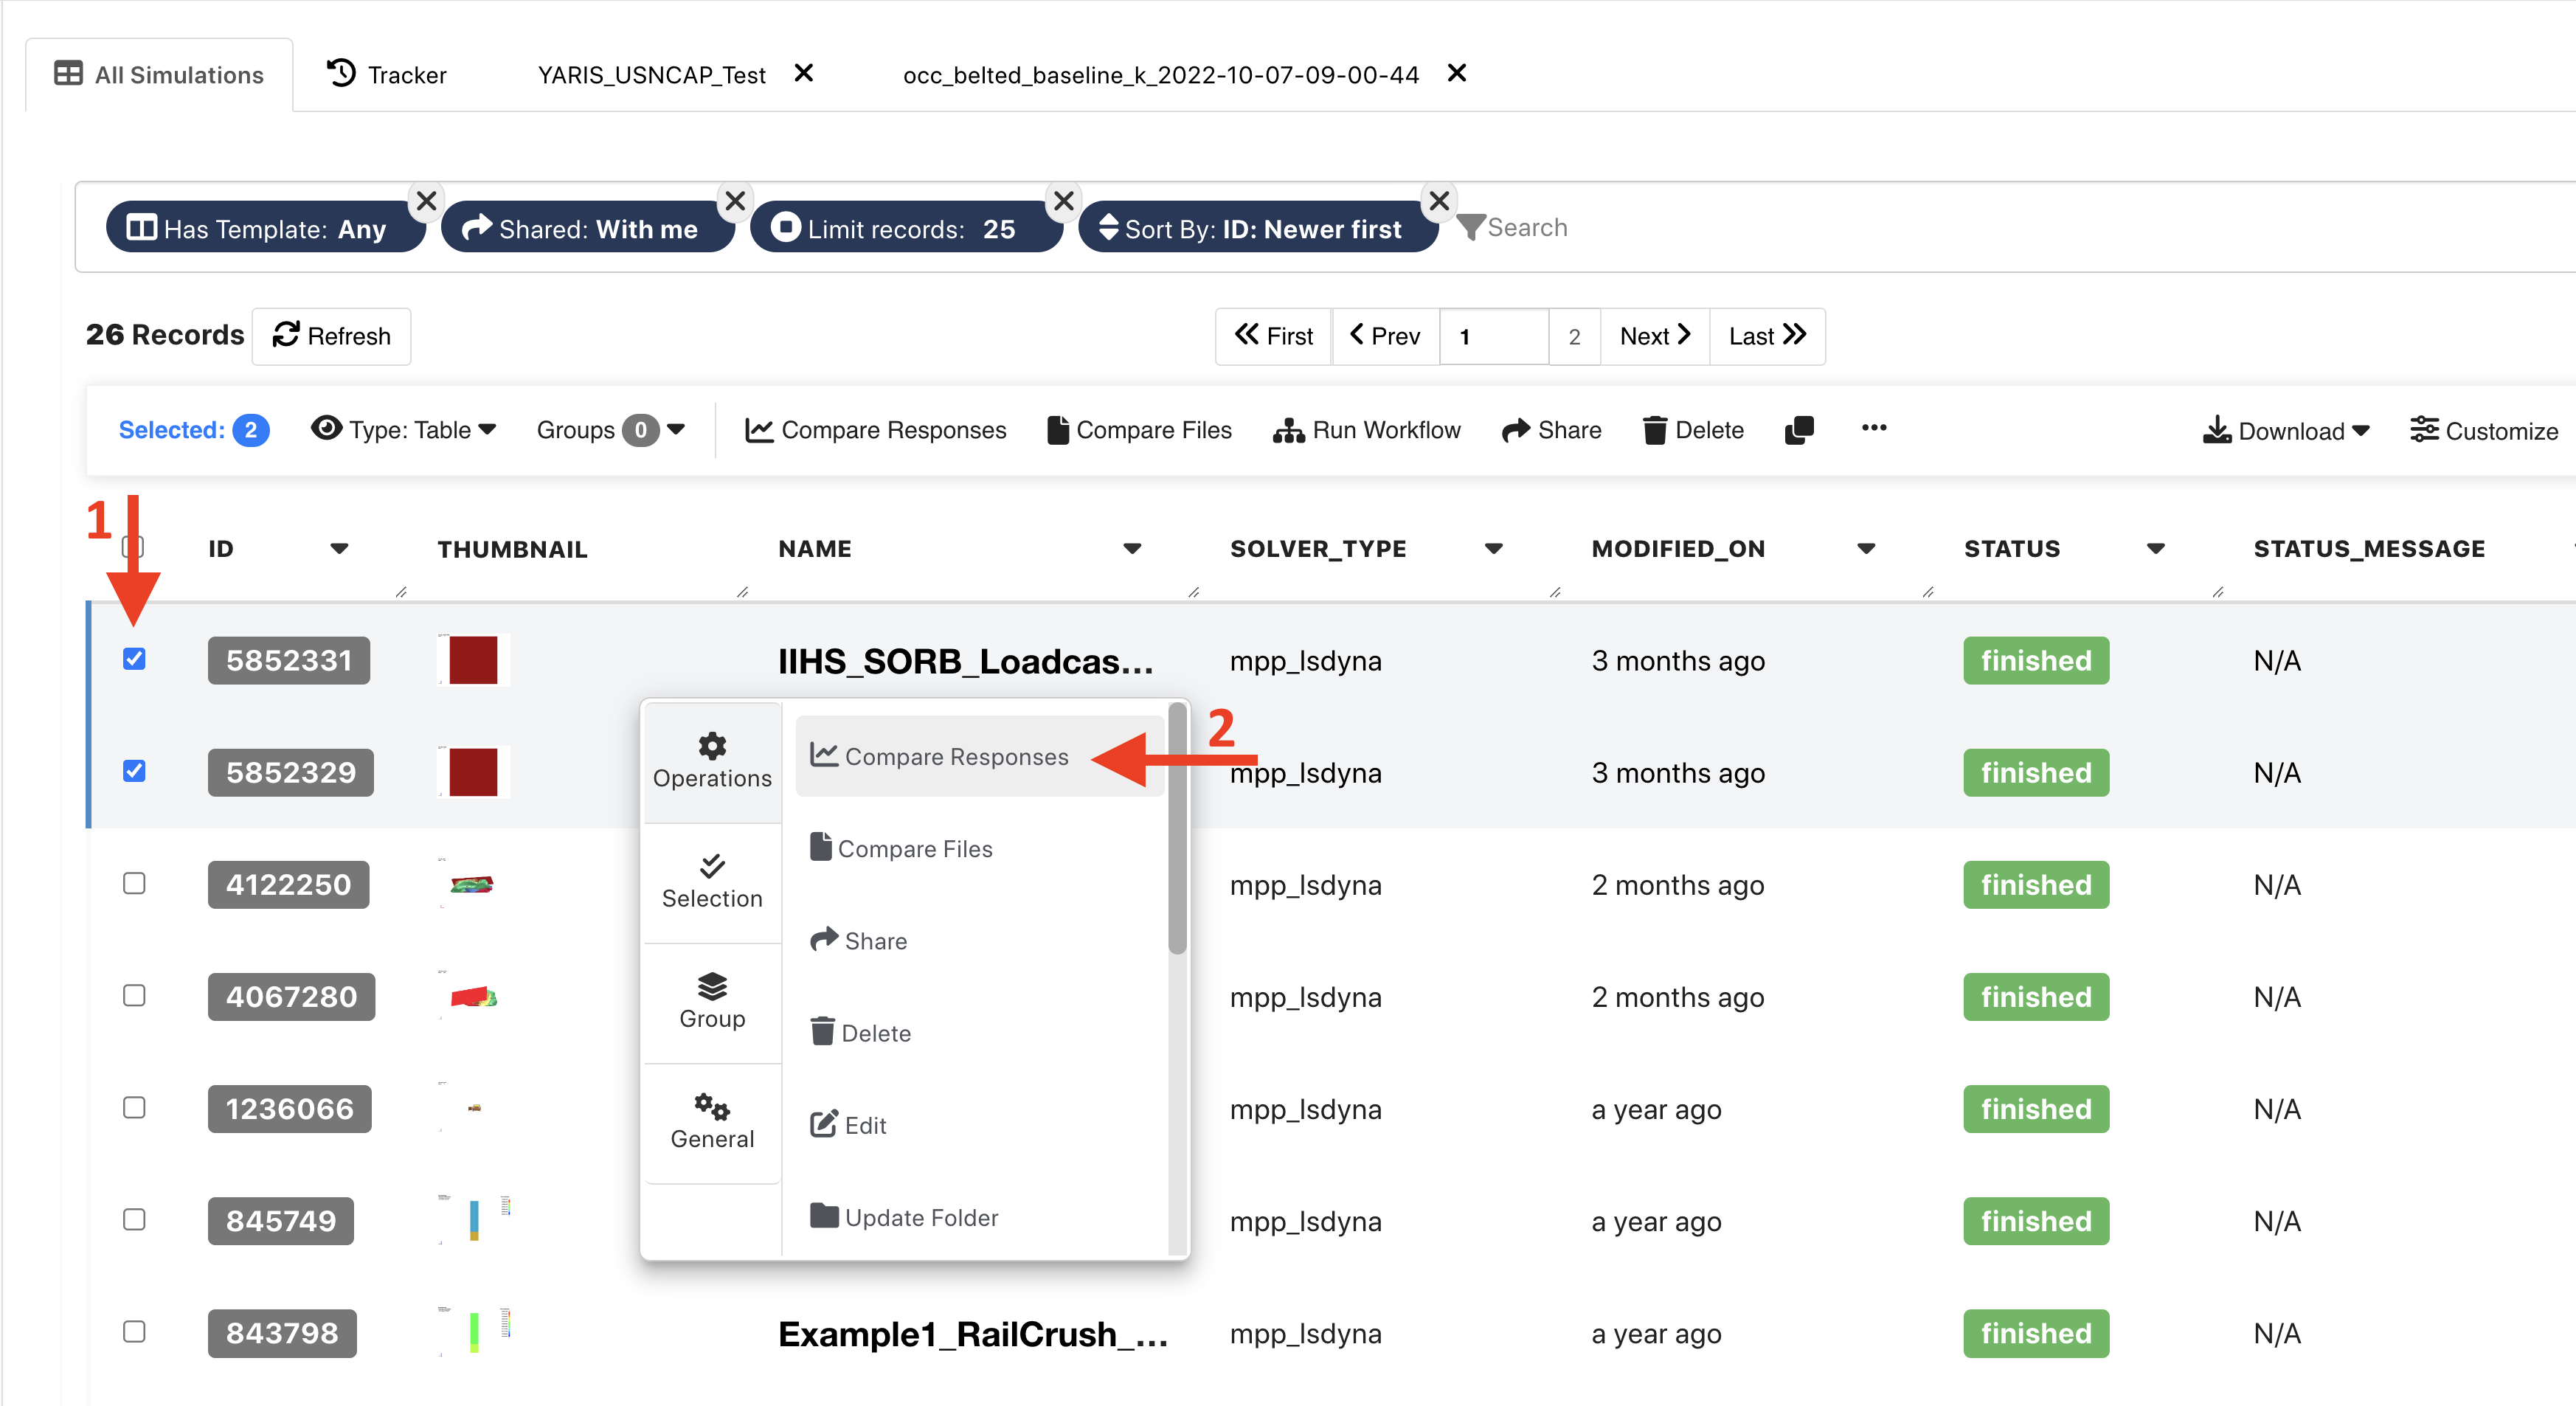
Figure 15: Choose Simulations and Compare Responses
Step 2b. Choose Simulation and Compare
Select the template that has been applied or needs to be applied to the simulation (1), then click Compare (2).
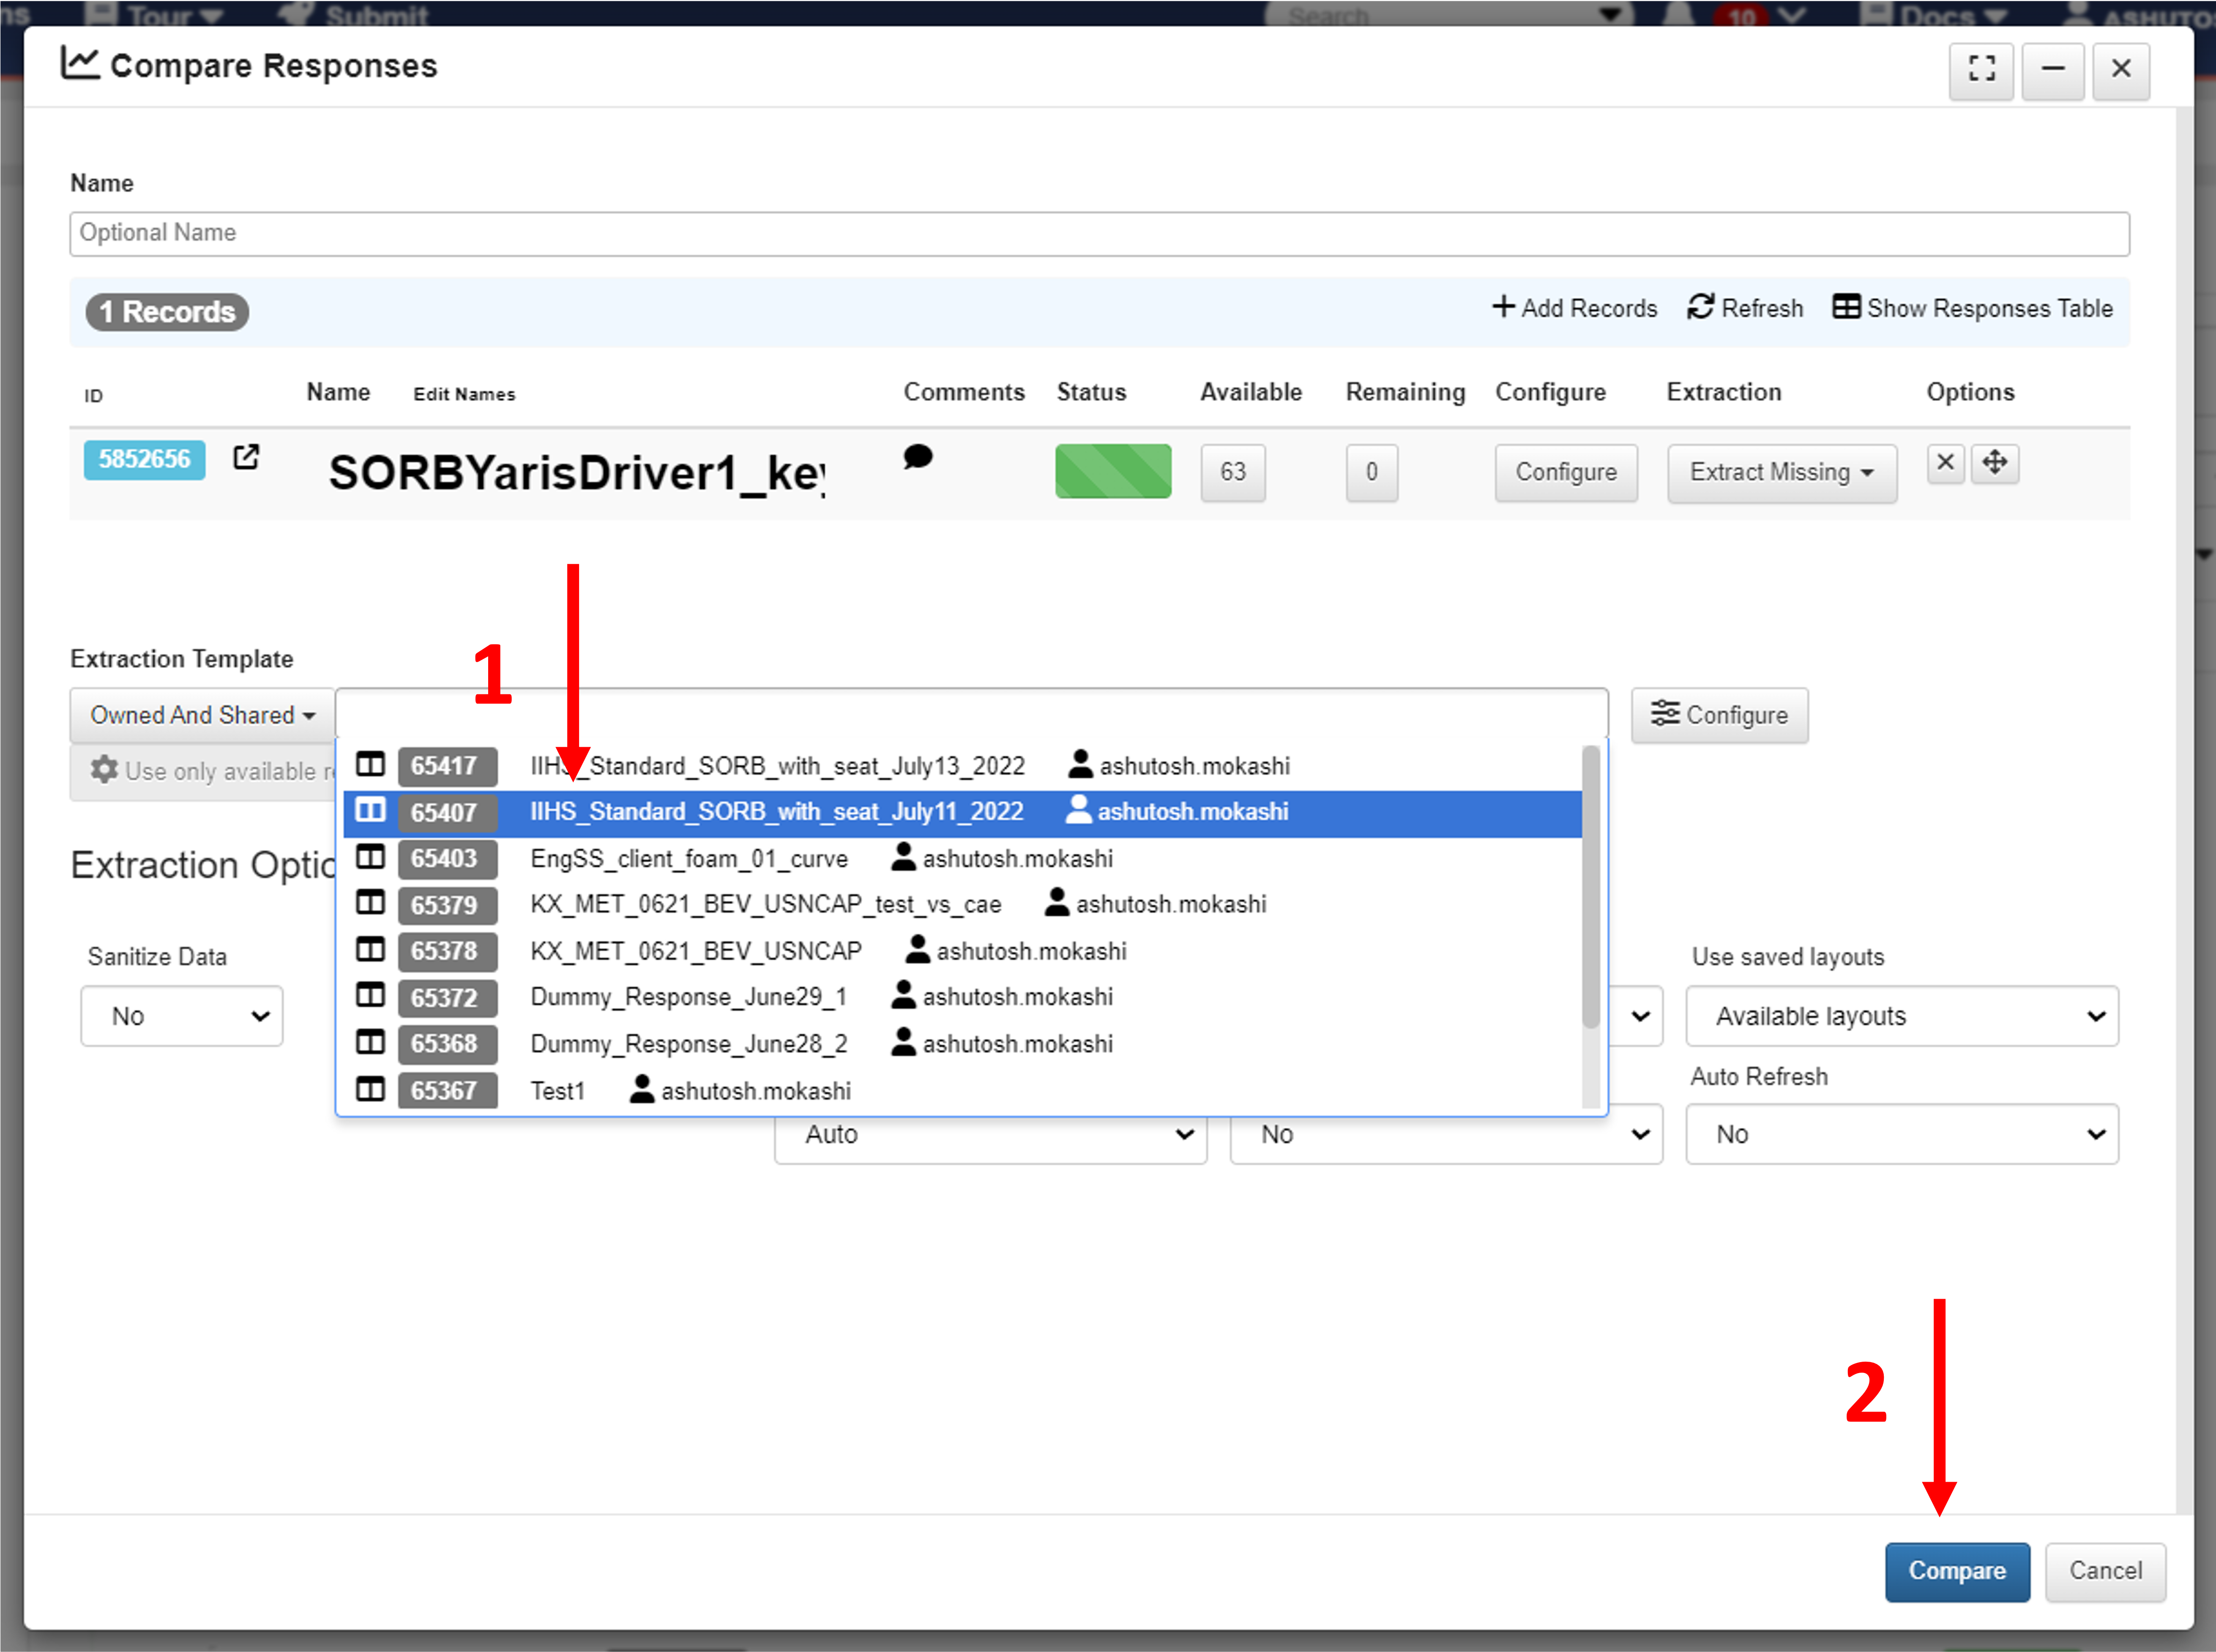
Figure 16: Choose Template and Compare
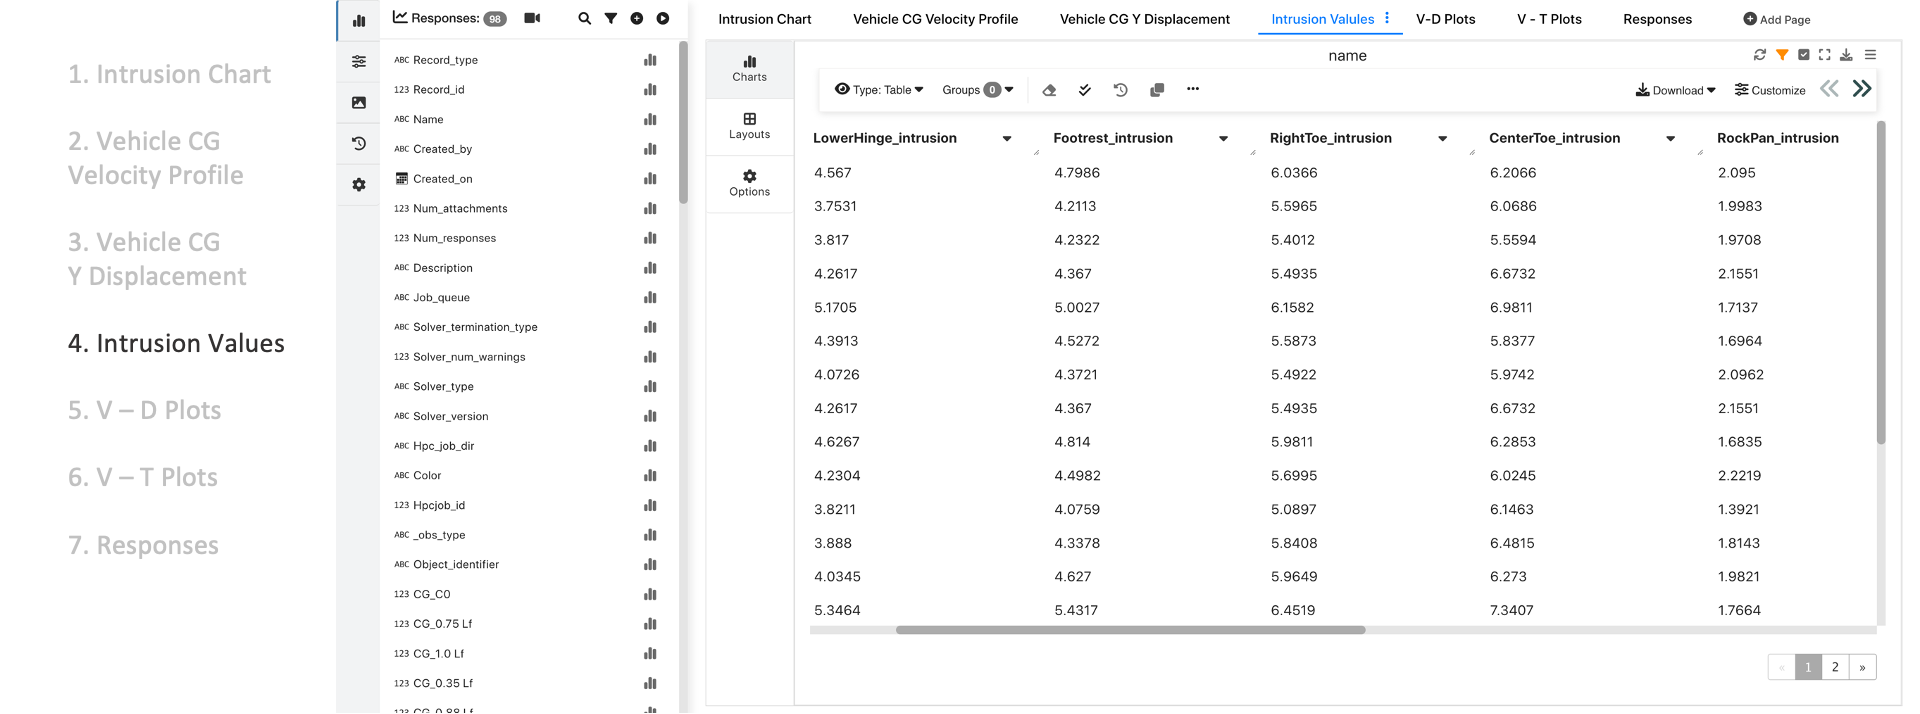
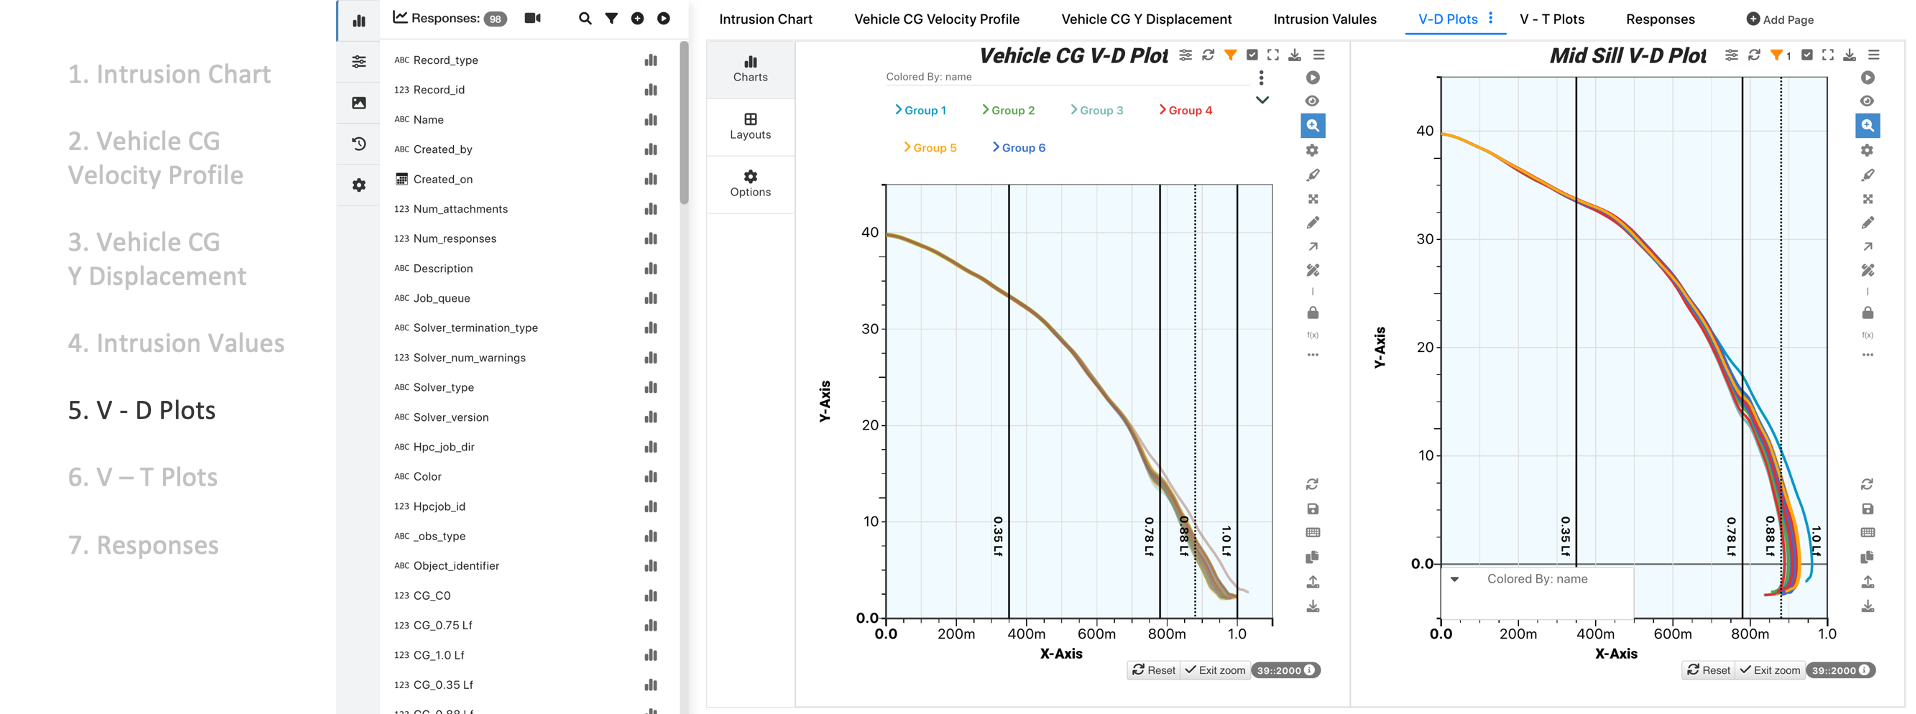
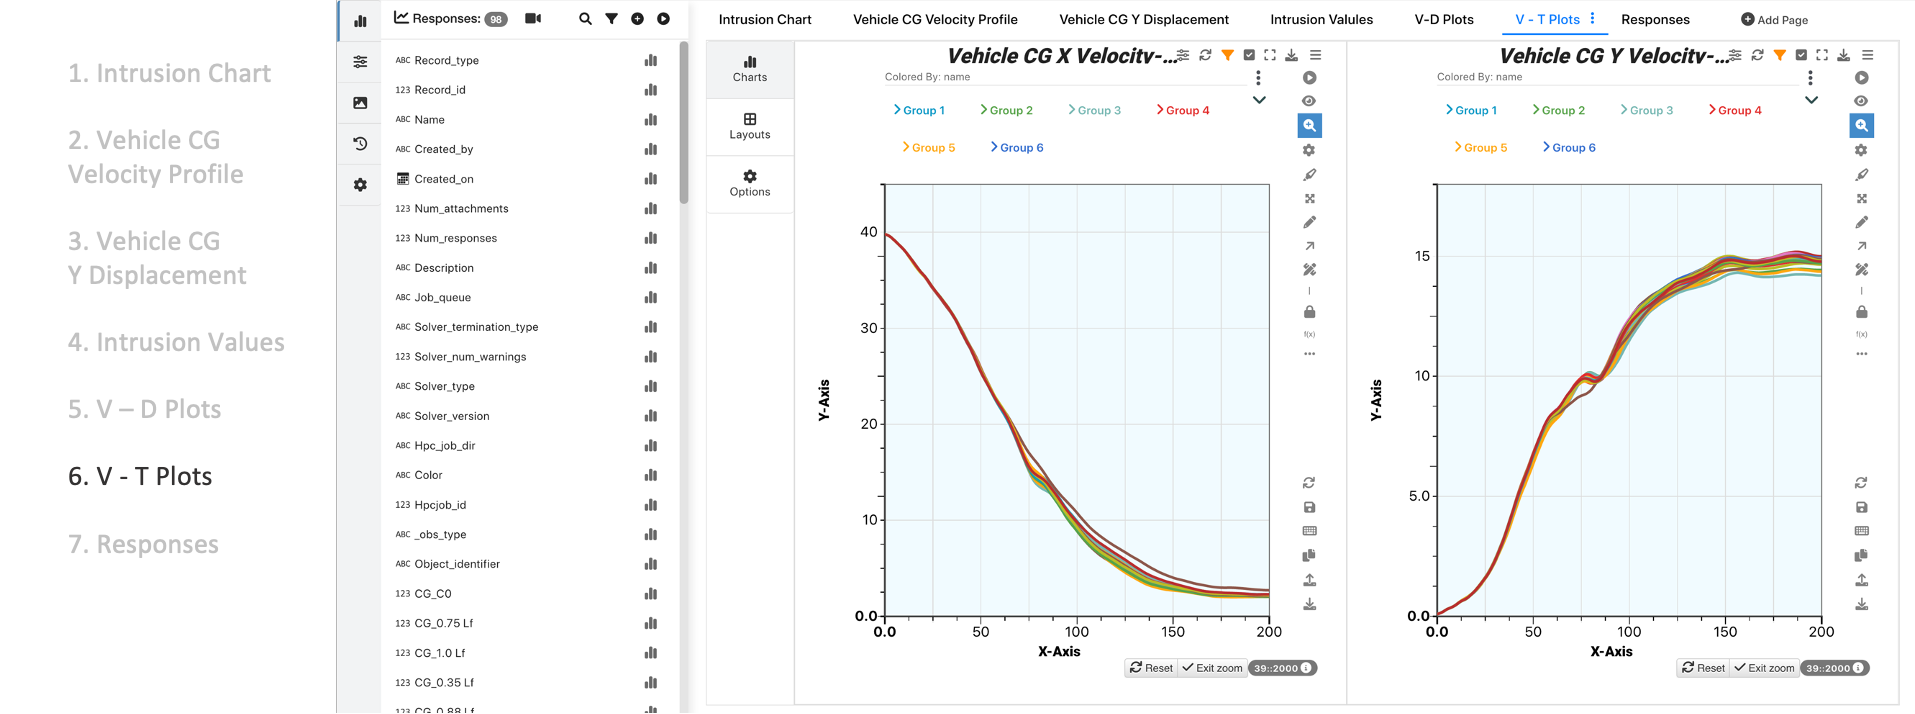
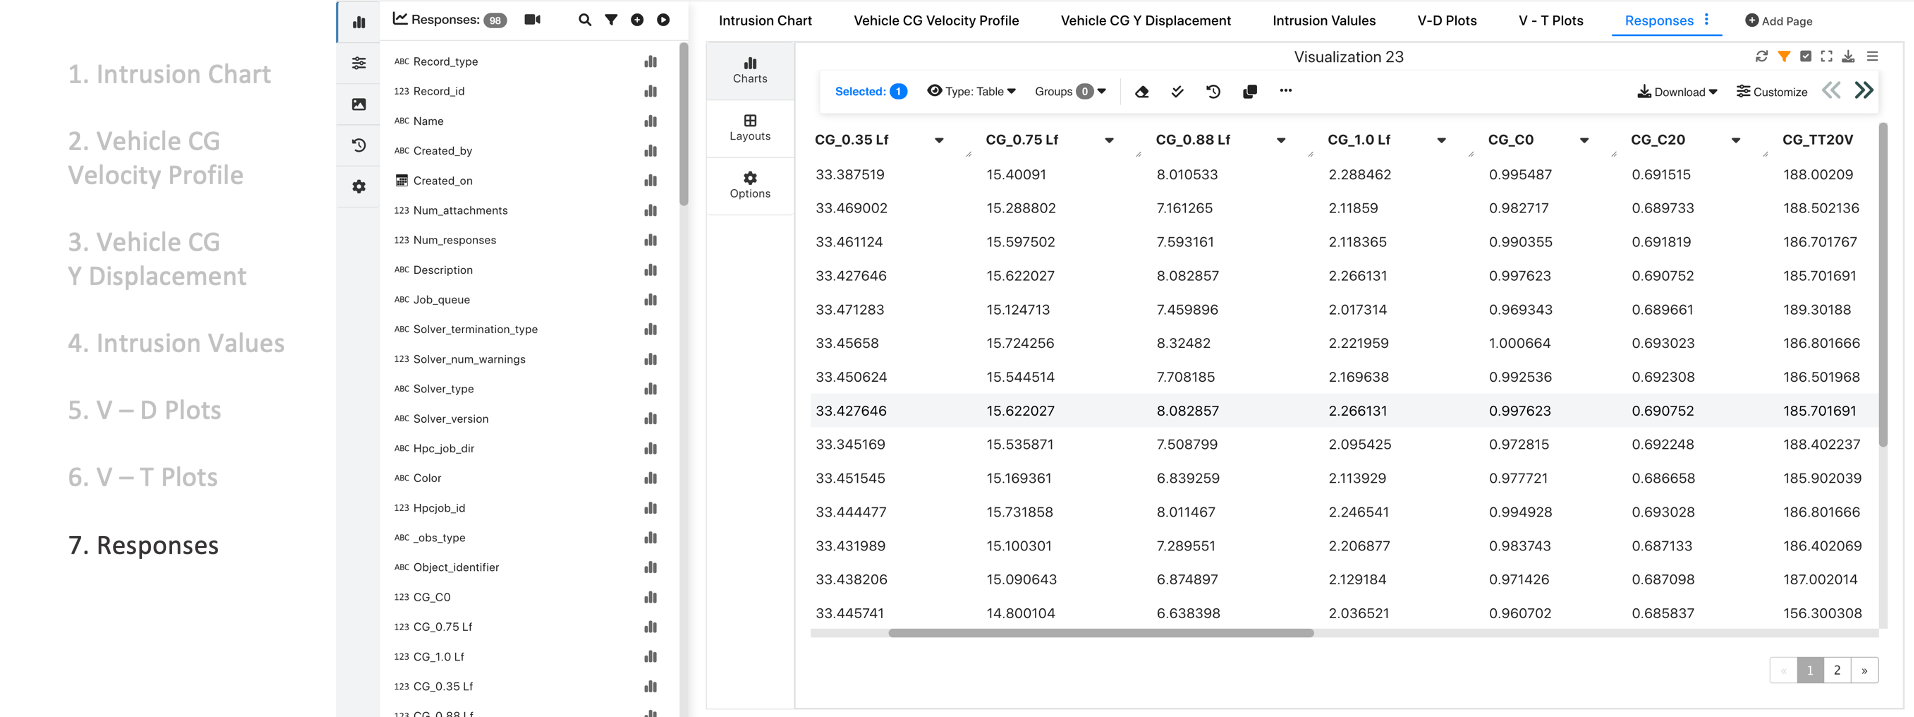
Step 3. Viewing Comparison in Simlytiks
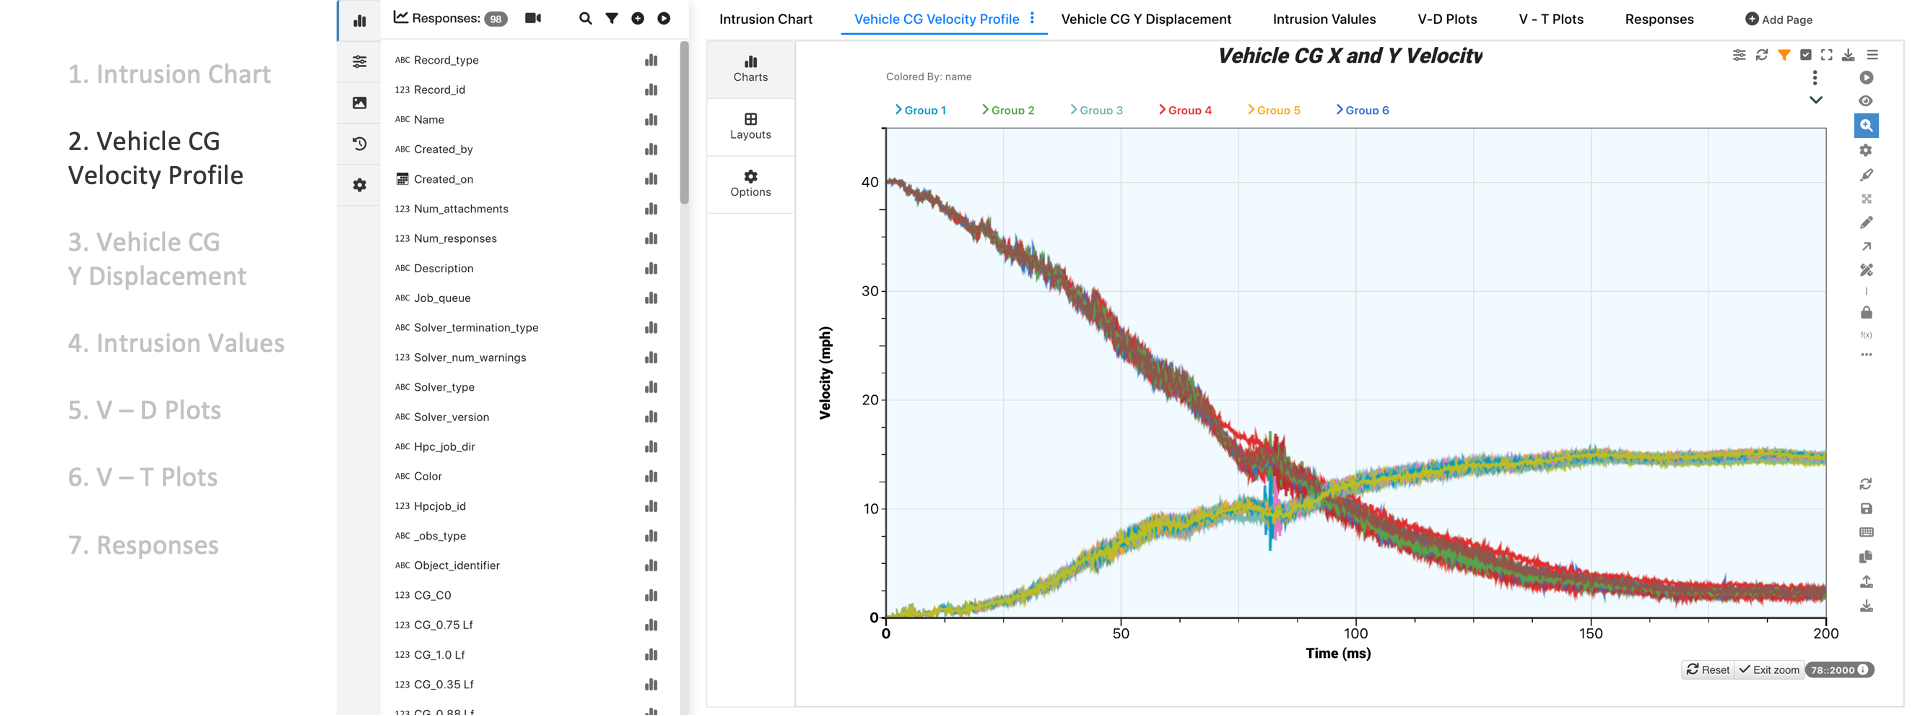
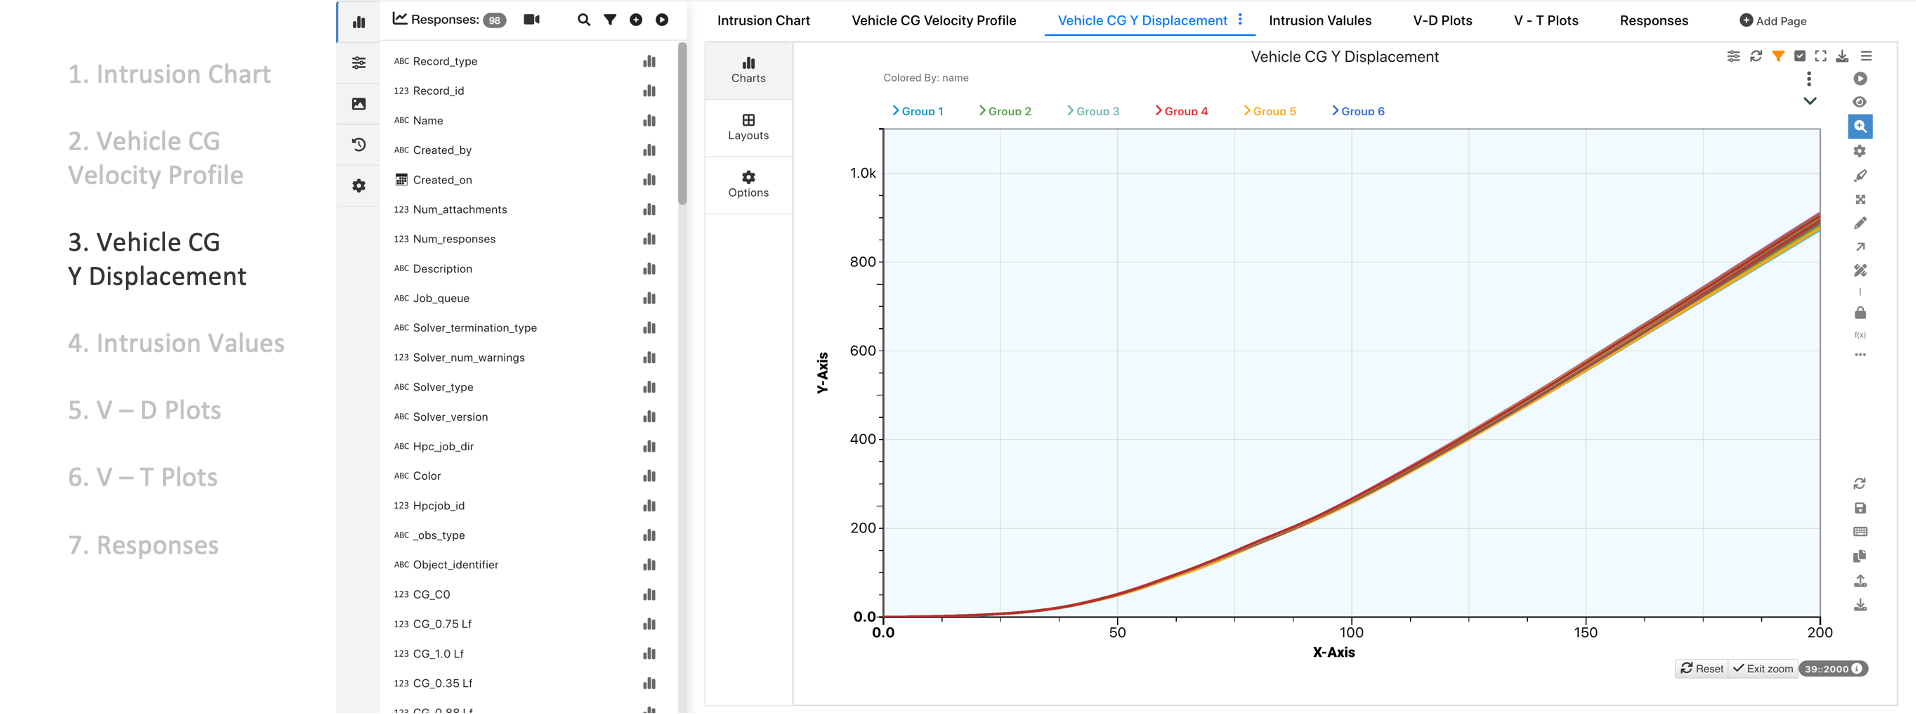
Here are some visualizations we’ll see in Simlytiks using the IIHS SORB template.
Step 4. Exporting and Sharing Comparison
Easily export the visualizations as a PowerPoint (1) file in the Export menu. Or, share a public web link of the entire exploration with no data-transfer with anyone by clicking on the blue Share button (2).

Figure 17: Export and Share
17.12. 163_IIHS_Side_MDB
Template Creation
- A new template can be created using the RESPONSETEMPLATE_CREATE_FROM_LIBRARY worker.
- Select the library template 163_IIHS_Side_MDB_G9)V250925 as the source for creation.
- Once the worker is executed, the system generates a new template entry under the Templates section.
- The newly created template will now be available and can be viewed in the Templates.
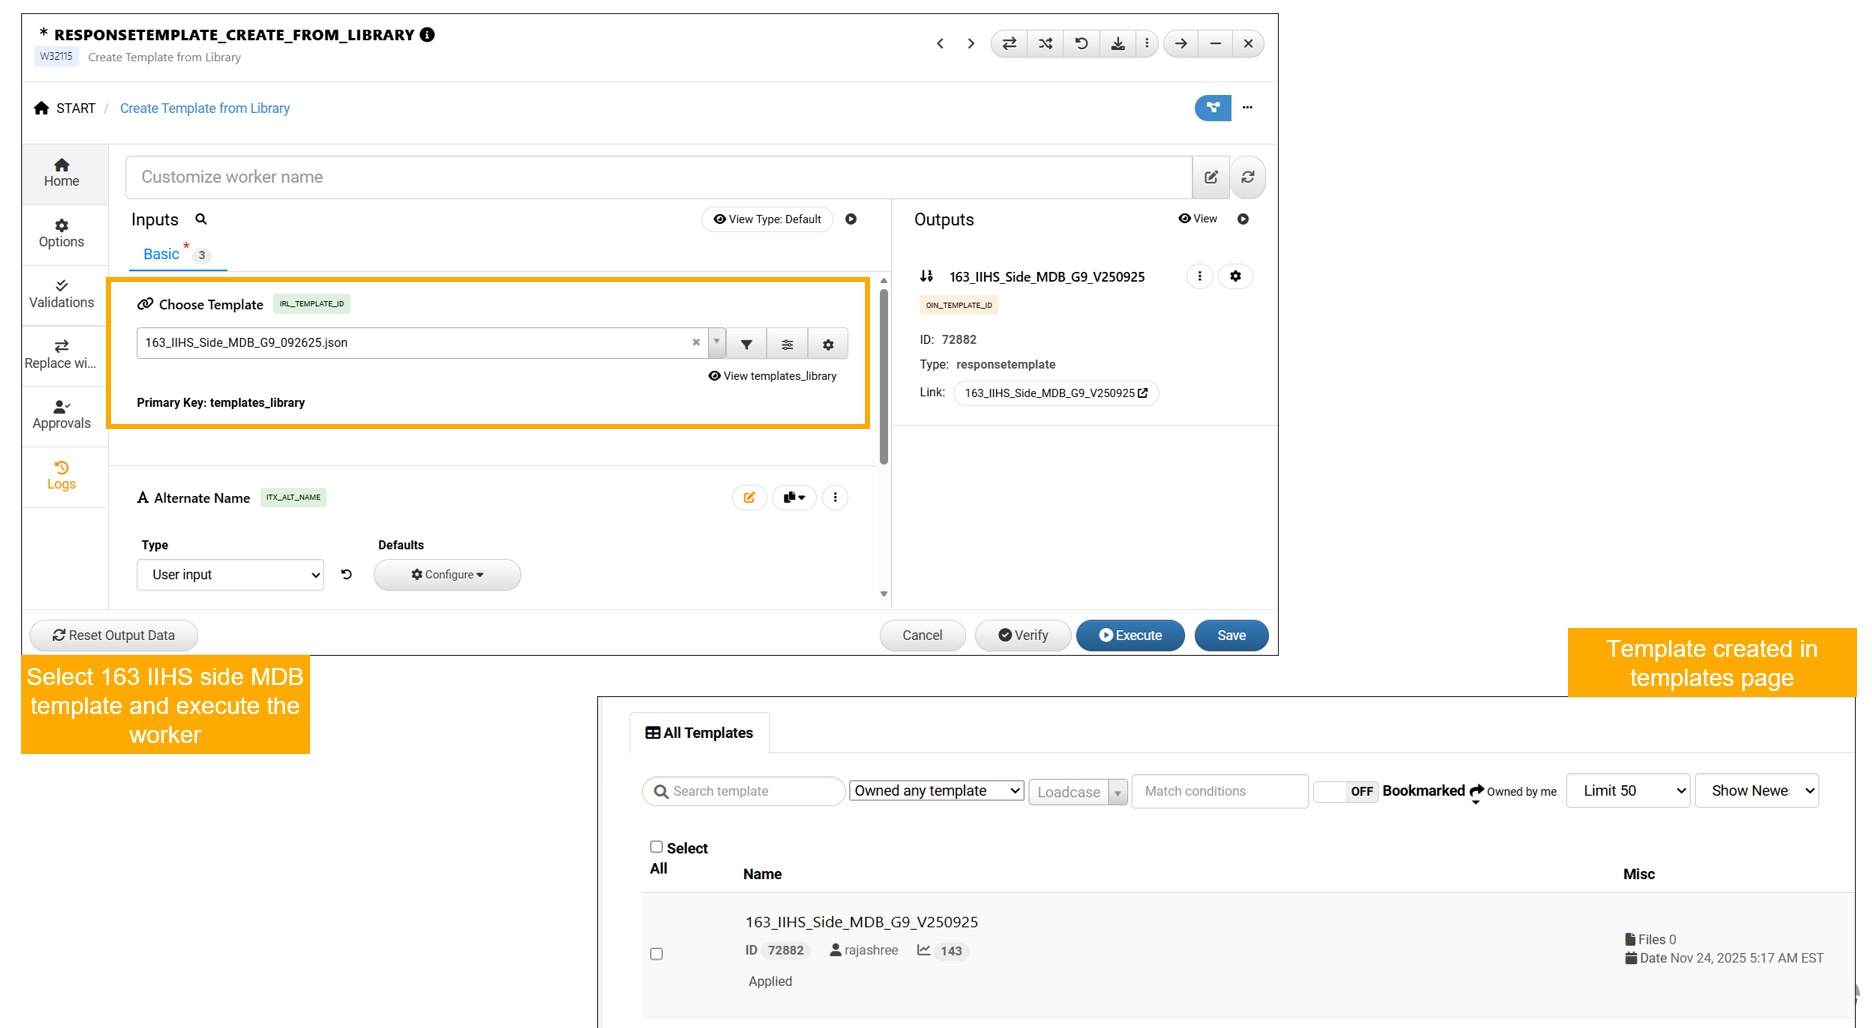
Template Creation
Opening a Template and viewing responses
Click on the template name to open and review its contents.
Upon opening the template, we’ll see under the Responses Tab all the data outputs that will be extracted from our simulation when applying this template.

Opening the Template
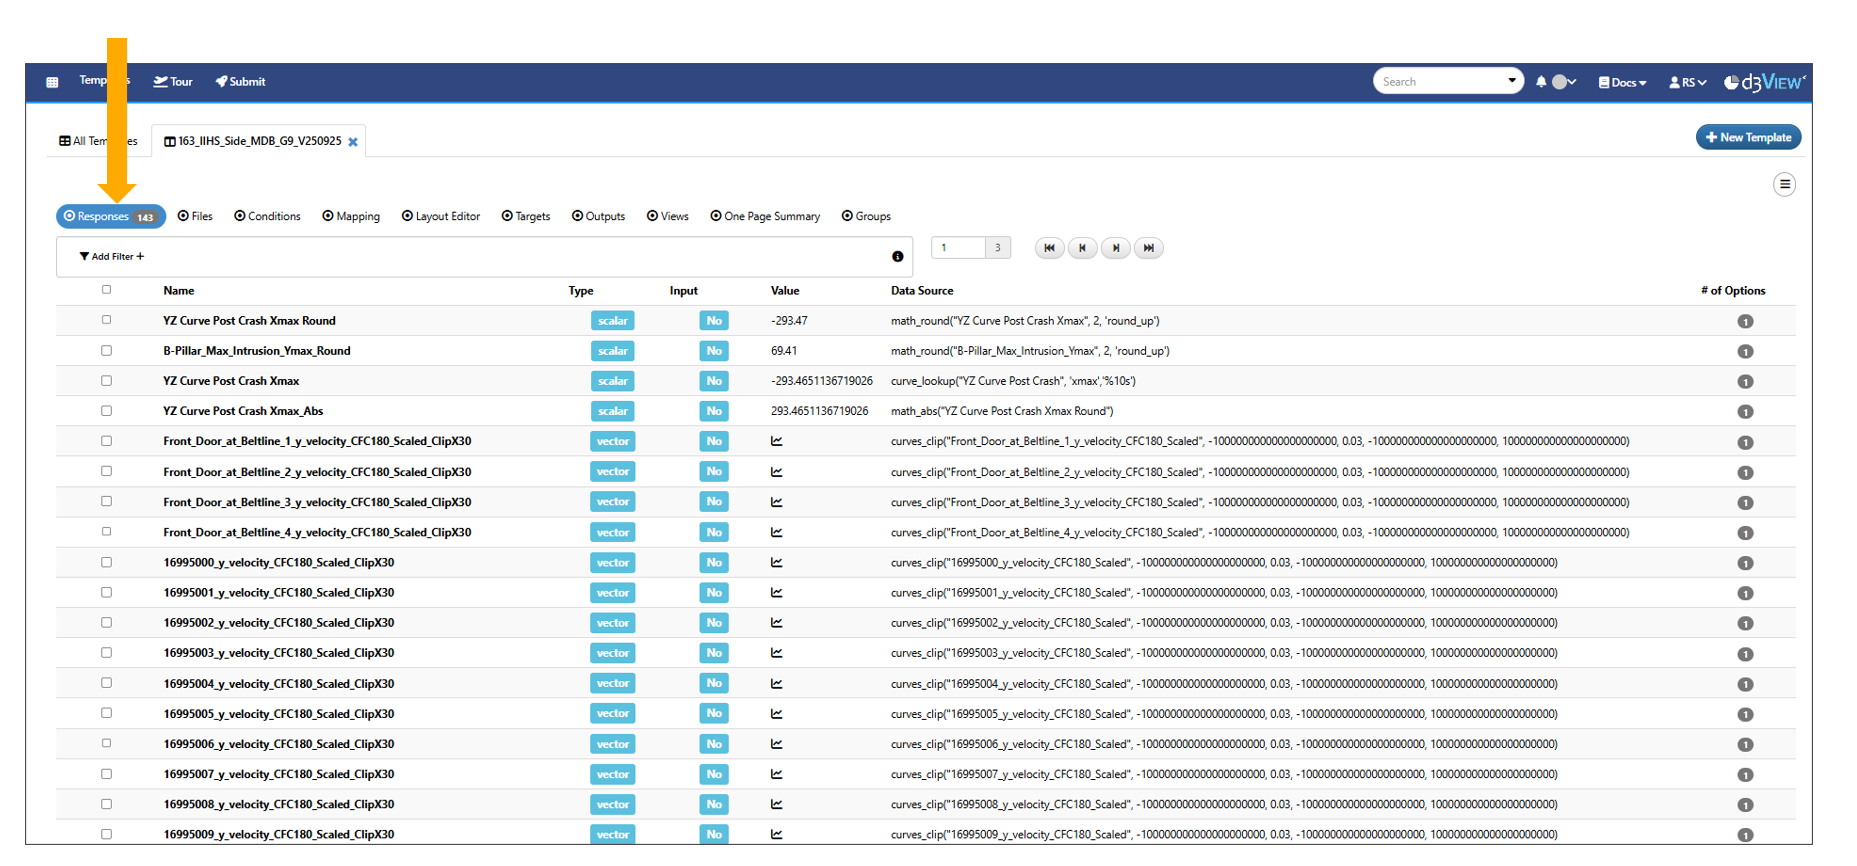
Responses tab