5. Job Submission
d3VIEW’s Job Submission application helps users to efficiently submit, run and manage HPC simulations. Figure below shows the d3VIEW Job Submission Dashboard.
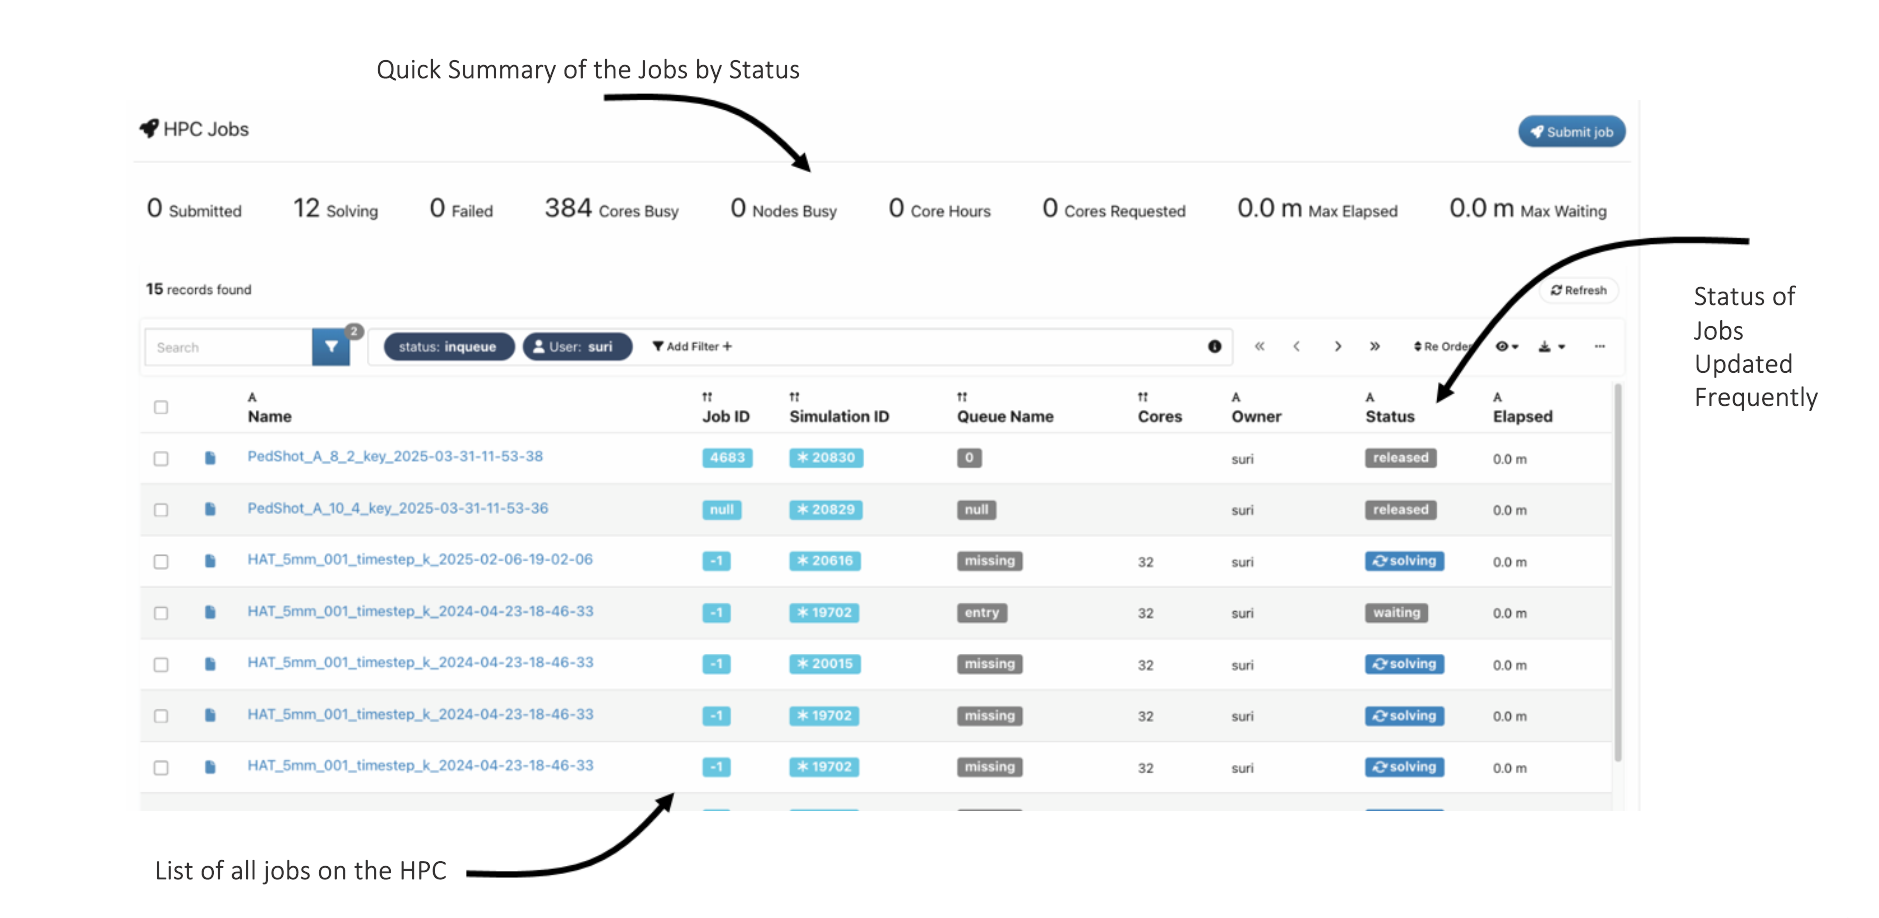
Job Submission Dashboard
5.1. Processing Simulation Files
When submitting jobs, simulation files are processed through the server and compute node to be available to you locally.

Figure 1: Client-Server-Compute Node File Location
Supported simulation files include:
| Solver | Extension(s) | Drop Zone |
|---|---|---|
| LS-DYNA | *.k, *.key, *.inc, etc. | 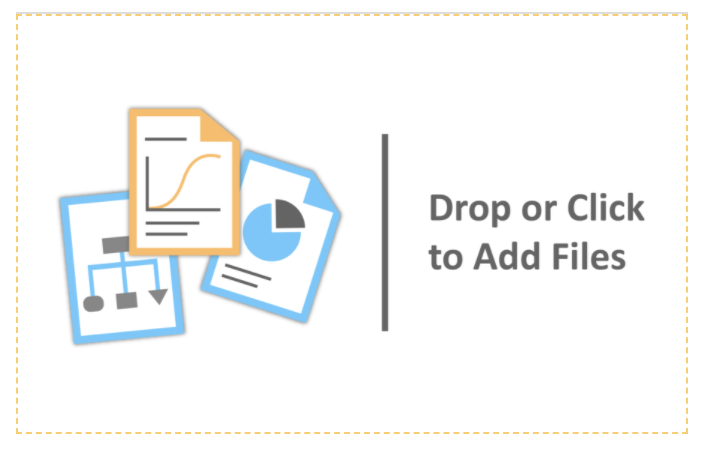
|
| Star-ccm | *.java | |
| NASTRAN | *.blk | |
| ABAQUS | *.inp | |
| Or any other extension based on solvers. | ||
5.2. Job Submission Features
- Submitting a New Job
- Saving & Applying a Configuration
- Submitting Multiple Simulations
- Preview and Summary of a Simulation
- Viewing and Exporting Files in a Simulation
- Comparing of Simulation response with Template
- Stop /Hold and Release Simulations
- AI Agents
Submitting Jobs
Jobs can be submitted to the HPC efficiently using the d3VIEW application. In this section, we’ll walk through the process of submitting a sample job or simulation.
5.3. Submit button
Click on the Submit button on the Simulations/HPC Jobs page, which opens the Job Submission window.
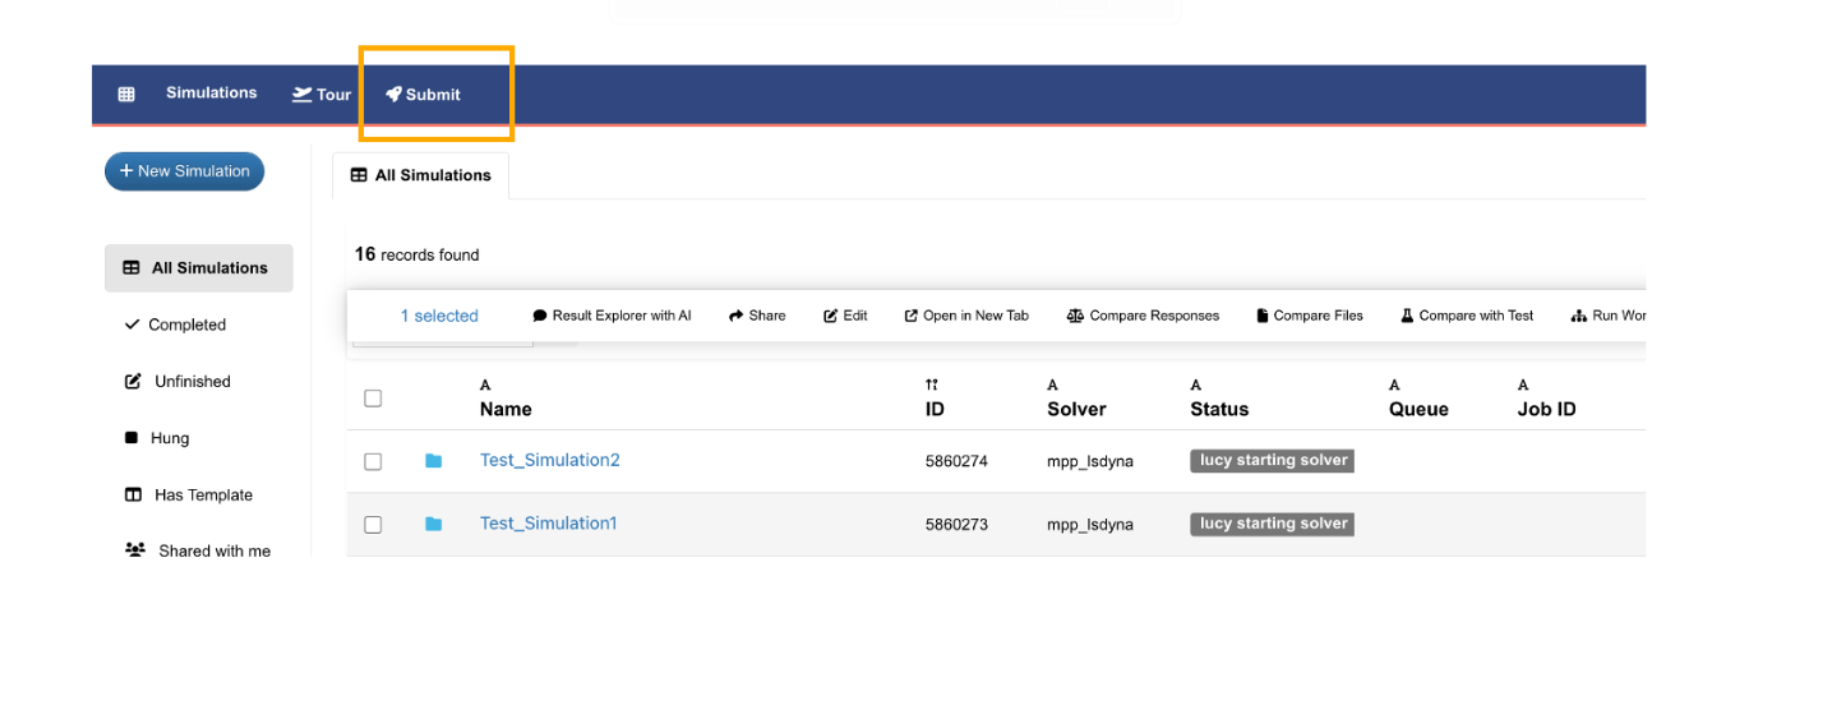
Submit button
5.4. Submit window
The Job Submission window contains the following sections:
- Available Servers
- Input Files
- Meta data - Includes Name, Template, and General Inputs.
- Compute Resources and Solver Attributes
Figure below shows the different sections included in job submission window.
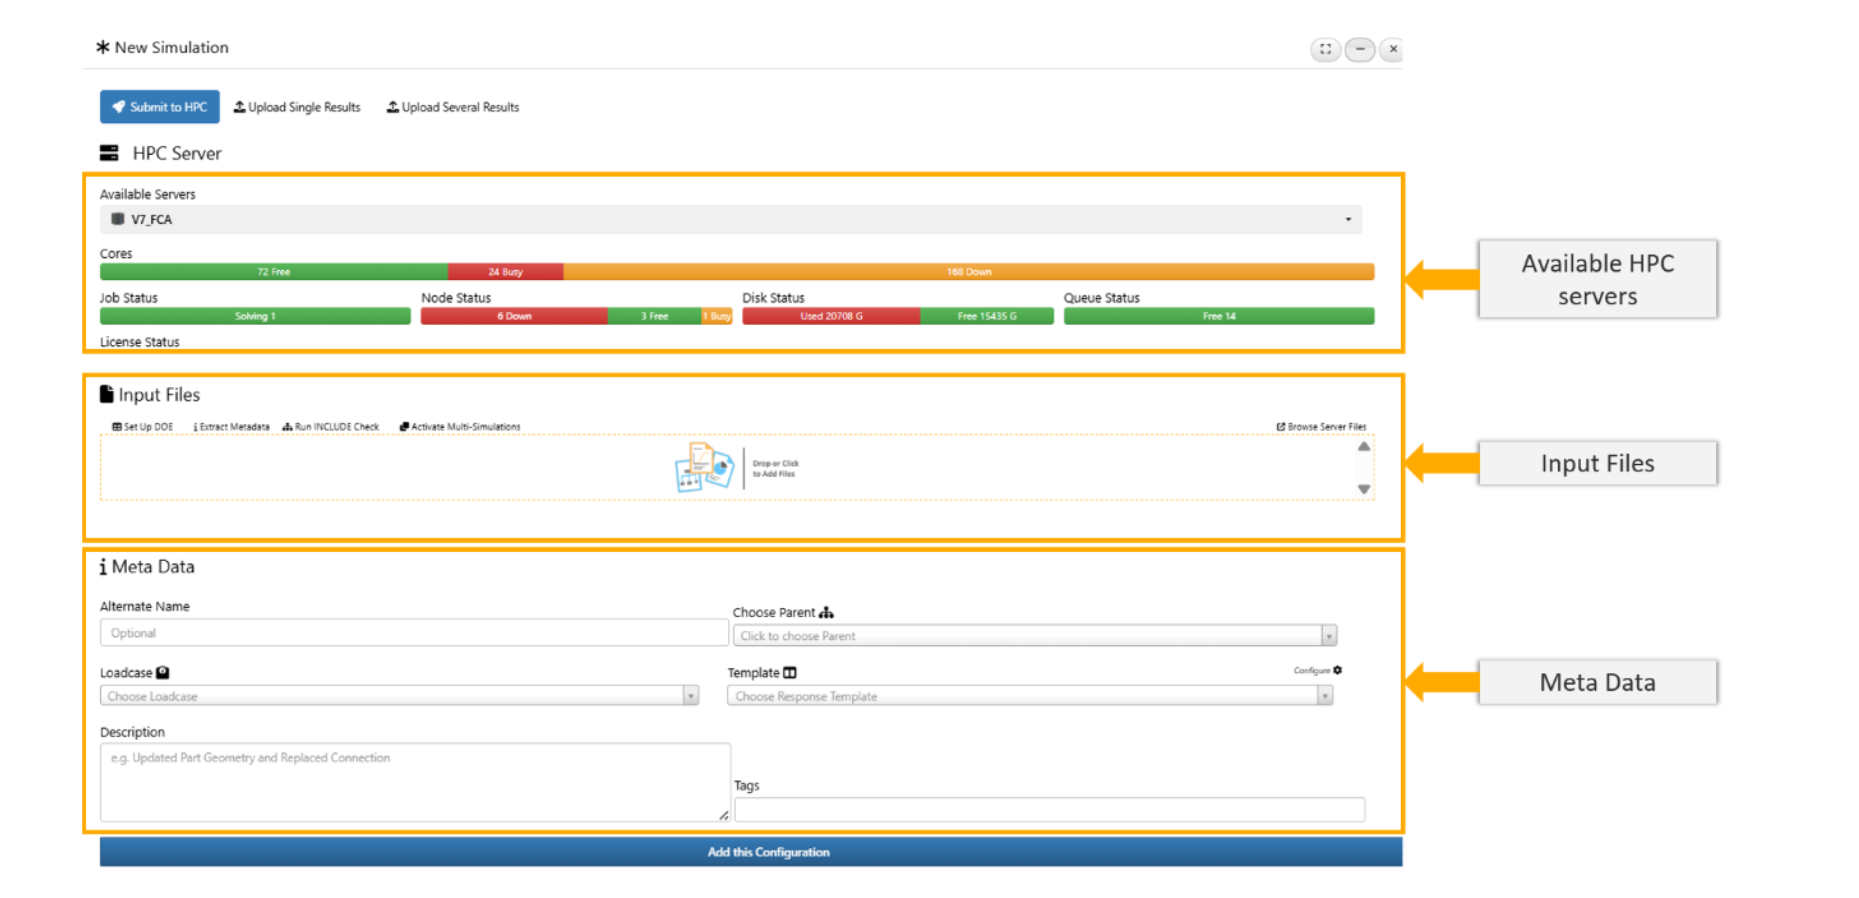
Job submission window sections
5.5. Add Input Files
Input files can be added in one of two ways:
- Upload from Local Machine: You can upload files directly from your local computer or simply drag and drop them into the upload box. Multiple files can be added at once.
- Select from Server: You also have the option to select existing files from the server
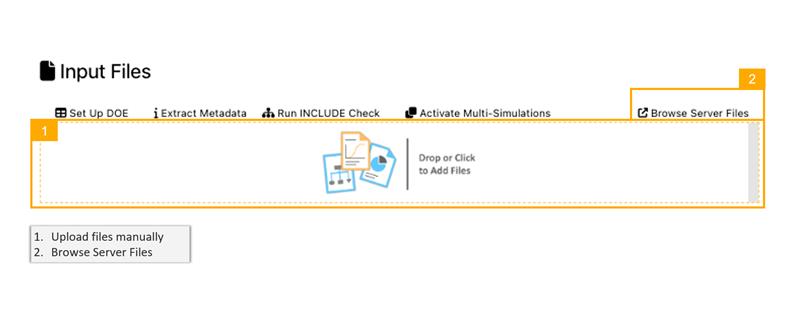
Add Input File
5.6. Compute Resources and Solver Attributes
You can configure the high-performance computing (HPC) resources and solver attributes by following these steps:
- Select the Solver, Queue, and Number of Cores: Choose the appropriate solver, job queue, and the number of CPU cores based on your simulation requirements.
- Add the Configuration: Click on ‘Add This Configuration’ to apply the selected setting
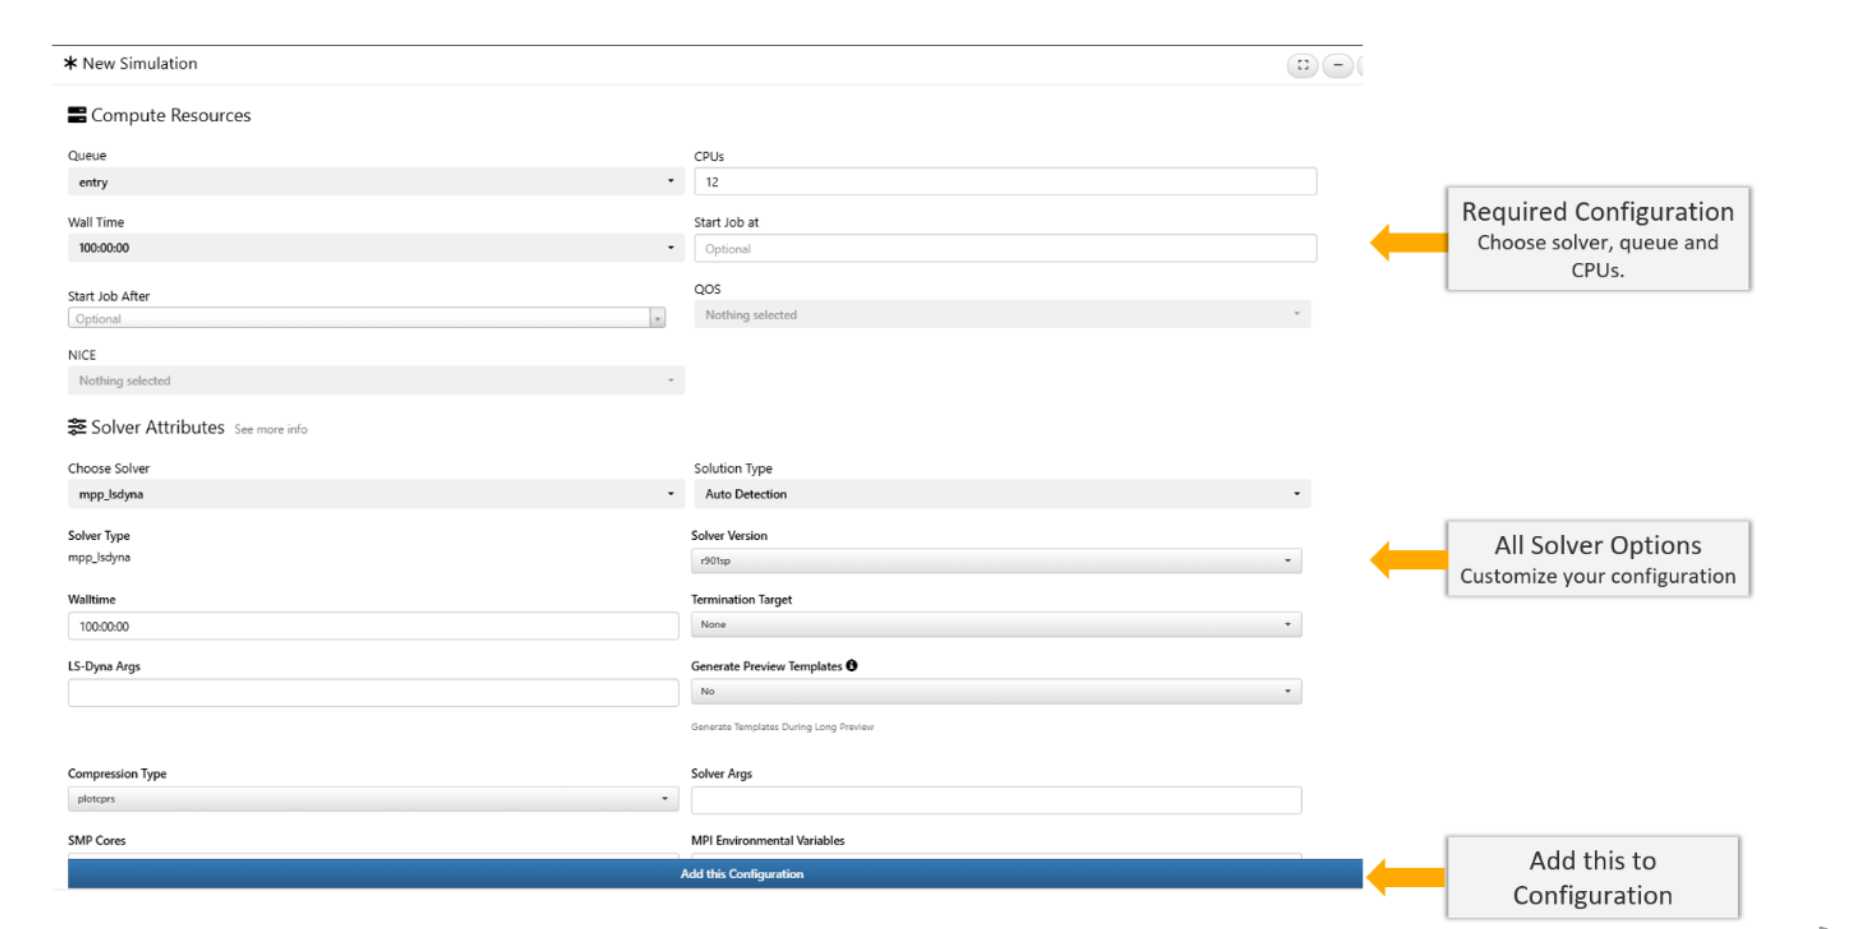
Compute Resources and Solver Attributes
5.7. Submit Simulation
Once all configurations are complete, click Submit to start the simulation. You can monitor the progress and status of the submitted simulation in the Status Panel.
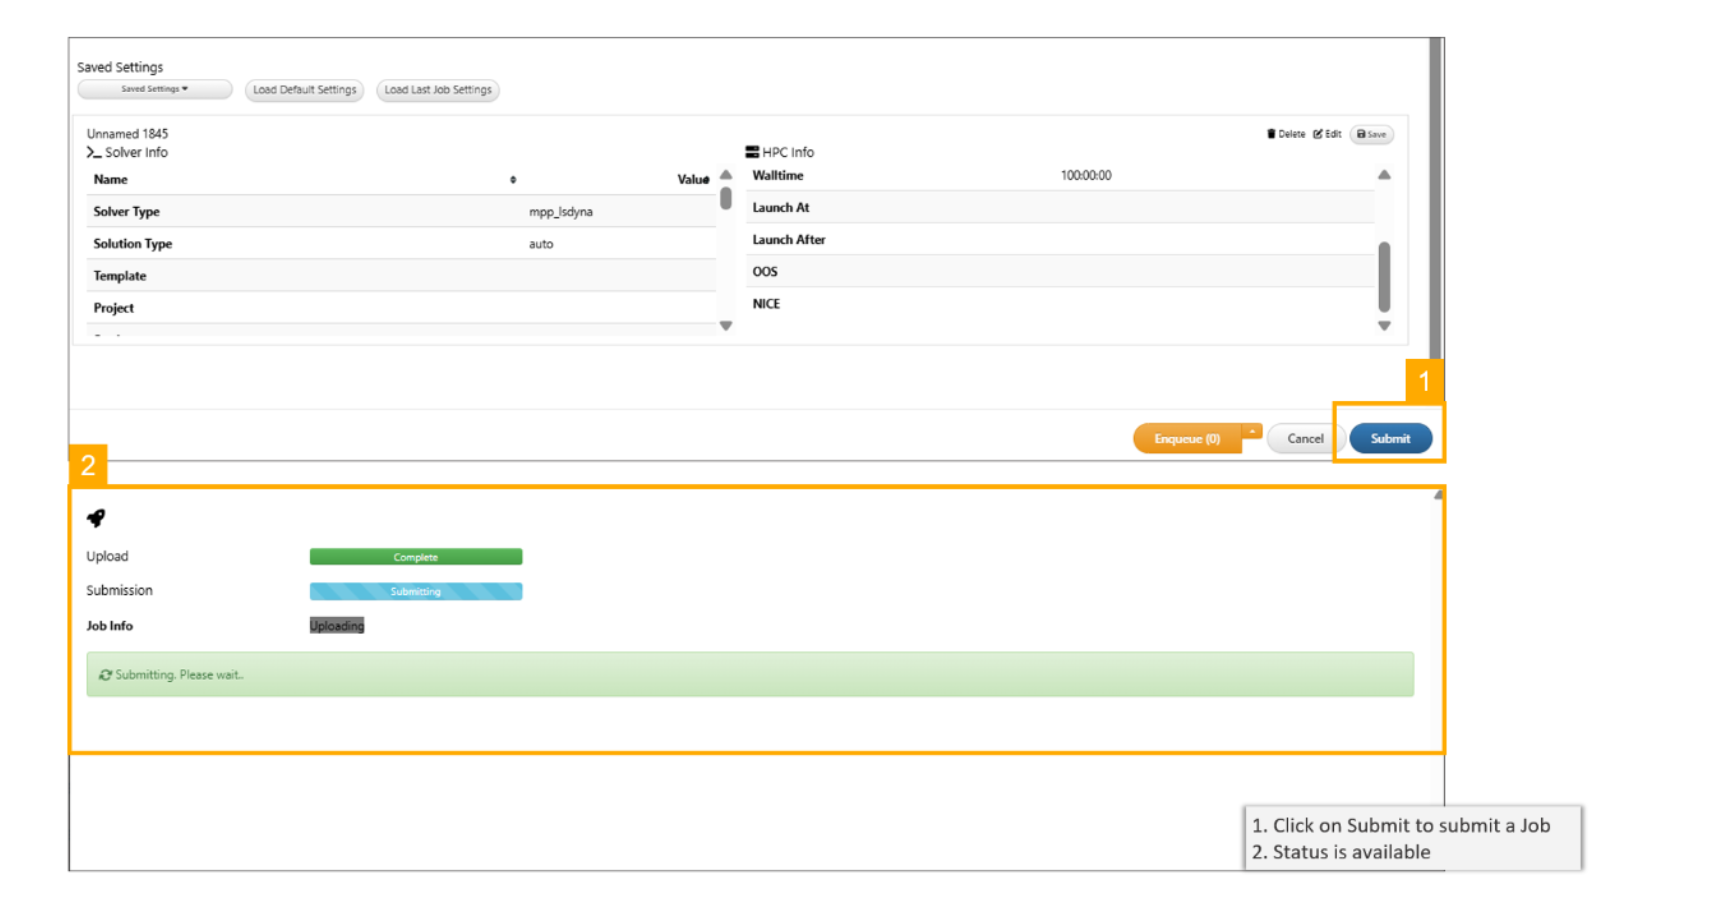
Submit Simulation
You can view your submitted jobs on your home page under the HPC Jobs section.
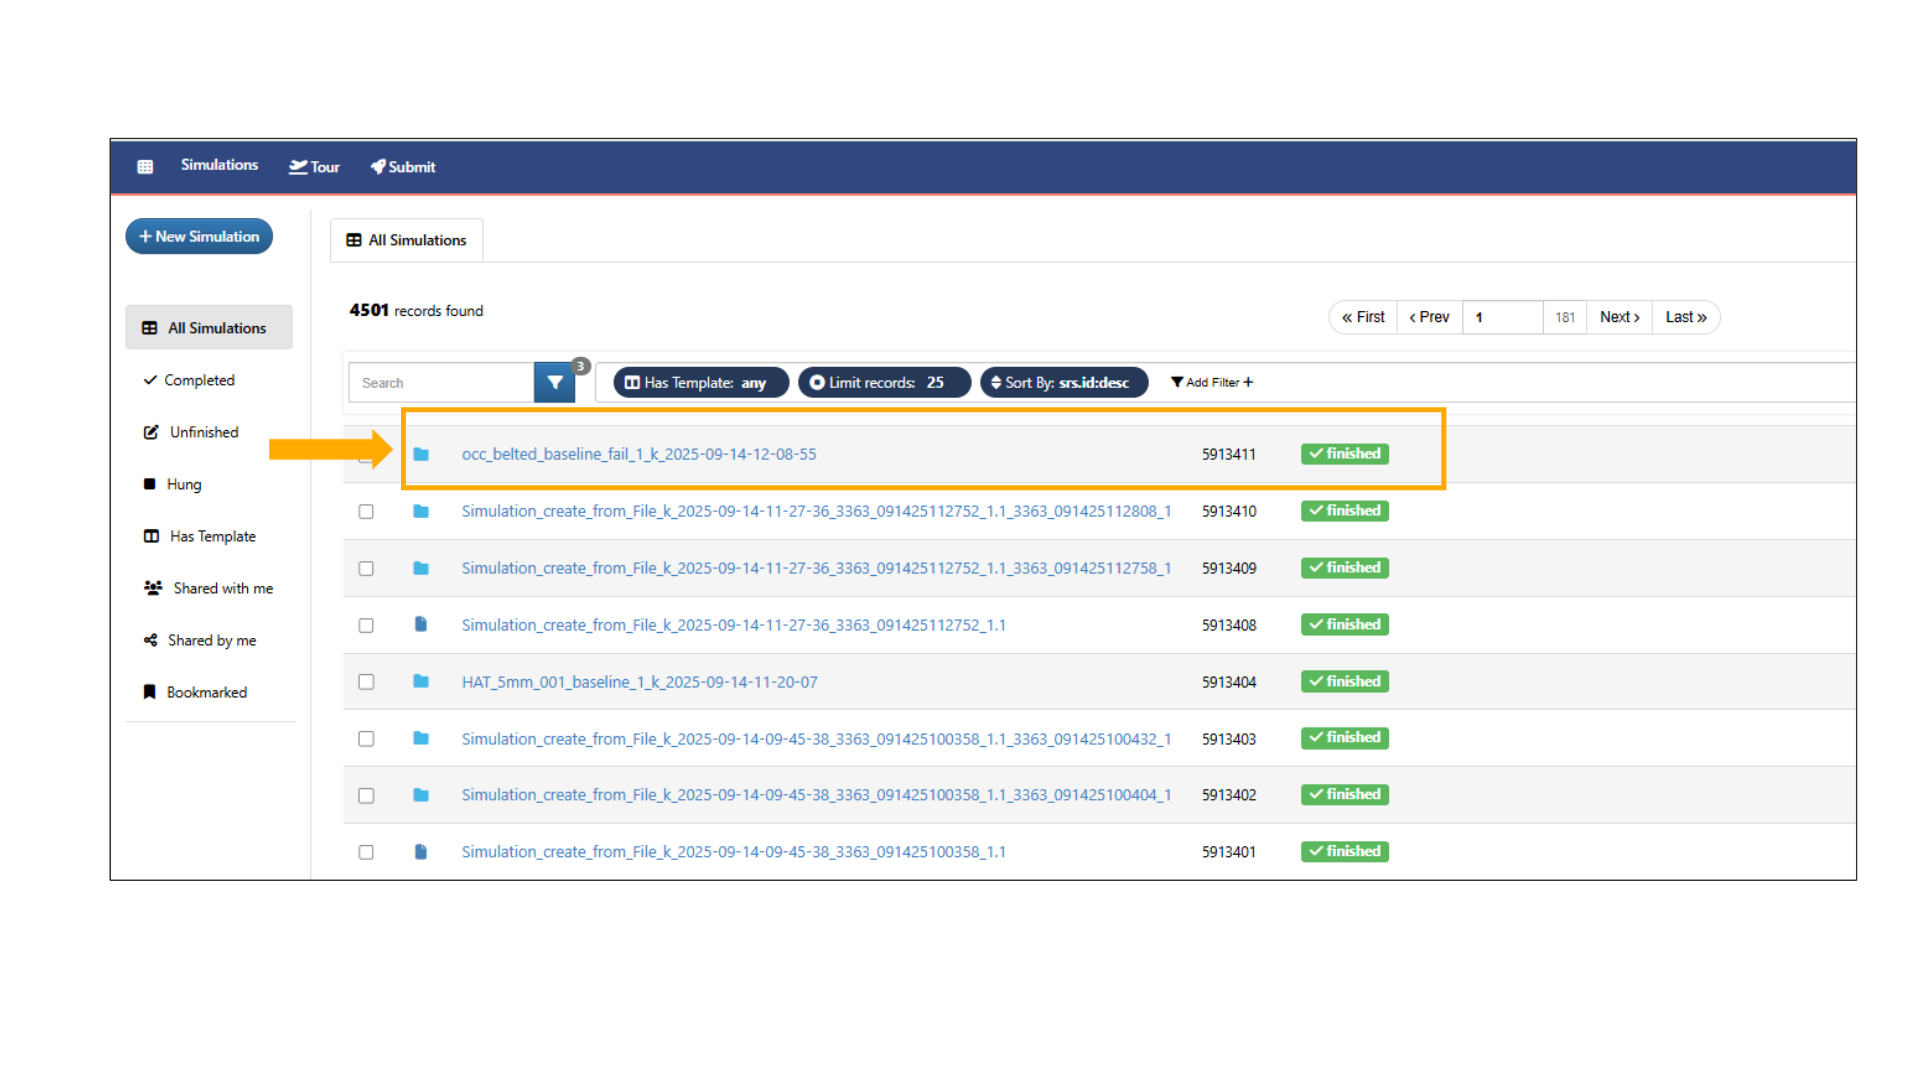
Simulation Name UID
Saving & Applying a Configuration
5.8. Saving a Configuration
- Click the Save button located at the top-right corner of the screen to save the configuration you created earlier.
- In the prompt box that appears, enter a name for the configuration.
- Click OK to complete the saving process.
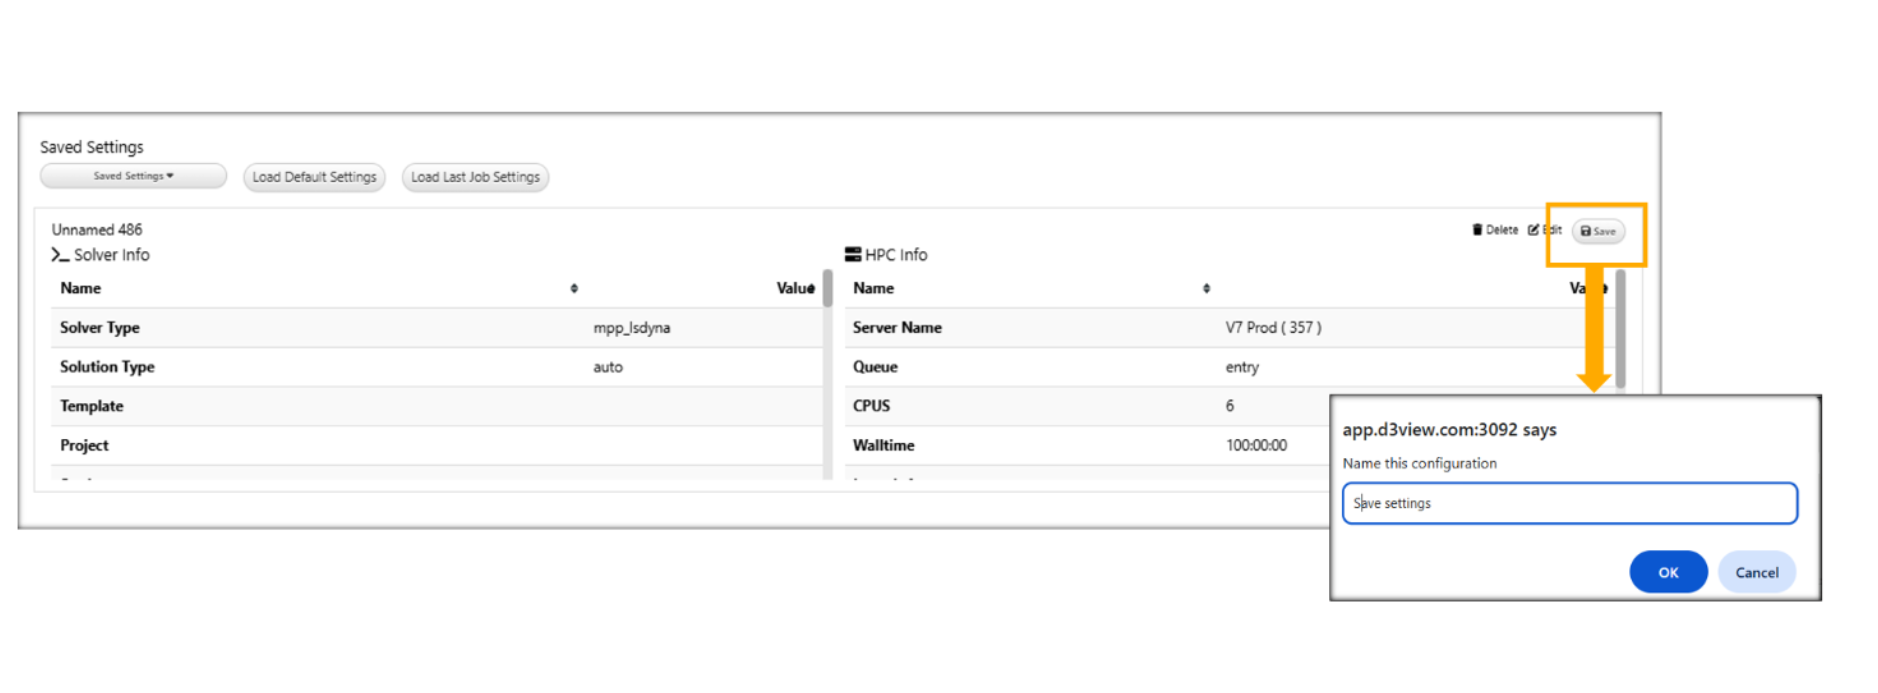
Saving a Configuration
5.9. Applying a Saved Configuration
A previously saved configuration can be easily applied to a new job on d3VIEW.
- Open the Job Submission Window
- Access the “Saved Settings” Menu
- Select a Saved Configuration and Apply.
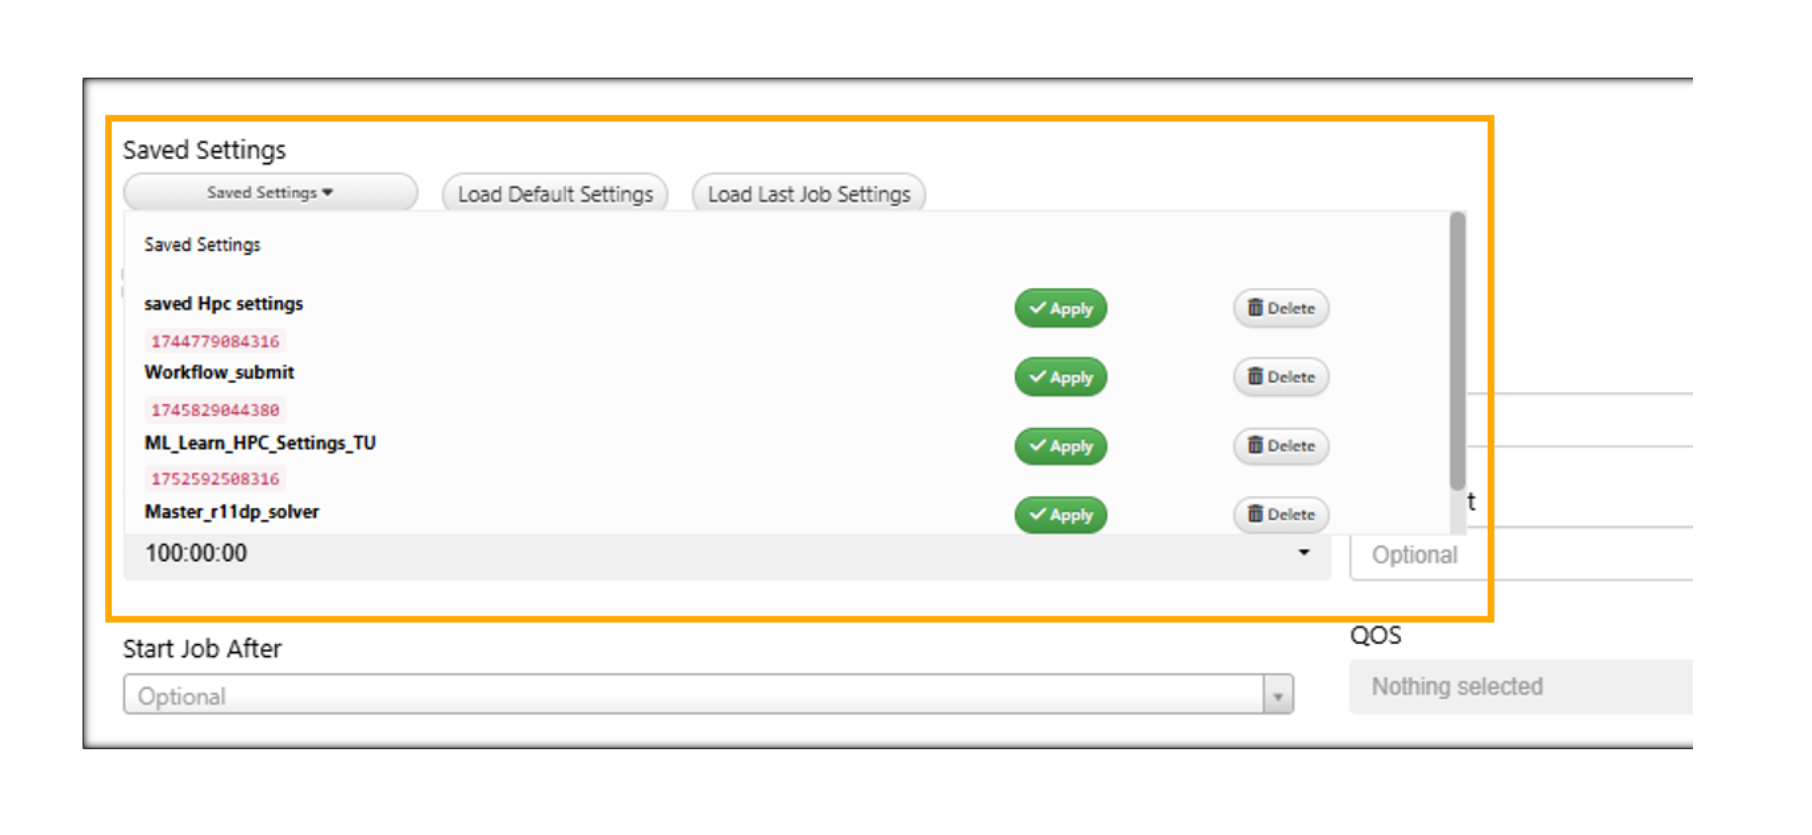
Applying a Saved Configuration
Submitting Multiple Simulations
The d3VIEW application provides two different methods to submit multiple simulations to the HPC efficiently:
- Adding Multiple Files (Activating Multiple Simulations) Upload multiple input files at once to run separate simulations for each file.
- Setting Up DOE Parameters (Design of Experiments) Use DOE parameters to generate multiple simulation iterations based on variations in input variables.
5.10. Activating Multiple Simulations
Upload multiple files in Input files section and click on ‘Activate Multi-Simulations’.
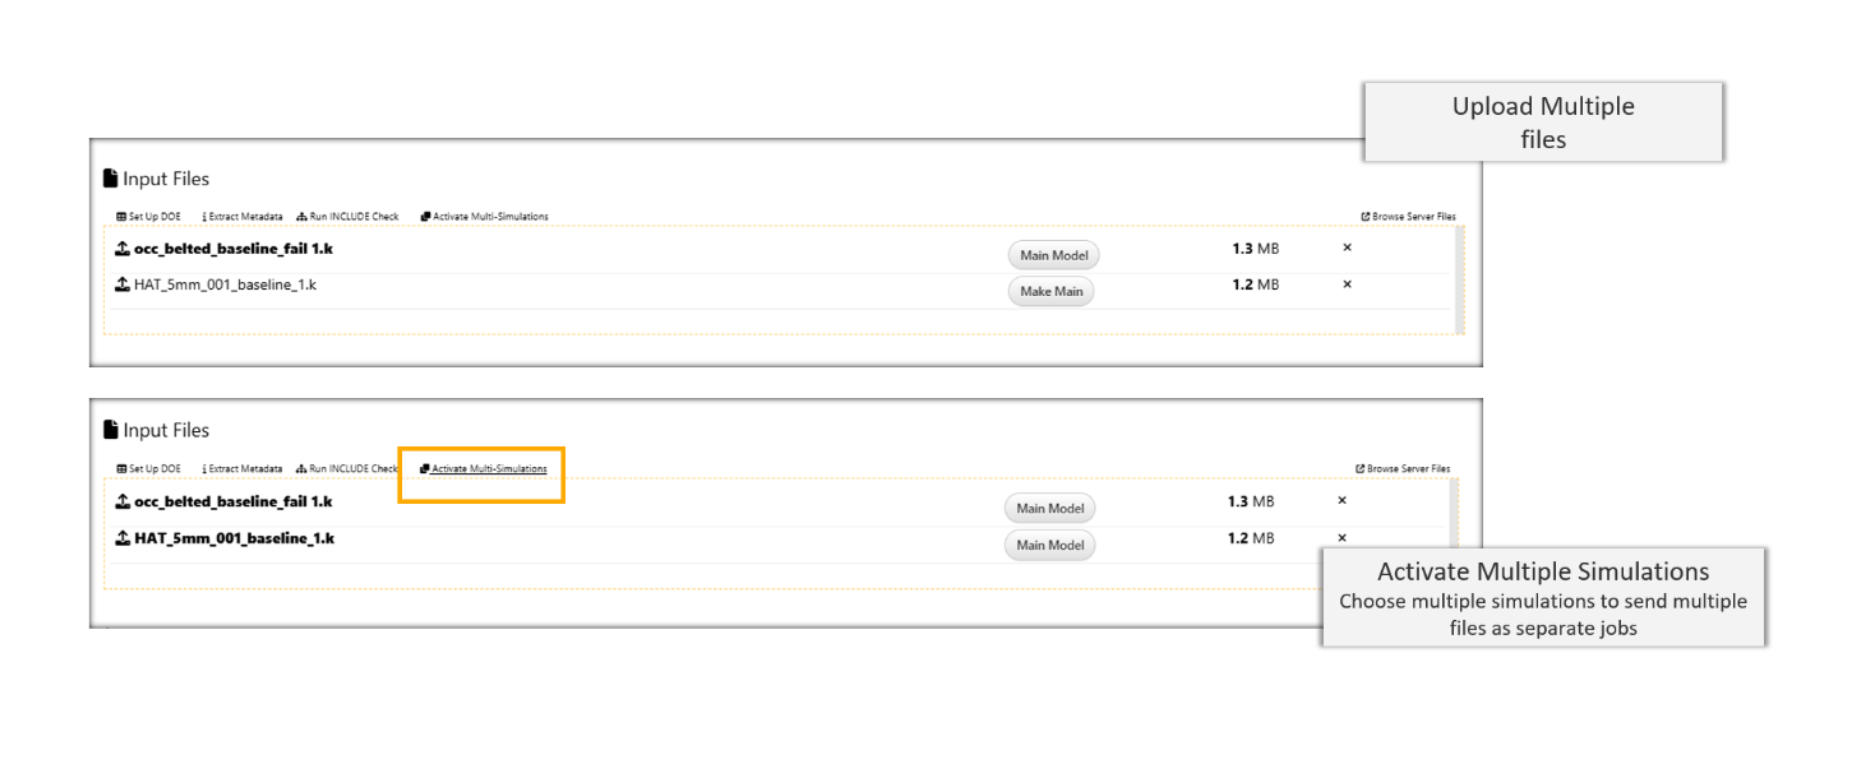
Activating Multiple Simulations
5.11. Setting Up DOE Parameters
After uploading your input file, click on ‘Set up DOE’.
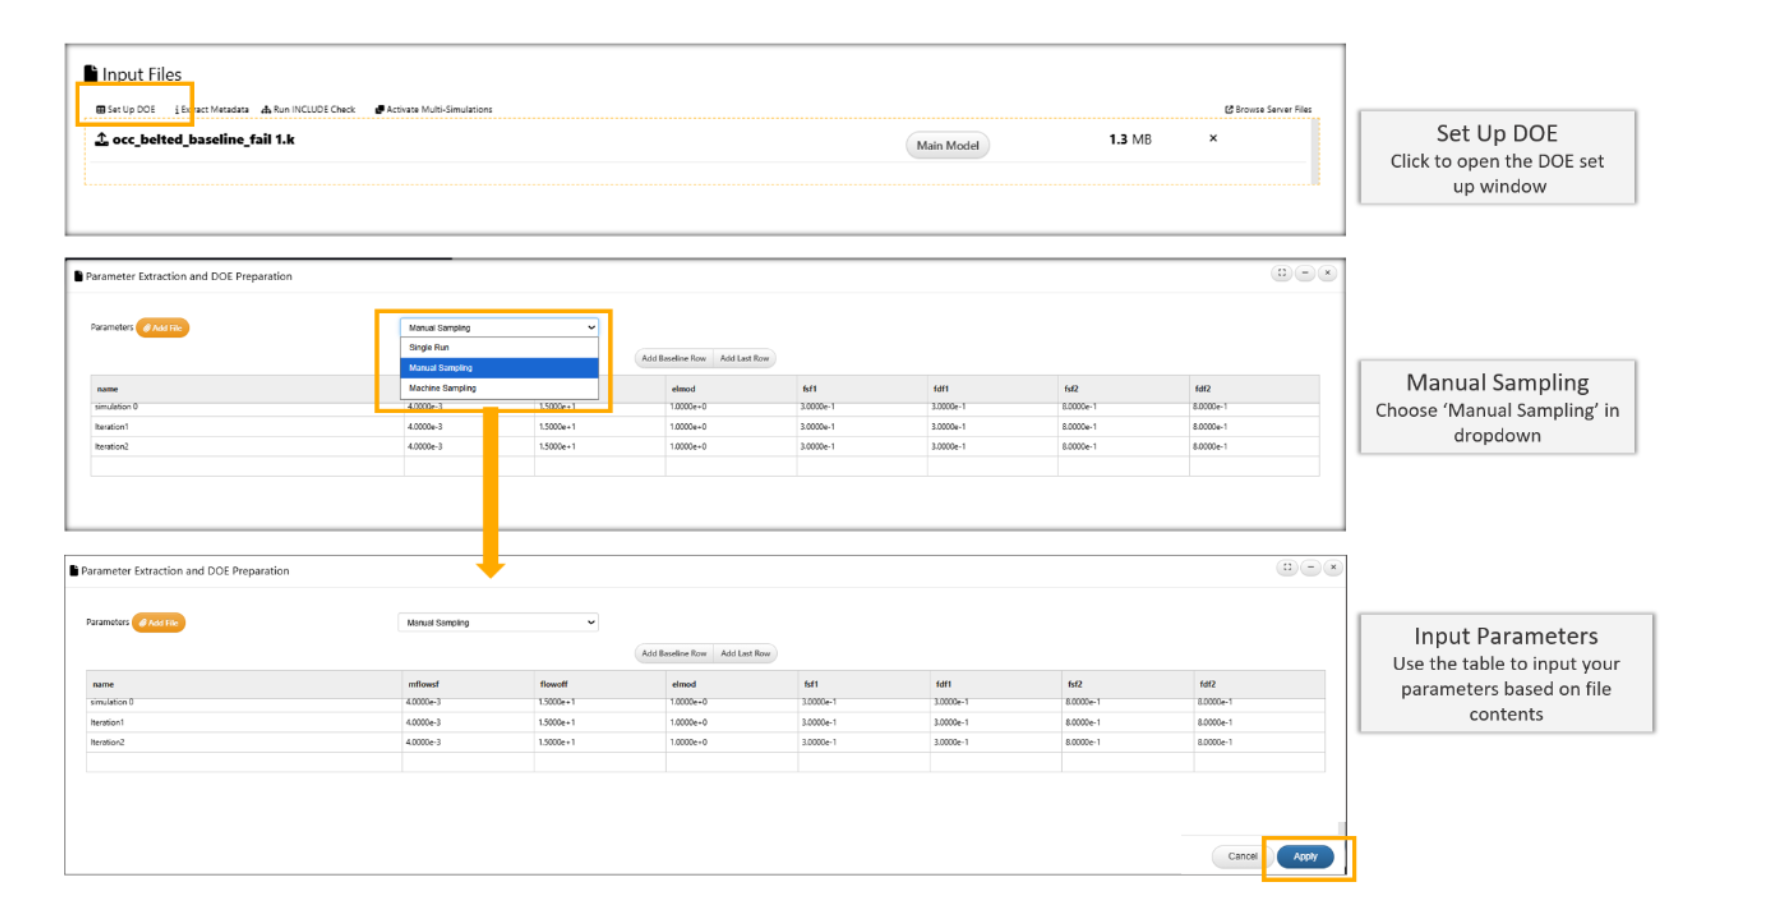
Setting Up DOE Parameters
Generate Preview While Solving
To generate and view a preview and summary of your simulation results, follow these steps:
- Enable Preview Templates In the job submission options, set ‘Generate Preview Templates’ to Yes.
- Submit the Simulation Proceed to submit the simulation as usual.
- View Preview and Summary While the simulation is running, you can monitor its progress and view the generated preview and summary on the Simulation Home page.
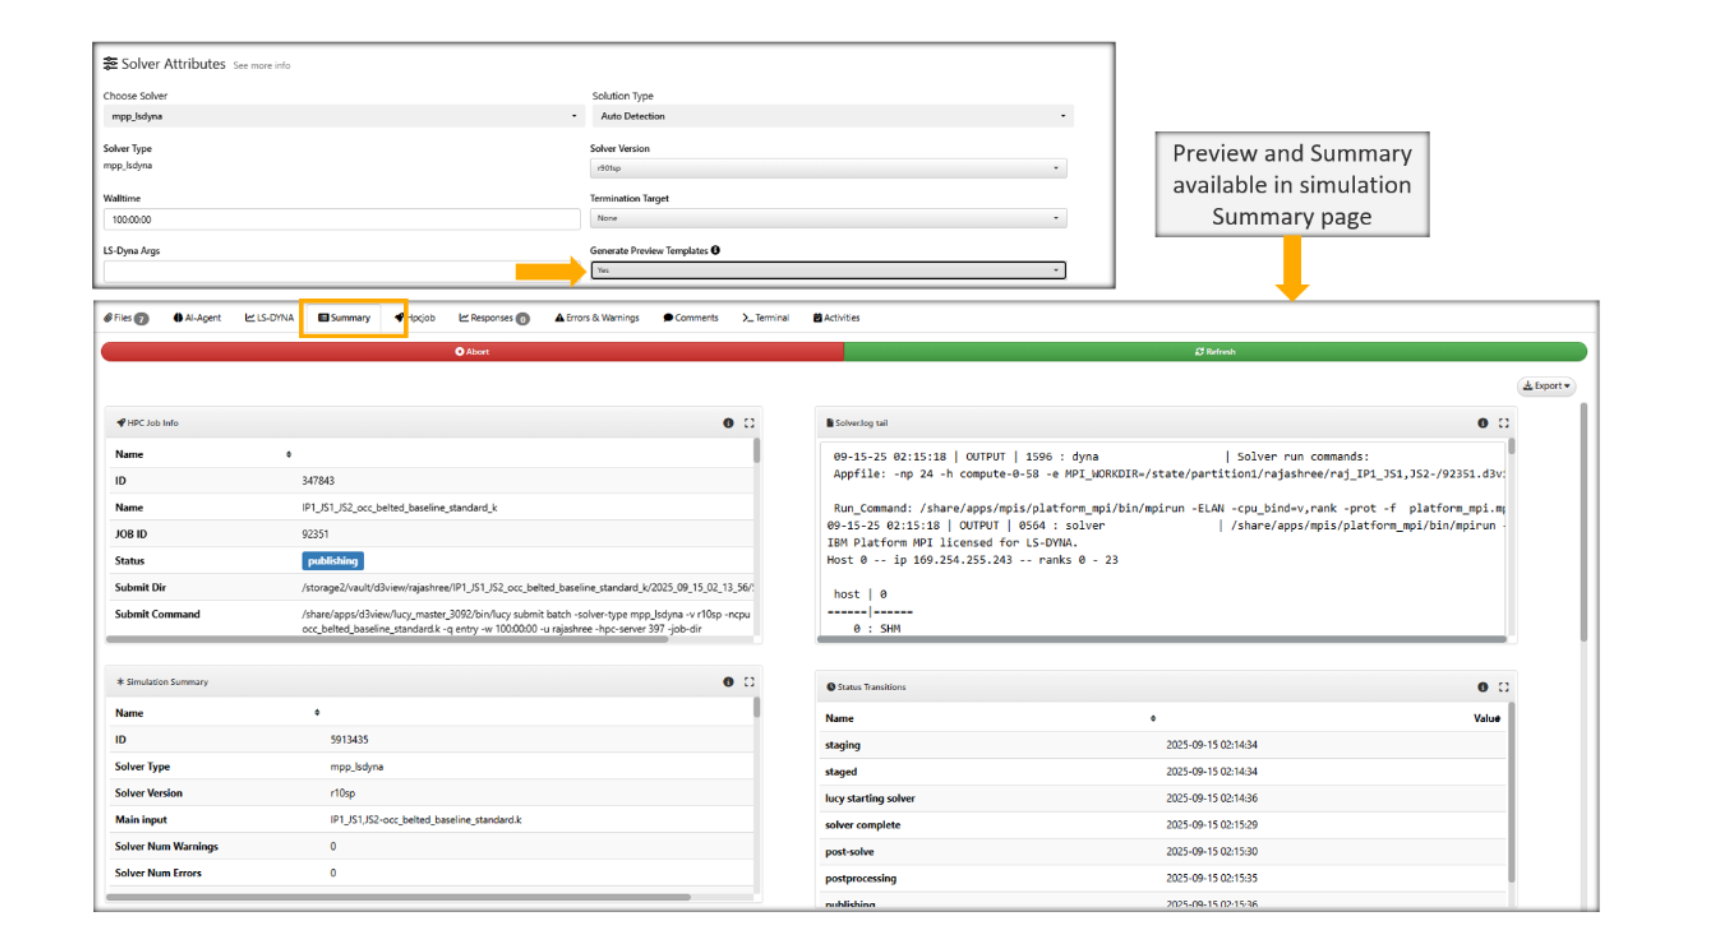
Generate Preview While Solving
5.12. Job Submission Parameters
The following images show the resource, pre-solve, on-solve and post-solve parameters for job submission when generating preview images.
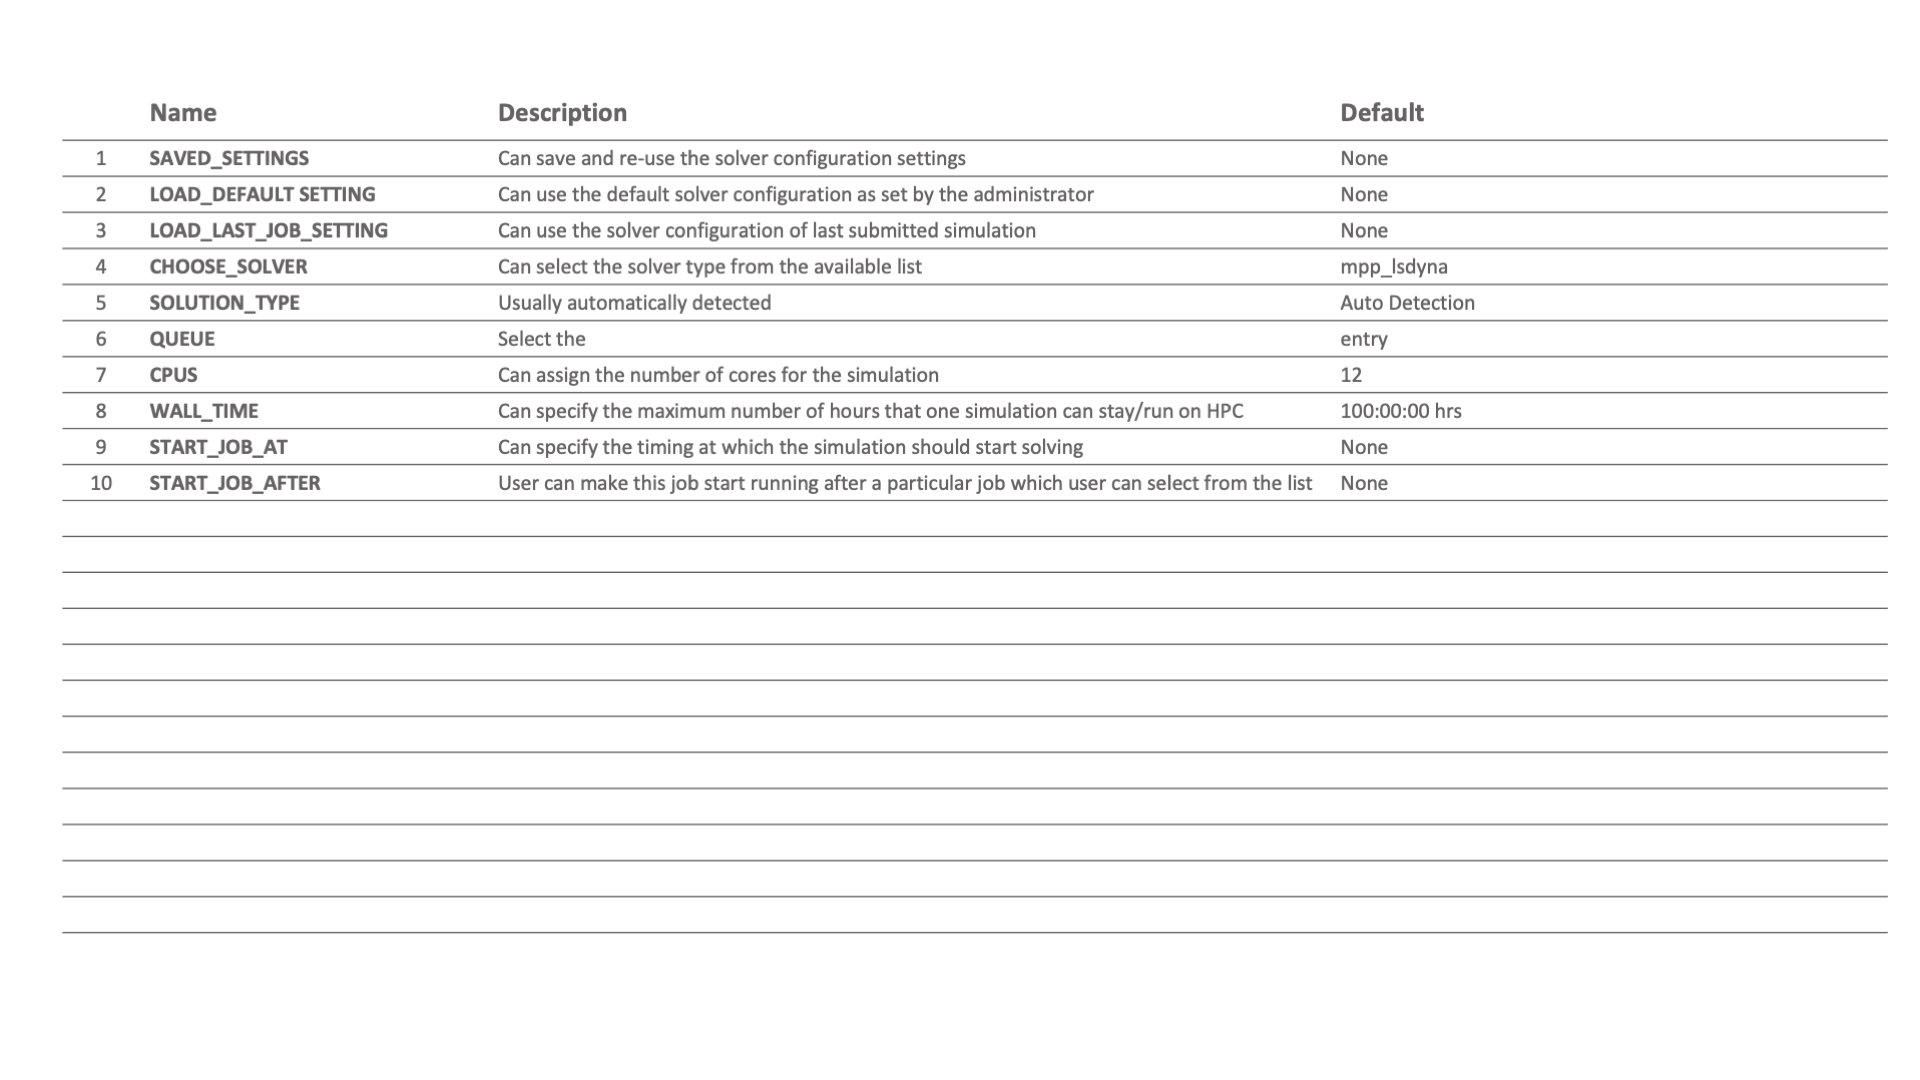
Figure 4: Resource Parameters
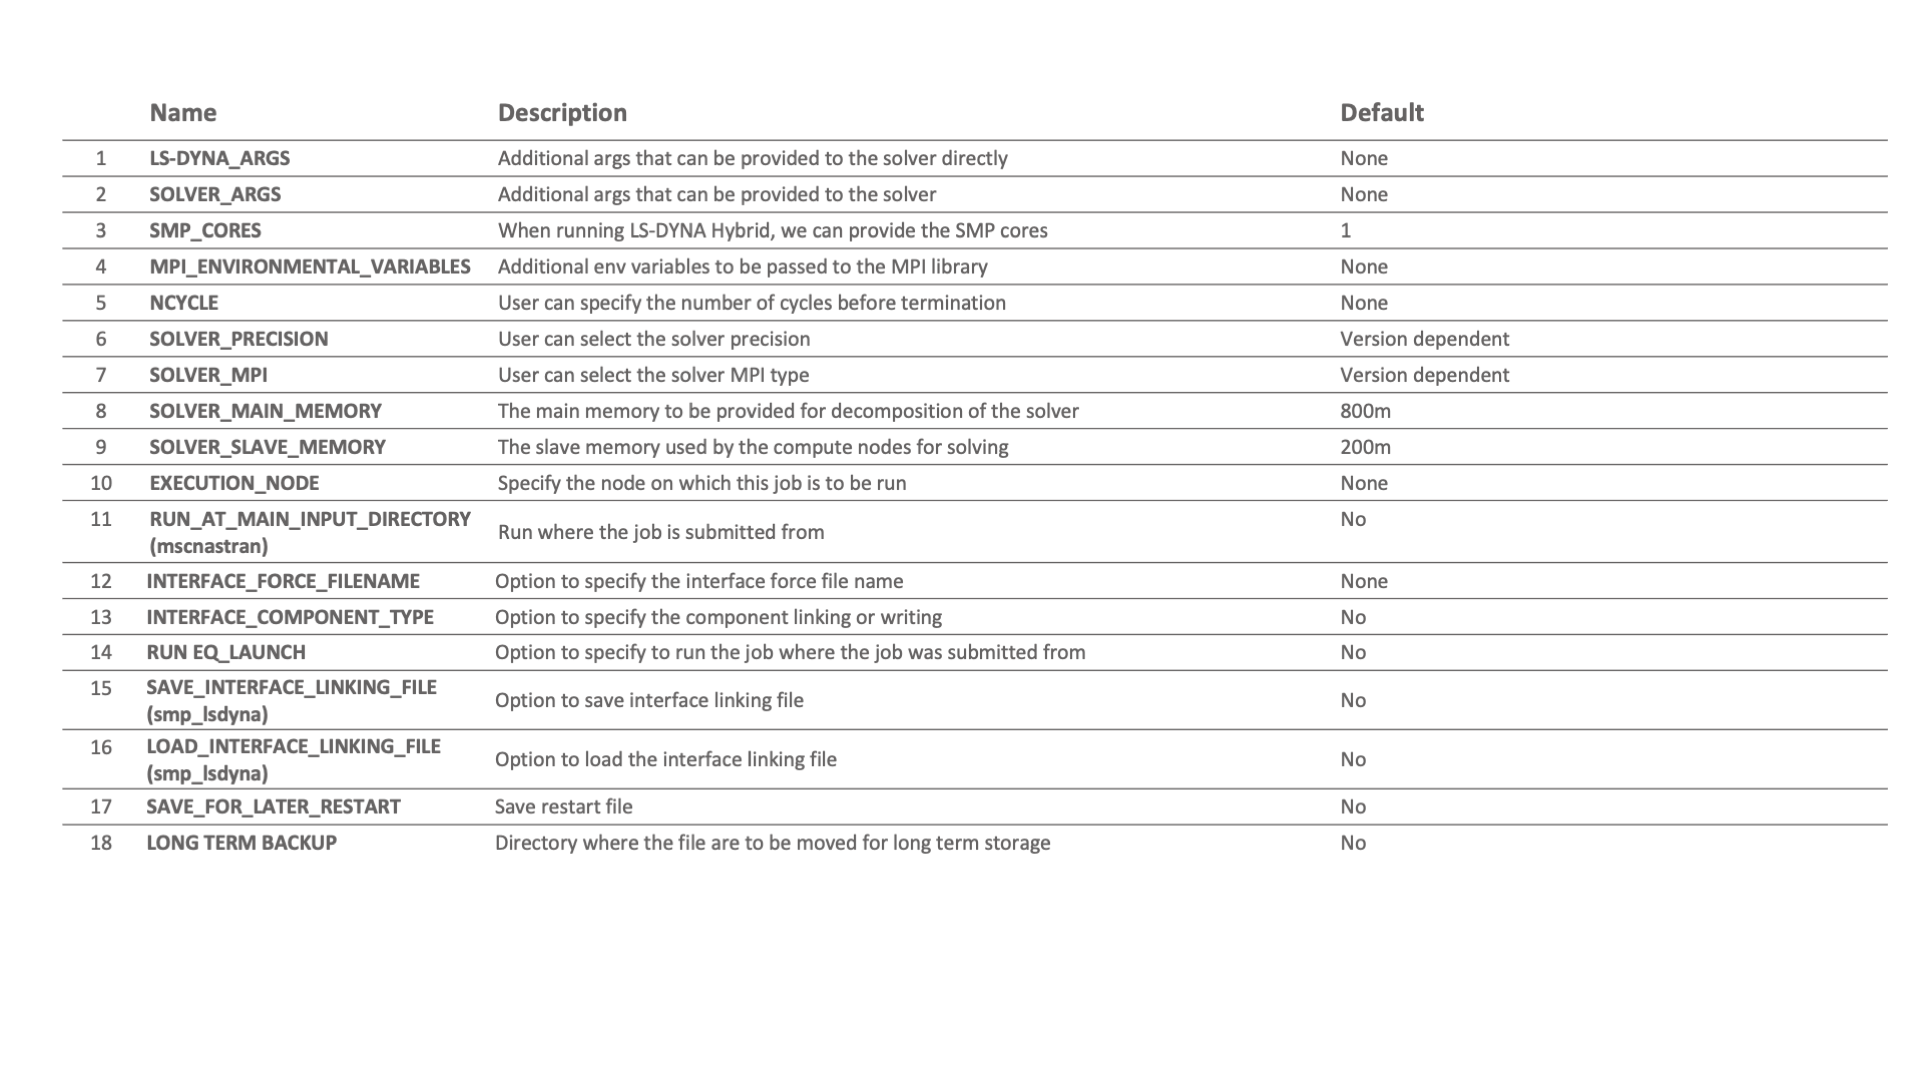
Figure 5: Pre-solve Parameters

Figure 6: On-solve Parameters
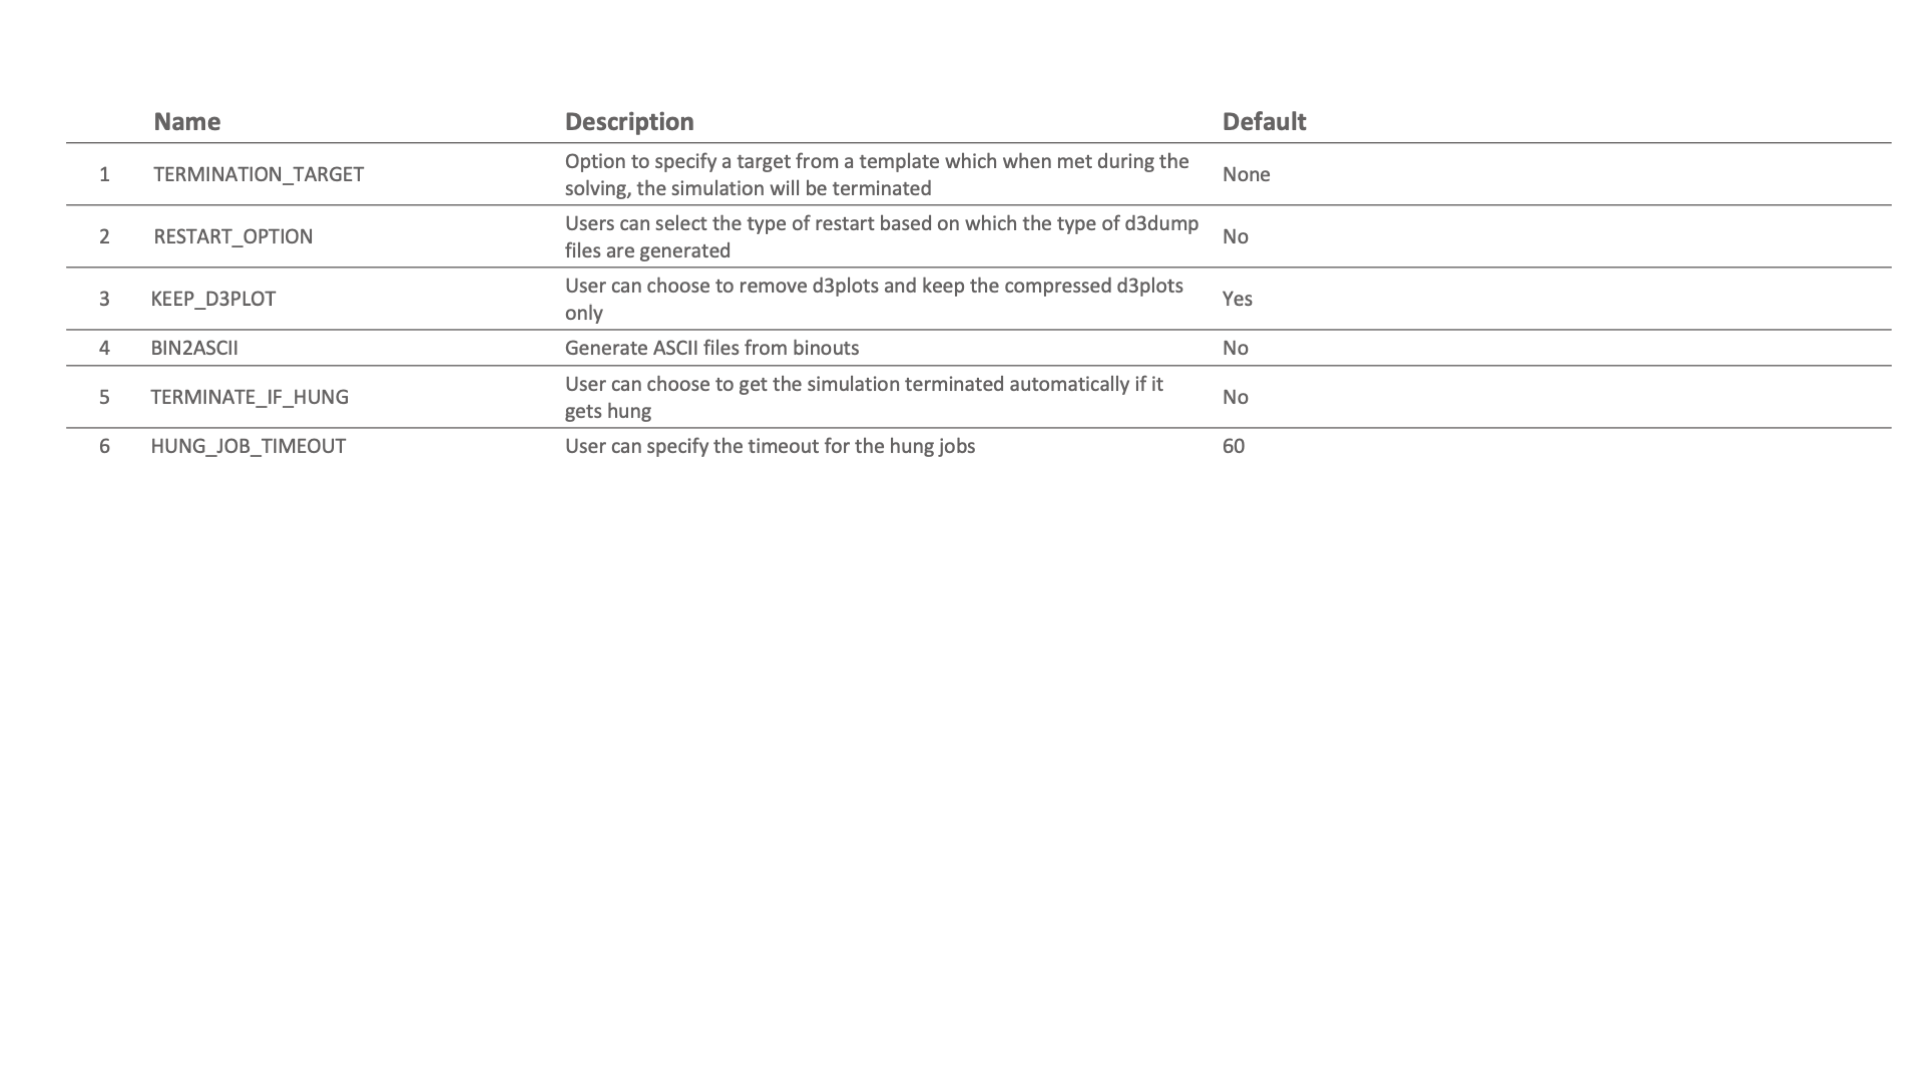
Figure 7: Post-solve Parameters
Viewing and Exporting Files in a Simulation
- View Simulation Files Click on the file name in the Files tab to open and view the simulation files directly within the application.
- Download Simulation Files Files can be downloaded using the context menu (right-click on the file) or by selecting files and using the Selected actions button to choose the download option.
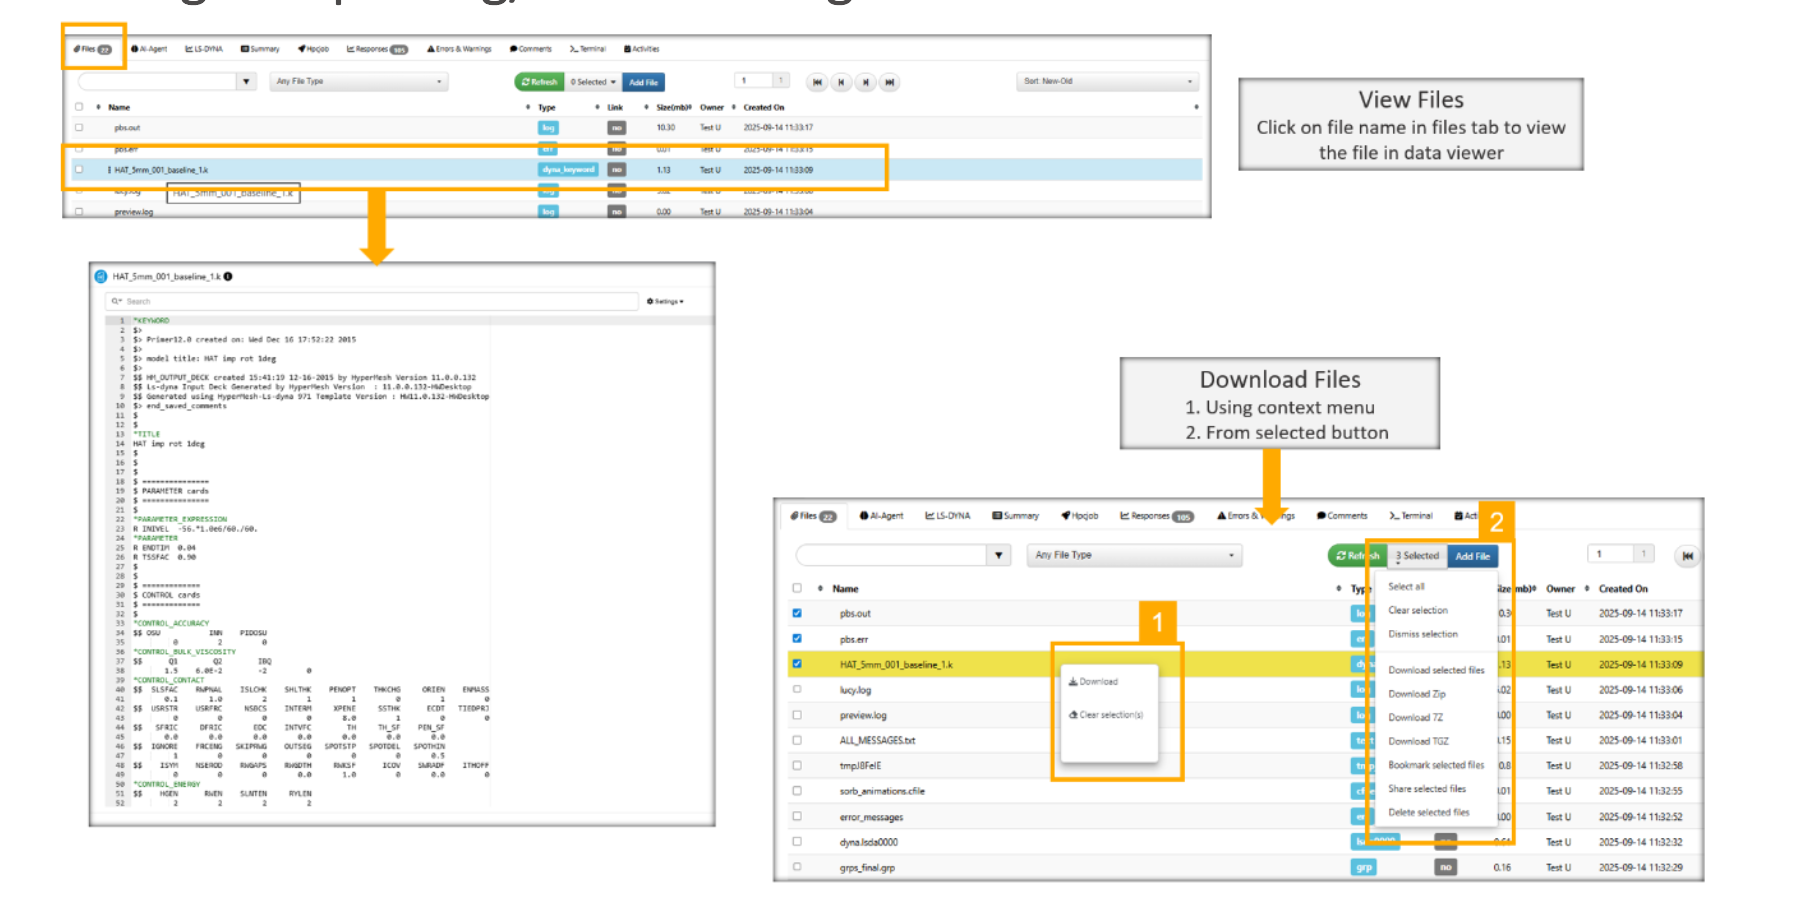
View and Export files
Comparing Simulation Response with a Template
- In Simlytiks, you can compare simulation responses directly with a predefined template.
- To do this, right-click on the simulation response and select the Compare responses option from the context menu.
- Select the template and click on compare button.
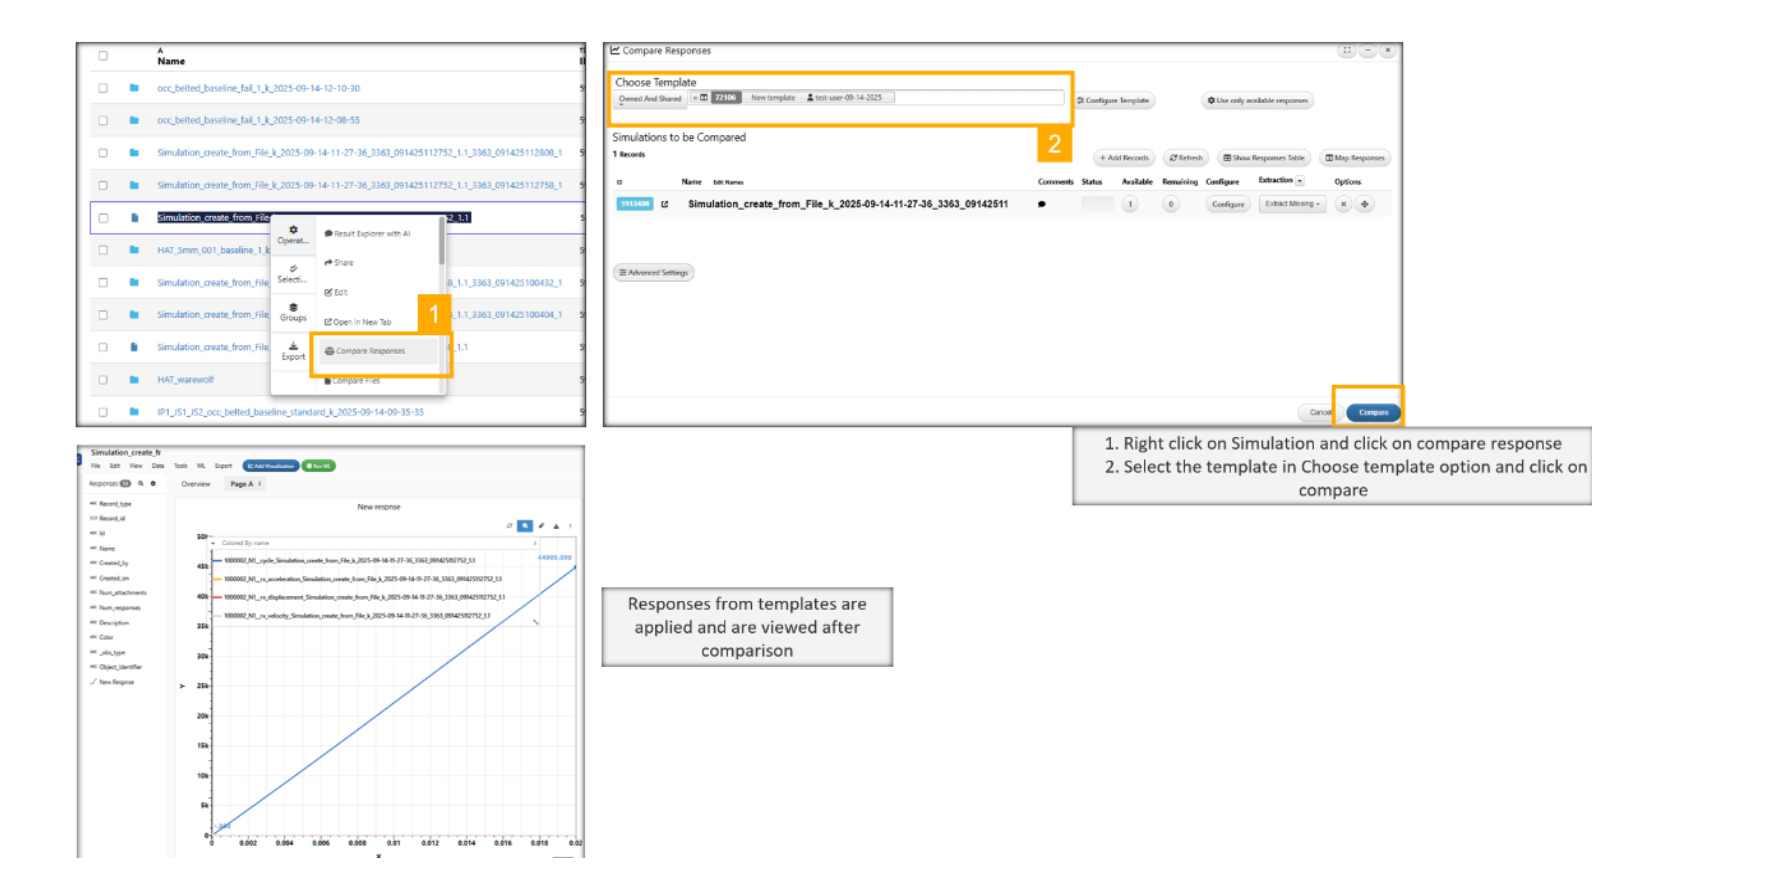
Comparing Simulation Response
Stop, Hold and Release Simulations
Users can manage active simulations by stopping, holding, or releasing them through the header options in the HPC jobs page.
Select Simulations
Use Header Options Once selected, use the appropriate button in the header to:
- Stop a running simulation
- Hold a simulation to pause its execution
- Release a held simulation to resume execution
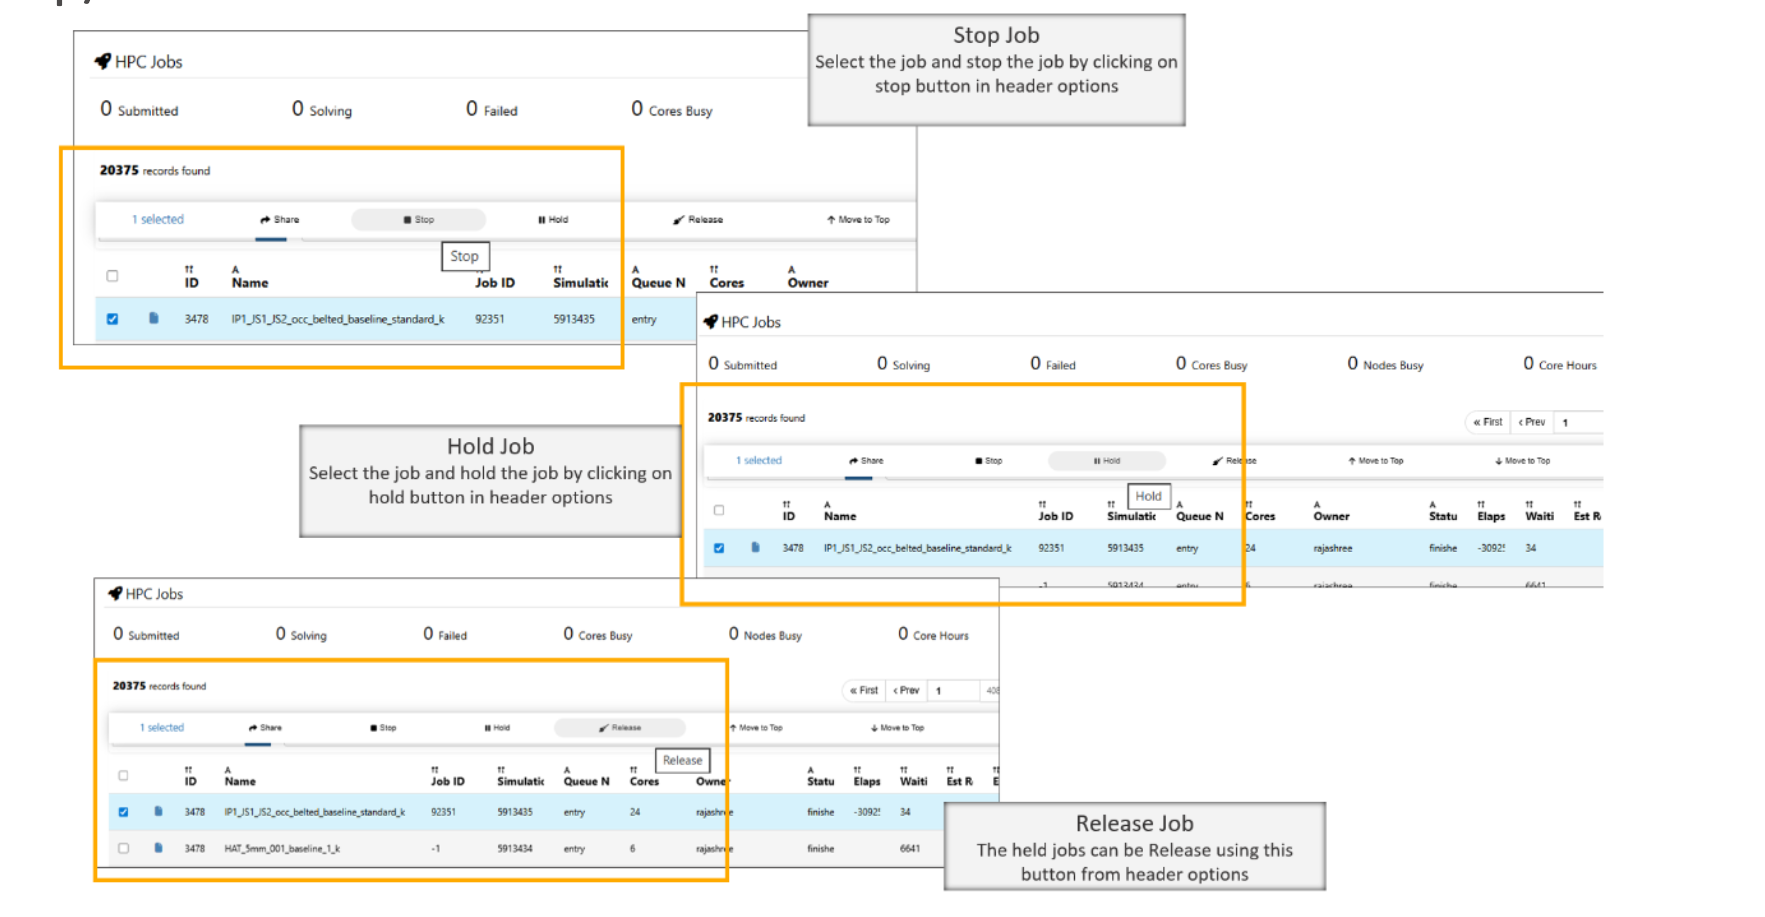
Stop, Hold and Release Simulations
AI Agent
The AI_Agent tab within a simulation allows user to view the simulation results.
It executes the AI Agent worker and generates a summary of the simulation results directly in the prompt area.
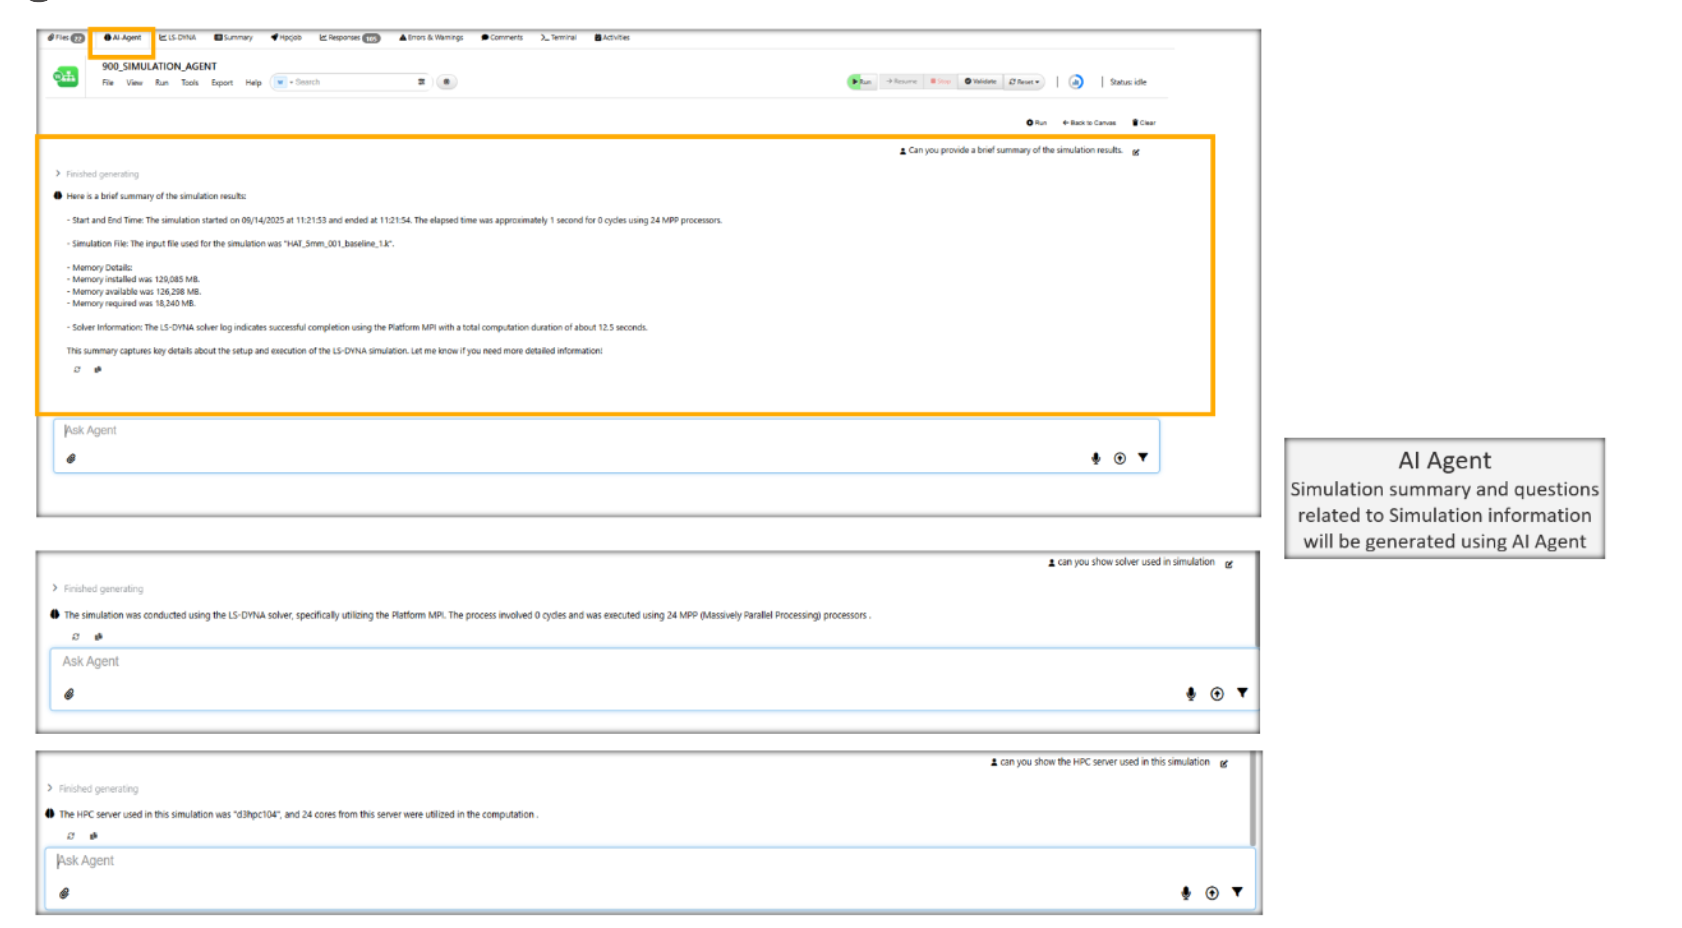
AI Agent
For additional questions about how to navigate the d3VIEW platform, please feel free to email our team at: support@d3view.com.