20. Studies
d3VIEW’s Studies Application makes it easy to keep all your comparisons in one place. Studies works with the Simlytiks Application so you can visualize and compare your records from Simulations or Physical Tests and save them for later use.
What Will Be Covered:
- Viewing Studies
- Comparing Studies
- Editing Studies
- New Study from Comparing Records
- New Study from Simulations or Physical Tests
- New Study from Studies Main Page
20.1. Studies Main Page
Studies Page Card Layout and Multi-Select
The Studies main page has been enhanced with a card-based layout and multi-select functionality, enabling more efficient management of studies.
Overview
The updated layout presents studies as individual cards, improving visual organization and accessibility. Users can now select multiple studies and perform bulk actions through a floating action panel.
Features
Card-Based Layout
- Studies are displayed as cards instead of a traditional table view
- Each card provides a clear and concise summary of study details
- Improves readability and navigation across studies
Multi-Select Support
- Users can select multiple studies simultaneously
- Selection can be performed using standard multi-select interactions
Bulk Action Panel
- A floating action panel appears when one or more studies are selected
- Provides quick access to bulk operations on selected studies
- Automatically hides when no studies are selected
Benefits
- Enhances visual clarity and user experience
- Streamlines workflows with bulk operations
- Reduces time required to manage multiple studies
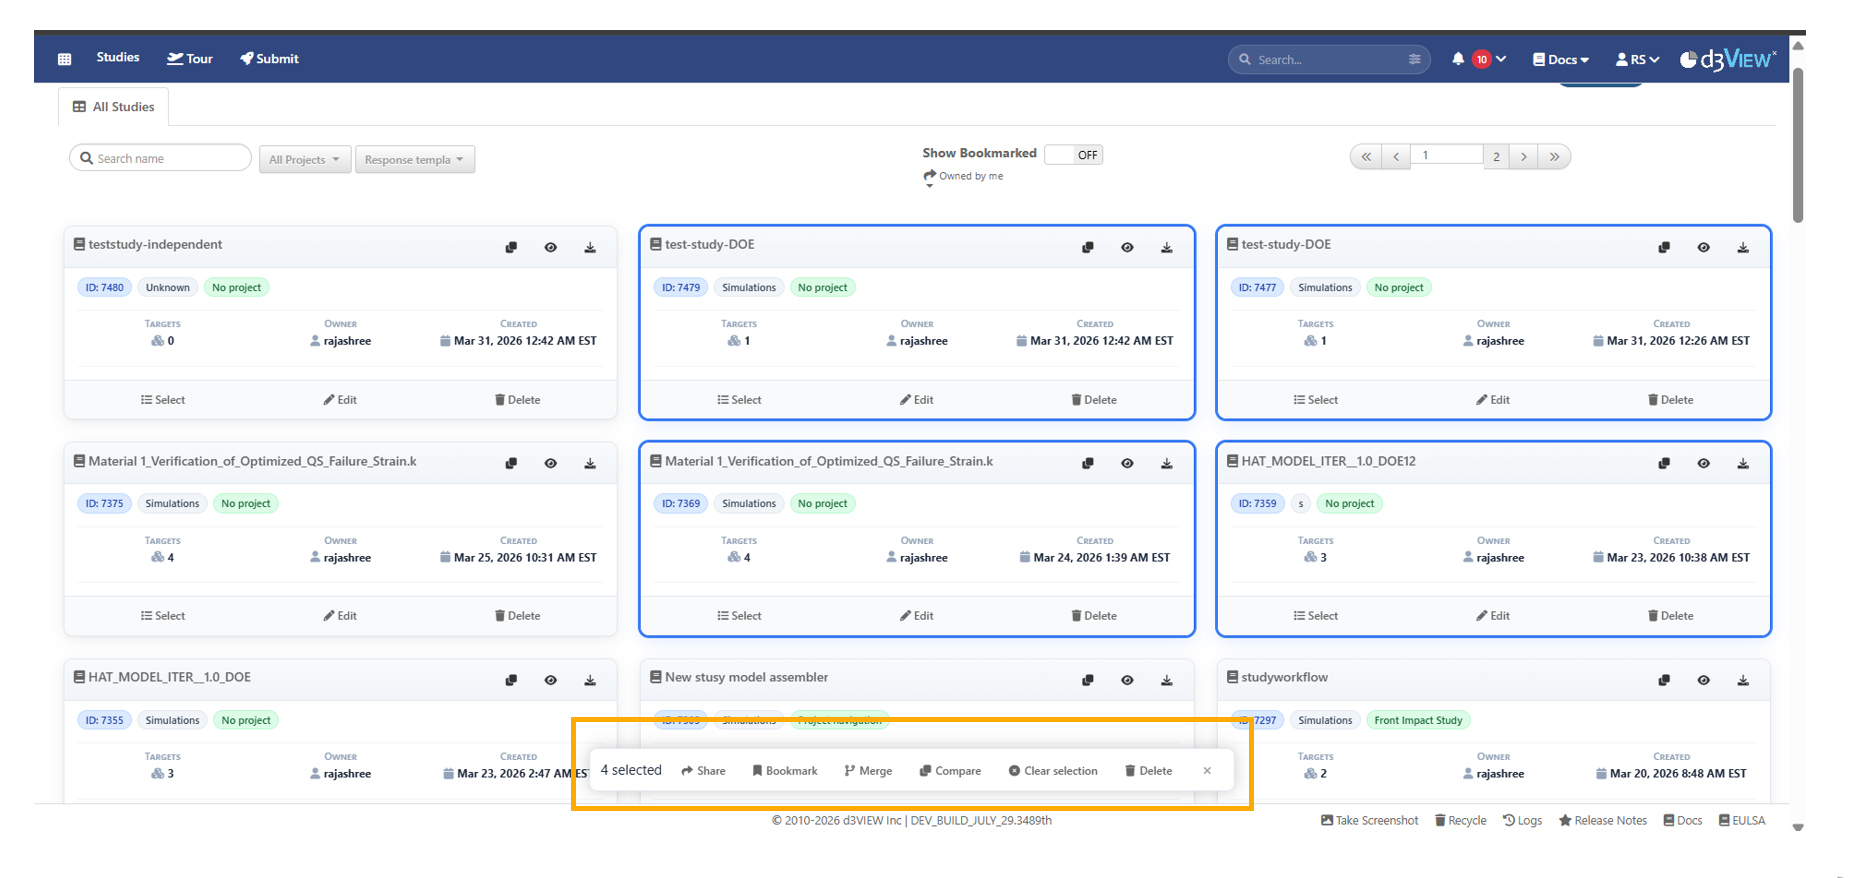
Studies main Page
Study Dashboard - Updated Layout
Overview
The Study dashboard page has been updated to provide a comprehensive overview of a study. The page now includes Study Summary, Status, About, Activity, Simulations, and Physical Tests, allowing users to quickly access all relevant study information in one place.
Key Sections
- Study Summary - Provides a high-level overview of the study, including key metrics and progress indicators.
- Status - Displays the current state of the study, such as Active, Completed, or Pending.
- About - Contains descriptive information about the study, including objectives, methodology, and relevant notes.
- Activity - Shows recent activity within the study, such as task updates, comments, and interactions.
- Simulations - Lists all simulation runs related to the study, including results, parameters, and logs.
- Physical Tests - Displays physical test data, results, and associated metadata for the study.
DOE Parameters Page in Study Dashboard
The Study dashboard now includes a dedicated DOE Parameters page, providing enhanced visibility into design parameter exploration and sampling.
This page offers the following capabilities:
- Parameter Range Visualization: Displays the full range of each design parameter along with clearly marked default values and sampled data points.
- Sample Distribution Insight: Users can easily compare how sampled values are distributed within the defined parameter ranges.
- Parallel Coordinates Chart: Includes an interactive parallel coordinates chart, with lines representing individual samples and colored based on the selected target variable.
- Improved Analysis: Enables better understanding of relationships between parameters and their impact on outcomes.
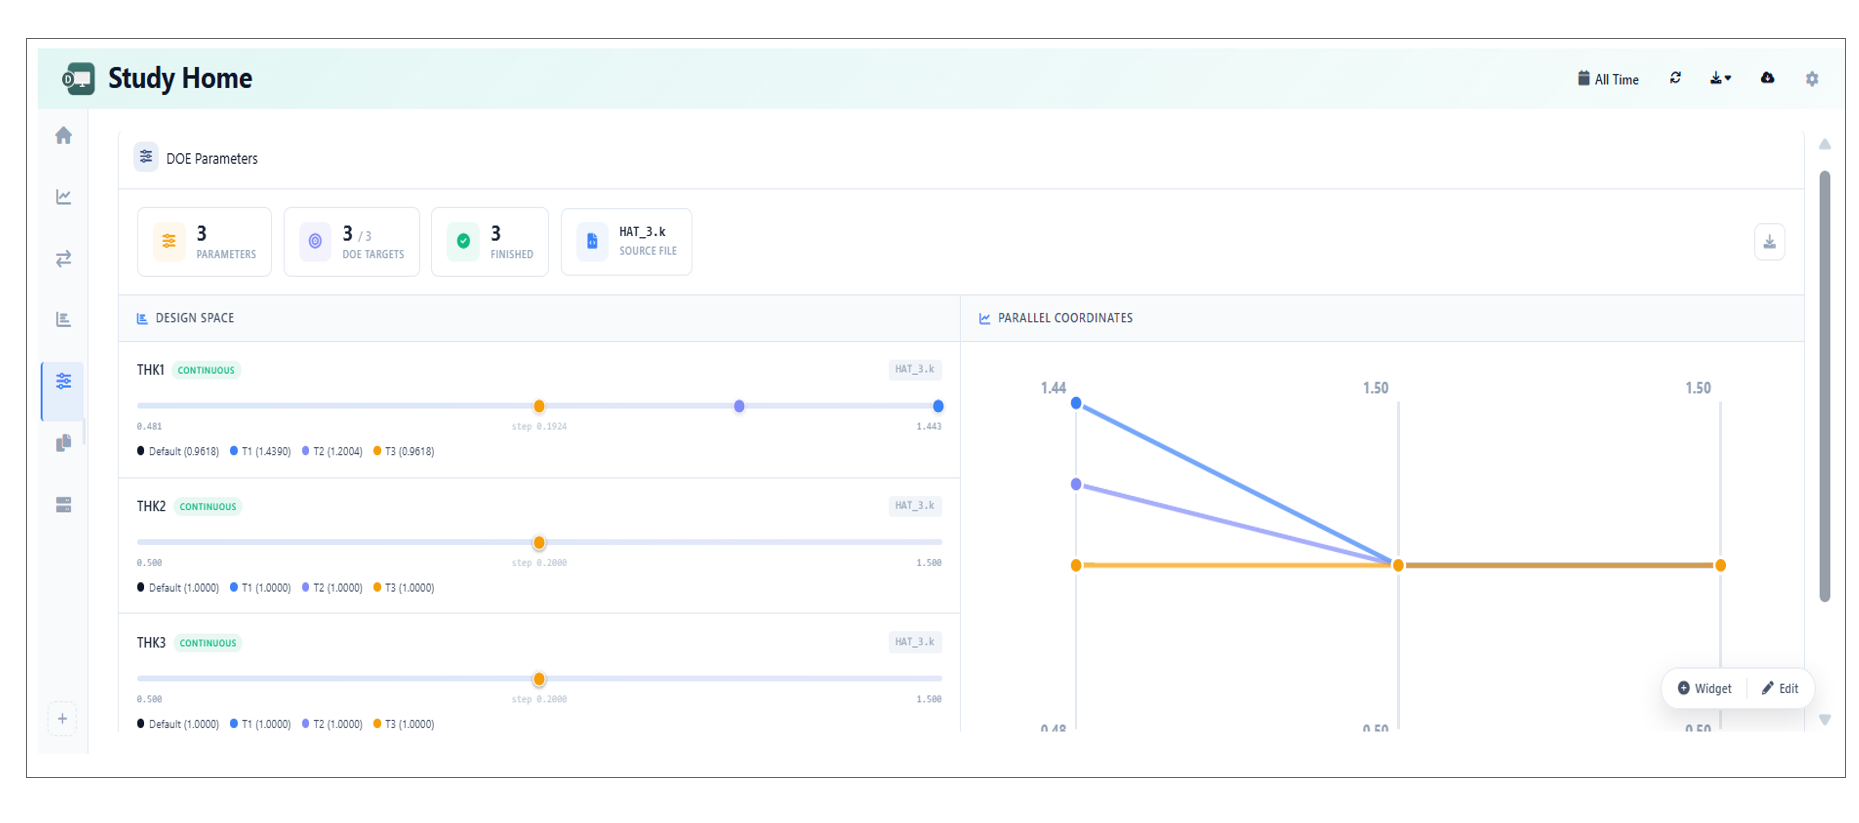
DOE Parameters Page
Viewing Studies
Click on “View” next to a study thumbnail to open it up in another tab. Here, you can review the records being compared in the study and take actions on them. You can compare, share, edit or delete your study from this window.
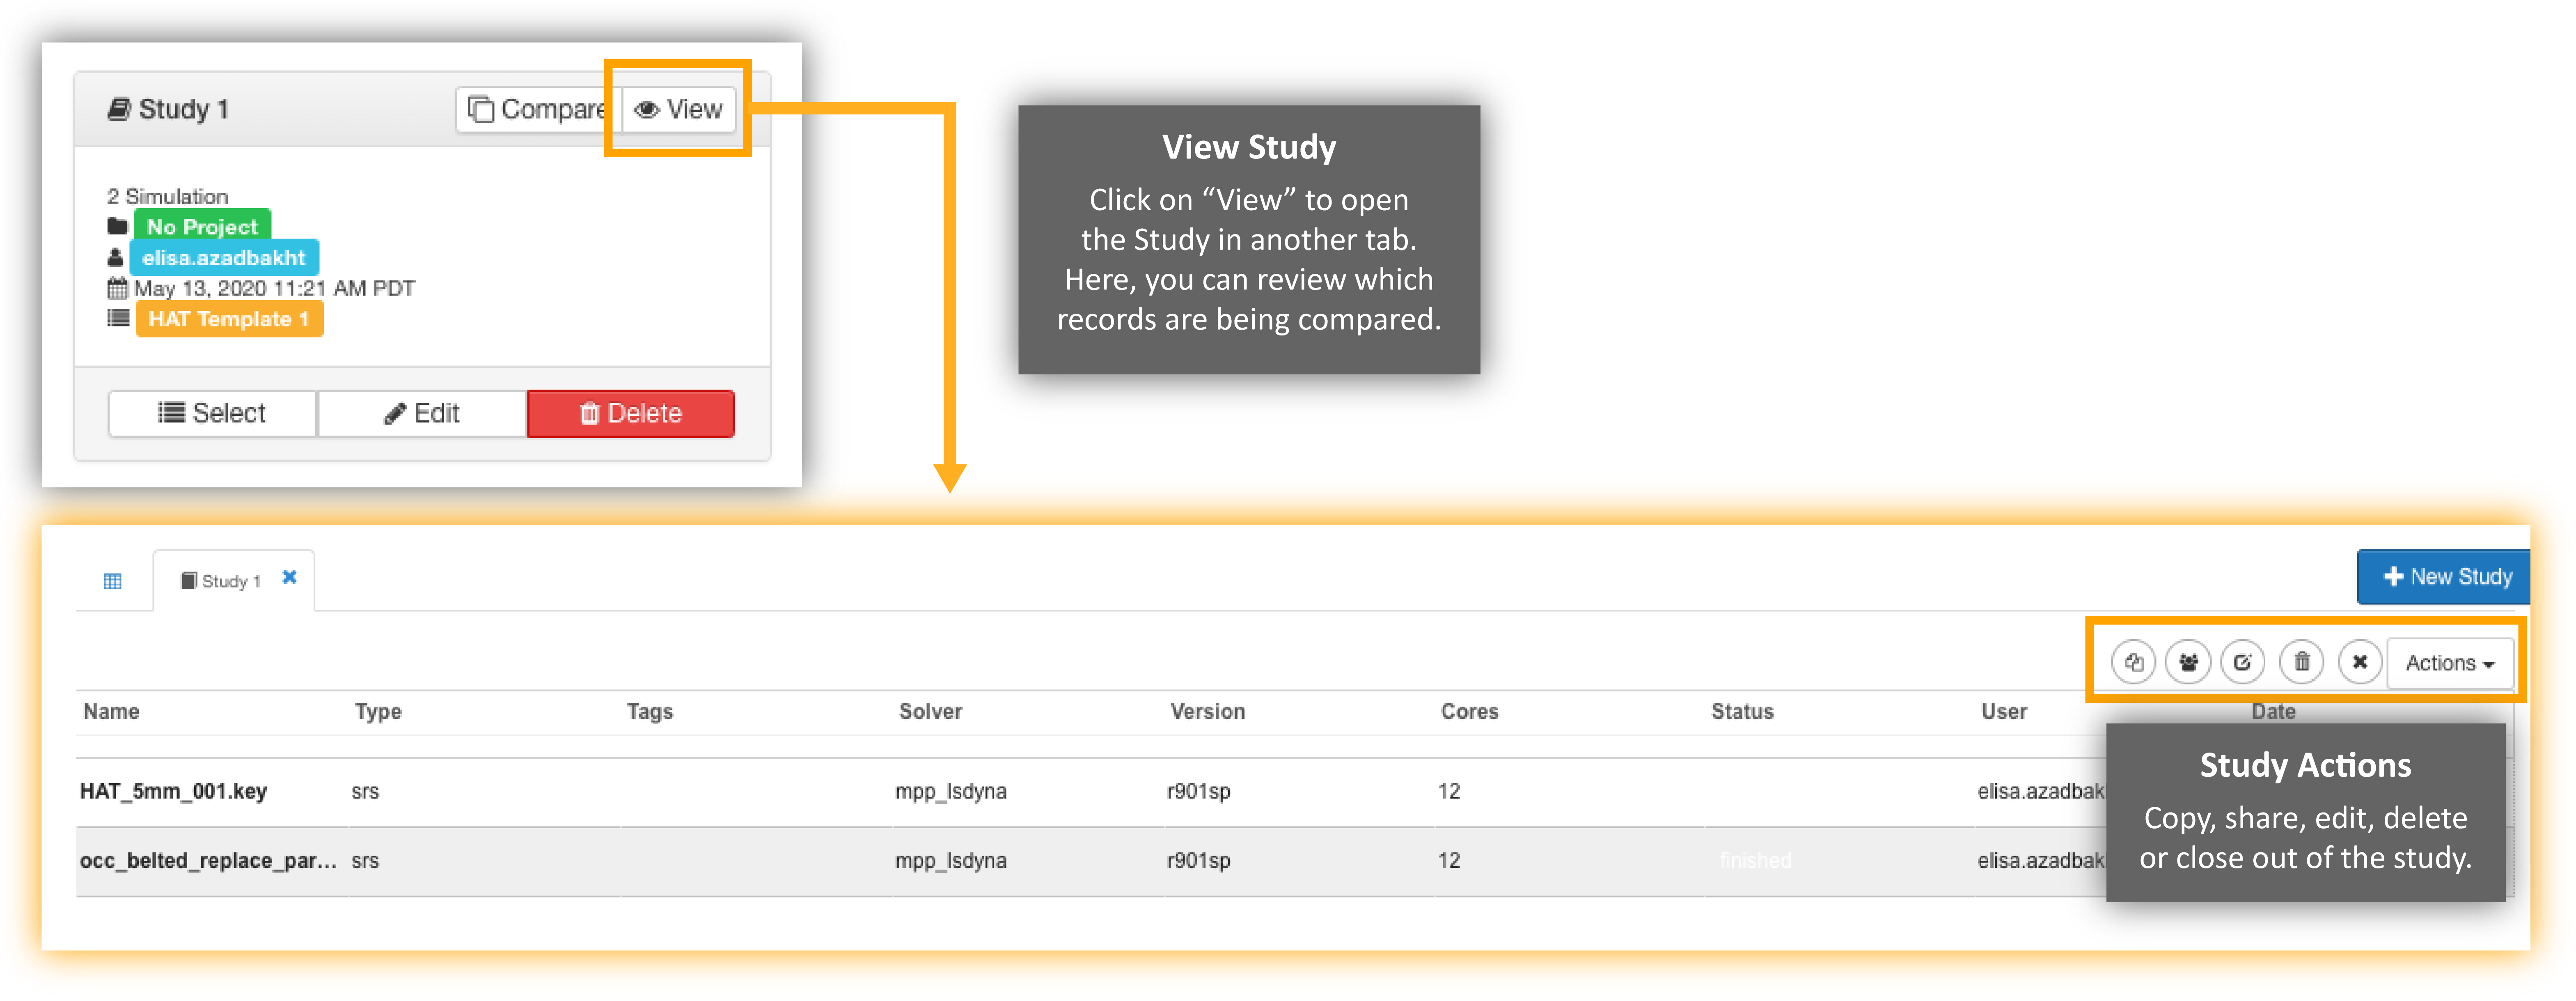
Figure 2: Viewing a Study
Comparing Records in Studies
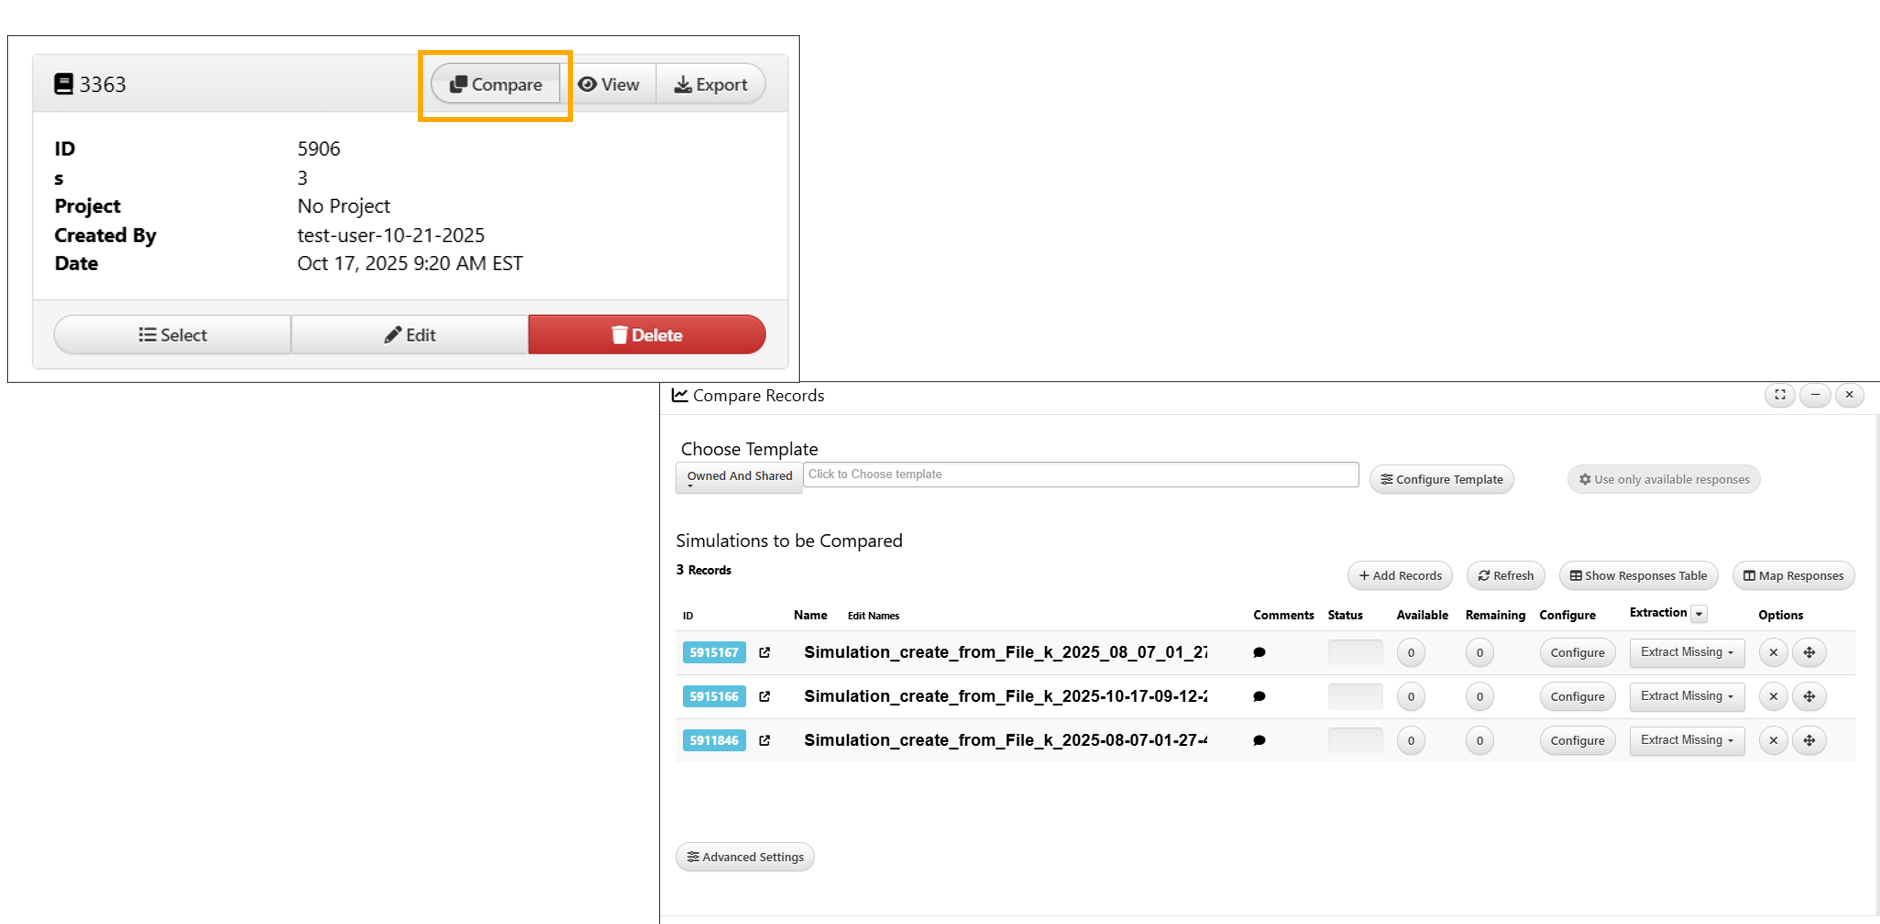
To open up your study for comparison, click on the compare button next to its thumbnail. You can also click on compare in an opened study tab as stated in the above section. In the next window, you will see the records in the chosen study. Hit the big blue bar at the bottom that says “Click to Search and add More Records to Compare’ if you want to compare more than the currently selected records. Click “OK” if you want to just compare what you have.
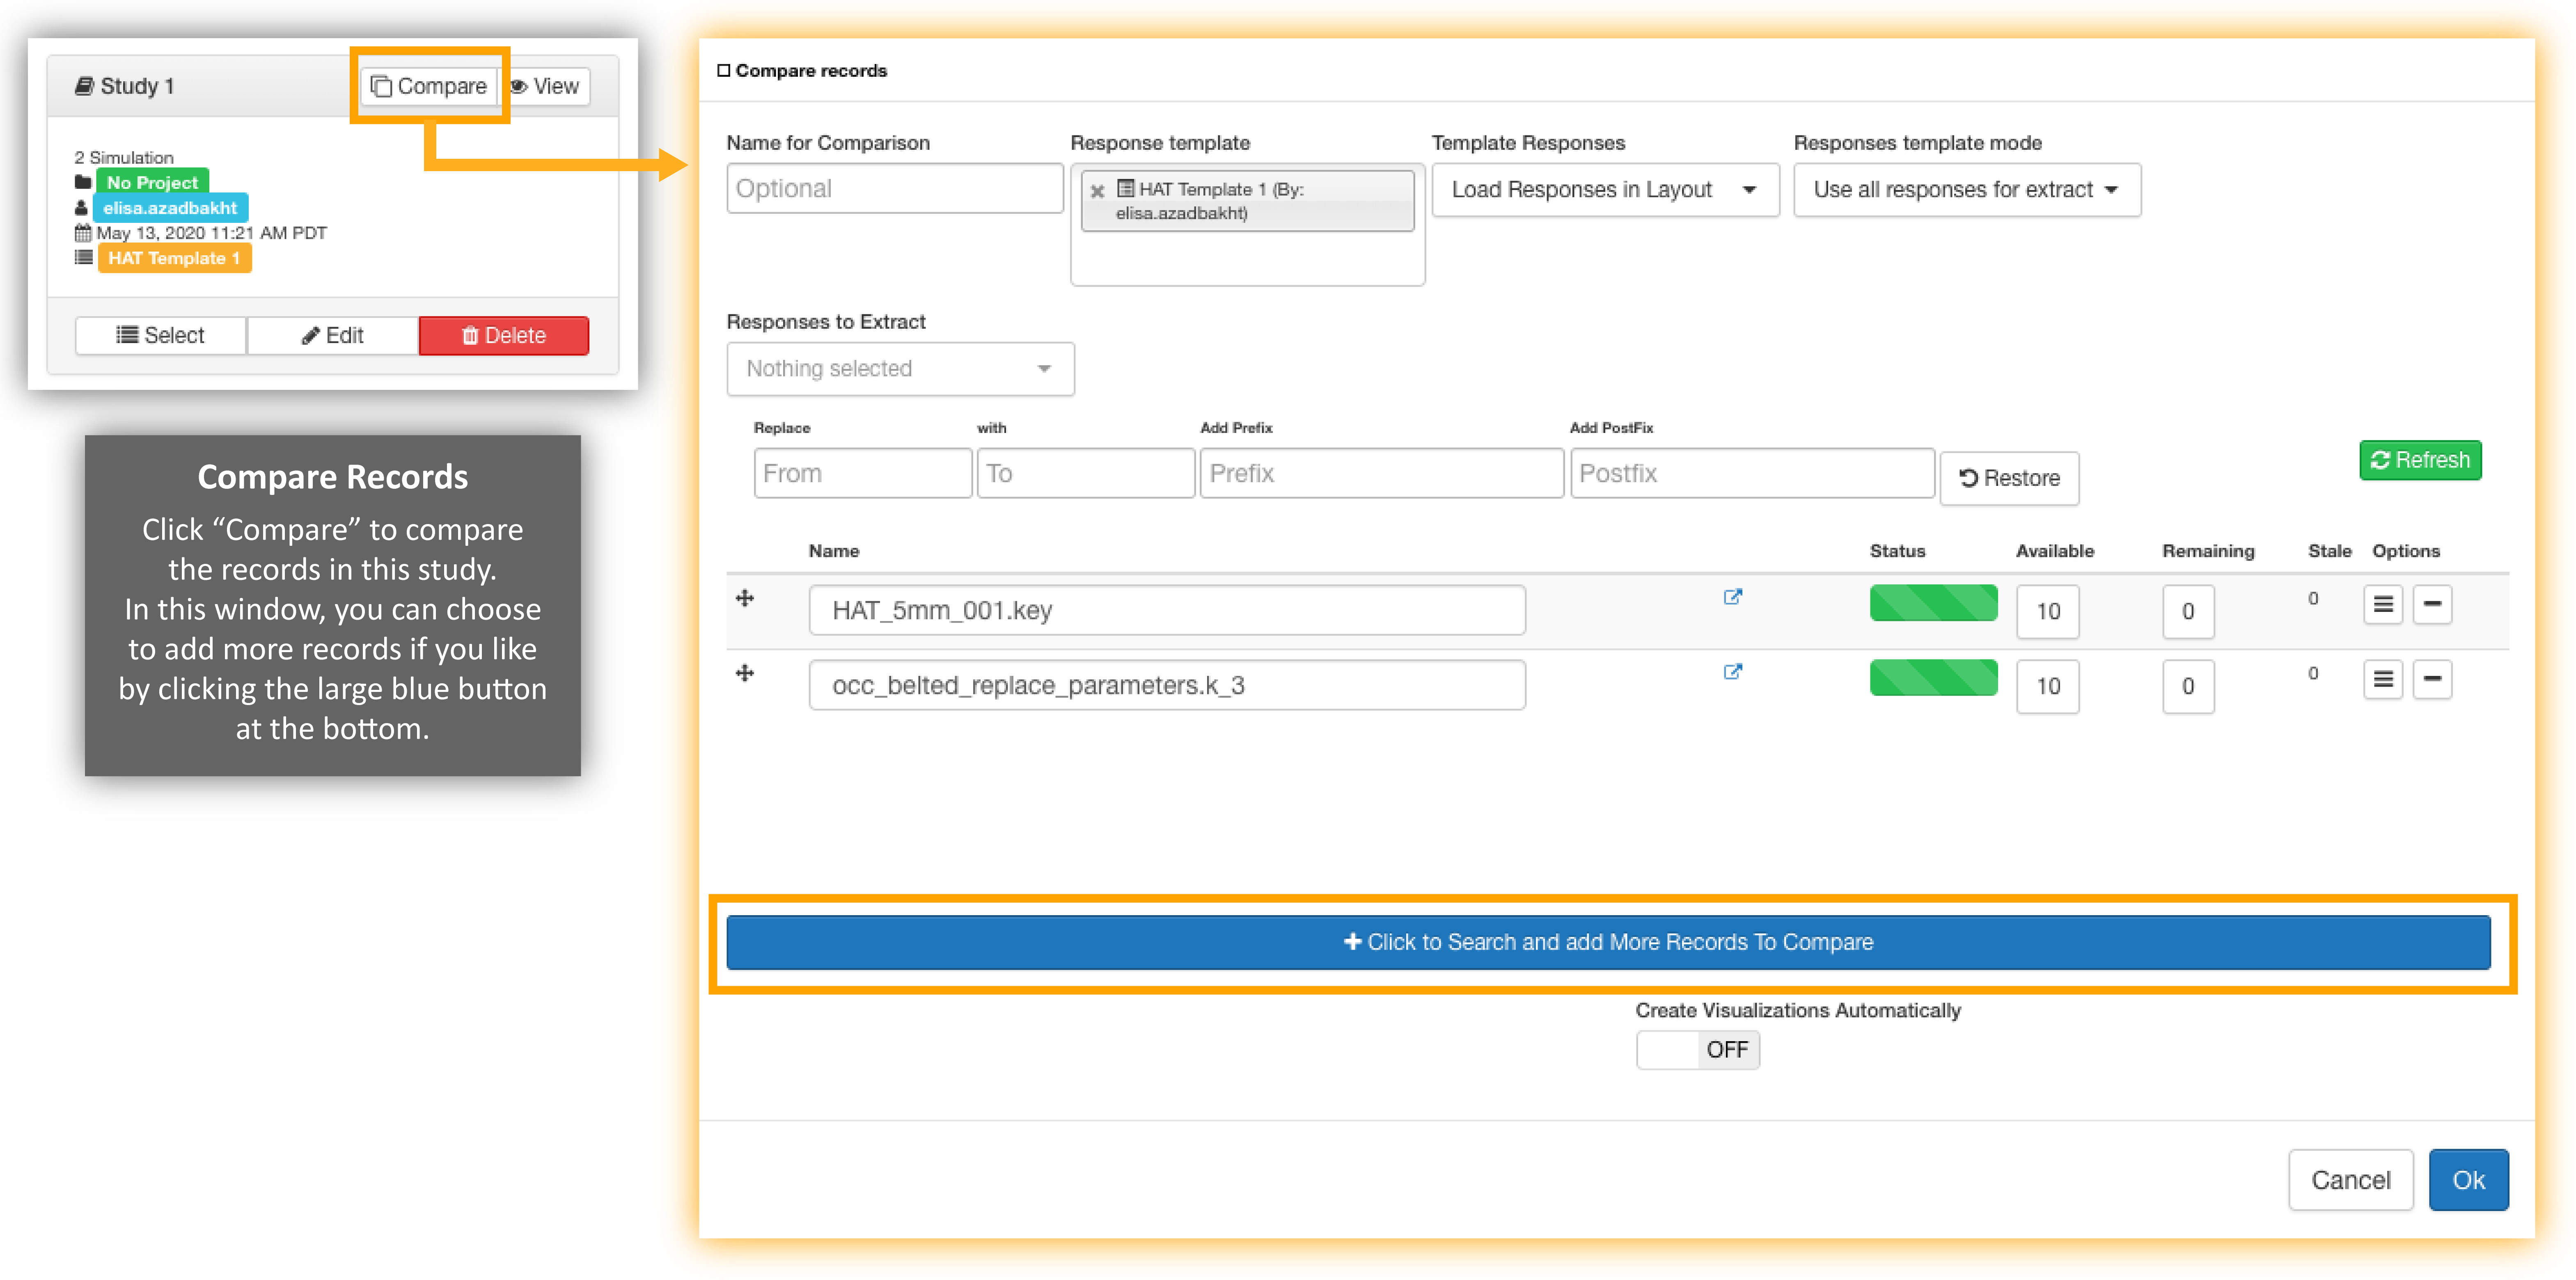
Figure 3: Open Study for Comparison
If you choose to add more, you can do so in the next window by sifting through all your records in the left column and selecting more. All the selected records will appear in the right column. After choosing, click on “Process” at the bottom.
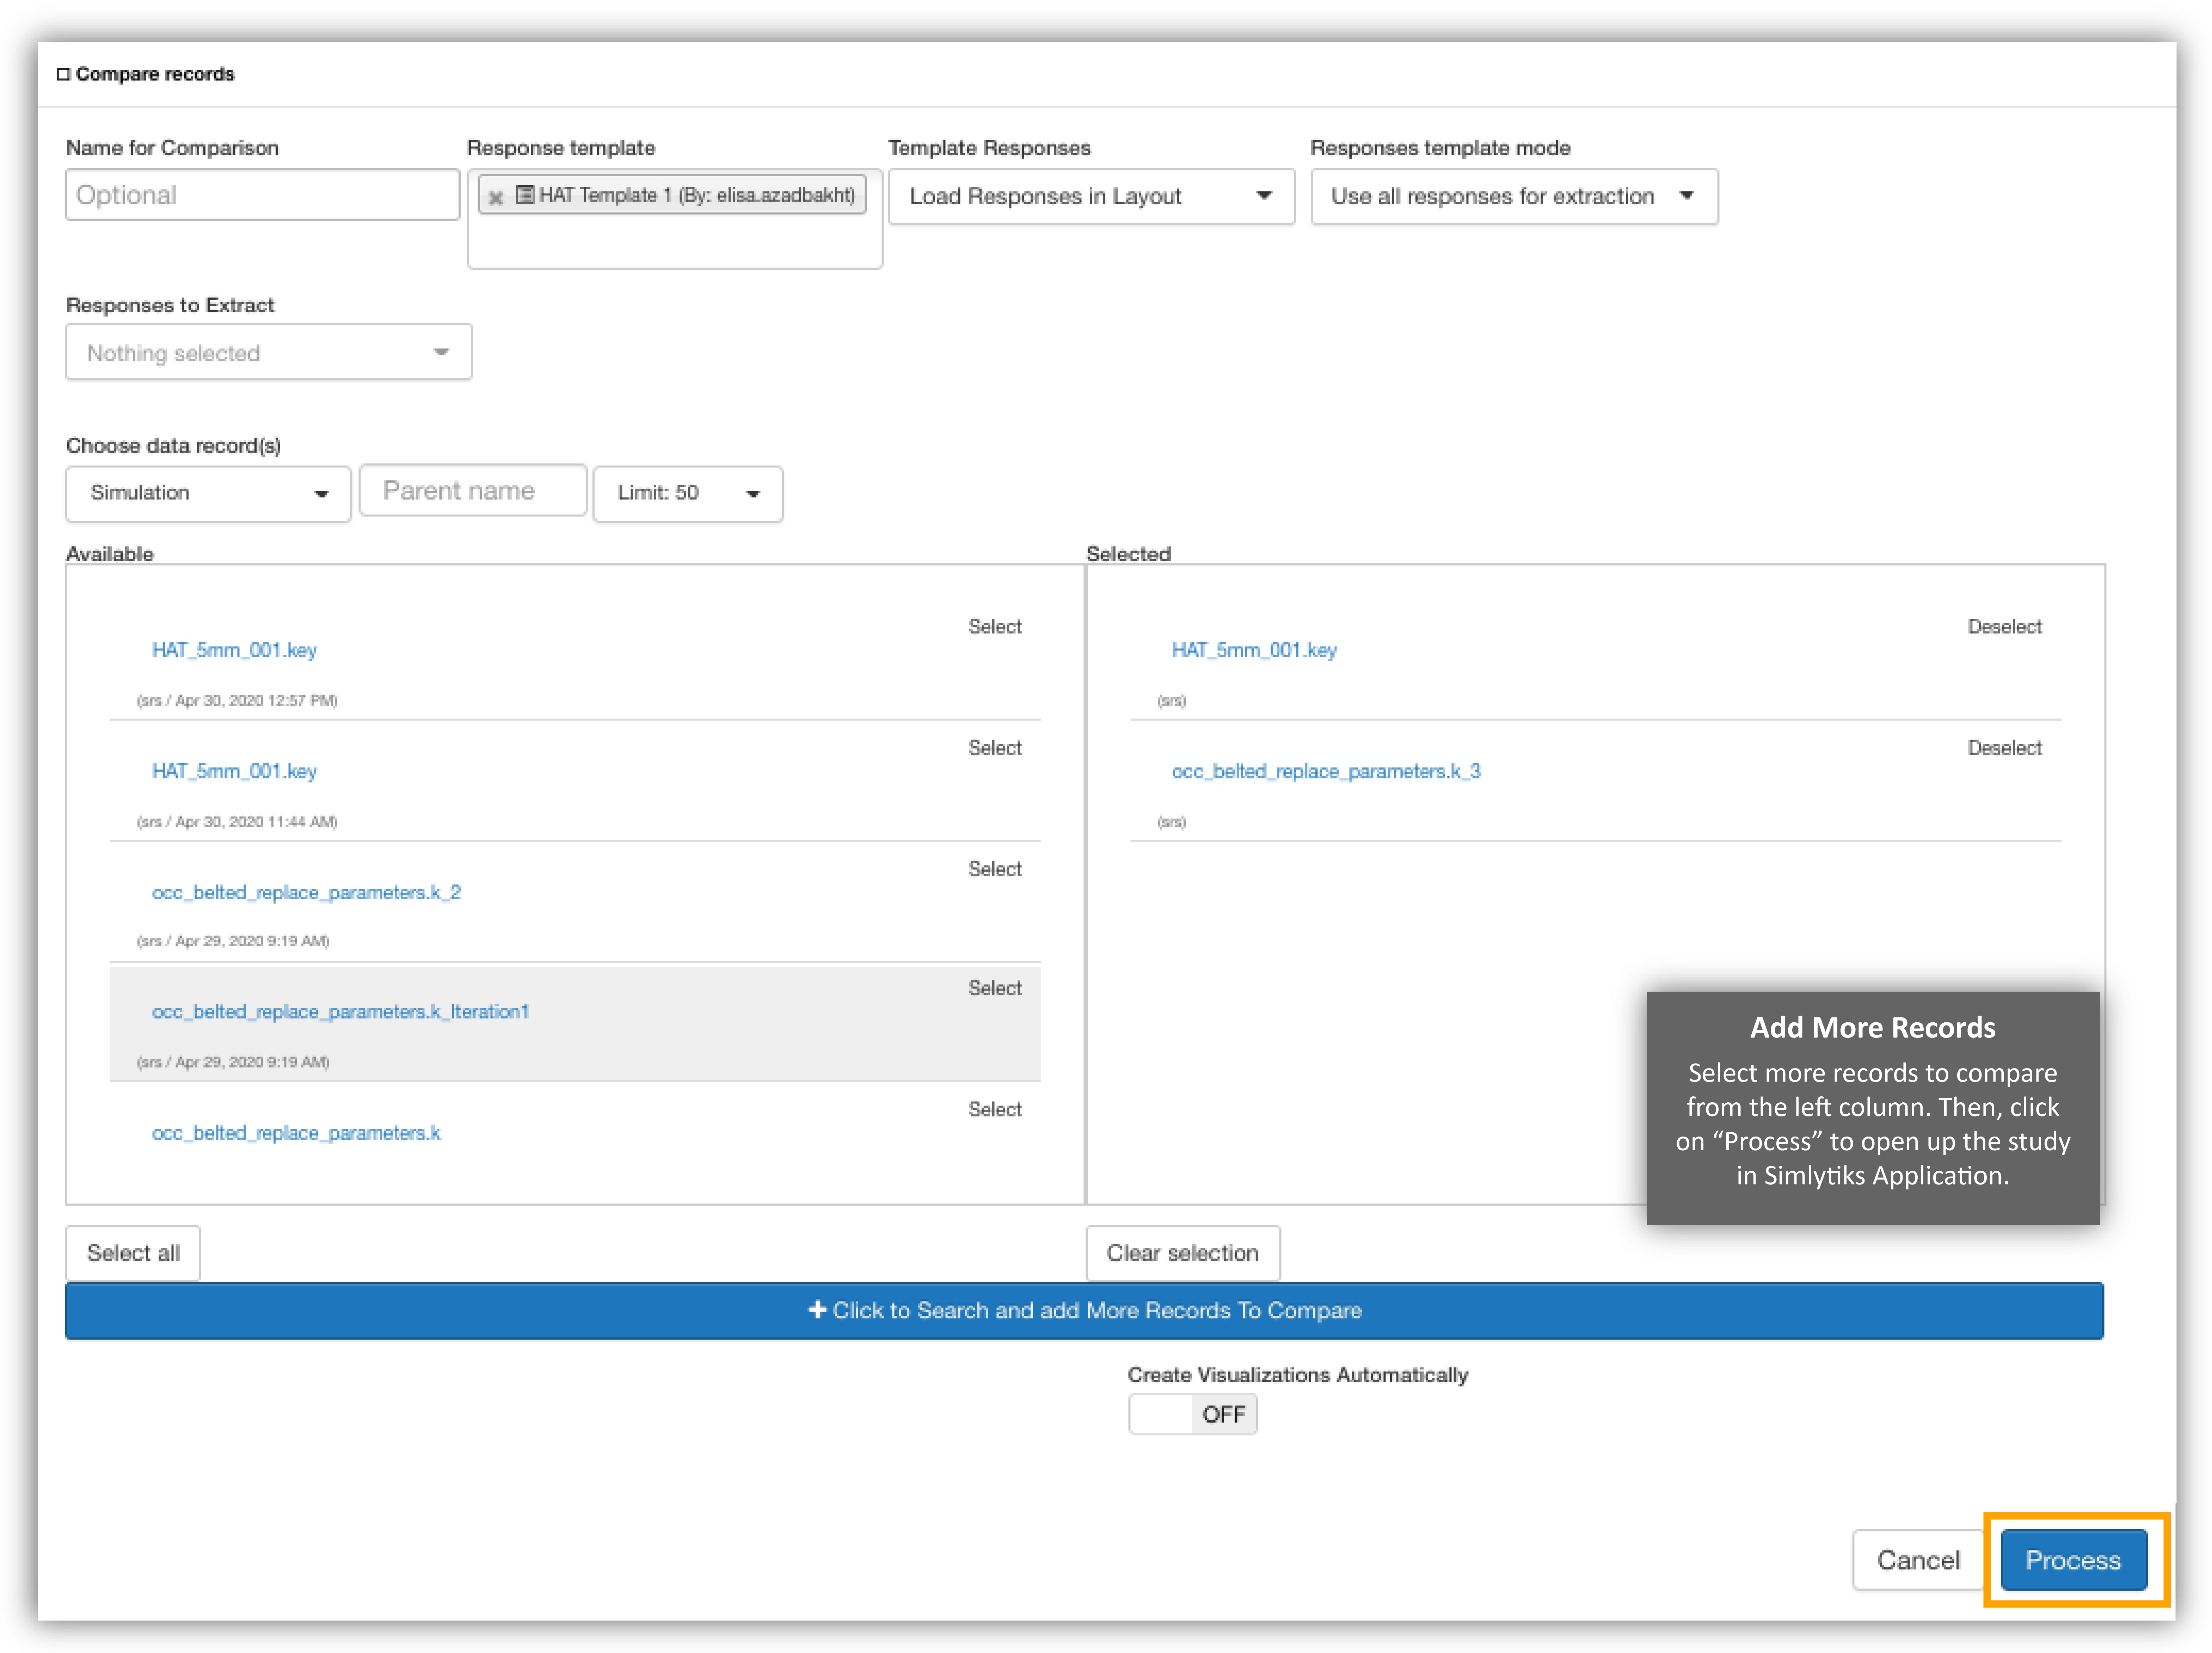
Figure 4: Add More Records
The comparison will open up in the Simlytiks application for you to explore.
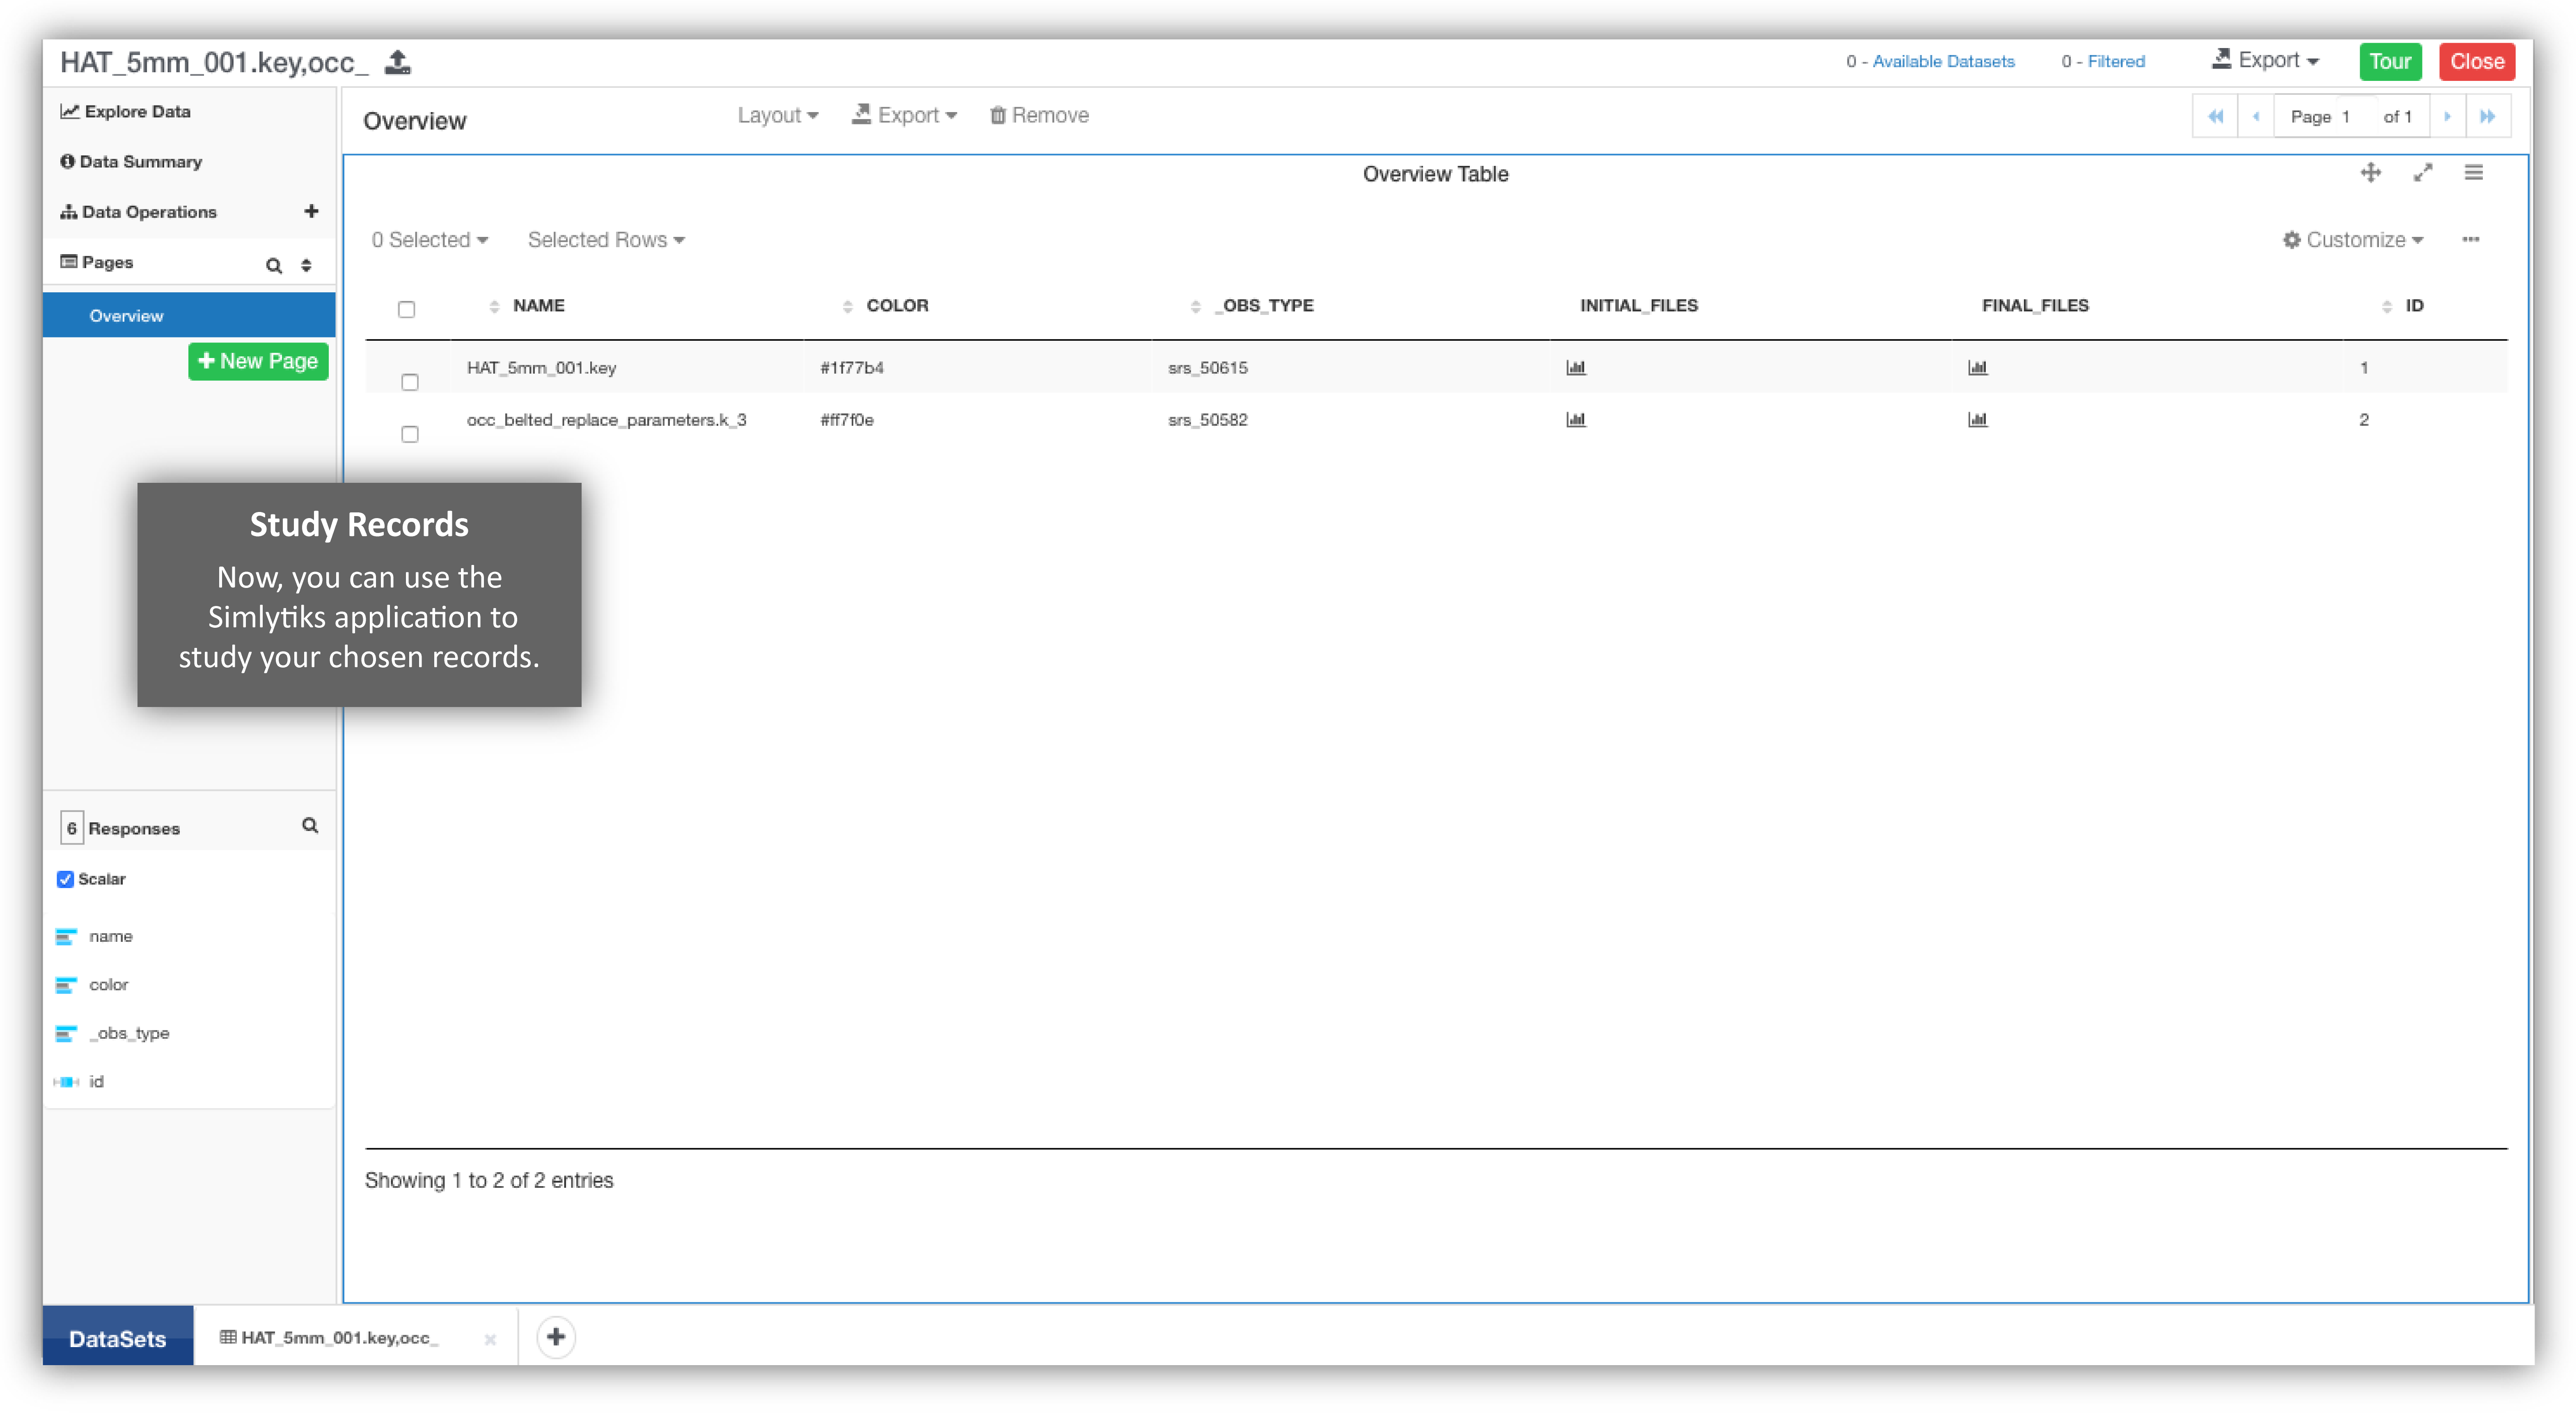
Figure 5: Open in Simlytiks
Studies can be compared in Simlytiks using the compare option.
Study Compare
Editing Studies
To edit a study, click on the edit button next to its thumbnail. You can also edit a study in its opened tab as explained earlier. In the edit study window, you can rename your study, add more records by selecting them from the left column, change its template and other specifications as well.
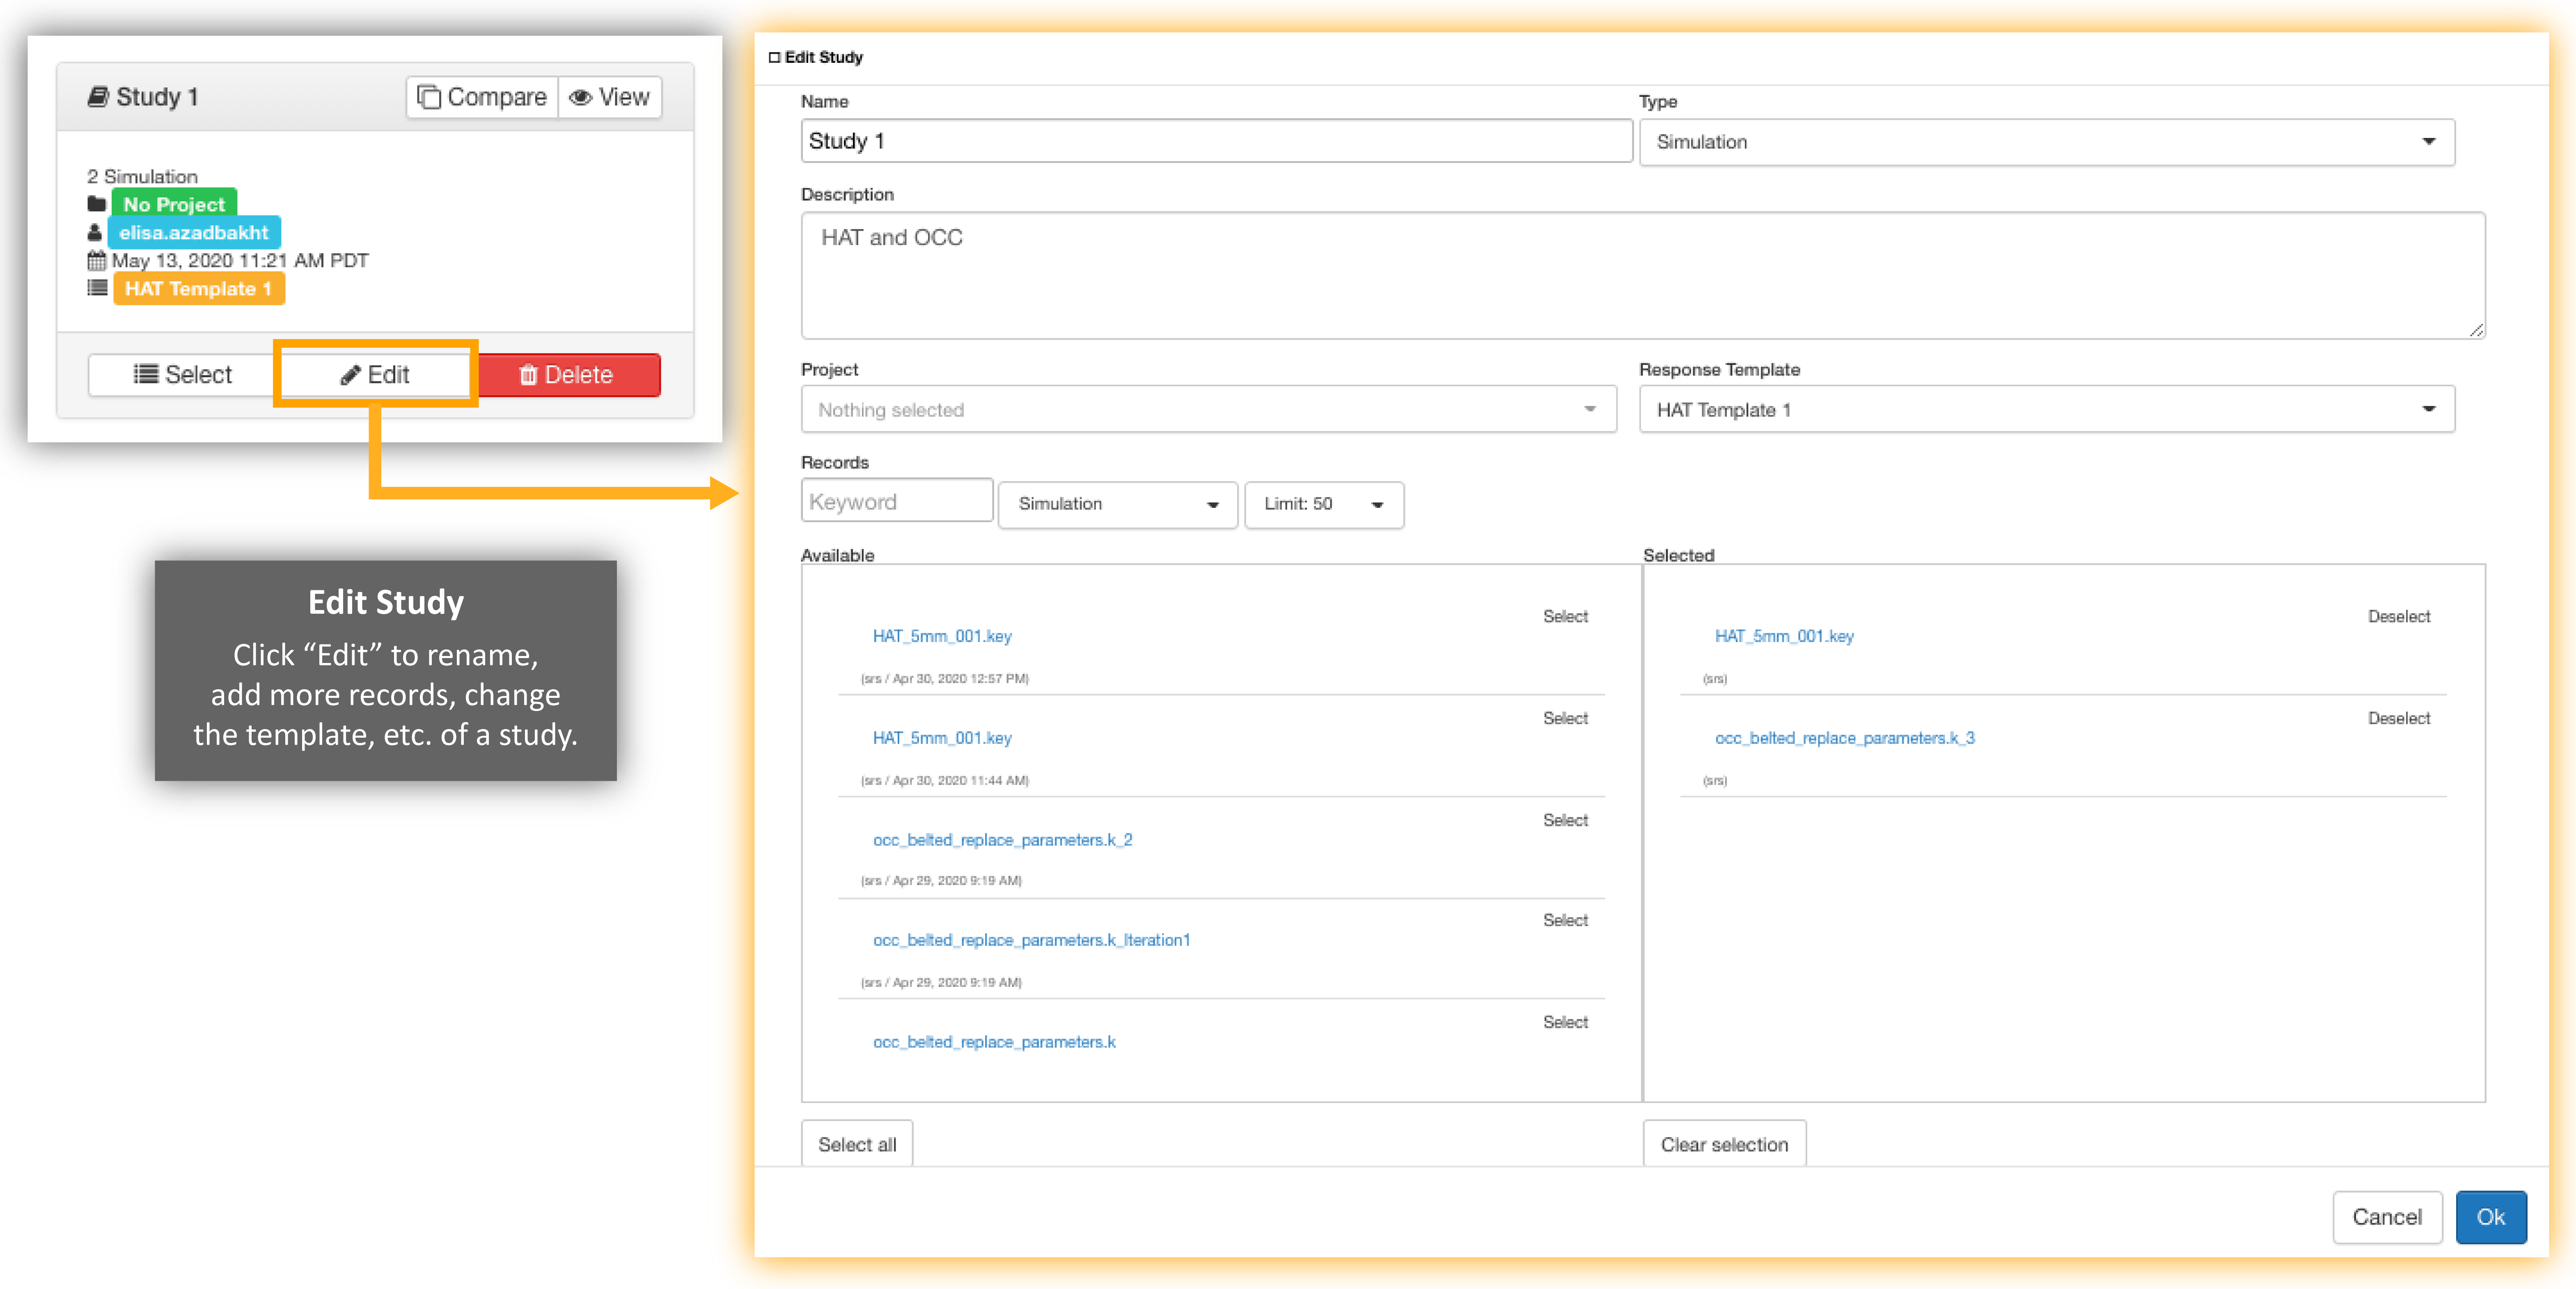
Figure 6: Editing a Study
20.2. Creating a New Study
There are a few ways to create a study: by comparing records, creating from selected simulations or physical tests, or creating from “New Test” on the Studies main page.
Comparing Records
Every time you compare records a study is created. When you go this route, instead of filling out study specifications, you pick your records and open them up for comparison in Simlytiks. Go to your Simulations page and select your desired records. Then, right click and choose “Compare.” You can also select records from your Physical Tests page as well.
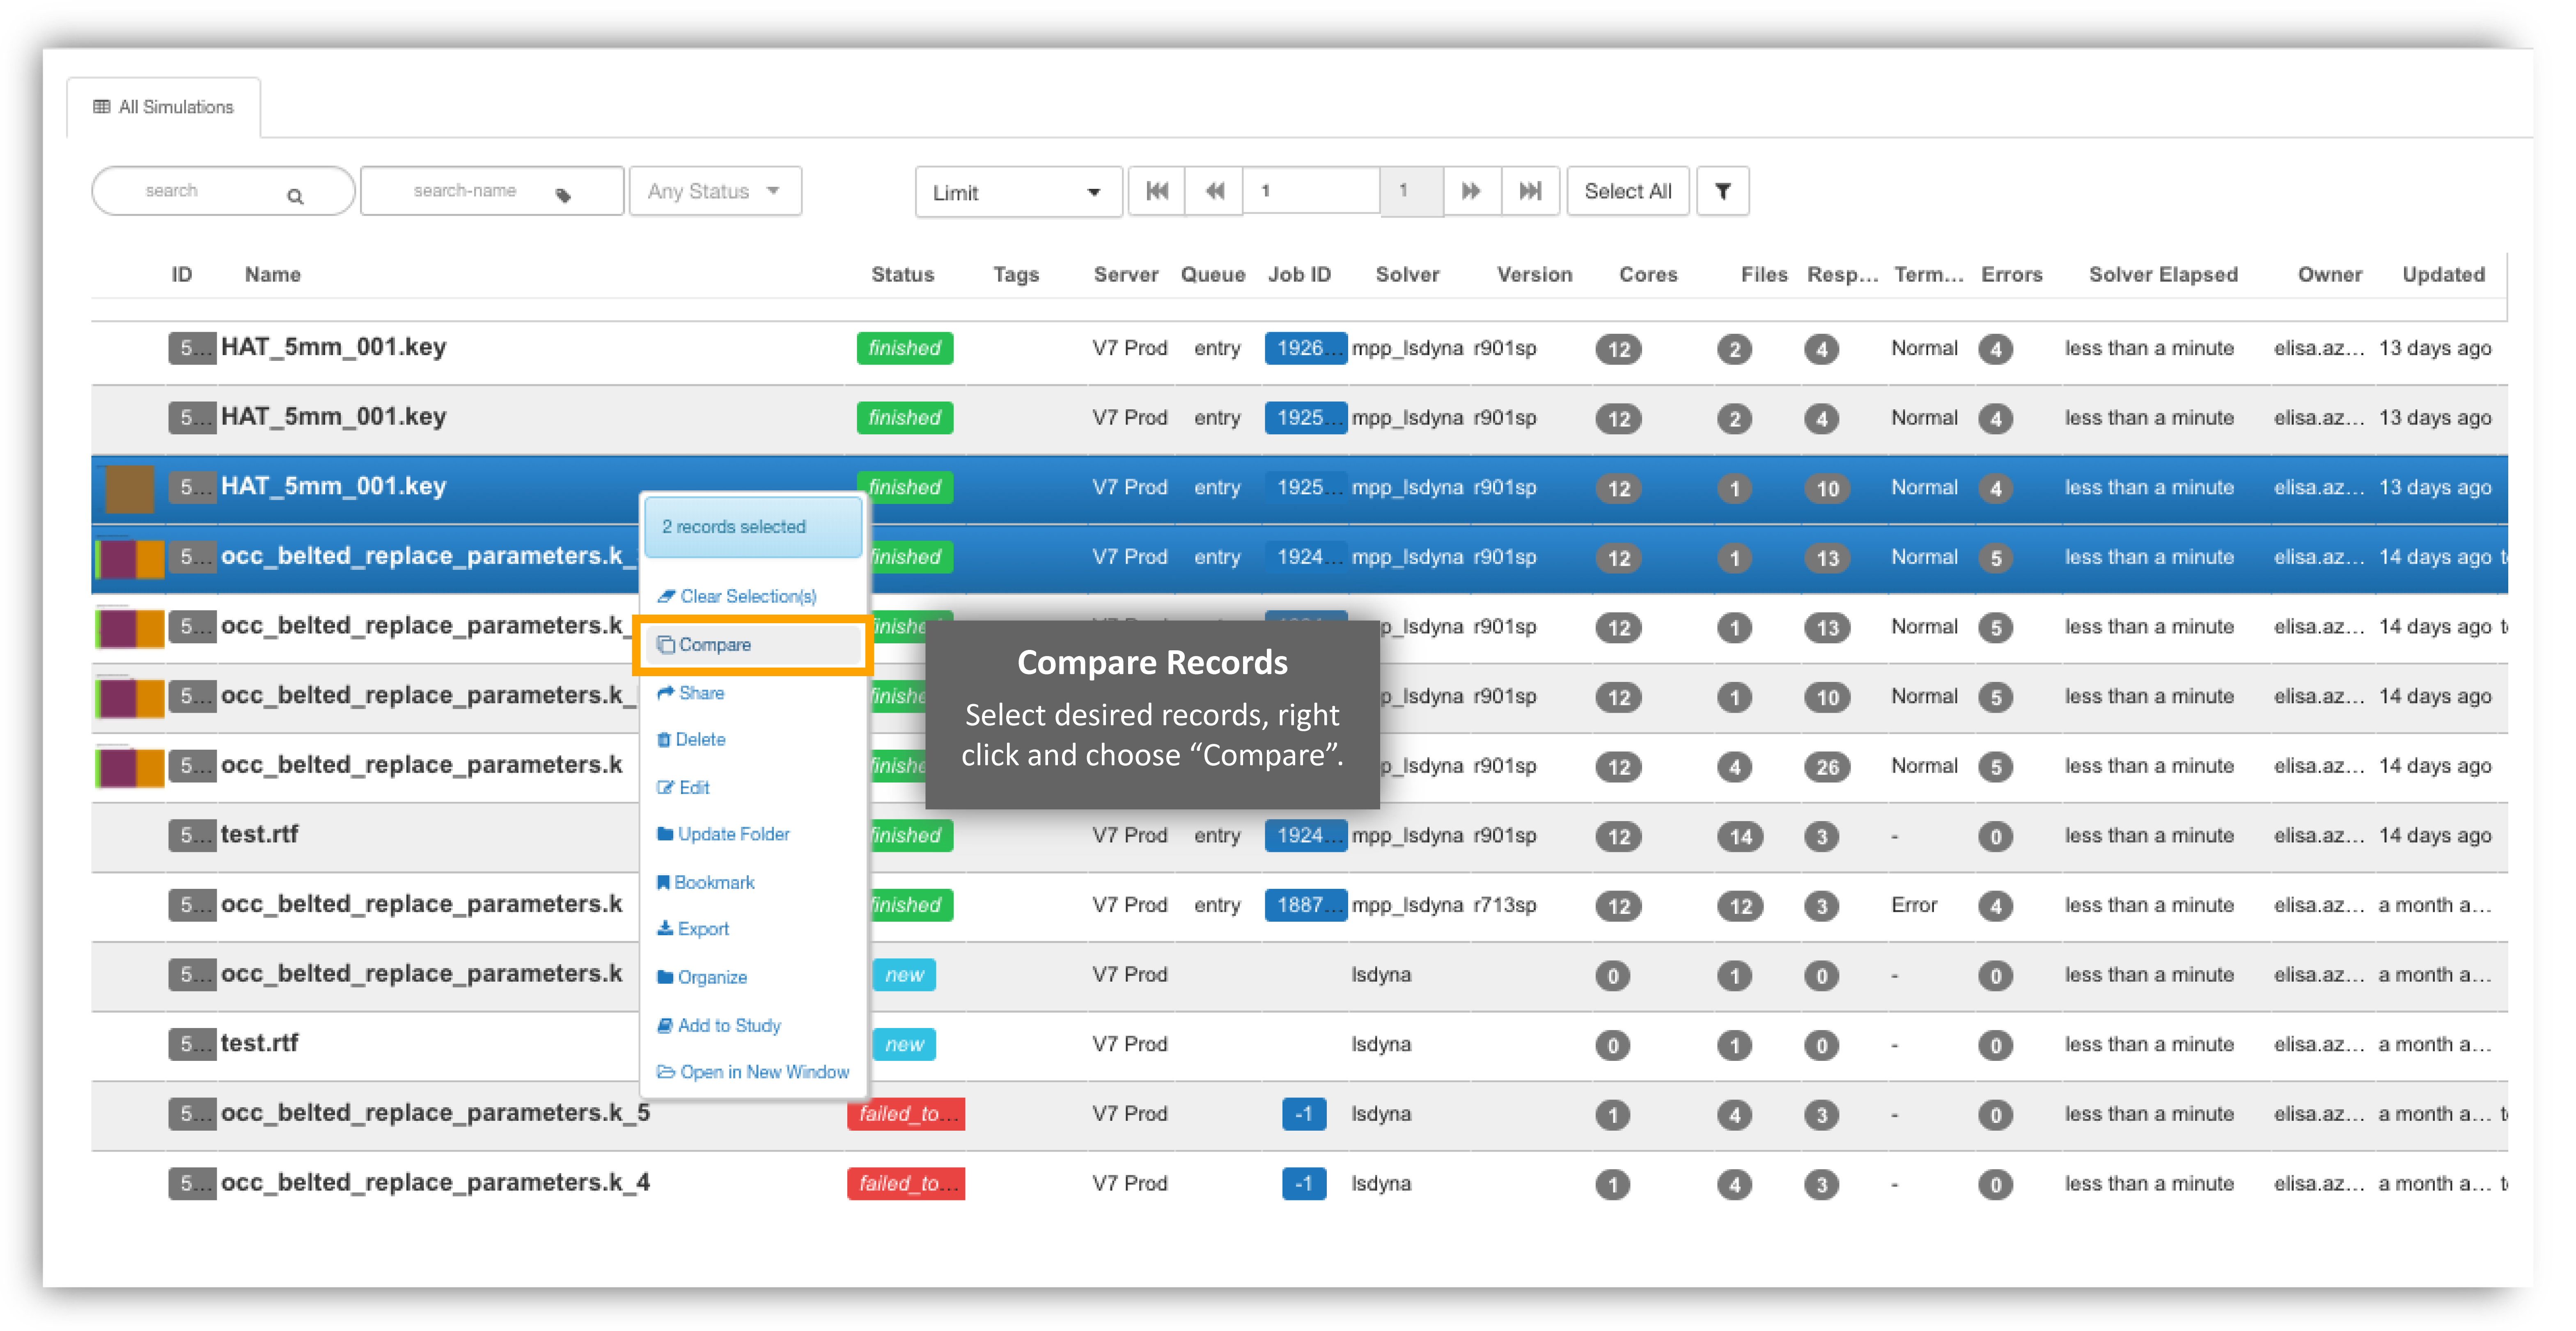
Figure 7: Comparing Records to Create a Study
After the compare records window pops up, press “OK” to open up these records in Simlytiks. You can also click on the big blue bar at the bottom to add more records to compare.

Figure 8: Comparing Records Window
New Study for Simulations of Physical Tests
If you would like to create a study before comparing the records you selected in your Simulations or Physical Tests page, you can do so by choosing the “Add to Study” option. Again, pick this option in the menu after selecting your records and right clicking.
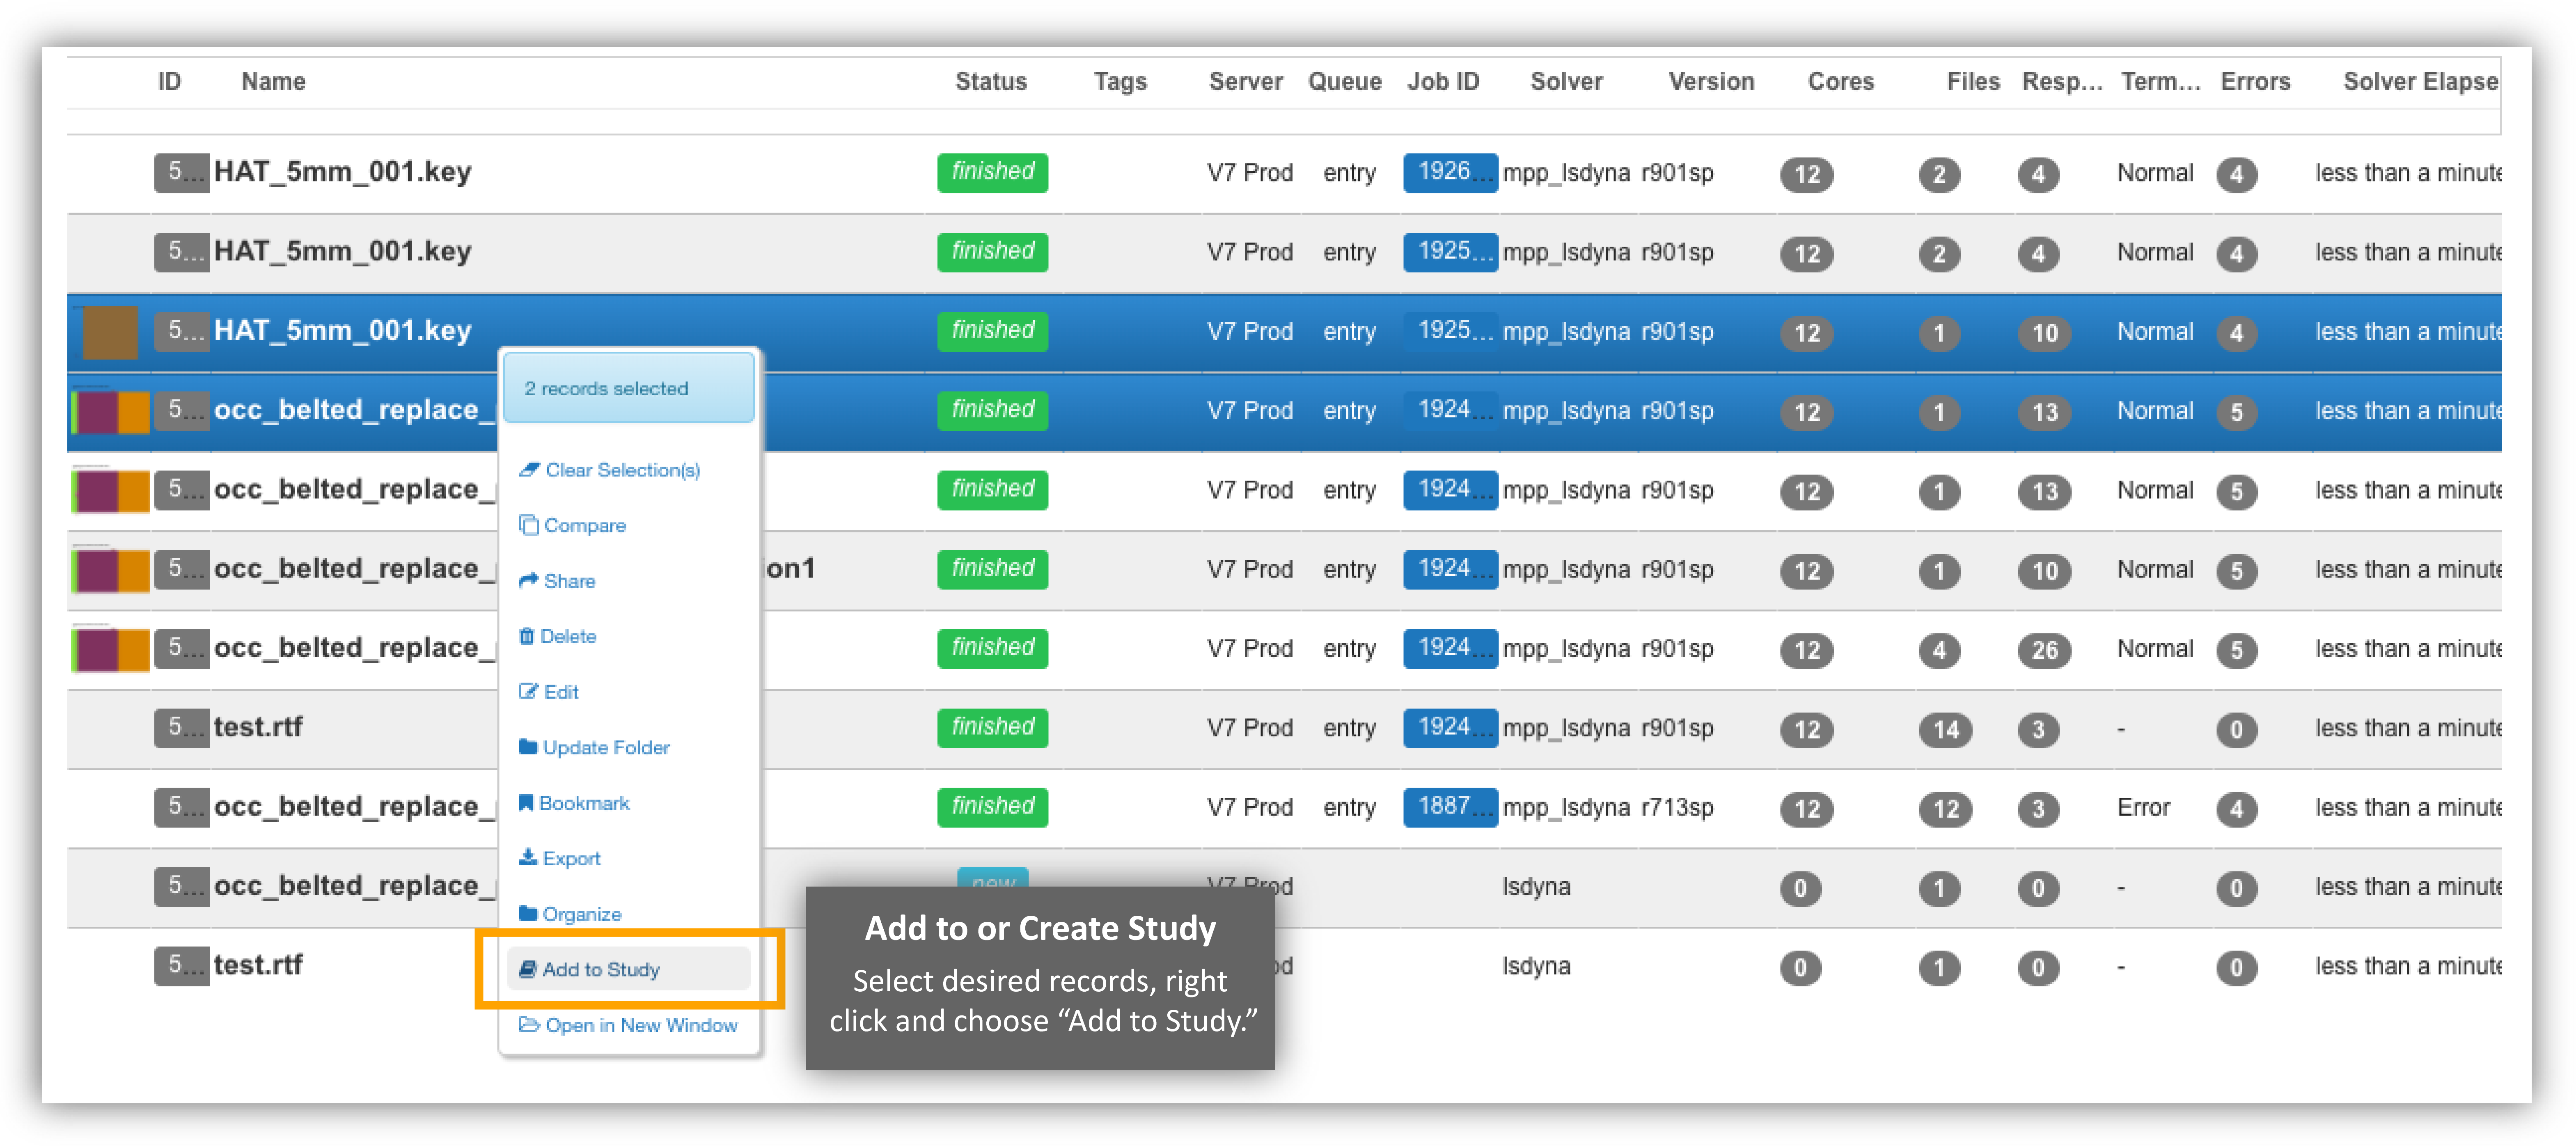
Figure 9: Create or Add to a Study from Selected Records
A window will pop up where you can create a new study or add these records to an existing one. If you are creating a new study, make sure to name it and add a description. You can also choose other specifications such as the type of study or template.
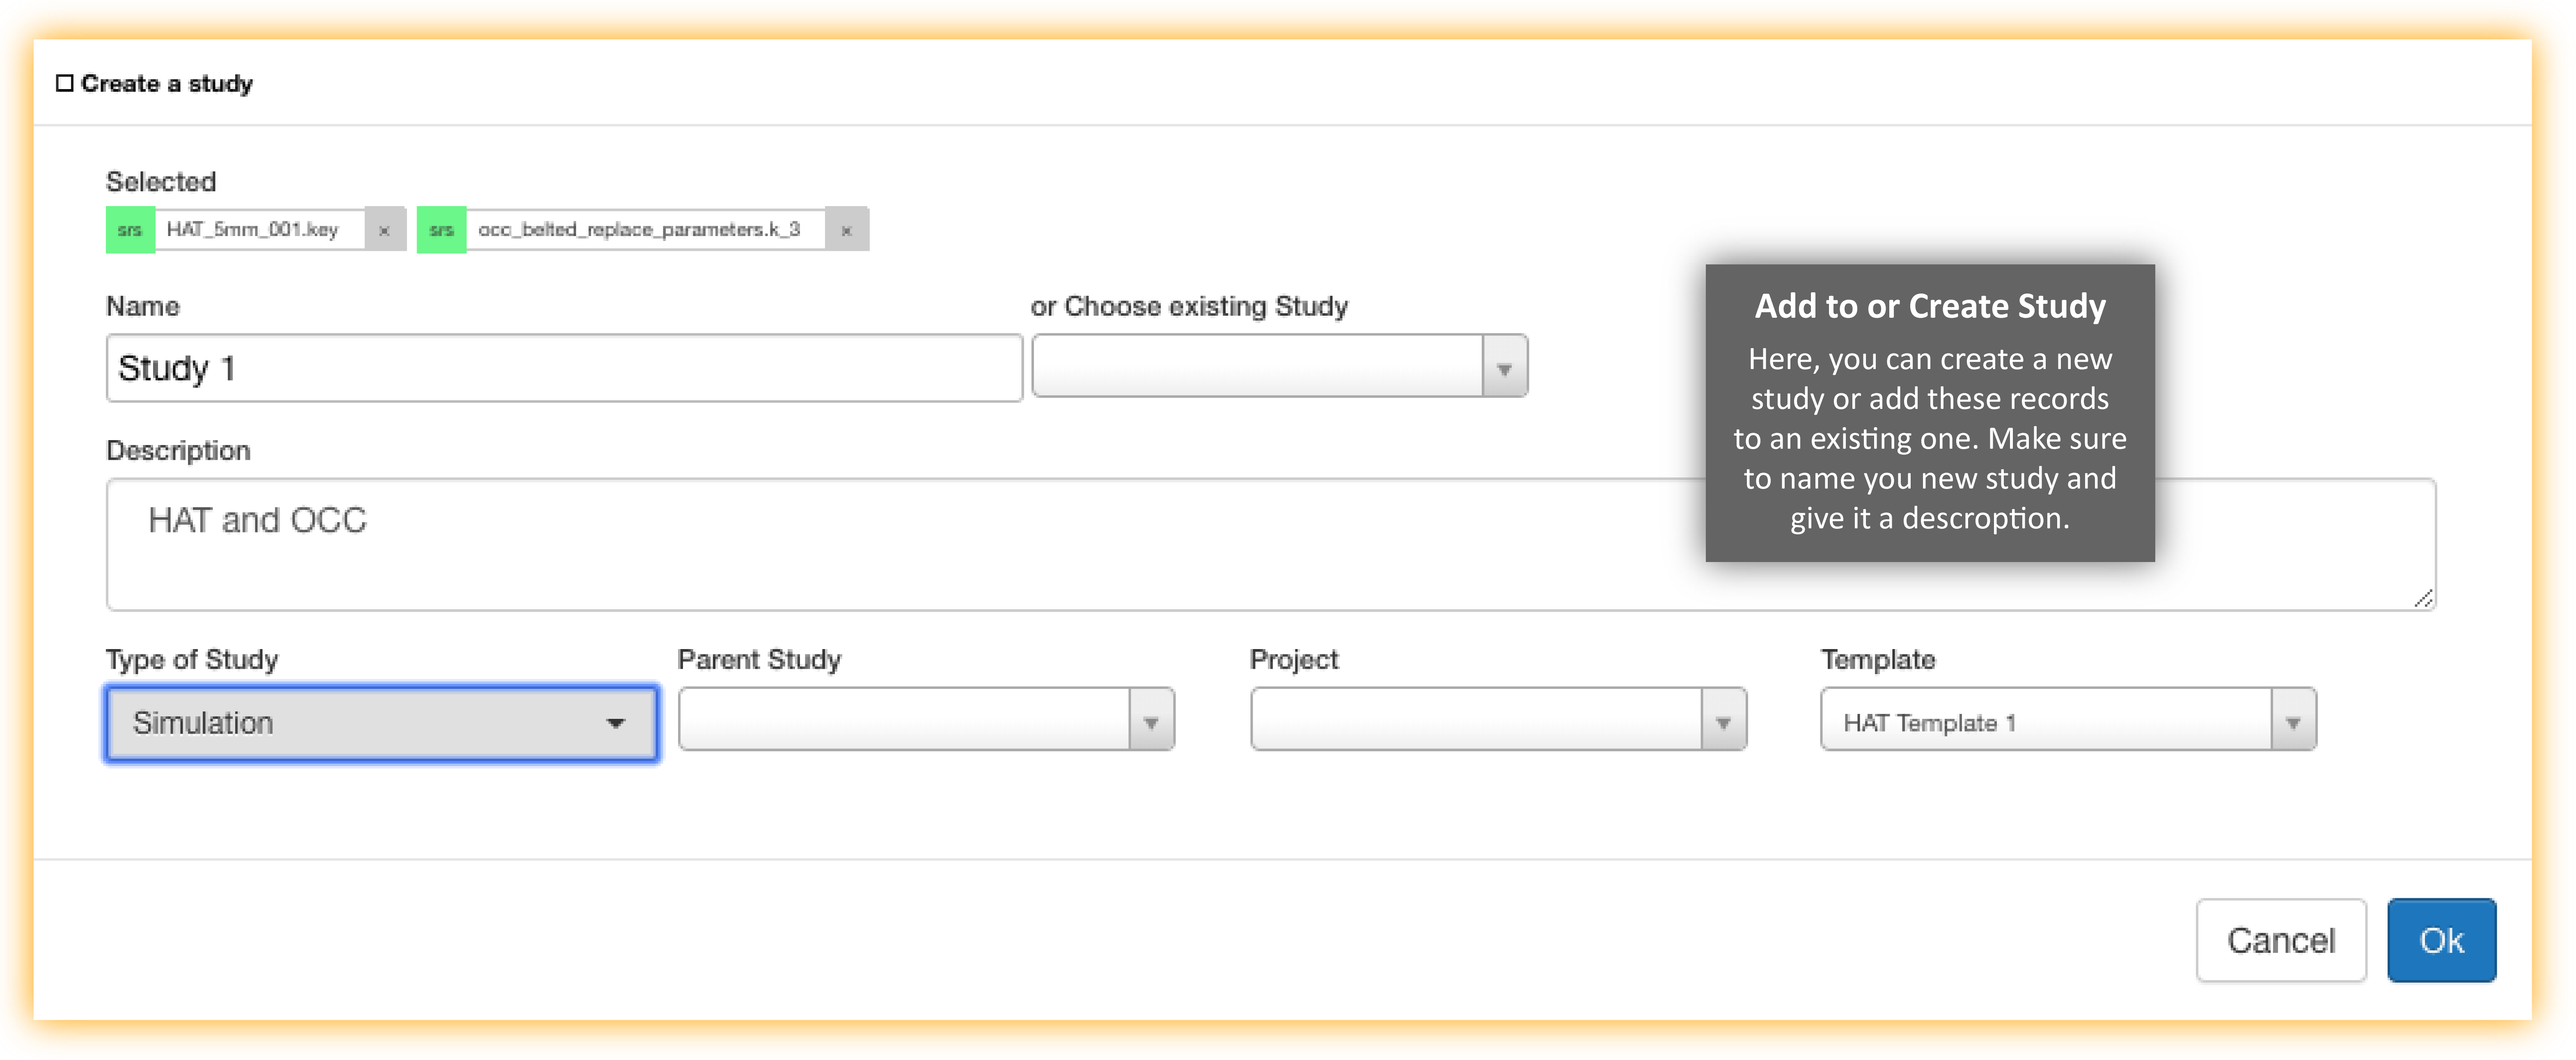
Figure 10: Create or Add to a Study from Selected Records
Simulations and files can be viewed inside Study.
New Study from Studies Main Page
The last way to create a study is from the Studies home page. Click on “New Study” on the upper right corner of the page. Similar to the window we saw in the above section, here, you can fill out the study specifications.

Figure 11: Create a Study from Main Page
To add records, save your study and go back to your Studies home page. As mentioned before, click on “edit” next to the study name to add records in the edit window.
Figure 12: Editing a Study to Add More Records
Study can now be associated to the job submitted by *JOB_SUBMIT_BY_CONFIG worker in Workflows. The job/simulation submitted will be available in the associated Study.

Associated Study
Study can be associated with the worker *SIMULATION_CREATE_FROM_TEXT. The simulation created will now be available in the selected Study.
Studies can now be organized into projects

Projects Organized
For additional questions about how to navigate the d3VIEW platform, please feel free to email our team at: support@d3view.com.