23. ML_MODEL_SELECTOR Worker
23.1. Overview
The ML_MODEL_SELECTOR worker is a newly added component under Shapes in Workflows. It enables users to compare multiple available machine learning models directly within a workflow.
The worker provides an ML Model Investigation tab, where users can analyze model performance using a ranking table and visualizations based on training data, helping in selecting the most suitable model for a given use case.
23.2. Key Features
- Model Comparison Capability Allows evaluation of multiple ML models within a single workflow.
- ML Model Investigation Tab Dedicated interface for analyzing model performance and behavior.
- Ranking Table Displays models ranked based on performance metrics for easy comparison.
- Training Data Visualizations Provides visual insights into model performance using training datasets.
- Seamless Workflow Integration Easily connects with existing ML pipelines and data sources.
23.3. Usage
- Open the Workflow canvas.
- Navigate to the Shapes panel.
- Add the
ML_MODEL_SELECTORworker to the canvas. - Connect inputs such as training data and model configurations.
- Run the workflow.
- Open the ML Model Investigation tab to:
- View the ranking table of models
- Analyze visualizations of training data
- Compare model performance metrics
ML Model Investigation Models Toggle
The ML Model Investigation feature now includes a Models toggle in the header, providing users with enhanced control over model comparison management.
This update allows users to easily view all models included in the comparison, add new models, and manage existing ones through edit and delete actions.
23.4. Key Features
- Models Toggle in Header Provides quick access to view and manage all models included in the comparison.
- View All Models Displays the complete list of models currently part of the investigation.
- Add New Models Enables users to include additional models in the comparison using the + icon.
- Edit Models Allows modification of existing model configurations directly from the toggle panel.
- Delete Models Provides the ability to remove models from the comparison.
23.5. Usage
- Open the ML Model Investigation tab.
- Locate the Models toggle in the header.
- Click the toggle to open the models panel.
- Perform desired actions:
- Click the + icon to add a new model
- Select an existing model to edit its configuration
- Use the delete option to remove a model from the comparison
- The comparison table and visualizations update dynamically based on the selected models.
Coefficients Widget Enhancement in ML Investigation
The Coefficients widget in the ML Investigation tab has been enhanced to provide a more intuitive and interactive visualization of model variables. It now displays coefficients per model using color-coded bars, improving interpretability and comparison across models.
Additional enhancements such as intercept separation, hover highlights, and grouped bar comparisons further enrich the analysis experience.
23.6. Key Features
- Color-Coded Bars Visualizes model coefficients using distinct colors for better differentiation.
- Per-Model Visualization Displays variables and their corresponding coefficients for each model.
- Intercept Separation Clearly distinguishes intercept values from other variable coefficients.
- Hover Highlights Highlights bars on hover to improve readability and focus.
- Grouped Bar Comparison Enables side-by-side comparison of coefficients across multiple models.
23.7. Usage
- Open the ML Investigation tab.
- Navigate to the Coefficients widget.
- Select or view multiple models.
- Analyze:
- Variable importance via color-coded bars
- Intercept values separately
- Grouped bars for cross-model comparison
- Hover over bars to view detailed highlights and insights.
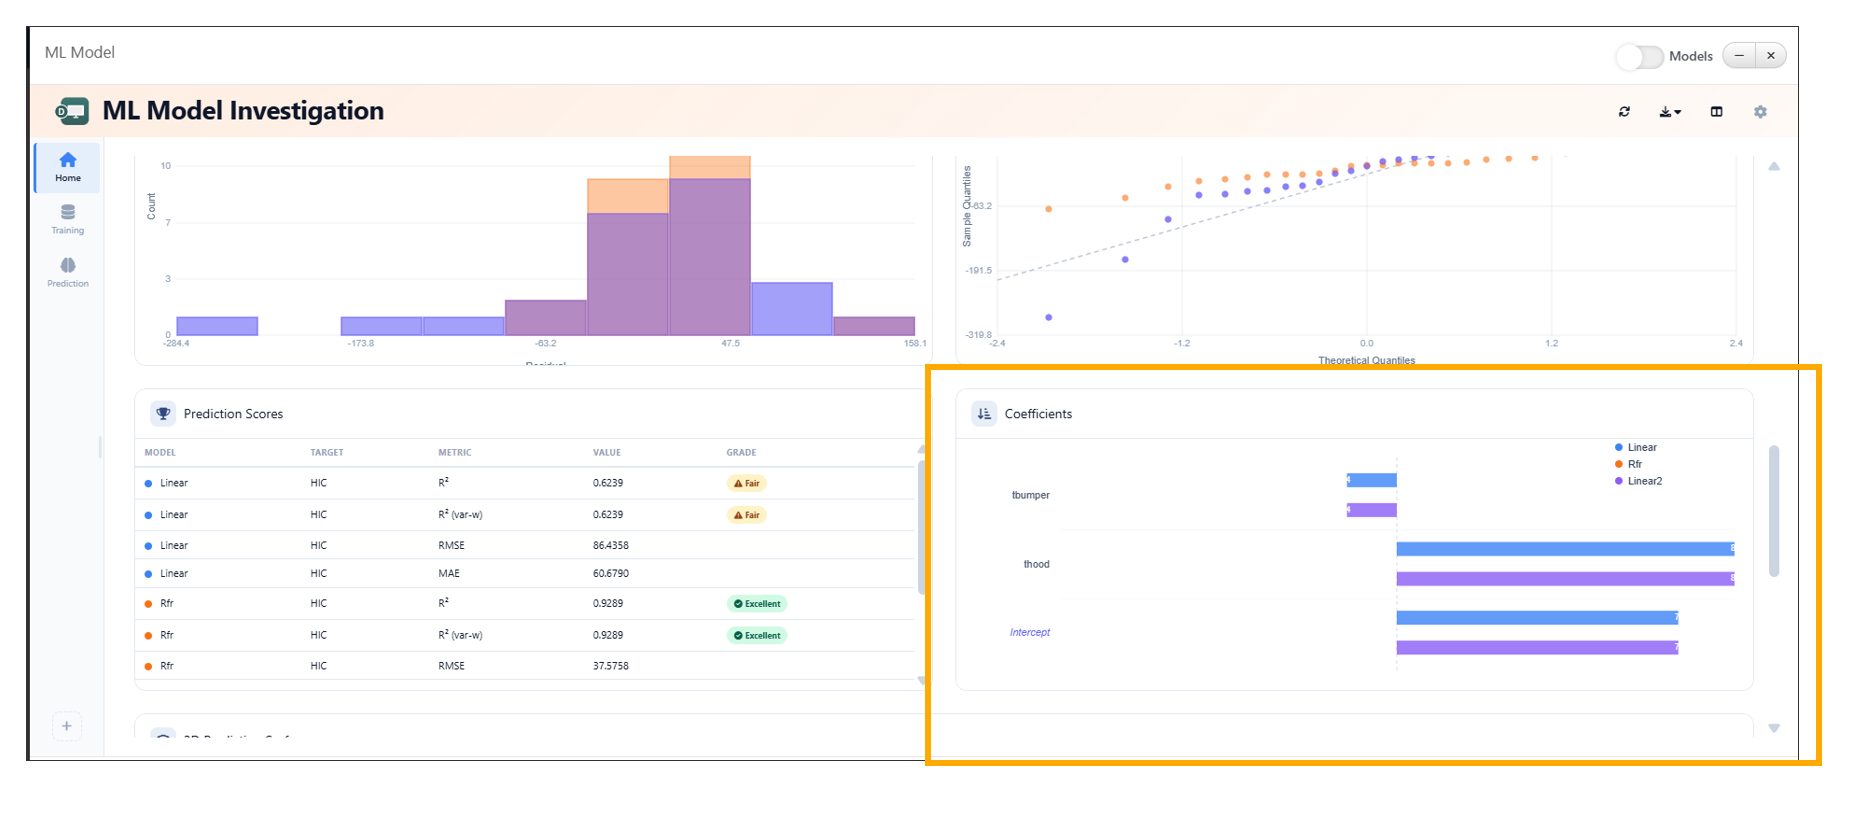
Coefficients Widget
ML Model Investigation Baseline Comparison
The ML Model Investigation feature now supports setting a model as a baseline using the Set as Baseline option available in the table context menu. This enhancement enables users to compare model performance relative to a selected baseline model.
The Baseline Comparison view provides clear visual indicators of performance differences, including percentage changes, directional arrows, and color-coded deltas.
23.8. Key Features
- Set as Baseline Option Allows users to designate any model as the baseline directly from the table context menu.
- Baseline Comparison View Displays performance differences of all models relative to the selected baseline.
- Percentage Difference Indicators Shows percentage change for each metric compared to the baseline.
- Directional Arrows Uses up and down arrows to indicate performance improvement or decline.
- Color-Coded Deltas - Green → Positive improvement over baseline - Red → Negative decline compared to baseline
- Baseline Badge Highlights the selected baseline model with a visible badge in the table.
ML_MODEL_SELECTOR Outputs
The ML_MODEL_SELECTOR worker in Workflows has been enhanced to provide two new outputs: Selected Model and Verified Predictions. These outputs enable seamless integration of model selection results into downstream workflow steps.
The Selected Model is determined directly from the ranking table using the context menu, while Verified Predictions are generated from the model’s predicted values.
23.9. Key Features
- Selected Model Output Outputs the model chosen by the user from the ranking table.
- Ranking Table Integration Allows users to select a model via the context menu within the ranking table.
- Verified Predictions Output Provides predictions generated from the selected model.
- Dynamic Updates Outputs are automatically updated based on the selected model and its predictions.
23.10. Usage
- Add the
ML_MODEL_SELECTORworker to the workflow. - Connect training data and model configurations.
- Execute the workflow.
- Open the ML Model Investigation tab.
- In the ranking table:
- Right-click on a model
- Select the desired option to mark it as the selected model
- Access outputs:
- Selected Model → Available for downstream workflow connections
- Verified Predictions → Contains predicted values from the selected model
Compare Models Button for Dataset Outputs
A new Compare Models button is now available for dataset outputs that contain a model_path column. This feature enables quick access to model comparison capabilities directly from dataset results.
By leveraging the model_path information, users can seamlessly launch model comparison workflows without manually configuring inputs.
23.11. Key Features
- Automatic Availability
The Compare Models button appears when a dataset includes a
model_pathcolumn. - Direct Model Comparison Access Allows users to initiate model comparison directly from dataset outputs.
- Seamless Integration Connects dataset outputs with model comparison tools such as the ML Model Investigation interface.
- Reduced Manual Setup Eliminates the need to manually gather and configure model paths for comparison.
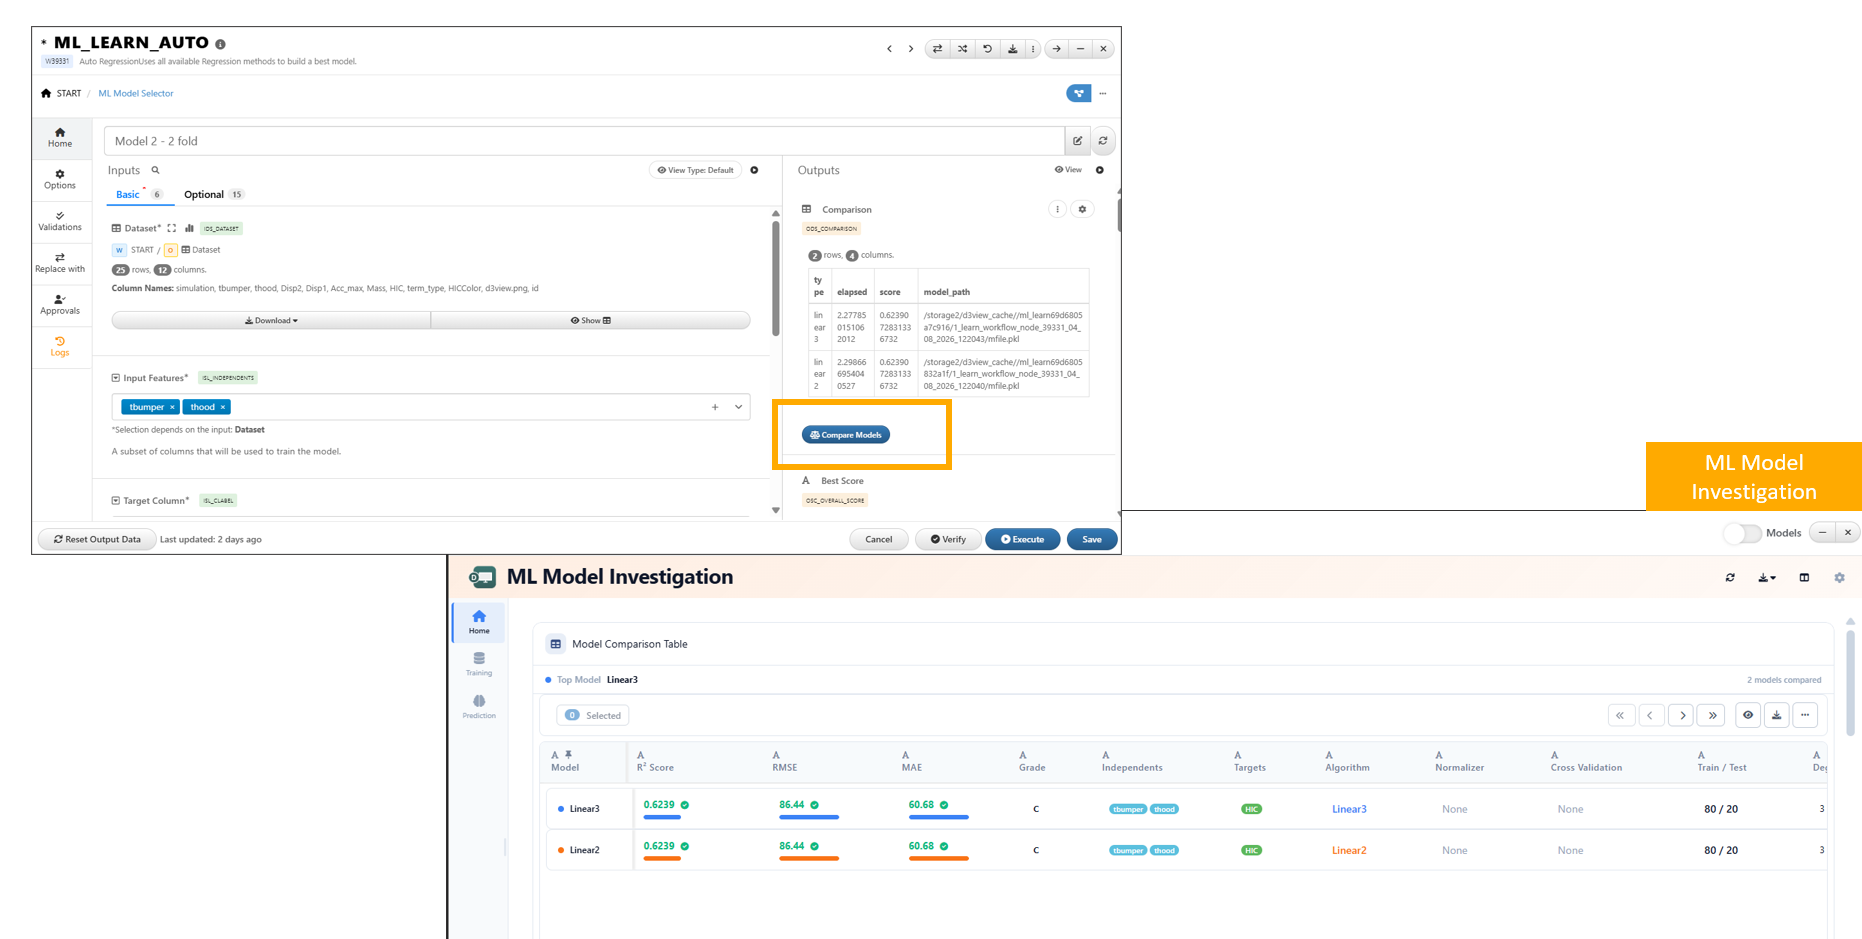
Compare Models button